Operation Manual
Page 10
... the Printer 133 Editing Images 134 Changing the Image Size and Quality 134 Trimming Images 136 Using Digital Filters to Edit Images 138 Settings 142 Camera Settings 142 Formatting an SD Memory Card 142 Adjusting the Brightness of the LCD Monitor 143 Changing the Start... Format 153 Changing the USB Connection Mode 153 Sleep Timeout 154 Setting Auto Power Off 155 Registering a Function (Fn Setting 156 Resetting to Default Settings 159 Appendix 160 List of Cities 160 Optional Accessories 161 Messages 162 Troubleshooting 164 Main Specifications 166 WARRANTY POLICY 169...
... the Printer 133 Editing Images 134 Changing the Image Size and Quality 134 Trimming Images 136 Using Digital Filters to Edit Images 138 Settings 142 Camera Settings 142 Formatting an SD Memory Card 142 Adjusting the Brightness of the LCD Monitor 143 Changing the Start... Format 153 Changing the USB Connection Mode 153 Sleep Timeout 154 Setting Auto Power Off 155 Registering a Function (Fn Setting 156 Resetting to Default Settings 159 Appendix 160 List of Cities 160 Optional Accessories 161 Messages 162 Troubleshooting 164 Main Specifications 166 WARRANTY POLICY 169...
Operation Manual
Page 16
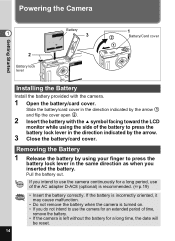
...the battery. Removing the Battery 1 Release the battery by the arrow. 3 Close the battery/card cover. Powering the Camera Getting Started 1 2 Battery lock lever Battery 3 1 2 Battery/Card cover 1 Installing the Battery Install the battery ...toward the LCD monitor while using your finger to use of time, remove the battery. • If the camera is left without the battery for an extended period of the AC adapter D-AC8 (optional) is recommended. ...side of the battery to use the camera continuously for a long period, use the camera for a long time, the date will be reset. 14
...the battery. Removing the Battery 1 Release the battery by the arrow. 3 Close the battery/card cover. Powering the Camera Getting Started 1 2 Battery lock lever Battery 3 1 2 Battery/Card cover 1 Installing the Battery Install the battery ...toward the LCD monitor while using your finger to use of time, remove the battery. • If the camera is left without the battery for an extended period of the AC adapter D-AC8 (optional) is recommended. ...side of the battery to use the camera continuously for a long period, use the camera for a long time, the date will be reset. 14

Operation Manual
Page 28
... next time you will return to the menu screen. Press the MENU button. • When you finish the settings and press the OK button, the camera clock is ready to change the minute. 15 Press the OK button when you can change the hour. AM/PM switches automatically as you change... if you selected [12h] in Step 3. 1 14 Repeat Step 12 and 13 to take pictures. The camera is reset to 00 seconds. • To set the date and time using the MENU button, you turn the camera on the TV, radio, etc.) reaches 00 seconds. • When the Initial Settings screen is displayed...
... next time you will return to the menu screen. Press the MENU button. • When you finish the settings and press the OK button, the camera clock is ready to change the minute. 15 Press the OK button when you can change the hour. AM/PM switches automatically as you change... if you selected [12h] in Step 3. 1 14 Repeat Step 12 and 13 to take pictures. The camera is reset to 00 seconds. • To set the date and time using the MENU button, you turn the camera on the TV, radio, etc.) reaches 00 seconds. • When the Initial Settings screen is displayed...
Operation Manual
Page 44
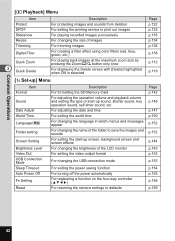
...Level Video Out USB Connection Mode Sleep Timeout Auto Power Off Fn Setting Reset Description For formatting the SD Memory Card For adjusting the operation volume and ... For registering a function on the four-way controller (2345) For returning the camera settings to print out images For playing recorded images successively For changing the size of... sound, self-timer sound, etc. Common Operations [Q Playback] Menu Item Protect DPOF Slideshow Resize Trimming Digital Filter Quick Zoom 3 Quick Delete Description For protecting images and sounds from deletion For setting the printing...
...Level Video Out USB Connection Mode Sleep Timeout Auto Power Off Fn Setting Reset Description For formatting the SD Memory Card For adjusting the operation volume and ... For registering a function on the four-way controller (2345) For returning the camera settings to print out images For playing recorded images successively For changing the size of... sound, self-timer sound, etc. Common Operations [Q Playback] Menu Item Protect DPOF Slideshow Resize Trimming Digital Filter Quick Zoom 3 Quick Delete Description For protecting images and sounds from deletion For setting the printing...
Operation Manual
Page 48
..., the SIMPLE menu will be displayed the next time you press the MENU button. • Interval shooting and bracket shooting is available even when the camera is set to display the SIMPLE menu. (When they are set to On.) • If you press the MENU button before you return to the... the camera is invalid in the FULL menu. • You cannot display the SIMPLE menu in the USER mode. 46 Finish the setting and close the setting screen and settings before pressing the OK button to 3 leave the menu, any changes you have made to the settings will not be reset to...
..., the SIMPLE menu will be displayed the next time you press the MENU button. • Interval shooting and bracket shooting is available even when the camera is set to display the SIMPLE menu. (When they are set to On.) • If you press the MENU button before you return to the... the camera is invalid in the FULL menu. • You cannot display the SIMPLE menu in the USER mode. 46 Finish the setting and close the setting screen and settings before pressing the OK button to 3 leave the menu, any changes you have made to the settings will not be reset to...

Operation Manual
Page 106
If you select P (Off), the settings will be reset to be saved when the camera is saved. P MF The manual focus position is saved. P White Balance The [White Balance] setting on the [A Rec.Mode] menu is saved. P Digital Zoom The [Digital Zoom] setting on the [A Rec.Mode] menu is saved.... If you select O (On), the settings will be saved in the status they were in immediately before the camera was turned off. The drive mode setting (ga) ...
If you select P (Off), the settings will be reset to be saved when the camera is saved. P MF The manual focus position is saved. P White Balance The [White Balance] setting on the [A Rec.Mode] menu is saved. P Digital Zoom The [Digital Zoom] setting on the [A Rec.Mode] menu is saved.... If you select O (On), the settings will be saved in the status they were in immediately before the camera was turned off. The drive mode setting (ga) ...

Operation Manual
Page 147
...; The background color cannot be deleted even if the original image is deleted or the SD Memory Card is formatted. The camera is ready to choose the background color. The camera is ready to select [Background Color]. 4 Press the four-way controller (5). MENU The background color of the LCD monitor. 7...controller (23) to take or play back images. • Once the start-up screen has been set any image captured with this camera as the start -up screen, reset the settings. (1p.159) • You can choose the background design and color of the menu changes. 6 Press the OK ...
...; The background color cannot be deleted even if the original image is deleted or the SD Memory Card is formatted. The camera is ready to choose the background color. The camera is ready to select [Background Color]. 4 Press the four-way controller (5). MENU The background color of the LCD monitor. 7...controller (23) to take or play back images. • Once the start-up screen has been set any image captured with this camera as the start -up screen, reset the settings. (1p.159) • You can choose the background design and color of the menu changes. 6 Press the OK ...

Operation Manual
Page 161
Settings 159 The Reset screen appears. 3 Use the four-way controller (2) to Reset Back to take or play back 7 images. Reset Cancel MENU OK OK The camera is ready to initial settings select [Reset]. 4 Press the OK button. Format Sound Date Adjust World Time Language/ Folder Name Set-up ] menu. 2 Press the four-way controller (5). MENU Exit SIMPLE Resetting to Default Settings You can return all the settings other than the date and time, language/ and world time to the default settings. 1 Select [Reset] on the [B Set-up English Std.
Settings 159 The Reset screen appears. 3 Use the four-way controller (2) to Reset Back to take or play back 7 images. Reset Cancel MENU OK OK The camera is ready to initial settings select [Reset]. 4 Press the OK button. Format Sound Date Adjust World Time Language/ Folder Name Set-up ] menu. 2 Press the four-way controller (5). MENU Exit SIMPLE Resetting to Default Settings You can return all the settings other than the date and time, language/ and world time to the default settings. 1 Select [Reset] on the [B Set-up English Std.

Operation Manual
Page 176
... 90 8 Quick Delete 119 Quick Zoom 112 R Rec.Mode Menu 41 Recorded Pixels 88 Recording Sound 108 Remote control receiver 11 Remote Control Unit 72 Reset 159 Rotate 30 S Saturation 101 Screen Effect 146 SD Memory Card 21, 22, 142 Self-Timer 70 174 Self-timer lamp 11 Self-timer sound...
... 90 8 Quick Delete 119 Quick Zoom 112 R Rec.Mode Menu 41 Recorded Pixels 88 Recording Sound 108 Remote control receiver 11 Remote Control Unit 72 Reset 159 Rotate 30 S Saturation 101 Screen Effect 146 SD Memory Card 21, 22, 142 Self-Timer 70 174 Self-timer lamp 11 Self-timer sound...