
Operation Manual
Page 3
Warning Caution These symbols indicate that it being dropped, please do not hang the strap around your nearest PENTAX service center. Please take the camera apart or remodel the camera. Seek medical attention immediately if accidentally swallowed. • Use an AC adapter that small children do not under... for exclusive use with this product but please pay particular attention to the warnings indicated by mistake, keep the SD Memory Card out of the reach of small children. FOR SAFE USE OF YOUR CAMERA Sufficient attention has been paid to the safety of this product.
Warning Caution These symbols indicate that it being dropped, please do not hang the strap around your nearest PENTAX service center. Please take the camera apart or remodel the camera. Seek medical attention immediately if accidentally swallowed. • Use an AC adapter that small children do not under... for exclusive use with this product but please pay particular attention to the warnings indicated by mistake, keep the SD Memory Card out of the reach of small children. FOR SAFE USE OF YOUR CAMERA Sufficient attention has been paid to the safety of this product.

Operation Manual
Page 7
... pocket as this may damage the exterior of the camera or the LCD monitor. • When using an SD Memory Card" (p.21) regarding the SD Memory Card. • Please do not press forcefully on the camera. 5 • If the camera is subjected to rapid temperature changes, condensation may form... on the inside and outside of water get onto the camera, please wipe dry. •...
... pocket as this may damage the exterior of the camera or the LCD monitor. • When using an SD Memory Card" (p.21) regarding the SD Memory Card. • Please do not press forcefully on the camera. 5 • If the camera is subjected to rapid temperature changes, condensation may form... on the inside and outside of water get onto the camera, please wipe dry. •...
Operation Manual
Page 8
...of Operating Parts 12 Getting Started 13 Attaching the Strap 13 Powering the Camera 14 Installing the Battery 14 Removing the Battery 14 Charging the Battery 15 Using the AC Adapter (optional 18 Installing the SD Memory Card 20 Image Size and Quality 22 Initial Settings 23 Setting the Display ...28 Playing Back an Image 28 Playing Back the Previous or Next Image 28 Rotating the Displayed Image 29 Common Operations 30 Turning the Camera On and Off 30 Lens Closed Playback Mode 31 Voice Recording Mode 31 Using the Button Functions 32 Capture Mode 32 Playback Mode ...
...of Operating Parts 12 Getting Started 13 Attaching the Strap 13 Powering the Camera 14 Installing the Battery 14 Removing the Battery 14 Charging the Battery 15 Using the AC Adapter (optional 18 Installing the SD Memory Card 20 Image Size and Quality 22 Initial Settings 23 Setting the Display ...28 Playing Back an Image 28 Playing Back the Previous or Next Image 28 Rotating the Displayed Image 29 Common Operations 30 Turning the Camera On and Off 30 Lens Closed Playback Mode 31 Voice Recording Mode 31 Using the Button Functions 32 Capture Mode 32 Playback Mode ...

Operation Manual
Page 10
...a TV 99 Setting the Printing Service (DPOF 100 Printing Single Images 100 Printing All Images 102 Direct Printing Using PictBridge 103 Connecting the Camera to the Printer 103 Printing Single Images 104 Printing All Images 105 Printing Using the DPOF Settings 105 Disconnecting the... the Printer 106 Editing Images 107 Changing the Image Size and Quality 107 Trimming Images 109 Copying Files 110 Settings 112 Camera Settings 112 Formatting an SD Memory Card or the Built-in Memory 112 Changing the Start-up Screen 113 Changing the Sound Settings 114 Changing the Date and Time...
...a TV 99 Setting the Printing Service (DPOF 100 Printing Single Images 100 Printing All Images 102 Direct Printing Using PictBridge 103 Connecting the Camera to the Printer 103 Printing Single Images 104 Printing All Images 105 Printing Using the DPOF Settings 105 Disconnecting the... the Printer 106 Editing Images 107 Changing the Image Size and Quality 107 Trimming Images 109 Copying Files 110 Settings 112 Camera Settings 112 Formatting an SD Memory Card or the Built-in Memory 112 Changing the Start-up Screen 113 Changing the Sound Settings 114 Changing the Date and Time...
Operation Manual
Page 22
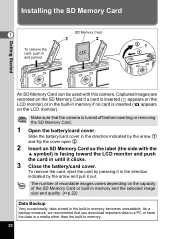
... removing the SD Memory Card. 1 Open the battery/card cover. Captured images are recorded on the SD Memory Card if a card is inserted ( appears on the LCD monitor). Slide the battery/card cover in the direction indicated by the arrow 1 and flip the cover open 2 . 2 Insert an SD Memory Card so the label (the side with this camera. As a backup...
... removing the SD Memory Card. 1 Open the battery/card cover. Captured images are recorded on the SD Memory Card if a card is inserted ( appears on the LCD monitor). Slide the battery/card cover in the direction indicated by the arrow 1 and flip the cover open 2 . 2 Insert an SD Memory Card so the label (the side with this camera. As a backup...

Operation Manual
Page 23
...in the following circumstances. If it unusable. • The data on the SD Memory Card may become unreadable. PENTAX does not accept any liability for data that is deleted (1) when the SD Memory Card is mishandled by your camera. Be sure to rapid changes in Memory" (p.112) for a long time...electrical interference. • Avoid using or storing the card in direct sunlight or where it to condensation. • When using the camera, as this may take a long time. • When you purchase the SD Memory Cards, access the PENTAX website and confirm beforehand if they have been used ...
...in the following circumstances. If it unusable. • The data on the SD Memory Card may become unreadable. PENTAX does not accept any liability for data that is deleted (1) when the SD Memory Card is mishandled by your camera. Be sure to rapid changes in Memory" (p.112) for a long time...electrical interference. • Avoid using or storing the card in direct sunlight or where it to condensation. • When using the camera, as this may take a long time. • When you purchase the SD Memory Cards, access the PENTAX website and confirm beforehand if they have been used ...

Operation Manual
Page 24
...ratio. Suitable for printing on A4 paper (8 1/2 in. × 11 1/2 in data volume reduces the total number of Recordable Images by PENTAX and may vary depending on the [A Rec. The default setting is based on standard shooting conditions specified by Size and Quality Quality Level Recorded Pixels... sec. • The above table indicates the number of recorded pixels and quality level on the subject, shooting conditions, capture mode, SD Memory Card, etc. 22 Mode] menu. Choose the appropriate number of images when using the built-in memory (10MB). • The above table is ...
...ratio. Suitable for printing on A4 paper (8 1/2 in. × 11 1/2 in data volume reduces the total number of Recordable Images by PENTAX and may vary depending on the [A Rec. The default setting is based on standard shooting conditions specified by Size and Quality Quality Level Recorded Pixels... sec. • The above table indicates the number of recorded pixels and quality level on the subject, shooting conditions, capture mode, SD Memory Card, etc. 22 Mode] menu. Choose the appropriate number of images when using the built-in memory (10MB). • The above table is ...

Operation Manual
Page 28
... and red lamps on the right of the viewfinder blink alternately while the image is the easiest way to the Green mode and let the camera set all the shooting functions automatically, press the QUICK button. Selecting the Green mode is being recorded.) 26 x : makes the subject bigger. 04/...14/2004 12:00 Focus frame w : makes the subject smaller. The image appears on the SD Memory Card or in the built-in the middle of the LCD monitor indicates the zone of the subject by the Simplest Procedure" (1p.40) 3 Press the...
... and red lamps on the right of the viewfinder blink alternately while the image is the easiest way to the Green mode and let the camera set all the shooting functions automatically, press the QUICK button. Selecting the Green mode is being recorded.) 26 x : makes the subject bigger. 04/...14/2004 12:00 Focus frame w : makes the subject smaller. The image appears on the SD Memory Card or in the built-in the middle of the LCD monitor indicates the zone of the subject by the Simplest Procedure" (1p.40) 3 Press the...

Operation Manual
Page 41
... volume of images p.107 Trimming For trimming images p.109 Copy Image & Sound For copying files from the built-in memory to the SD Memory Card and vice versa p.110 Alarm For setting the alarm to ring at the maximum zoom size by pressing the Zoom/f/y button only once ...Operations [Q Playback] Menu Item Description Page Slideshow For playing recorded images successively p.94 Resize For changing the size of start -up screen when the camera is selected p.96 3 [B Set-up] Menu Item Format Sound Date Adjust World Time Language/ Start-up Screen Video Out USB Connection Mode ...
... volume of images p.107 Trimming For trimming images p.109 Copy Image & Sound For copying files from the built-in memory to the SD Memory Card and vice versa p.110 Alarm For setting the alarm to ring at the maximum zoom size by pressing the Zoom/f/y button only once ...Operations [Q Playback] Menu Item Description Page Slideshow For playing recorded images successively p.94 Resize For changing the size of start -up screen when the camera is selected p.96 3 [B Set-up] Menu Item Format Sound Date Adjust World Time Language/ Start-up Screen Video Out USB Connection Mode ...

Operation Manual
Page 64
2 1 Taking Pictures RBH
2 1 Taking Pictures RBH

Operation Manual
Page 86
... are assigned sequentially. P File No. If a new SD Memory Card is saved. If you select O (On), the settings will be saved when the camera is turned off. P The [Sensitivity] setting on the [A Rec.Mode] menu is saved. P Digital Zoom The [Digital Zoom] setting on the menus for each function when the... camera is saved. The file number is saved. ...
... are assigned sequentially. P File No. If a new SD Memory Card is saved. If you select O (On), the settings will be saved when the camera is turned off. P The [Sensitivity] setting on the [A Rec.Mode] menu is saved. P Digital Zoom The [Digital Zoom] setting on the menus for each function when the... camera is saved. The file number is saved. ...
Operation Manual
Page 88
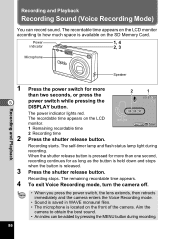
... stops. The power indicator lights red. The remaining recordable time appears. Recording starts. The recordable time appears on the SD Memory Card. To exit Voice Recording mode, turn the camera off. • When you press the power switch, the lens extends, then retracts immediately and the... camera enters the Voice Recording mode. • Sound is saved in WAVE monaural files. • The microphone is available on the LCD ...
... stops. The power indicator lights red. The remaining recordable time appears. Recording starts. The recordable time appears on the SD Memory Card. To exit Voice Recording mode, turn the camera off. • When you press the power switch, the lens extends, then retracts immediately and the... camera enters the Voice Recording mode. • Sound is saved in WAVE monaural files. • The microphone is available on the LCD ...

Operation Manual
Page 91
... "Playing Back an Image" (p.28), or "Playing Back the Previous or Next Image" (p.28) for instructions on the SD Memory Card when a card is inserted in the camera, or in the built-in memory when no card is inserted. 2 1 3 Playing Back Still Pictures Press the Q Playback button. Refer to be performed while the magnified image...
... "Playing Back an Image" (p.28), or "Playing Back the Previous or Next Image" (p.28) for instructions on the SD Memory Card when a card is inserted in the camera, or in the built-in memory when no card is inserted. 2 1 3 Playing Back Still Pictures Press the Q Playback button. Refer to be performed while the magnified image...

Operation Manual
Page 96
... LCD monitor. • The slideshow will continue until you press any button. • Moving pictures and pictures with which to start ] appears on the SD Memory Card or in the built-in memory continuously. 1 Enter the Playback mode and use the four-way controller (45) to choose the image with a voice memo...
... LCD monitor. • The slideshow will continue until you press any button. • Moving pictures and pictures with which to start ] appears on the SD Memory Card or in the built-in memory continuously. 1 Enter the Playback mode and use the four-way controller (45) to choose the image with a voice memo...

Operation Manual
Page 100
.... Select [Unprotect] in Step 3 to 100-0010 select [Protect]. 6 4 Press the OK button. Even protected images and sounds will be deleted by formatting the SD Memory Card or built-in Step 3 to cancel the Protect setting. • If the image is protected, the Z icon appears when the image or sound is played...
.... Select [Unprotect] in Step 3 to 100-0010 select [Protect]. 6 4 Press the OK button. Even protected images and sounds will be deleted by formatting the SD Memory Card or built-in Step 3 to cancel the Protect setting. • If the image is protected, the Z icon appears when the image or sound is played...

Operation Manual
Page 102
.... 100-0010 Copies 1 Date MENU Exit DISP AllImages OK OK Playback/Deleting/Editing 100 Date: Specify whether you want the date imprinted on the SD Memory Card using a DPOF (Digital Print Order Format) compatible printer or at a printing service. 1, 2, 3, 4 5 Printing Single Images Set the following items for each image. Copies: Choose the number...
.... 100-0010 Copies 1 Date MENU Exit DISP AllImages OK OK Playback/Deleting/Editing 100 Date: Specify whether you want the date imprinted on the SD Memory Card using a DPOF (Digital Print Order Format) compatible printer or at a printing service. 1, 2, 3, 4 5 Printing Single Images Set the following items for each image. Copies: Choose the number...

Operation Manual
Page 110
... to [Quality Level]. 8 Use the four-way controller (45) RecordedPixels 640 480 Quality Level to change the size. Resize all the images saved on the SD Memory Card or in the built-in memory. 6 4 Press the DISPLAY button in Step 3 on the previous page. 100-0010 The Resize All screen appears. Playback...
... to [Quality Level]. 8 Use the four-way controller (45) RecordedPixels 640 480 Quality Level to change the size. Resize all the images saved on the SD Memory Card or in the built-in memory. 6 4 Press the DISPLAY button in Step 3 on the previous page. 100-0010 The Resize All screen appears. Playback...

Operation Manual
Page 112
...the SD Memory Card. When files are copied one at once. Use the four-way controller (3) to the built-in memory, the files are copied from the built-in Playback mode. 6 2 3 The [Q Playback] menu appears. This function can copy image and sound files from the Built-in the camera. Playback.../Deleting/Editing To Copy Files from the built-in memory to turn the camera off before inserting or removing the SD Memory Card. Choose the copying method you want to select [ ’ ] and press the...
...the SD Memory Card. When files are copied one at once. Use the four-way controller (3) to the built-in memory, the files are copied from the built-in Playback mode. 6 2 3 The [Q Playback] menu appears. This function can copy image and sound files from the Built-in the camera. Playback.../Deleting/Editing To Copy Files from the built-in memory to turn the camera off before inserting or removing the SD Memory Card. Choose the copying method you want to select [ ’ ] and press the...

Operation Manual
Page 113
... image has a voice memo attached, the sound file will be copied at the same time as the image. • When a file is copied from the SD Memory Card to the Built-in Memory 5 Use the four-way controller (23) to select [ ’ ] and press the OK button. 6 Use the four-way controller... (45) to select the file to the built-in memory, it is copied to copy. 7 Press the OK button. 100-0010 SD Copy this image & sound The...
... image has a voice memo attached, the sound file will be copied at the same time as the image. • When a file is copied from the SD Memory Card to the Built-in Memory 5 Use the four-way controller (23) to select [ ’ ] and press the OK button. 6 Use the four-way controller... (45) to select the file to the built-in memory, it is copied to copy. 7 Press the OK button. 100-0010 SD Copy this image & sound The...

Operation Manual
Page 114
.... The Format screen appears. 3 Use the four-way controller (2) to take pictures. Be sure to format the card with the camera. • Formatting will delete all the data on the SD Memory Card if you are using a card, and all the data in the built-in Memory Formatting will delete protected data too. 1 Select [Format...
.... The Format screen appears. 3 Use the four-way controller (2) to take pictures. Be sure to format the card with the camera. • Formatting will delete all the data on the SD Memory Card if you are using a card, and all the data in the built-in Memory Formatting will delete protected data too. 1 Select [Format...

