
Operation Manual
Page 8
...Pet Mode 54 Taking Pictures of Dark Scenes (Night Scene Mode 55 Reducing Camera Shake and Blurring When Taking Pictures (Digital SR Mode 56 Framing Your Pictures (Frame Composite Mode 57 Taking Panoramic Pictures (Digital Panorama Mode 59 Taking Pictures with Customized Settings 62 Selecting the Recorded Pixels... Movie 81 Selecting the Settings for Taking Movies 83 Playing Back and Deleting Images 85 Playing Back Images on the Camera 85 Playing Back Still Pictures 85 Reviewing Shooting Information 85 Nine-Image Display, Folder Display and Calendar Display 86 Zoom Playback 88 6
...Pet Mode 54 Taking Pictures of Dark Scenes (Night Scene Mode 55 Reducing Camera Shake and Blurring When Taking Pictures (Digital SR Mode 56 Framing Your Pictures (Frame Composite Mode 57 Taking Panoramic Pictures (Digital Panorama Mode 59 Taking Pictures with Customized Settings 62 Selecting the Recorded Pixels... Movie 81 Selecting the Settings for Taking Movies 83 Playing Back and Deleting Images 85 Playing Back Images on the Camera 85 Playing Back Still Pictures 85 Reviewing Shooting Information 85 Nine-Image Display, Folder Display and Calendar Display 86 Zoom Playback 88 6
Operation Manual
Page 34
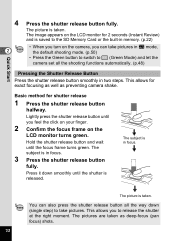
.... Hold the shutter release button and wait until the shutter is in focus. 3 Press the shutter release button fully. The pictures are taken as preventing camera shake. You can take pictures. This allows you to take pictures in b mode, the default shooting mode. (p.50) • Press the Green button... the shutter release button smoothly in memory. (p.22) • When you turn on the camera, you feel the click on your finger. 2 Confirm the focus frame on the LCD monitor for 2 seconds (Instant Review) and is in focus. The subject is saved to the SD Memory Card or the built...
.... Hold the shutter release button and wait until the shutter is in focus. 3 Press the shutter release button fully. The pictures are taken as preventing camera shake. You can take pictures. This allows you to take pictures in b mode, the default shooting mode. (p.50) • Press the Green button... the shutter release button smoothly in memory. (p.22) • When you turn on the camera, you feel the click on your finger. 2 Confirm the focus frame on the LCD monitor for 2 seconds (Instant Review) and is in focus. The subject is saved to the SD Memory Card or the built...

Operation Manual
Page 61
...stitch 2 or 3 frames taken in sequence into a panoramic scene. 4 1 Press the four-way controller (3) in Taking Panoramic Pictures (Digital Panorama Mode) Taking Pictures In (Digital Panorama Mode), you want to pan appears. 3 Use the four-way controller (45) to select the direction to stitch. (5): stitch the... screen, an "overlay" from the first frame appears at the left Set shift direction The camera is ready for taking the first frame. The on the LCD monitor (Instant Review), the camera is ready for taking the second frame. The Capture Mode Palette appears. 2 Use the four...
...stitch 2 or 3 frames taken in sequence into a panoramic scene. 4 1 Press the four-way controller (3) in Taking Panoramic Pictures (Digital Panorama Mode) Taking Pictures In (Digital Panorama Mode), you want to pan appears. 3 Use the four-way controller (45) to select the direction to stitch. (5): stitch the... screen, an "overlay" from the first frame appears at the left Set shift direction The camera is ready for taking the first frame. The on the LCD monitor (Instant Review), the camera is ready for taking the second frame. The Capture Mode Palette appears. 2 Use the four...

Operation Manual
Page 62
...(23) Save Discard to Step 6 and select "Save" in the second frame when you select "Save" after the Instant Review of the full panoramic picture, the camera will return to the screen to take the second frame. When you select "Save" after the second frame is taken, the... "Discard" : All the frames taken will be discarded, and the camera will blink. After the Instant Review of the 2 frames stitched together, the camera will return to the screen to take the first frame. "Cancel" : The camera quits the operation and returns to the most recent shooting screen. Pan the...
...(23) Save Discard to Step 6 and select "Save" in the second frame when you select "Save" after the Instant Review of the full panoramic picture, the camera will return to the screen to take the second frame. When you select "Save" after the second frame is taken, the... "Discard" : All the frames taken will be discarded, and the camera will blink. After the Instant Review of the 2 frames stitched together, the camera will return to the screen to take the first frame. "Cancel" : The camera quits the operation and returns to the most recent shooting screen. Pan the...

Operation Manual
Page 63
Taking Pictures • Focus, exposure, drive mode and zoom position used for all images in the panorama sequence are those set for the first frame. • You can re-take a frame again. 4 61 During the Instant Review, press i button, the four-way controller (2), and the 4 button to discard the image, then take the first or second frame.
Taking Pictures • Focus, exposure, drive mode and zoom position used for all images in the panorama sequence are those set for the first frame. • You can re-take a frame again. 4 61 During the Instant Review, press i button, the four-way controller (2), and the 4 button to discard the image, then take the first or second frame.

Operation Manual
Page 87
For playing back movies, see p.15. For the meanings of shooting information on the Camera Playing Back Still Pictures To play back still pictures, press Q button in A mode to switch to Q mode (Playback mode). Reviewing Shooting Information In Q mode, you can change the display of the indications, see "Playing Back a Movie" (p.91). Playing...
For playing back movies, see p.15. For the meanings of shooting information on the Camera Playing Back Still Pictures To play back still pictures, press Q button in A mode to switch to Q mode (Playback mode). Reviewing Shooting Information In Q mode, you can change the display of the indications, see "Playing Back a Movie" (p.91). Playing...

Operation Manual
Page 95
... time. (p.20) 93 If this happens, change the video output format setting. (p.129) • The LCD monitor of the camera turns off while it is set different from the one in use the camera for review or picture taking. 1 Connect the supplied USB/AV cable to the USB/AV 5 terminal on the... camera. 2 Connect the other ends of the equipment and select the video input terminal to which the camera is connected. 4 Turn the camera on. • Depending on the...
... time. (p.20) 93 If this happens, change the video output format setting. (p.129) • The LCD monitor of the camera turns off while it is set different from the one in use the camera for review or picture taking. 1 Connect the supplied USB/AV cable to the USB/AV 5 terminal on the... camera. 2 Connect the other ends of the equipment and select the video input terminal to which the camera is connected. 4 Turn the camera on. • Depending on the...

Operation Manual
Page 96
.... 3 Use the four-way controller (23) to delete. 2 Press the i button. Delete Cancel All Images/Sounds OK OK If you press the i button during Instant Review, the screen in Step 2 appears, enabling you to delete the image you want to select [Delete]. 100-0017 4 Press the 4 button. Deleting Images and Sound...
.... 3 Use the four-way controller (23) to delete. 2 Press the i button. Delete Cancel All Images/Sounds OK OK If you press the i button during Instant Review, the screen in Step 2 appears, enabling you to delete the image you want to select [Delete]. 100-0017 4 Press the 4 button. Deleting Images and Sound...

Operation Manual
Page 152
• This warranty policy does not affect the customer's statutory rights. • The local warranty policies available from PENTAX distributors in your country for more information and to receive a copy of the warranty policy. 9 The CE Mark is a Directive conformity mark of purchase, or contact the PENTAX distributor in some countries can supersede this warranty policy. Therefore, we recommend that you review the warranty card supplied with your product at the time of the European Union. 150 Appendix
• This warranty policy does not affect the customer's statutory rights. • The local warranty policies available from PENTAX distributors in your country for more information and to receive a copy of the warranty policy. 9 The CE Mark is a Directive conformity mark of purchase, or contact the PENTAX distributor in some countries can supersede this warranty policy. Therefore, we recommend that you review the warranty card supplied with your product at the time of the European Union. 150 Appendix
Operation Manual
Page 157
..., 39 Frame Composite 107 Frame Rate 84 G Green Button 37, 39 Green Mode 48 Guide Display .........46, 47, 133 I Infinity s 67 Installing batteries 18 Instant Review 32 L Language 28, 126 M 3 button 37, 39 Macro q 67 Magnify y 88 Memory 79 N Nine-image display f .........86 NTSC 129 O 4/W button ....37, 39 Optional accessory 140...
..., 39 Frame Composite 107 Frame Rate 84 G Green Button 37, 39 Green Mode 48 Guide Display .........46, 47, 133 I Infinity s 67 Installing batteries 18 Instant Review 32 L Language 28, 126 M 3 button 37, 39 Macro q 67 Magnify y 88 Memory 79 N Nine-image display f .........86 NTSC 129 O 4/W button ....37, 39 Optional accessory 140...