
MX Manual
Page 2
SMC Pentax lenses and Pentax accessories are not produced to these precise specifications and, therefore, may cause difficulties with Pentax camera. Pentax cannot assume any responsibility for difficulties resulting from other brand of any other manufacturers are engineered and produced meticulously to -a Pentax camera. Lenses and accessories from the use of lenses or accessories with -or actual damage to precise Pentax specifications.
SMC Pentax lenses and Pentax accessories are not produced to these precise specifications and, therefore, may cause difficulties with Pentax camera. Pentax cannot assume any responsibility for difficulties resulting from other brand of any other manufacturers are engineered and produced meticulously to -a Pentax camera. Lenses and accessories from the use of lenses or accessories with -or actual damage to precise Pentax specifications.
MX Manual
Page 3
... Setting the Shutter Speed Dial 12 Composing and Focusing 13 Exposure Measurement 14 Holding the Camera 15 Unloading Film 16 Flash Synchronization 18 Depth-of-Field Preview Lever and Scale 20 Depth-of-Field Table: SMC Pentax-M 50mm f/1.4 Lens 21 Meter Coupling Range 22 Helpful Hints on Exposure Problems 23 Dual Control... Interchangeable Focusing Screens 29 Using Screw-mount Takumar Lenses 30 Open-aperture and Stop-down Metering Lenses 32 Resistance to Temperature Extremes and Changes 33 Camera Maintenance 34 Warranty Policy 36 • 1
... Setting the Shutter Speed Dial 12 Composing and Focusing 13 Exposure Measurement 14 Holding the Camera 15 Unloading Film 16 Flash Synchronization 18 Depth-of-Field Preview Lever and Scale 20 Depth-of-Field Table: SMC Pentax-M 50mm f/1.4 Lens 21 Meter Coupling Range 22 Helpful Hints on Exposure Problems 23 Dual Control... Interchangeable Focusing Screens 29 Using Screw-mount Takumar Lenses 30 Open-aperture and Stop-down Metering Lenses 32 Resistance to Temperature Extremes and Changes 33 Camera Maintenance 34 Warranty Policy 36 • 1
MX Manual
Page 6
...shows f/stop, shutter speed and tricolored LED read-out dots. Rewind crank for X contact; 1/60 sec. SMC Pentax 50mm f/1.2 SMC Pentax-M 40mm f/2.8 SMC Pentax-M 50mm f/1.4 SMC Pentax-M 50mm f/1.7 SMC Pentax-M 50mm f/2 Horizontal-run, rubberized silk focal-plane shutter; FP and X sockets, plus B; Correction lens adaptor M,... Self-timer Viewfinder Mirror and diaphragm Film wind and rewind 35mm full-frame SLR camera with self-timer lever. Silver-coated pentaprism finder; Depth-of 20°. Pentax K bayonet. shutter lock and "Cocked" indicator. speeds from 1 to 4 -12 seconds...
...shows f/stop, shutter speed and tricolored LED read-out dots. Rewind crank for X contact; 1/60 sec. SMC Pentax 50mm f/1.2 SMC Pentax-M 40mm f/2.8 SMC Pentax-M 50mm f/1.4 SMC Pentax-M 50mm f/1.7 SMC Pentax-M 50mm f/2 Horizontal-run, rubberized silk focal-plane shutter; FP and X sockets, plus B; Correction lens adaptor M,... Self-timer Viewfinder Mirror and diaphragm Film wind and rewind 35mm full-frame SLR camera with self-timer lever. Silver-coated pentaprism finder; Depth-of 20°. Pentax K bayonet. shutter lock and "Cocked" indicator. speeds from 1 to 4 -12 seconds...
MX Manual
Page 7
MX camera body accepts Winder MX for up to 2 frames-per-second (single-frame and consecutive exposure operation possible) and Motor Drive MX for up to light on film. 135.5mm x 83.5mm x 49.5mm. 495 grams. •5 Two 1.5V Alkaline (LR44) or Silver-oxide (G13) ...double as meter switch. Open-aperture, center-weighted Through-The-Lens meter, with SPD cells for fast light response, with Bulk Film Magazine MX, Dial Data MX for automatic, speedy film wind and shutter cocking. Automatic reset type. Film loading Automatic winder Exposure counter Exposure meter Power source Back cover...
MX camera body accepts Winder MX for up to 2 frames-per-second (single-frame and consecutive exposure operation possible) and Motor Drive MX for up to light on film. 135.5mm x 83.5mm x 49.5mm. 495 grams. •5 Two 1.5V Alkaline (LR44) or Silver-oxide (G13) ...double as meter switch. Open-aperture, center-weighted Through-The-Lens meter, with SPD cells for fast light response, with Bulk Film Magazine MX, Dial Data MX for automatic, speedy film wind and shutter cocking. Automatic reset type. Film loading Automatic winder Exposure counter Exposure meter Power source Back cover...
MX Manual
Page 8
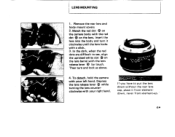
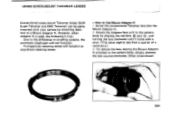
... have to see, align the upraised white dot Q on the lens. Then turn it front-elementdown, never front-element-up. 6• To detach, hold the camera with your left hand. In the dark, when the red dots are difficult to put the lens down without the rear lens cap, place it... the lens into the body and turn and lock as above. Remove the rear lens and body mount covers 2. Match the red dot 0 on the camera body with the red dot 0 on the lens barrel with a click. 3.
... have to see, align the upraised white dot Q on the lens. Then turn it front-elementdown, never front-element-up. 6• To detach, hold the camera with your left hand. In the dark, when the red dots are difficult to put the lens down without the rear lens cap, place it... the lens into the body and turn and lock as above. Remove the rear lens and body mount covers 2. Match the red dot 0 on the camera body with the red dot 0 on the lens barrel with a click. 3.
MX Manual
Page 9
... the batteries are packed separately. It can be especially sure to insert them into a fire, as shown above, each with a dry cloth before operating the camera. INSERTING BATTERIES Two Alkaline batteries are dead, the LED dots will not glow. Do not throw a dead battery into the battery chamber before insertion into...
... the batteries are packed separately. It can be especially sure to insert them into a fire, as shown above, each with a dry cloth before operating the camera. INSERTING BATTERIES Two Alkaline batteries are dead, the LED dots will not glow. Do not throw a dead battery into the battery chamber before insertion into...
MX Manual
Page 10
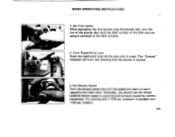
... '300 using is centered in daylight and 1/30 sec. Generally, you want to use the fastest possible shutter speed to avoid blurred pictures caused by camera movement. BASIC OPERATING INSTRUCTIONS 1. Try starting with 1/125 sec. Set Shutter Speed Turn the shutter speed dial until the speed you should use is cocked...
... '300 using is centered in daylight and 1/30 sec. Generally, you want to use the fastest possible shutter speed to avoid blurred pictures caused by camera movement. BASIC OPERATING INSTRUCTIONS 1. Try starting with 1/125 sec. Set Shutter Speed Turn the shutter speed dial until the speed you should use is cocked...
MX Manual
Page 11
..., change the shutter speed. 6. Release Shutter Hold your subject comes into sharp focus and choose the most pleasing composition. 5. Trun the aperture ring until your camera firmly and trip the shutter. Then cock the rapid-wind lever for the next picture. (As long as the lever is also visible in the...
..., change the shutter speed. 6. Release Shutter Hold your subject comes into sharp focus and choose the most pleasing composition. 5. Trun the aperture ring until your camera firmly and trip the shutter. Then cock the rapid-wind lever for the next picture. (As long as the lever is also visible in the...
MX Manual
Page 13
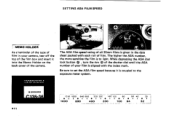
... depressing the ASA dial lock button Q , turn the rim 0 of the shutter dial until the ASA number of your camera, tear off the top of the film box and insert it is given in your film is to the exposure meter system. innn The ASA ...
... depressing the ASA dial lock button Q , turn the rim 0 of the shutter dial until the ASA number of your camera, tear off the top of the film box and insert it is given in your film is to the exposure meter system. innn The ASA ...
MX Manual
Page 14
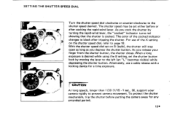
... For use a cable release with a locking device for any extended period. 12• Alternately, use of the cocked indicator changes to prevent camera movement. The shutter speed may be set on the shutter speed dial, refer to page 18. As you cock the shutter by moving the ... (1/15 - 1 sec., B), support your finger from the shutter button, the shutter closes. With the shutter speed dial set either before putting the camera away for a time exposure. To protect the shutter mechanism, trip the shutter before or after tripping the shutter. SETTING THE SHUTTER SPEED DIAL Turn the...
... For use a cable release with a locking device for any extended period. 12• Alternately, use of the cocked indicator changes to prevent camera movement. The shutter speed may be set on the shutter speed dial, refer to page 18. As you cock the shutter by moving the ... (1/15 - 1 sec., B), support your finger from the shutter button, the shutter closes. With the shutter speed dial set either before putting the camera away for a time exposure. To protect the shutter mechanism, trip the shutter before or after tripping the shutter. SETTING THE SHUTTER SPEED DIAL Turn the...

MX Manual
Page 17
...your left hand, and draw your forehead with the right hand - Hold your camera tightly to your forehead with your left arm to your body. Hold your camera tightly to your arms close to your camera can be held more firmly in the left hand, and draw your right arm... close to camera movement. Vertical position C. HOLDING THE CAMERA As a general rule, your body. . 15 Vertical position ...
...your left hand, and draw your forehead with the right hand - Hold your camera tightly to your forehead with your left arm to your body. Hold your camera tightly to your arms close to your camera can be held more firmly in the left hand, and draw your right arm... close to camera movement. Vertical position C. HOLDING THE CAMERA As a general rule, your body. . 15 Vertical position ...
MX Manual
Page 20
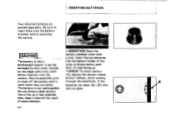
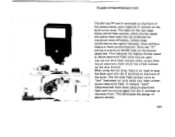
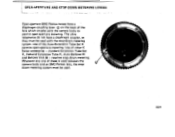
... you insert a shoe! When using a shoemount electronic flash which flash bulb may be combined for maximum lamp efficiency. FLASH SYNCHRONIZATION 0 P EUI&X 11100 BO SINAI The MX has FP and X terminals on the front of the camera body, and a separate X contact on the built-in flash synchronization.
... you insert a shoe! When using a shoemount electronic flash which flash bulb may be combined for maximum lamp efficiency. FLASH SYNCHRONIZATION 0 P EUI&X 11100 BO SINAI The MX has FP and X terminals on the front of the camera body, and a separate X contact on the built-in flash synchronization.
MX Manual
Page 21
The correct terminal and the correct shutter speed to the camera, you must remove the protective plug from the proper terminal. When not using the terminals, keep the plugs inserted. i . 7P4111oP, i V*1 SHUTTER SPEED 41 ELECTRONIC FLASH ... bulb attachments on the market: clip-on types and ri bracket types. There are attached via the tripod socket. Either can be used with your camera.
The correct terminal and the correct shutter speed to the camera, you must remove the protective plug from the proper terminal. When not using the terminals, keep the plugs inserted. i . 7P4111oP, i V*1 SHUTTER SPEED 41 ELECTRONIC FLASH ... bulb attachments on the market: clip-on types and ri bracket types. There are attached via the tripod socket. Either can be used with your camera.
MX Manual
Page 24
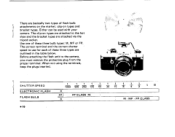
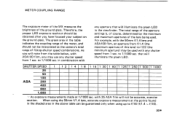
...ASA100 film, an aperture from the table below with any aperture that will illuminate the green LED. METER COUPLING RANGE The exposure meter of the MX measures the brightness of the lens being used with 25 ASA film will not be guaranteed only when using the 50mm f/1.4 lens, accurate exposure..., you have focused your subject on the ground glass. in the table indicates the coupling range of the meter, and should be interpreted as the camera's total range of this lens) to 1/1000 sec. to f/16 (f/1.4 f/16). 22• Therefore, the proper LED exposure read-out should not be ...
...ASA100 film, an aperture from the table below with any aperture that will illuminate the green LED. METER COUPLING RANGE The exposure meter of the MX measures the brightness of the lens being used with 25 ASA film will not be guaranteed only when using the 50mm f/1.4 lens, accurate exposure..., you have focused your subject on the ground glass. in the table indicates the coupling range of the meter, and should be interpreted as the camera's total range of this lens) to 1/1000 sec. to f/16 (f/1.4 f/16). 22• Therefore, the proper LED exposure read-out should not be ...
MX Manual
Page 27
... your own experience. If the batteries have worn out. the shutter mechanism is a totally manual operation. • Therefore, your MX are used only for 1710.8 determining the correct exposure in your camera can still be operated even if the batteries have worn out and the exposure meter is no longer functioning, you...
... your own experience. If the batteries have worn out. the shutter mechanism is a totally manual operation. • Therefore, your MX are used only for 1710.8 determining the correct exposure in your camera can still be operated even if the batteries have worn out and the exposure meter is no longer functioning, you...
MX Manual
Page 28
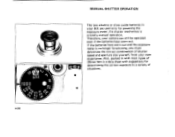
After cocking the rapid-wind lever, advance the Self-timer lever Ot 90° - 180°. it will commence. co 4 O C4 26• SELF-TIMER The Self-timer delays the shutter release by 4-12 seconds, depending upon how far counterclockwise (when camera faces you) the lever is advanced. Then, push the start button O , and the Self-timer will immediately release the shutter without delayed action. When using the Self-timer, do not depress the shutter button .. . t.
After cocking the rapid-wind lever, advance the Self-timer lever Ot 90° - 180°. it will commence. co 4 O C4 26• SELF-TIMER The Self-timer delays the shutter release by 4-12 seconds, depending upon how far counterclockwise (when camera faces you) the lever is advanced. Then, push the start button O , and the Self-timer will immediately release the shutter without delayed action. When using the Self-timer, do not depress the shutter button .. . t.
MX Manual
Page 29
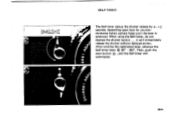
... is not required when working with an orange line on the lens. First, bring your subject-to-camera distance to the infra-red mark by turning the focusing ring accordingly. Then determine the subject-to-camera distance from the distance scale on the depth-of-field scale. m t 8if,4TT4in8 Cit 22 „...
... is not required when working with an orange line on the lens. First, bring your subject-to-camera distance to the infra-red mark by turning the focusing ring accordingly. Then determine the subject-to-camera distance from the distance scale on the depth-of-field scale. m t 8if,4TT4in8 Cit 22 „...
MX Manual
Page 32
USING SCREW-MOUNT TAKUMAR LENSES Conventional screw-mount Takumar lenses (both Super-Takumar and SMC Takumar) can be easily mounted onto your camera by aligning the red dots f and © , and turning the lens clockwise until it locks with a click. (This takes slightly less than a...to Use Mount Adaptor K Screw the conventional Takumar lens into the Mount Adaptor K. 2 Attach the Adaptor/lens unit to the camera body by attaching them first to the camera body, simply unscrew the lens counterclockwise. Other screw-mount 30• Full-aperture metering lenses will not function. . Due ...
USING SCREW-MOUNT TAKUMAR LENSES Conventional screw-mount Takumar lenses (both Super-Takumar and SMC Takumar) can be easily mounted onto your camera by aligning the red dots f and © , and turning the lens clockwise until it locks with a click. (This takes slightly less than a...to Use Mount Adaptor K Screw the conventional Takumar lens into the Mount Adaptor K. 2 Attach the Adaptor/lens unit to the camera body by attaching them first to the camera body, simply unscrew the lens counterclockwise. Other screw-mount 30• Full-aperture metering lenses will not function. . Due ...
MX Manual
Page 33
... K from that which locks in an SMC Pentax bayonet-mount lens, the lens release lever C) on the camera body plays no part at all. •31 molimimerrr-**MOMINIES.rt ... $ Takumar lenses can then be attached in the Mount Adaptor K is totally different from the camera body, first remove the screw-mount lens. Turn...
... K from that which locks in an SMC Pentax bayonet-mount lens, the lens release lever C) on the camera body plays no part at all. •31 molimimerrr-**MOMINIES.rt ... $ Takumar lenses can then be attached in the Mount Adaptor K is totally different from the camera body, first remove the screw-mount lens. Turn...
MX Manual
Page 34
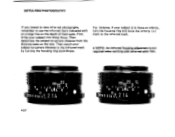
... a diaphragm coupling lever 0 on the back of the lens which couples with the stop - st down metering system must be used between the camera body and an SMC Pentax lens, the stop -down metering. OPEN-APERTURE AND STOP-DOWN METERING LENSES Open-aperture SMC... Pentax lenses have a diaphragm coupler, so they must be used with the camera body to permit open -aperture metering. USe of the Auto-Extension Tube Set K permits open -aperture metering. Whenever any one of these is used...
... a diaphragm coupling lever 0 on the back of the lens which couples with the stop - st down metering system must be used between the camera body and an SMC Pentax lens, the stop -down metering. OPEN-APERTURE AND STOP-DOWN METERING LENSES Open-aperture SMC... Pentax lenses have a diaphragm coupler, so they must be used with the camera body to permit open -aperture metering. USe of the Auto-Extension Tube Set K permits open -aperture metering. Whenever any one of these is used...


