
KX Manual
Page 8
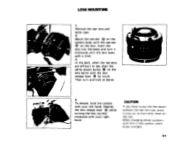
... body with the red dot 0 on the lens barrel with the lens release lever 0 by touch. Then turn it only on its front end, never on the rear. Depress the lens release lever 0 while turning the lens counter clockwise with your right hand. Insert the lens into the body and... turn and lock as above. 4. When changing lenses outdoors with a click. 3. LENS MOUNTING 1. To detach, hold the camera with ...
... body with the red dot 0 on the lens barrel with the lens release lever 0 by touch. Then turn it only on its front end, never on the rear. Depress the lens release lever 0 while turning the lens counter clockwise with your right hand. Insert the lens into the body and... turn and lock as above. 4. When changing lenses outdoors with a click. 3. LENS MOUNTING 1. To detach, hold the camera with ...
KX Manual
Page 10
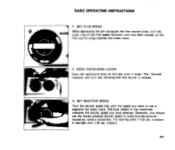
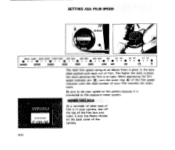
... shutter speed you want to avoid blurred pictures caused by camera movement. The blue needle in daylight and 1/30 sec. The "Cocked" indicator will turn the outer ring of the film speed indicator until the ASA number of the film you should use the fastest possible shutter speed to use... is cocked. SET SHUTTER SPEED Turn the shutter speed dial until it stops. Generally, you 're using matches the index mark. 2. indoors. 8. COCK RAPID-WIND LEVER Cock the rapid-wind ...
... shutter speed you want to avoid blurred pictures caused by camera movement. The blue needle in daylight and 1/30 sec. The "Cocked" indicator will turn the outer ring of the film speed indicator until the ASA number of the film you should use the fastest possible shutter speed to use... is cocked. SET SHUTTER SPEED Turn the shutter speed dial until it stops. Generally, you 're using matches the index mark. 2. indoors. 8. COCK RAPID-WIND LEVER Cock the rapid-wind ...
KX Manual
Page 11
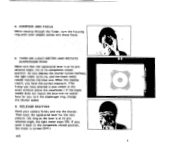
...into sharp focus. 5. When the needles match, you have the correct exposure. (The f-stop you have selected is turned OFF.) •9 II Is 6 2 1 If you depress the shutter button halfway, the light meter turns on, and the black meter needle matches the blue one no matter how far you... focusing ring until your camera firmly and trip the shutter. COMPOSE AND FOCUS While viewing through the finder, turn the diaphragm ring, change the shutter speed. 6. TURN ON LIGHT METER AND ROTATE DIAPHRAGM RING Make sure that the rapid-wind lever is at its preadvance angle, the light meter stays ...
...into sharp focus. 5. When the needles match, you have the correct exposure. (The f-stop you have selected is turned OFF.) •9 II Is 6 2 1 If you depress the shutter button halfway, the light meter turns on, and the black meter needle matches the blue one no matter how far you... focusing ring until your camera firmly and trip the shutter. COMPOSE AND FOCUS While viewing through the finder, turn the diaphragm ring, change the shutter speed. 6. TURN ON LIGHT METER AND ROTATE DIAPHRAGM RING Make sure that the rapid-wind lever is at its preadvance angle, the light meter stays ...
KX Manual
Page 12
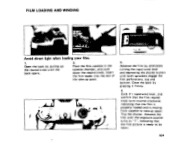
...shutter button until both sprockets engage the film perforations, top and bottom. Advance the film by pulling up the rewind knob until the exposure counter turns to "1", indicating that the film is properly loaded and is ready to take -up spool. Advance the film until the back opens. 2. FILM...film. 1. Trip the shutter. Close the back by pressing it firmly. 4. Cock tl-3 rapid-wind lever, and confirm that the film rewind knob turns counter-clockwise, indicating that the first picture is moving from cassette to be taken. 10* Insert the film leader into the slot of the take...
...shutter button until both sprockets engage the film perforations, top and bottom. Advance the film by pulling up the rewind knob until the exposure counter turns to "1", indicating that the film is properly loaded and is ready to take -up spool. Advance the film until the back opens. 2. FILM...film. 1. Trip the shutter. Close the back by pressing it firmly. 4. Cock tl-3 rapid-wind lever, and confirm that the film rewind knob turns counter-clockwise, indicating that the first picture is moving from cassette to be taken. 10* Insert the film leader into the slot of the take...
KX Manual
Page 13
... on the camera because it into the Memo Holder on the back cover of the camera. •11 While depressing the film speed indicator pin turn the outer ring C) of the film speed indicator until the ASA number of film. Be sure to set your film matches the index mark. MEMO...
... on the camera because it into the Memo Holder on the back cover of the camera. •11 While depressing the film speed indicator pin turn the outer ring C) of the film speed indicator until the ASA number of film. Be sure to set your film matches the index mark. MEMO...
KX Manual
Page 14
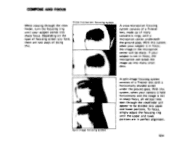
... ground glass. With this . Depending on the type of focusing screen you have, there are in sharp focus, all vertical lines seen through the viewfinder, turn the focusing ring until the upper and lower portions are two ways of a Fresnel lens, made up into sharp focus. To focus, simply adjust the...
... ground glass. With this . Depending on the type of focusing screen you have, there are in sharp focus, all vertical lines seen through the viewfinder, turn the focusing ring until the upper and lower portions are two ways of a Fresnel lens, made up into sharp focus. To focus, simply adjust the...
KX Manual
Page 15
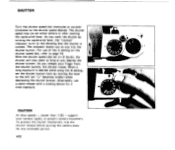
The shutter speed may be set the shutter button lock by turning the rapid-wind lever, the "cocked" indicator turns to page 16. For use a cable release with a locking device for any extended period. •13 ~ti 1000 91 Sp0 S/ rt? CAUTION At slow speeds - ... left (an "L" becomes visible) while depressing the shutter button. When a long exposure is cocked. support your finger from the shutter button, the shutter closes. SHUTTER Turn the shutter speed dial clockwise or counterclockwise to the shutter speed desired.
The shutter speed may be set the shutter button lock by turning the rapid-wind lever, the "cocked" indicator turns to page 16. For use a cable release with a locking device for any extended period. •13 ~ti 1000 91 Sp0 S/ rt? CAUTION At slow speeds - ... left (an "L" becomes visible) while depressing the shutter button. When a long exposure is cocked. support your finger from the shutter button, the shutter closes. SHUTTER Turn the shutter speed dial clockwise or counterclockwise to the shutter speed desired.
KX Manual
Page 17
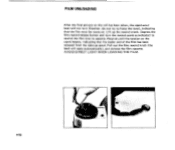
... After the final picture on the crank lessens, indicating that the film must be rewound. Pull out the film rewind knob (the back will not turn the rewind crank as indicated to force the lever), indicating that the leader end of the film has been released from the take-up the...
... After the final picture on the crank lessens, indicating that the film must be rewound. Pull out the film rewind knob (the back will not turn the rewind crank as indicated to force the lever), indicating that the leader end of the film has been released from the take-up the...
KX Manual
Page 18
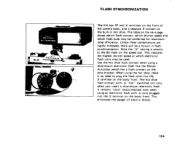
Use the hot shoe flash contact when using a shoe-mount electronic flash like the Pentax Autorobo which has a flash contact on the speed dial . Note the "X" setting is no need to "hot" (switched on the built-in flash synchronization. This ... body, and a separate X contact on ) only when you insert a shoe-mount electronic flash. AUTOR000 KX RENTAX FLASH SYNCHRONIZATION The KX has FP and X terminals on the front of electric shocks. 16. P ENT., x. The hot shoe flash contact turns to plug the flash cord into the X terminal on the body front. When using an...
Use the hot shoe flash contact when using a shoe-mount electronic flash like the Pentax Autorobo which has a flash contact on the speed dial . Note the "X" setting is no need to "hot" (switched on the built-in flash synchronization. This ... body, and a separate X contact on ) only when you insert a shoe-mount electronic flash. AUTOR000 KX RENTAX FLASH SYNCHRONIZATION The KX has FP and X terminals on the front of electric shocks. 16. P ENT., x. The hot shoe flash contact turns to plug the flash cord into the X terminal on the body front. When using an...
KX Manual
Page 23
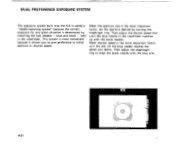
When shutter speed is the more important factor, turn the dial till the blue needle reaches the speed you to give preference to align the black needle with the black needle. blue and black - ... aperture desired by matching the two needles - DUAL PREFERENCE EXPOSURE SYSTEM The exposure system built into the KX is called a "needle-matching system" because the correct exposure for any given situation is determined by turning the diaphragm ring. Then adjust the diaphragm ring to either aperture or shutter speed. seen in the...
When shutter speed is the more important factor, turn the dial till the blue needle reaches the speed you to give preference to align the black needle with the black needle. blue and black - ... aperture desired by matching the two needles - DUAL PREFERENCE EXPOSURE SYSTEM The exposure system built into the KX is called a "needle-matching system" because the correct exposure for any given situation is determined by turning the diaphragm ring. Then adjust the diaphragm ring to either aperture or shutter speed. seen in the...
KX Manual
Page 24
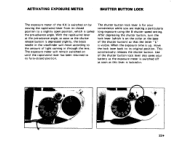
After depressing the shutter button, turn the lock lever (which is called the pre-advance angle. This automatically releases the shutter button. Use of the shutter button lock lever also saves ... position, which is on by moving the rapid-wind lever from its closed position. ACTIVATING EXPOSURE METER SHUTTER BUTTON LOCK The exposure meter of the KX is switched on the collar at the pre-advance angle, as soon as this lever is locked-in through the lens. When the exposure time...
After depressing the shutter button, turn the lock lever (which is called the pre-advance angle. This automatically releases the shutter button. Use of the shutter button lock lever also saves ... position, which is on by moving the rapid-wind lever from its closed position. ACTIVATING EXPOSURE METER SHUTTER BUTTON LOCK The exposure meter of the KX is switched on the collar at the pre-advance angle, as soon as this lever is locked-in through the lens. When the exposure time...
KX Manual
Page 26
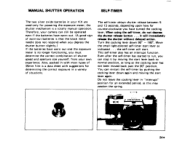
... the correct exposure in a variety of shutter speed and aperture size yourself, from your KX are used only for an extended period, as this may weaken the spring. •- • 1M - Turn the cocking lever down again and moving the start lever as the cocking lever has not... been moved back past the 90° position. MANUAL SHUTTER OPERATION SELF-TIMER The two silver oxide batteries in your own experience. it by pushing the cocking lever down 90° - 180°. IICX PENTAX...
... the correct exposure in a variety of shutter speed and aperture size yourself, from your KX are used only for an extended period, as this may weaken the spring. •- • 1M - Turn the cocking lever down again and moving the start lever as the cocking lever has not... been moved back past the 90° position. MANUAL SHUTTER OPERATION SELF-TIMER The two silver oxide batteries in your own experience. it by pushing the cocking lever down 90° - 180°. IICX PENTAX...
KX Manual
Page 27
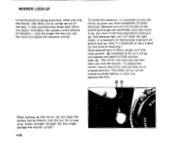
... locked up the mirror, do not keep the camera facing directly into place. Direct sunlight through the viewfinder once the mirror is in focus, simply turn the lock-up lever (;) clockwise as far as it will not reach the light meter, it is necessary to have completely finished focusing. (Because you...
... locked up the mirror, do not keep the camera facing directly into place. Direct sunlight through the viewfinder once the mirror is in focus, simply turn the lock-up lever (;) clockwise as far as it will not reach the light meter, it is necessary to have completely finished focusing. (Because you...
KX Manual
Page 28
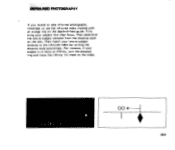
For instance, if your lens-to-subject distance to the infra-red index by turning the distance scale accordingly. L. 28 00 4 26• Then match your subject is in focus at infinity, turn the distance ring and move the infinity Icy/ mark to the index. Then determine the lens-to-subject distance from the distance scale on the depth-of-field guide. First, bring your subject into clear focus. INPRIMIED PHOTOGRAPHY If you intend to take infra-red photographs, remember to use the infra-red index marked with an orange line on the lens.
For instance, if your lens-to-subject distance to the infra-red index by turning the distance scale accordingly. L. 28 00 4 26• Then match your subject is in focus at infinity, turn the distance ring and move the infinity Icy/ mark to the index. Then determine the lens-to-subject distance from the distance scale on the depth-of-field guide. First, bring your subject into clear focus. INPRIMIED PHOTOGRAPHY If you intend to take infra-red photographs, remember to use the infra-red index marked with an orange line on the lens.
KX Manual
Page 29
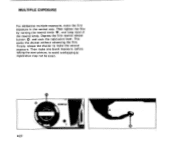
Finally release the shutter to avoid overlapping as registration may not be exact. Then make one blank exposure, before taking the next picture, to make the first exposure in the normal way. A 8238542 •27 Then tighten the film by turning the rewind knob 0 , and keep hold of the rewind knob. Depress the film rewind release button t and cock the rapid-wind lever. MULTIPLE EXPOSURE For deliberate multiple exposures, make the second exposure. This cocks the shutter without advancing the film.
Finally release the shutter to avoid overlapping as registration may not be exact. Then make one blank exposure, before taking the next picture, to make the first exposure in the normal way. A 8238542 •27 Then tighten the film by turning the rewind knob 0 , and keep hold of the rewind knob. Depress the film rewind release button t and cock the rapid-wind lever. MULTIPLE EXPOSURE For deliberate multiple exposures, make the second exposure. This cocks the shutter without advancing the film.
KX Manual
Page 31
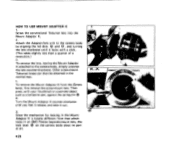
...quarter of a revolution.) 3. To remove the lens, leaving the Mount Adaptor K attached to the camera body by aligning the red dots 0 and 0 , and turning 4F the lens clockwise until you feel it release, and take it locks with your thumbnail or a pointed object such as a ballpoint pen, against the... spring pin 2. Turn the Mount Adaptor K counter-clockwise until it out. 3. Other screw-mount Takumar lenses can then be attached in an SMC Pentax bayonet-mount lens, the lock lever 0 on the camera body plays no part at ...
...quarter of a revolution.) 3. To remove the lens, leaving the Mount Adaptor K attached to the camera body by aligning the red dots 0 and 0 , and turning 4F the lens clockwise until you feel it release, and take it locks with your thumbnail or a pointed object such as a ballpoint pen, against the... spring pin 2. Turn the Mount Adaptor K counter-clockwise until it out. 3. Other screw-mount Takumar lenses can then be attached in an SMC Pentax bayonet-mount lens, the lock lever 0 on the camera body plays no part at ...

