
ZX-L Manual
Page 2
WELCOME Thank you to get the most out of all the camera's capabilities. Please read this manual safe, as it can be a valuable tool in order to understand all the features and functions. Keep this manual before using the camera in helping you very much for purchasing the Pentax SLR camera.
WELCOME Thank you to get the most out of all the camera's capabilities. Please read this manual safe, as it can be a valuable tool in order to understand all the features and functions. Keep this manual before using the camera in helping you very much for purchasing the Pentax SLR camera.

ZX-L Manual
Page 3
...that , if not followed, could result in minor or medium injury to the operator or damage to the operator. Never attempt to disassemble the camera yourself. • Never touch internal parts of the battery in serious injury to the equipment. Be careful not burn yourself during removal. This ... reason, as it may explode. Be particularly careful with the flash around their neck. • Do not look directly at the sun through the camera, as it may hurt them. WARNING This mark indicates precautions that , if not followed, could result in fire, as there is dangerous. Seek...
...that , if not followed, could result in minor or medium injury to the operator or damage to the operator. Never attempt to disassemble the camera yourself. • Never touch internal parts of the battery in serious injury to the equipment. Be careful not burn yourself during removal. This ... reason, as it may explode. Be particularly careful with the flash around their neck. • Do not look directly at the sun through the camera, as it may hurt them. WARNING This mark indicates precautions that , if not followed, could result in fire, as there is dangerous. Seek...
ZX-L Manual
Page 4
... extended periods in places where the humidity and temperature are very high, such as it to a Pentax service center for inspection. • Be careful not to subject the camera to hit solid objects. Store it in a closet with a margin of safety at the edges. • When a macro or telephoto lens is ... in an area where chemicals are not covered under the terms of crystals may be caused by water, dirt or dust at a Pentax service center. In such a case, put the camera into a case or plastic bag so that any other object. • Use a blower and lens brush to remove dust accumulated on...
... extended periods in places where the humidity and temperature are very high, such as it to a Pentax service center for inspection. • Be careful not to subject the camera to hit solid objects. Store it in a closet with a margin of safety at the edges. • When a macro or telephoto lens is ... in an area where chemicals are not covered under the terms of crystals may be caused by water, dirt or dust at a Pentax service center. In such a case, put the camera into a case or plastic bag so that any other object. • Use a blower and lens brush to remove dust accumulated on...
ZX-L Manual
Page 5
...while traveling. • If the built-in flash is used in conditions as outlined in the "Precautions for Your Camera" section or any other operation contrary to contact a Pentax Service Center immediately. • To maintain optimum performance, it is one of the battery's characteristics. • ...Replace the batteries at the same time. it is recommended that the camera be inspected every one . Do not mix battery ...
...while traveling. • If the built-in flash is used in conditions as outlined in the "Precautions for Your Camera" section or any other operation contrary to contact a Pentax Service Center immediately. • To maintain optimum performance, it is one of the battery's characteristics. • ...Replace the batteries at the same time. it is recommended that the camera be inspected every one . Do not mix battery ...
ZX-L Manual
Page 6
CONTENTS FOR SAFE USE OF YOUR CAMERA 1 PRECAUTIONS FOR YOUR CAMERA 2 PRECAUTIONS FOR BATTERY USAGE 3 NAMES OF WORKING PARTS 8 USING THIS OPERATING MANUAL 10 SET UP 11 THINGS TO DO 11 BEFORE TAKING PICTURES 12 STEP 1 Attaching the Strap 12 STEP 2 Loading the Batteries 13 STEP 3 Attaching a Lens 14 STEP 4 Imprinting the date or time (OPTIONAL) 16 STEP 5 Adjusting the viewfinder's diopter . 17 STEP 6 Film loading 18 O
CONTENTS FOR SAFE USE OF YOUR CAMERA 1 PRECAUTIONS FOR YOUR CAMERA 2 PRECAUTIONS FOR BATTERY USAGE 3 NAMES OF WORKING PARTS 8 USING THIS OPERATING MANUAL 10 SET UP 11 THINGS TO DO 11 BEFORE TAKING PICTURES 12 STEP 1 Attaching the Strap 12 STEP 2 Loading the Batteries 13 STEP 3 Attaching a Lens 14 STEP 4 Imprinting the date or time (OPTIONAL) 16 STEP 5 Adjusting the viewfinder's diopter . 17 STEP 6 Film loading 18 O
ZX-L Manual
Page 7
BASIC 21 BASIC OPERATIONS 21 QUICK AND EASY SHOOTING 22 POWER ON/OFF 22 QUICK AND EASY SHOOTING 24 TAKING A PICTURE 27 BUILT-IN FLASH-SMART FLASH 30 USING THE BUILT-IN FLASH 30 SETTING THE RED-EYE REDUCTION MODE 33 UNLOADING FILM 34 REWINDING THE FILM 34 SETTING THE FILM SPEED(ISO) MANUALLY 36 REPLACING THE BATTERIES 38 REPLACING THE CAMERA BATTERIES 38 REPLACE BATTERY FOR DATA BACK FJ (OPTIONAL) 40 ADJUSTING THE DATA BACK (OPTIONAL) 42
BASIC 21 BASIC OPERATIONS 21 QUICK AND EASY SHOOTING 22 POWER ON/OFF 22 QUICK AND EASY SHOOTING 24 TAKING A PICTURE 27 BUILT-IN FLASH-SMART FLASH 30 USING THE BUILT-IN FLASH 30 SETTING THE RED-EYE REDUCTION MODE 33 UNLOADING FILM 34 REWINDING THE FILM 34 SETTING THE FILM SPEED(ISO) MANUALLY 36 REPLACING THE BATTERIES 38 REPLACING THE CAMERA BATTERIES 38 REPLACE BATTERY FOR DATA BACK FJ (OPTIONAL) 40 ADJUSTING THE DATA BACK (OPTIONAL) 42

ZX-L Manual
Page 8
STEP UP 45 ADVANCED OPERATIONS 45 CAMERA OPERATIONS 46 CONSECUTIVE-FRAME DRIVE 46 MULTIPLE EXPOSURES ON A SINGLE FRAME 47 SELF-TIMER MODE 49 REMOTE CONTROL SHOOTING (OPTIONAL) E.i0 AUTO BRACKETING 53 USING ...
STEP UP 45 ADVANCED OPERATIONS 45 CAMERA OPERATIONS 46 CONSECUTIVE-FRAME DRIVE 46 MULTIPLE EXPOSURES ON A SINGLE FRAME 47 SELF-TIMER MODE 49 REMOTE CONTROL SHOOTING (OPTIONAL) E.i0 AUTO BRACKETING 53 USING ...
ZX-L Manual
Page 9
... 101 USING CONTRAST-CONTROL-SYNC FLASH MODE 103 USING SLOW-SPEED SYNC 105 PRECAUTIONS FOR USING FLASH 107 APPENDIX 109 PENTAX FUNCTIONS 110 BASIC SETTING OF PENTAX FUNCTIONS 111 SETTING A PENTAX FUNCTION 113 CAMERA FUNCTIONS AVAILABLE WITH VARIOUS LENSES 117 ACCESSORIES (OPTIONAL) 119 PROGRAM DIAGRAMS 122 TROUBLE SHOOTING 125 SPECIFICATIONS TABLE 128 WARRANTY POLICY...
... 101 USING CONTRAST-CONTROL-SYNC FLASH MODE 103 USING SLOW-SPEED SYNC 105 PRECAUTIONS FOR USING FLASH 107 APPENDIX 109 PENTAX FUNCTIONS 110 BASIC SETTING OF PENTAX FUNCTIONS 111 SETTING A PENTAX FUNCTION 113 CAMERA FUNCTIONS AVAILABLE WITH VARIOUS LENSES 117 ACCESSORIES (OPTIONAL) 119 PROGRAM DIAGRAMS 122 TROUBLE SHOOTING 125 SPECIFICATIONS TABLE 128 WARRANTY POLICY...
ZX-L Manual
Page 12
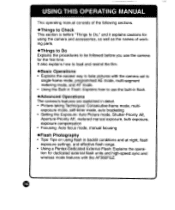
... mode. • Using the Built-in backlit conditions and at night, flash exposure settings, and effective flash range. • Using a Pentax-Dedicated External Flash: Explains the opera- USING THIS OPERATING MANUAL This operating manual consists of the following sections. ♦Things to Check This ...section is before you use the built-in flash. ♦Advanced Operations The camera's features are explained in detail. • Picture-taking Techniques: Consecutive-frame mode, multi- It also explains how to load and rewind the...
... mode. • Using the Built-in backlit conditions and at night, flash exposure settings, and effective flash range. • Using a Pentax-Dedicated External Flash: Explains the opera- USING THIS OPERATING MANUAL This operating manual consists of the following sections. ♦Things to Check This ...section is before you use the built-in flash. ♦Advanced Operations The camera's features are explained in detail. • Picture-taking Techniques: Consecutive-frame mode, multi- It also explains how to load and rewind the...
ZX-L Manual
Page 14
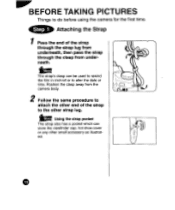
Step 1 Attaching the Strap 1 Pass the end of the strap through the strap lug from underneath, then pass the strap through the clasp from the O camera body. 2 Follow the same procedure to attach the other end of the strap to the other small accessory as illustrated. tcom The strap's clasp can ... the strap pocket The strap also has a pocket which can be used to rewind the film in mid-roll or to do before using the camera for the first time. BEFORE TAKING PICTURES Things to alter the date or time. I CE!
Step 1 Attaching the Strap 1 Pass the end of the strap through the strap lug from underneath, then pass the strap through the clasp from the O camera body. 2 Follow the same procedure to attach the other end of the strap to the other small accessory as illustrated. tcom The strap's clasp can ... the strap pocket The strap also has a pocket which can be used to rewind the film in mid-roll or to do before using the camera for the first time. BEFORE TAKING PICTURES Things to alter the date or time. I CE!

ZX-L Manual
Page 15
ies. • When taking the camera to unfamiliar areas or when using in the battery chamber cover firmly and use two lithium CR2 batter- Memo About the Batteries • Be sure ...
ies. • When taking the camera to unfamiliar areas or when using in the battery chamber cover firmly and use two lithium CR2 batter- Memo About the Batteries • Be sure ...

ZX-L Manual
Page 16
II • After attaching the lens, try and turn the lens clockwise until it is locked in place. For long-term camera storage, the optional accessory "Body Mount Cap K" is also available. 2 Align the red dots on the lens and camera while attaching the lens to the camera, then turn the lens counterclockwise to make • sure it clicks in place. Step 3 Attaching a Lens 1 Remove the body mount cap and rear lens cap. 7r) li= The body mount cap protects the inside of the camera from dust and scratches upon factory shipment.
II • After attaching the lens, try and turn the lens clockwise until it is locked in place. For long-term camera storage, the optional accessory "Body Mount Cap K" is also available. 2 Align the red dots on the lens and camera while attaching the lens to the camera, then turn the lens counterclockwise to make • sure it clicks in place. Step 3 Attaching a Lens 1 Remove the body mount cap and rear lens cap. 7r) li= The body mount cap protects the inside of the camera from dust and scratches upon factory shipment.
ZX-L Manual
Page 18
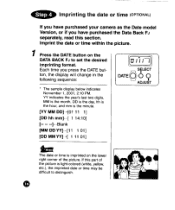
... have purchased the Data Back FJ separately, read this part of the picture. Step 4 Imprinting the date or time (OPTIONAL) If you have purchased your camera as the Date model Version, or if you press the DATE button, the display will change in the following sequence: DATE SELECT 00 ADJUST * The...
... have purchased the Data Back FJ separately, read this part of the picture. Step 4 Imprinting the date or time (OPTIONAL) If you have purchased your camera as the Date model Version, or if you press the DATE button, the display will change in the following sequence: DATE SELECT 00 ADJUST * The...

ZX-L Manual
Page 19
Step 5 Adjusting the viewfinder's diopter Adjust the viewfinder's diopter to a well-lit scene. Look through the viewfinder and point the camera to suit your eye's vision. Then move the diopter adjustment lever left or right until the autofocus frame in the multi-exposure mode. AF (0) NOTE &#...
Step 5 Adjusting the viewfinder's diopter Adjust the viewfinder's diopter to a well-lit scene. Look through the viewfinder and point the camera to suit your eye's vision. Then move the diopter adjustment lever left or right until the autofocus frame in the multi-exposure mode. AF (0) NOTE &#...

ZX-L Manual
Page 20
... designed to use a non-DX coded film, you first operate the camera with no film loaded to become familiar with its operations. .NOTE • When DX-coded film is used, the correct film speed is automatically set .... 44 O 0 io ip Always load and unload film in the direction of the arrow. *Et Remove the protective cover • Before loading film for the camera. tem We suggest that you can set for the first time after purchase, open the back cover and remove the protective sheet. • Be careful...
... designed to use a non-DX coded film, you first operate the camera with no film loaded to become familiar with its operations. .NOTE • When DX-coded film is used, the correct film speed is automatically set .... 44 O 0 io ip Always load and unload film in the direction of the arrow. *Et Remove the protective cover • Before loading film for the camera. tem We suggest that you can set for the first time after purchase, open the back cover and remove the protective sheet. • Be careful...

ZX-L Manual
Page 23
if BASIC BASIC OPERATIONS QUICK AND EASY SHOOTING 22 POWER ON/OFF 22 QUICK AND EASY SHOOTING 24 TAKING A PICTURE 27 BUILT-IN FLASH-SMART FLASH 30 USING THE BUILT-IN FLASH 30 SETTING THE RED-EYE REDUCTION MODE 33 UNLOADING FILM 34 REWINDING THE FILM 34 SETTING THE FILM SPEED(ISO) MANUALLY 36 REPLACING THE BATTERIES 38 REPLACING THE CAMERA BATTERIES 38 REPLACING THE DATA BACK FJ BATTERY (OPTIONAL) 40 ADJUSTING THE DATA BACK (OPTIONAL) 42 0
if BASIC BASIC OPERATIONS QUICK AND EASY SHOOTING 22 POWER ON/OFF 22 QUICK AND EASY SHOOTING 24 TAKING A PICTURE 27 BUILT-IN FLASH-SMART FLASH 30 USING THE BUILT-IN FLASH 30 SETTING THE RED-EYE REDUCTION MODE 33 UNLOADING FILM 34 REWINDING THE FILM 34 SETTING THE FILM SPEED(ISO) MANUALLY 36 REPLACING THE BATTERIES 38 REPLACING THE CAMERA BATTERIES 38 REPLACING THE DATA BACK FJ BATTERY (OPTIONAL) 40 ADJUSTING THE DATA BACK (OPTIONAL) 42 0

ZX-L Manual
Page 24
OFF ON • a__! • itizz Be sure to turn the main switch to OFF. I POWER ON/OFF 1 Turn on the batteries. After you finish taking pictures, turn the main switch to OFF to prevent accidental drain on the camera. QUICK AND EASY SHOOTING I Turn the main switch to ON. OFF ON ems 0 O__! 2 Turn off the camera.
OFF ON • a__! • itizz Be sure to turn the main switch to OFF. I POWER ON/OFF 1 Turn on the batteries. After you finish taking pictures, turn the main switch to OFF to prevent accidental drain on the camera. QUICK AND EASY SHOOTING I Turn the main switch to ON. OFF ON ems 0 O__! 2 Turn off the camera.

ZX-L Manual
Page 26
One picture is taken each time the shutter release button is pressed. like= The drive mode can also be set your camera for singleframe shooting, Auto picture, multi-segment metering, and autofocus. . ON IMO 1 .111 6 e__! 0 T Set the main switch to consecutive-frame mode OW p.46), selftimer ( p....
One picture is taken each time the shutter release button is pressed. like= The drive mode can also be set your camera for singleframe shooting, Auto picture, multi-segment metering, and autofocus. . ON IMO 1 .111 6 e__! 0 T Set the main switch to consecutive-frame mode OW p.46), selftimer ( p....

ZX-L Manual
Page 27
ars a I;CA AUTO PICT V ISO nooG70O 55 28 0 61185.6 3$ ®The lens aperture ring can be released from the [A] position in the same manner. 70 II 35 28 ®The selected picture mode appears in the viewfinder and the mode dial. SNOLLVLI3d0 OISV9 C.2Ult" ANU tHJY Jilt/O111\U 2 Set the Auto Picture Mode. ®Set the mode dial to the [AUTO PICT] position. ()Turn the aperture ring to the [A] position while holding down the aperture-A lock button on the lens.
ars a I;CA AUTO PICT V ISO nooG70O 55 28 0 61185.6 3$ ®The lens aperture ring can be released from the [A] position in the same manner. 70 II 35 28 ®The selected picture mode appears in the viewfinder and the mode dial. SNOLLVLI3d0 OISV9 C.2Ult" ANU tHJY Jilt/O111\U 2 Set the Auto Picture Mode. ®Set the mode dial to the [AUTO PICT] position. ()Turn the aperture ring to the [A] position while holding down the aperture-A lock button on the lens.

ZX-L Manual
Page 28
... page 78 for the manual focus. 0 The focus will be taken unless focus is off the cen- ket • In the Auto picture mode, the camera automatically selects one of 5 picture modes according to the requirement of Sopt AF. 4 Set autofocus Set the focus mode switch to [ ]. tom AF • The...
... page 78 for the manual focus. 0 The focus will be taken unless focus is off the cen- ket • In the Auto picture mode, the camera automatically selects one of 5 picture modes according to the requirement of Sopt AF. 4 Set autofocus Set the focus mode switch to [ ]. tom AF • The...

