
Auto 110 Manual
Page 2
... lens hoods. CONTENTS Specifications Names of parts Basic operating instructions Battery loading Battery life Battery precautions Film loading Advancing the film Holding the camera Focusing Exposure check Using a tripod Aperture and shutter speed relationship At the end of an SLR system. THE PENTAX AUTO 110 SYSTEM Pentax Auto 110 is an automatic-exposure SLR (singlelens-reflex) camera that uses...
... lens hoods. CONTENTS Specifications Names of parts Basic operating instructions Battery loading Battery life Battery precautions Film loading Advancing the film Holding the camera Focusing Exposure check Using a tripod Aperture and shutter speed relationship At the end of an SLR system. THE PENTAX AUTO 110 SYSTEM Pentax Auto 110 is an automatic-exposure SLR (singlelens-reflex) camera that uses...
Auto 110 Manual
Page 3
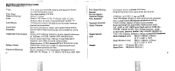
... for automatic flash synch with AF 130P or AF 1OOP auto flash unit at f/13.5 - 1 sec. Pentax 110 24mm 1/2.8; 47 -degree angle of tripod or auto flash to light on depressing shutter button when batteries are low. Green LED indicates adequate shutter speed (minimum ...Lens: 172 grams (6.1 ozs.) Body Only: 159 grams (5.6 ozs.) 3 AUTO:ll° SPECIFs.ICA,t TIONS Type Film Type Negative Format Lens Lens Mount Viewfinder Focusing Viewfinder Information Battery Check Exposure Metering 2 TTL metering 110 SLR camera with quick-return mirror, Central split -image focusing spot surrounded by ...
... for automatic flash synch with AF 130P or AF 1OOP auto flash unit at f/13.5 - 1 sec. Pentax 110 24mm 1/2.8; 47 -degree angle of tripod or auto flash to light on depressing shutter button when batteries are low. Green LED indicates adequate shutter speed (minimum ...Lens: 172 grams (6.1 ozs.) Body Only: 159 grams (5.6 ozs.) 3 AUTO:ll° SPECIFs.ICA,t TIONS Type Film Type Negative Format Lens Lens Mount Viewfinder Focusing Viewfinder Information Battery Check Exposure Metering 2 TTL metering 110 SLR camera with quick-return mirror, Central split -image focusing spot surrounded by ...
Auto 110 Manual
Page 4
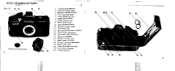
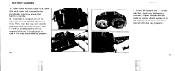
...!d isoa PENTIaX 5. Flash synch shoe 7. Film cartridge chamber 15. Shutter release button 12 4. Lens release button 6. Shutter/mirror box module 13. Winder contact terminals 19. AUTO 110 NAMES OF PARTS ••0.0 9!,.., . 0 E) (:), q al O. 1. 110-Bayonet Mount 2. Flash contact pin 8. Battery chamber 16. Viewfinder eyepiece 14. Battery holder tray 17. Focusing ring 12.
...!d isoa PENTIaX 5. Flash synch shoe 7. Film cartridge chamber 15. Shutter release button 12 4. Lens release button 6. Shutter/mirror box module 13. Winder contact terminals 19. AUTO 110 NAMES OF PARTS ••0.0 9!,.., . 0 E) (:), q al O. 1. 110-Bayonet Mount 2. Flash contact pin 8. Battery chamber 16. Viewfinder eyepiece 14. Battery holder tray 17. Focusing ring 12.
Auto 110 Manual
Page 5
...film advance lever TWO full strokes. k CAUTION: • Be sure to insert two batteries in the back cover window. • 7 Insert film (110 cartridge). properly and you depress the shutter release button halfway, the batteries are 2. AAA 6 3. maw • If neither the green or yellow light 411... carefully and correct the problem. v, • 'MO 6. BASIC OPERATING INSTRUCTIONS • For details, refer to original position. 5. Remove battery case, dead or have been inserted im- Insert batteries and return case to the appropriate section of this manual. 1.
...film advance lever TWO full strokes. k CAUTION: • Be sure to insert two batteries in the back cover window. • 7 Insert film (110 cartridge). properly and you depress the shutter release button halfway, the batteries are 2. AAA 6 3. maw • If neither the green or yellow light 411... carefully and correct the problem. v, • 'MO 6. BASIC OPERATING INSTRUCTIONS • For details, refer to original position. 5. Remove battery case, dead or have been inserted im- Insert batteries and return case to the appropriate section of this manual. 1.
Auto 110 Manual
Page 7
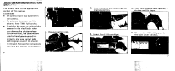
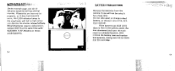
... and do the same with the (-) indication on top as long as batteries have been inserted into the battery chamber. Push down the hack cover lock, open the back cover and remove the battery holder tray from inside the battery chamber. 2. A\ 10 3. Insert the loaded tray - curvedside first -...back into the tray properly. 11 Insert the (-) side of one of the batteries into the opened side of the tray when inserted properly...
... and do the same with the (-) indication on top as long as batteries have been inserted into the battery chamber. Push down the hack cover lock, open the back cover and remove the battery holder tray from inside the battery chamber. 2. A\ 10 3. Insert the loaded tray - curvedside first -...back into the tray properly. 11 Insert the (-) side of one of the batteries into the opened side of the tray when inserted properly...
Auto 110 Manual
Page 8
... not be using it may explode. Should batteries require replacement, replace BOTH at the same time with equivalent 1.5V Alkaline or Silveroxide batteries. 12 BATTERY PRECAUTIONS Remove the batteries from the camera if you depress the shutter release halfway. If batteries are inserted improperly, or if they have become...indicator lamps in a shaded location, then remove the battery case and replace the batteries, taking care not to tt. Do not take apart or charge a dead battery, or throw it into a fire, as it for a long time. If the batteries go dead while there•is.film in the...
... not be using it may explode. Should batteries require replacement, replace BOTH at the same time with equivalent 1.5V Alkaline or Silveroxide batteries. 12 BATTERY PRECAUTIONS Remove the batteries from the camera if you depress the shutter release halfway. If batteries are inserted improperly, or if they have become...indicator lamps in a shaded location, then remove the battery case and replace the batteries, taking care not to tt. Do not take apart or charge a dead battery, or throw it into a fire, as it for a long time. If the batteries go dead while there•is.film in the...


