
Auto 110 Manual
Page 2
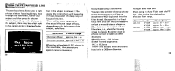
... of parts Basic operating instructions Battery loading Battery life Battery precautions Film loading Advancing the film Holding the camera Focusing Exposure check Using a tripod Aperture and shutter speed relationship At the end of an SLR system. THE PENTAX AUTO 110 SYSTEM Pentax Auto 110 is an automatic-exposure SLR (singlelens-reflex) camera that uses 110 cartridge film. As such, it offers both the pocketability and easy loading of the 110 format and the advantages of the roll Changing lenses Lenses available Using the PF (panfocus) lens Auto flash units 110 Winder/Other accessories...
... of parts Basic operating instructions Battery loading Battery life Battery precautions Film loading Advancing the film Holding the camera Focusing Exposure check Using a tripod Aperture and shutter speed relationship At the end of an SLR system. THE PENTAX AUTO 110 SYSTEM Pentax Auto 110 is an automatic-exposure SLR (singlelens-reflex) camera that uses 110 cartridge film. As such, it offers both the pocketability and easy loading of the 110 format and the advantages of the roll Changing lenses Lenses available Using the PF (panfocus) lens Auto flash units 110 Winder/Other accessories...
Auto 110 Manual
Page 3
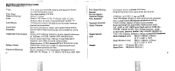
....) Body Only: 159 grams (5.6 ozs.) 3 AUTO:ll° SPECIFs.ICA,t TIONS Type Film Type Negative Format Lens Lens Mount Viewfinder Focusing Viewfinder Information Battery Check Exposure Metering 2 TTL metering 110 SLR camera with bayonet mount for available 110 films. Programmed electronic behind-the-lens shutter. 1/750 sec. Cartridge-loading 110 film. 13mm x 17mm. Focusing Range: 0.35m-00. 110 bayonet mount; 80-degree setting angle; Viewfinder LEDs fail to avoid camera shake. Two 145-degree strokes of the picture area. Sync terminal for automatic flash synch...
....) Body Only: 159 grams (5.6 ozs.) 3 AUTO:ll° SPECIFs.ICA,t TIONS Type Film Type Negative Format Lens Lens Mount Viewfinder Focusing Viewfinder Information Battery Check Exposure Metering 2 TTL metering 110 SLR camera with bayonet mount for available 110 films. Programmed electronic behind-the-lens shutter. 1/750 sec. Cartridge-loading 110 film. 13mm x 17mm. Focusing Range: 0.35m-00. 110 bayonet mount; 80-degree setting angle; Viewfinder LEDs fail to avoid camera shake. Two 145-degree strokes of the picture area. Sync terminal for automatic flash synch...
Auto 110 Manual
Page 4
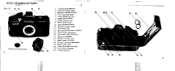
AUTO 110 NAMES OF PARTS ••0.0 9!,.., . 0 E) (:), q al O. 1. 110-Bayonet Mount 2. Wrist strap hook 9. Shutter/mirror box module 13. Viewfinder eyepiece 14. Film cartridge chamber 15. Aperture diaphragm \ 3. Film advance lever • \ V moon loo!d isoa PENTIaX 5. Battery chamber 16. Back cover lock 20. Tripod socket to .icrP4-rr Is 14 Back cover window • 18. Film cartridge chamber Flash-synch-shoe cap 4 okr) 21. Flash synch shoe 7. Lens release button 6. Shutter release button 12 4. Distance scale index...
AUTO 110 NAMES OF PARTS ••0.0 9!,.., . 0 E) (:), q al O. 1. 110-Bayonet Mount 2. Wrist strap hook 9. Shutter/mirror box module 13. Viewfinder eyepiece 14. Film cartridge chamber 15. Aperture diaphragm \ 3. Film advance lever • \ V moon loo!d isoa PENTIaX 5. Battery chamber 16. Back cover lock 20. Tripod socket to .icrP4-rr Is 14 Back cover window • 18. Film cartridge chamber Flash-synch-shoe cap 4 okr) 21. Flash synch shoe 7. Lens release button 6. Shutter release button 12 4. Distance scale index...
Auto 110 Manual
Page 5
... released. Remove battery case, dead or have been inserted im- Open back cover. properly and you depress the shutter release button halfway, the batteries are 2. Insert batteries and return case to insert two batteries in the camera. • To advance film, turn the film advance lever TWO full strokes. k CAUTION: • Be sure to original position. 5. BASIC OPERATING INSTRUCTIONS • For details, refer to the appropriate section of this manual. 1. Turn film advance lever approx. 7 strokes until it stops...
... released. Remove battery case, dead or have been inserted im- Open back cover. properly and you depress the shutter release button halfway, the batteries are 2. Insert batteries and return case to insert two batteries in the camera. • To advance film, turn the film advance lever TWO full strokes. k CAUTION: • Be sure to original position. 5. BASIC OPERATING INSTRUCTIONS • For details, refer to the appropriate section of this manual. 1. Turn film advance lever approx. 7 strokes until it stops...
Auto 110 Manual
Page 6
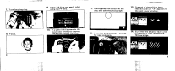
Turn focusing ring. •4 11 8. Focus. 8 9. rocuo lefil - - 10. t S' ant.' 11. OR x+ 12. If a green light appears in the viewfinder when you depress the shutter release halfway. Turn film advance lever 2 strokes for next exposure. Steps 7 & 8 do not apply when using the PF lens. Gently press the button all the way and take the photograph. Turn the film advance lever until appears, then remove the film cartridge. .013 '74 9 A•lo..?-kt...
Turn focusing ring. •4 11 8. Focus. 8 9. rocuo lefil - - 10. t S' ant.' 11. OR x+ 12. If a green light appears in the viewfinder when you depress the shutter release halfway. Turn film advance lever 2 strokes for next exposure. Steps 7 & 8 do not apply when using the PF lens. Gently press the button all the way and take the photograph. Turn the film advance lever until appears, then remove the film cartridge. .013 '74 9 A•lo..?-kt...
Auto 110 Manual
Page 7
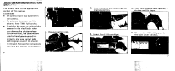
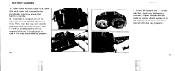
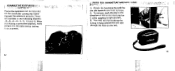
BATTERY LOADING 1. Push down the hack cover lock, open the back cover and remove the battery holder tray from inside the battery chamber. 2. Insert the (-) side of one of the batteries into the opened side of the tray when inserted properly. Insert the loaded tray - curvedside first -back into the tray properly. 11 A\ 10 3. the (-) side of both batteries will be made no matter which battery is on...
BATTERY LOADING 1. Push down the hack cover lock, open the back cover and remove the battery holder tray from inside the battery chamber. 2. Insert the (-) side of one of the batteries into the opened side of the tray when inserted properly. Insert the loaded tray - curvedside first -back into the tray properly. 11 A\ 10 3. the (-) side of both batteries will be made no matter which battery is on...
Auto 110 Manual
Page 8
... camera, point the lens downward and open the back cover in the viewfinder will last several months. Under normal usage, one set of Alkaline batteries will fail to light when you will not be using it may explode. If batteries are inserted improperly, or if they have become worn, the LED indicator lamps in a shaded location, then remove the battery case and replace the batteries...
... camera, point the lens downward and open the back cover in the viewfinder will last several months. Under normal usage, one set of Alkaline batteries will fail to light when you will not be using it may explode. If batteries are inserted improperly, or if they have become worn, the LED indicator lamps in a shaded location, then remove the battery case and replace the batteries...

Auto 110 Manual
Page 9
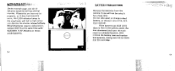
.... No manual film speed setting is appropriate for the next exposure. FILM LOADING 1. s After each exposure, turn . The 110 cartridge film automatically adjusts the camera to take your first picture. Otherwise, we recommend ASA 64 or 100. 14 ADVANCING THE FILM Turn the film advance lever about 7 times until the numeral "1" appears in the back cover window. You may also use a winder to cock the S:F^ shutter for photographing dark subjects or when you desire a fast shutter speed...
.... No manual film speed setting is appropriate for the next exposure. FILM LOADING 1. s After each exposure, turn . The 110 cartridge film automatically adjusts the camera to take your first picture. Otherwise, we recommend ASA 64 or 100. 14 ADVANCING THE FILM Turn the film advance lever about 7 times until the numeral "1" appears in the back cover window. You may also use a winder to cock the S:F^ shutter for photographing dark subjects or when you desire a fast shutter speed...
Auto 110 Manual
Page 10
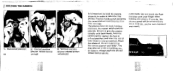
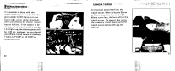
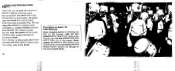
... holding the camera. If you use a tree or building, etc., as support. Always push the shutter release button gently. Niro. x • 17 The photos show the basic holding and operating the camera before inserting your body. Vertical position (shutter release button on top) 3. Practice holding positions. CAUTION: Do not touch the flash hot shoe with both hands, hold the camera properly in a secure posture. Vertical position (shutter release button at...
... holding the camera. If you use a tree or building, etc., as support. Always push the shutter release button gently. Niro. x • 17 The photos show the basic holding and operating the camera before inserting your body. Vertical position (shutter release button on top) 3. Practice holding positions. CAUTION: Do not touch the flash hot shoe with both hands, hold the camera properly in a secure posture. Vertical position (shutter release button at...

Auto 110 Manual
Page 11
...; "As. FFOCUSING Look through the eyepiece and turn the focusing ring further until both halves of poor eyesight, corrective eyepieces are available (see page 32). 18 1 split-image matte field 01 4.4s-ojv-at%irft4t'=i_l7iffizrx „ rOnole"--- t27 WWI .Ytn r;'. ; out of the lens. To be obtained by focusing on any part of the screen.
...; "As. FFOCUSING Look through the eyepiece and turn the focusing ring further until both halves of poor eyesight, corrective eyepieces are available (see page 32). 18 1 split-image matte field 01 4.4s-ojv-at%irft4t'=i_l7iffizrx „ rOnole"--- t27 WWI .Ytn r;'. ; out of the lens. To be obtained by focusing on any part of the screen.
Auto 110 Manual
Page 12
... of the viewfinder when you depress the shutter release button halfway. If the subject to be photographed is possible to prevent blurring. It is dark and the orange LED lights up in the lower right corner of the Auto Flashes (AF100P or AF130P) to shoot with the camera held in your hands when the green diode (LED) lights up , the shutter speed will hit...
... of the viewfinder when you depress the shutter release button halfway. If the subject to be photographed is possible to prevent blurring. It is dark and the orange LED lights up in the lower right corner of the Auto Flashes (AF100P or AF130P) to shoot with the camera held in your hands when the green diode (LED) lights up , the shutter speed will hit...
Auto 110 Manual
Page 13
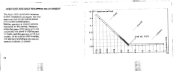
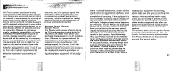
... the viewfinder the speed is 1/30 second or faster, and the aperture is f/2.8 or smaller. However, when the green LED lights up in preset combinations. or slower. 22 • 16 f = aperture setting) 11 8 5.6 • 4. .. 2.8 0 0 113 0 0In 0 N ID • 1/30 sec. If the yellow LED is visible, the aperture is f/2.8 and the shutter speed is 1/30 sec. f/2.8 Exposure time APERTURE AND SHUTTER SPEED RELATIONSHIP The Auto 110's automatic exposure...
... the viewfinder the speed is 1/30 second or faster, and the aperture is f/2.8 or smaller. However, when the green LED lights up in preset combinations. or slower. 22 • 16 f = aperture setting) 11 8 5.6 • 4. .. 2.8 0 0 113 0 0In 0 N ID • 1/30 sec. If the yellow LED is visible, the aperture is f/2.8 and the shutter speed is 1/30 sec. f/2.8 Exposure time APERTURE AND SHUTTER SPEED RELATIONSHIP The Auto 110's automatic exposure...
Auto 110 Manual
Page 14
... the film to check the film window. I ow: imvientiim 1. Turn the lens to the left until NMI or Egij appears and the film stops. mately 90 degrees to the right until it locks in place, with the red dot on the camera body O and insert the lens into the body. ...Open the back cover and remove the film for processing. 24 r CHANGING L• ENSESUr• "$4.,' "r4 4:futon Push upwards on the roll. An "X" will be sure to advance any further. AT THE END OF THE ROLL When nearing the end of the film roll (12 or 24 exposures), be taken. After that, although the shutter can be released...
... the film to check the film window. I ow: imvientiim 1. Turn the lens to the left until NMI or Egij appears and the film stops. mately 90 degrees to the right until it locks in place, with the red dot on the camera body O and insert the lens into the body. ...Open the back cover and remove the film for processing. 24 r CHANGING L• ENSESUr• "$4.,' "r4 4:futon Push upwards on the roll. An "X" will be sure to advance any further. AT THE END OF THE ROLL When nearing the end of the film roll (12 or 24 exposures), be taken. After that, although the shutter can be released...
Auto 110 Manual
Page 15
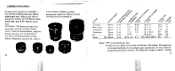
LENSES AVAILABLE A total of six lenses are bayonet mounted, and all of them accept filters, close-up attachments, and lens hoods. (see pg. 31 "Accessories") The filter thread diameter of the 70mm telephoto and the 20-40mm zoom lenses is 49mm, so lens accessories made for 35mm format cameras can be screwed in. 6.r. 4%,t .-MII • A, ttt tl • : I I I, 26 o•SA All Pentax 110 lenses are available -the standard 24rnm lens, an 18mrn wide-angle lens, 50mm and 70mm telephoto lenses, the PF18mm fixedfocus lens, and a 20-40mm zoom lens.
LENSES AVAILABLE A total of six lenses are bayonet mounted, and all of them accept filters, close-up attachments, and lens hoods. (see pg. 31 "Accessories") The filter thread diameter of the 70mm telephoto and the 20-40mm zoom lenses is 49mm, so lens accessories made for 35mm format cameras can be screwed in. 6.r. 4%,t .-MII • A, ttt tl • : I I I, 26 o•SA All Pentax 110 lenses are available -the standard 24rnm lens, an 18mrn wide-angle lens, 50mm and 70mm telephoto lenses, the PF18mm fixedfocus lens, and a 20-40mm zoom lens.
Auto 110 Manual
Page 16
... Outdoors Clear approx. 1m - Size of the subject, as follows: PAN FOCUS 03 "115111 • - The PF lens accepts filters and a lens hood with the PF lens, refer to take photos without focusing. Simply look through the viewfinder, frame your subject and then press the shutter release. Because this is at other distances. Using an auto flash unit When using an Auto Flash with a 30.5mm diameter...
... Outdoors Clear approx. 1m - Size of the subject, as follows: PAN FOCUS 03 "115111 • - The PF lens accepts filters and a lens hood with the PF lens, refer to take photos without focusing. Simply look through the viewfinder, frame your subject and then press the shutter release. Because this is at other distances. Using an auto flash unit When using an Auto Flash with a 30.5mm diameter...

Auto 110 Manual
Page 17
... 0.8 - 4.6 meters from the camera using the AF13OP Auto Flash, and a subject 0.8 - 3.5 meters away using ASA 100 400 film, you may photograph subjects at the rate of the 70mm and 20-40mm zoom lenses is finished. AUTO FLASH UNITS • el • Auto Flash units are available in the viewfinder, as when the room is a specially -designed hood for each 110 lens. However, the flash cannot be used if the green...
... 0.8 - 4.6 meters from the camera using the AF13OP Auto Flash, and a subject 0.8 - 3.5 meters away using ASA 100 400 film, you may photograph subjects at the rate of the 70mm and 20-40mm zoom lenses is finished. AUTO FLASH UNITS • el • Auto Flash units are available in the viewfinder, as when the room is a specially -designed hood for each 110 lens. However, the flash cannot be used if the green...
Auto 110 Manual
Page 18
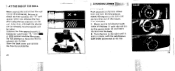
CORRECTIVE EYEPIECES IA Corrective eyepieces can be mounted on the viewfinder window by pushing the clip towards you from its front. 2. These are available in the direction of the arrow imprinted on it while wiggling it right and left . When purchasing a corrective ... on the left . 3. I CASt •:;:rs 1. You may use the handstrap by testing it hang outside the soft case through the hole on a camera. 32 USING THE HANDSTRAP AND SUI- Attach the handstrap by inserting over the accessory grooves. pgN'r 33 To remove, push the clip in the following diopters: -5, -4, -3, -2, ...
CORRECTIVE EYEPIECES IA Corrective eyepieces can be mounted on the viewfinder window by pushing the clip towards you from its front. 2. These are available in the direction of the arrow imprinted on it while wiggling it right and left . When purchasing a corrective ... on the left . 3. I CASt •:;:rs 1. You may use the handstrap by testing it hang outside the soft case through the hole on a camera. 32 USING THE HANDSTRAP AND SUI- Attach the handstrap by inserting over the accessory grooves. pgN'r 33 To remove, push the clip in the following diopters: -5, -4, -3, -2, ...
Auto 110 Manual
Page 19
... mount. Do not wipe the camera or lens with a lens brush. 34 Precaution on Auto 110 Lens Removal When changing lenses or removing the lens on the camera, slide the lens release button upward and, without first unlocking the mount by sliding the lens release button upward, as damage to the mount could result. 0 „IV 4), yr Use a blower to remove a lens without letting go, turn the lens counterclockwise until it in a drawer...
... mount. Do not wipe the camera or lens with a lens brush. 34 Precaution on Auto 110 Lens Removal When changing lenses or removing the lens on the camera, slide the lens release button upward and, without first unlocking the mount by sliding the lens release button upward, as damage to the mount could result. 0 „IV 4), yr Use a blower to remove a lens without letting go, turn the lens counterclockwise until it in a drawer...
Auto 110 Manual
Page 20
... expressed or implied, is covered by use or from Pentax distributors in those made and parts replaced free of charge, and the equipment will take a considerable length of time before the equipment can be replaced without cost to you upon completion of servicing. The local warranty policies available from other than Pentax lenses are beyond our control, damage caused by warranty, repairs will be serviced free...
... expressed or implied, is covered by use or from Pentax distributors in those made and parts replaced free of charge, and the equipment will take a considerable length of time before the equipment can be replaced without cost to you upon completion of servicing. The local warranty policies available from other than Pentax lenses are beyond our control, damage caused by warranty, repairs will be serviced free...


