
Operation Manual
Page 1
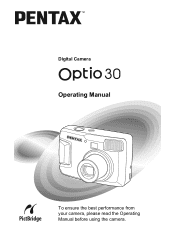
Digital Camera Operating Manual To ensure the best performance from your camera, please read the Operating Manual before using the camera.
Digital Camera Operating Manual To ensure the best performance from your camera, please read the Operating Manual before using the camera.
Operation Manual
Page 2
...also. PRINT Image Matching is a trademark of all the camera's capabilities. Regarding copyrights Images taken using the unified standard for purchasing the PENTAX Optio 30 Digital Camera. All Rights Reserved. Please read this manual safe, as there are even cases where limitations are trademarks... or registered trademarks of PENTAX Corporation. • Optio is 99.99% or better, you should ...
...also. PRINT Image Matching is a trademark of all the camera's capabilities. Regarding copyrights Images taken using the unified standard for purchasing the PENTAX Optio 30 Digital Camera. All Rights Reserved. Please read this manual safe, as there are even cases where limitations are trademarks... or registered trademarks of PENTAX Corporation. • Optio is 99.99% or better, you should ...
Operation Manual
Page 6
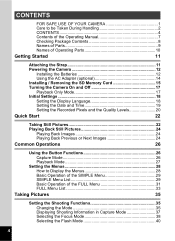
... to be Taken During Handling 2 CONTENTS 4 Contents of the Operating Manual 7 Checking Package Contents 8 Names of Parts 9 Names of Operating Parts 10 Getting Started 11 Attaching the Strap 11 Powering the Camera 12 Installing the Batteries 12 Using the AC Adapter (optional 14 Installing / Removing the SD Memory Card 15 ...Turning the Camera On and Off 17 Playback Only Mode 17 Initial Settings 18 Setting the Display Language 18 Setting the Date and Time 19 Setting the...
... to be Taken During Handling 2 CONTENTS 4 Contents of the Operating Manual 7 Checking Package Contents 8 Names of Parts 9 Names of Operating Parts 10 Getting Started 11 Attaching the Strap 11 Powering the Camera 12 Installing the Batteries 12 Using the AC Adapter (optional 14 Installing / Removing the SD Memory Card 15 ...Turning the Camera On and Off 17 Playback Only Mode 17 Initial Settings 18 Setting the Display Language 18 Setting the Date and Time 19 Setting the...
Operation Manual
Page 9
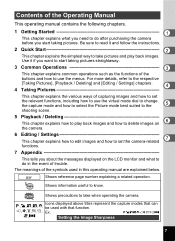
... pictures and play back images and how to delete images on the LCD monitor and what you need to do in this operating manual are explained below. For more details, refer to the respective [Taking Pictures], [Playback / Deleting] and [Editing / Settings] .../ Deleting This chapter explains how to play back images. Contents of the Operating Manual This operating manual contains the following chapters. 1 Getting Started 1 This chapter explains what to do after purchasing the camera before you start taking pictures. Shows reference page number explaining a related operation. Ex...
... pictures and play back images and how to delete images on the LCD monitor and what you need to do in this operating manual are explained below. For more details, refer to the respective [Taking Pictures], [Playback / Deleting] and [Editing / Settings] .../ Deleting This chapter explains how to play back images. Contents of the Operating Manual This operating manual contains the following chapters. 1 Getting Started 1 This chapter explains what to do after purchasing the camera before you start taking pictures. Shows reference page number explaining a related operation. Ex...

Operation Manual
Page 10
For other optional accessories, refer to the list on page 106. ∗Type of AC plug cord D-CO2A Australia / D-CO2B United Kingdom / D-CO2E Europe / D-CO2H Hong Kong / D-CO2J Japan / D-CO2K Korea / D-CO2U North America, Canada 8 Checking Package Contents Camera Optio 30 Strap O-ST18 (∗) Software (CD-ROM) S-SW18 USB cable I-USB6 (*) AA Alkaline batteries (2) Operating Manual (this manual) Operating Manual (PC Connection Manual) About items marked with (∗) ∗ Items marked with (∗) are also available as optional accessories.
For other optional accessories, refer to the list on page 106. ∗Type of AC plug cord D-CO2A Australia / D-CO2B United Kingdom / D-CO2E Europe / D-CO2H Hong Kong / D-CO2J Japan / D-CO2K Korea / D-CO2U North America, Canada 8 Checking Package Contents Camera Optio 30 Strap O-ST18 (∗) Software (CD-ROM) S-SW18 USB cable I-USB6 (*) AA Alkaline batteries (2) Operating Manual (this manual) Operating Manual (PC Connection Manual) About items marked with (∗) ∗ Items marked with (∗) are also available as optional accessories.
Operation Manual
Page 16
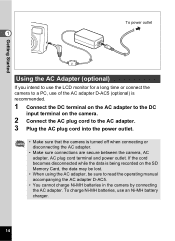
...; Make sure that the camera is being recorded on the SD Memory Card, the data may be lost. • When using the AC adapter, be sure to read the operating manual accompanying the AC adapter D-AC5.... • You cannot charge Ni-MH batteries in the camera by connecting the AC adapter. Getting Started To power outlet 1... Adapter (optional) If you intend to use the LCD monitor for a long time or connect the camera to a PC, use an Ni-MH battery charger. 14 If the cord becomes disconnected while the ...
...; Make sure that the camera is being recorded on the SD Memory Card, the data may be lost. • When using the AC adapter, be sure to read the operating manual accompanying the AC adapter D-AC5.... • You cannot charge Ni-MH batteries in the camera by connecting the AC adapter. Getting Started To power outlet 1... Adapter (optional) If you intend to use the LCD monitor for a long time or connect the camera to a PC, use an Ni-MH battery charger. 14 If the cord becomes disconnected while the ...

Operation Manual
Page 28
...) 9 MENU button Displays SIMPLE menu or [A Rec.Mode] menu. (1p.33) 26 Macro mode (1p.38), Infinity-landscape mode (1p.38), Manual focus mode (1p.38) 2 Zoom button Changes the size of the subject on your camera will function differently in different camera modes. Capture Mode 1 ) button Changes the capture mode as follows.
...) 9 MENU button Displays SIMPLE menu or [A Rec.Mode] menu. (1p.33) 26 Macro mode (1p.38), Infinity-landscape mode (1p.38), Manual focus mode (1p.38) 2 Zoom button Changes the size of the subject on your camera will function differently in different camera modes. Capture Mode 1 ) button Changes the capture mode as follows.
Operation Manual
Page 40
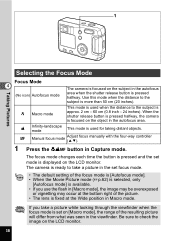
... the distance to the subject is more than 50 cm (20 inches). q Macro mode This mode is used for taking distant objects. z Manual focus mode Adjust focus manually with the four-way controller (23). 1 Press the ) button in the viewfinder. If you take a picture in the set focus mode....area. s Infinity-landscape mode This mode is pressed halfway. 1 Taking Pictures Selecting the Focus Mode Focus Mode 4 (No icon) Autofocus mode The camera is focused on the subject in the autofocus area when the shutter release button is used when the distance to the subject is approx. 2 cm...
... the distance to the subject is more than 50 cm (20 inches). q Macro mode This mode is used for taking distant objects. z Manual focus mode Adjust focus manually with the four-way controller (23). 1 Press the ) button in the viewfinder. If you take a picture in the set focus mode....area. s Infinity-landscape mode This mode is pressed halfway. 1 Taking Pictures Selecting the Focus Mode Focus Mode 4 (No icon) Autofocus mode The camera is focused on the subject in the autofocus area when the shutter release button is used when the distance to the subject is approx. 2 cm...
Operation Manual
Page 41
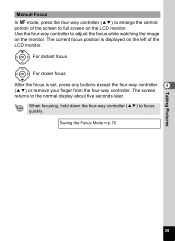
... the Focus Mode 1p.70 39 Use the four-way controller to adjust the focus while watching the image on the LCD monitor. Taking Pictures Manual Focus In z mode, press the four-way controller (23) to enlarge the central portion of the LCD monitor.
... the Focus Mode 1p.70 39 Use the four-way controller to adjust the focus while watching the image on the LCD monitor. Taking Pictures Manual Focus In z mode, press the four-way controller (23) to enlarge the central portion of the LCD monitor.

Operation Manual
Page 58
... 6 for PENTAX) to join the pictures. For details on creating panorama images, see the separate booklet "PC Connection Manual". • Continuous shooting and multi continuous shooting are not possible in half-transparent form on the left edge of the LCD monitor. 100 10/10/2004 11:20 6 4 Move the camera to take... 10/10/2004 11:20 third and following pictures. 5 Take the first picture. To change to another mode. • You cannot use the camera itself to step 1 and choose again. Taking Pictures 56 The right edge of the image is displayed in Panorama Assist mode. Position the...
... 6 for PENTAX) to join the pictures. For details on creating panorama images, see the separate booklet "PC Connection Manual". • Continuous shooting and multi continuous shooting are not possible in half-transparent form on the left edge of the LCD monitor. 100 10/10/2004 11:20 6 4 Move the camera to take... 10/10/2004 11:20 third and following pictures. 5 Take the first picture. To change to another mode. • You cannot use the camera itself to step 1 and choose again. Taking Pictures 56 The right edge of the image is displayed in Panorama Assist mode. Position the...
Operation Manual
Page 106
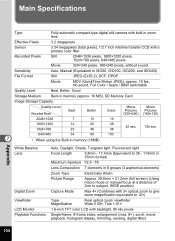
...digital still camera with built-in zoom lens Effective Pixels 3.2 megapixels Sensor 3.34 megapixels (total pixels), 1/2.7 inch interline transfer CCD with backlight, 85 kilo pixels Single-frame, 9-frame index, enlargement (max. 8×), scroll, movie playback, histogram display, trimming, resizing, digital... filters Appendix 104 f/5 Lens Composition 7 elements in 6 groups (3 aspherical elements) Zoom Type Electrically driven Picture Range Approx. 28.6mm × 21.2mm (full screen) (Using macro mode or manual focus at a distance of 2cm...
...digital still camera with built-in zoom lens Effective Pixels 3.2 megapixels Sensor 3.34 megapixels (total pixels), 1/2.7 inch interline transfer CCD with backlight, 85 kilo pixels Single-frame, 9-frame index, enlargement (max. 8×), scroll, movie playback, histogram display, trimming, resizing, digital... filters Appendix 104 f/5 Lens Composition 7 elements in 6 groups (3 aspherical elements) Zoom Type Electrically driven Picture Range Approx. 28.6mm × 21.2mm (full screen) (Using macro mode or manual focus at a distance of 2cm...
Operation Manual
Page 107
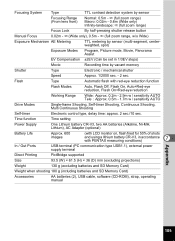
... system by sensor Normal: 0.5m - ∞ (full zoom range) MInafincritoy:-l0a.n0d2smca-p0e.:6∞m (Wide only) (full zoom range) Manual Focus Focus Lock By half-pressing shutter release button 0.02m - ∞ (Wide only), 0.5m - ∞ (full zoom range, ... TTL metering by vacant memory Shutter Type Electronic / mechanical shutter Speed Approx. 1/2000 sec. - 2 sec. Flash Type Automatic flash with PENTAX measuring conditions) 7 In / Out Ports USB terminal (PC communication type USB1.1), external power supply terminal Direct Printing PictBridge supported Size 93.5 ...
... system by sensor Normal: 0.5m - ∞ (full zoom range) MInafincritoy:-l0a.n0d2smca-p0e.:6∞m (Wide only) (full zoom range) Manual Focus Focus Lock By half-pressing shutter release button 0.02m - ∞ (Wide only), 0.5m - ∞ (full zoom range, ... TTL metering by vacant memory Shutter Type Electronic / mechanical shutter Speed Approx. 1/2000 sec. - 2 sec. Flash Type Automatic flash with PENTAX measuring conditions) 7 In / Out Ports USB terminal (PC communication type USB1.1), external power supply terminal Direct Printing PictBridge supported Size 93.5 ...


