
Operating Instructions
Page 4
... the SD memory card 48 8 About the network security 50 8.1 Equipped security functions 50 9 Display the setup menu from a PC 51 9.1 How to display the setup menu 51 9.2 How to operate the setup menu 53 9.3 About the setup menu window 55 10 Configure the basic settings of the camera [Basic 57 10.1 10.2 10...
... the SD memory card 48 8 About the network security 50 8.1 Equipped security functions 50 9 Display the setup menu from a PC 51 9.1 How to display the setup menu 51 9.2 How to operate the setup menu 53 9.3 About the setup menu window 55 10 Configure the basic settings of the camera [Basic 57 10.1 10.2 10...

Operating Instructions
Page 5
... 100 Configure the settings relating to image quality ("Image adjust" setup menu 101 Set mask areas ...106 Configure the preset positions (Preset position setup menu 109 Configure the preset positions (Initial position setup menu 110 Configure the settings relating to the privacy zone ("Privacy...areas [VMD area 134 Configuration of the settings relating to the E-mail notification [Notification] .......136 Configure the settings relating to Panasonic alarm protocol [Notification 137 14 Configure the setting relating to the image recognition [Advanced func.] ...140 14.1 Configure the ...
... 100 Configure the settings relating to image quality ("Image adjust" setup menu 101 Set mask areas ...106 Configure the preset positions (Preset position setup menu 109 Configure the preset positions (Initial position setup menu 110 Configure the settings relating to the privacy zone ("Privacy...areas [VMD area 134 Configuration of the settings relating to the E-mail notification [Notification] .......136 Configure the settings relating to Panasonic alarm protocol [Notification 137 14 Configure the setting relating to the image recognition [Advanced func.] ...140 14.1 Configure the ...
Operating Instructions
Page 9
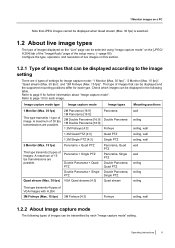
... images displayed on the "Live" page can be selected using "Image capture mode" on the [JPEG/ H.264] tab of the "Image/Audio" page of the setup menu. (®page 85) Configure the type, operation, and resolution of live images on this section. 1.2.1 Type of images that can be displayed and the...
... images displayed on the "Live" page can be selected using "Image capture mode" on the [JPEG/ H.264] tab of the "Image/Audio" page of the setup menu. (®page 85) Configure the type, operation, and resolution of live images on this section. 1.2.1 Type of images that can be displayed and the...

Operating Instructions
Page 14
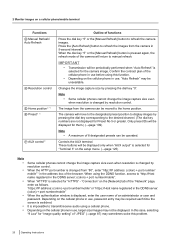
...; ü ü ü [Rec. Double Panorama Panorama Quad PTZ Single PTZ Quad stream Fisheye [select language] ü pull-down-menu ü ü ü ü ü [Setup] button ü ü ü ü ü ü [Live] button ü ü ü ü ü ü [Compression] buttons [Image capture size] buttons (when "JPEG" is selected...
...; ü ü ü [Rec. Double Panorama Panorama Quad PTZ Single PTZ Quad stream Fisheye [select language] ü pull-down-menu ü ü ü ü ü [Setup] button ü ü ü ü ü ü [Live] button ü ü ü ü ü ü [Compression] buttons [Image capture size] buttons (when "JPEG" is selected...

Operating Instructions
Page 18
... 92) • [2] button: The letter "2" will turn green and images in the main area will be displayed in the [Basic] settings. (®page 57) [Setup] button*1 Displays the setup menu. The button will turn green and an H.264 image will be used differ and the displayed buttons change. S A TUV W X Y B C D E F Z G H I J K L Q R M N O P [select ...and the "Live" page will be displayed. [Compression] buttons • [H.264] button: The letters "H.264" on the button will turn green and the setup menu will be displayed. [Live] button Display the "Live" page. Refer to page 14.
... 92) • [2] button: The letter "2" will turn green and images in the main area will be displayed in the [Basic] settings. (®page 57) [Setup] button*1 Displays the setup menu. The button will turn green and an H.264 image will be used differ and the displayed buttons change. S A TUV W X Y B C D E F Z G H I J K L Q R M N O P [select ...and the "Live" page will be displayed. [Compression] buttons • [H.264] button: The letters "H.264" on the button will turn green and the setup menu will be displayed. [Live] button Display the "Live" page. Refer to page 14.

Operating Instructions
Page 19
... size of the Web browser. [Zoom] buttons (when the image type is Fisheye, Panorama, or Double Panorama) Digital zoom is performed by clicking on the setup menu. (®page 85) Note • With the following "Image capture mode" settings, the refresh interval of JPEG images is limited to a maximum of 15...
... size of the Web browser. [Zoom] buttons (when the image type is Fisheye, Panorama, or Double Panorama) Digital zoom is performed by clicking on the setup menu. (®page 85) Note • With the following "Image capture mode" settings, the refresh interval of JPEG images is limited to a maximum of 15...

Operating Instructions
Page 20
... right-clicked, the displayed image will be played. on SD] button*2 This button will be taken according to the settings for "Save trigger" on the setup menu. (®page 63) Click this button to manually record images on the SD memory card. The selected operation will stop the operation. In this..."Self return" (®page 99) starts. • Auto pan: Automatically pans. It is also possible to pan/tilt the camera by registering cameras on the setup menu. (®page 23) [Zoom] buttons*2 (when the image type is Quad PTZ or Single PTZ) An image selected on the "Control Image" can be...
... right-clicked, the displayed image will be played. on SD] button*2 This button will be taken according to the settings for "Save trigger" on the setup menu. (®page 63) Click this button to manually record images on the SD memory card. The selected operation will stop the operation. In this..."Self return" (®page 99) starts. • Auto pan: Automatically pans. It is also possible to pan/tilt the camera by registering cameras on the setup menu. (®page 23) [Zoom] buttons*2 (when the image type is Quad PTZ or Single PTZ) An image selected on the "Control Image" can be...

Operating Instructions
Page 21
..."Image capture mode", only [1] (Ch1) of the "Control Image" setting. When "Preset ID" is registered for "Audio transmission/ reception" on the setup menu. (®page 120) When this button is clicked, the button will turn into the button and audio from the camera will not be displayed... menu. It is clicked, the alarm output terminal will be reset and this button to Preset 4. • The home position can be displayed on the setup menu. (®page 120) The button will blink during the audio transmission. Open Internet Explorer, click [Tools] ® [Internet Options] ® [...
..."Image capture mode", only [1] (Ch1) of the "Control Image" setting. When "Preset ID" is registered for "Audio transmission/ reception" on the setup menu. (®page 120) When this button is clicked, the button will turn into the button and audio from the camera will not be displayed... menu. It is clicked, the alarm output terminal will be reset and this button to Preset 4. • The home position can be displayed on the setup menu. (®page 120) The button will blink during the audio transmission. Open Internet Explorer, click [Tools] ® [Internet Options] ® [...

Operating Instructions
Page 22
...changed temporarily. The camera moves to 5 minutes per transmission. Select "On with face frame display" for "Face detection" on the setup menu to display the face detection frame on the setup menu. (®page 61) Main area*2 Images from the camera will be located at the center of lines for the other... access level user, images displayed on the screen may occur when the shooting scene drastically changes due to set on the [Audio] tab on the setup menu. (®page 120) • Actual volume level will change in the main area by users whose access level is up to adjust the position...
...changed temporarily. The camera moves to 5 minutes per transmission. Select "On with face frame display" for "Face detection" on the setup menu to display the face detection frame on the setup menu. (®page 61) Main area*2 Images from the camera will be located at the center of lines for the other... access level user, images displayed on the screen may occur when the shooting scene drastically changes due to set on the [Audio] tab on the setup menu. (®page 120) • Actual volume level will change in the main area by users whose access level is up to adjust the position...
Operating Instructions
Page 26
.... When the HTTP port number is displayed, enter the user name of the camera will be displayed. When "HTTPS" is selected for "Terminal 3" on the setup menu. (®page 125) Note • • • • • • Some cellular phones cannot change the image capture size even when resolution is impossible...
.... When the HTTP port number is displayed, enter the user name of the camera will be displayed. When "HTTPS" is selected for "Terminal 3" on the setup menu. (®page 125) Note • • • • • • Some cellular phones cannot change the image capture size even when resolution is impossible...

Operating Instructions
Page 35
...;page 7) 2. This button is operable only when "Manual" is selected for "Save trigger" on the [SD memory card] tab on the "Basic" page of the setup menu. (®page 63) It is possible to select "JPEG", "H.264(1)", or "H.264(2)" on "Recording format" of ""Live" page (Initial display)". (®page 87) 1. When... from when the "Image capture mode" type is 2 Monitor (Max. 15 fps) become the type of image configured in the "Image capture size" of the setup menu. (®page 61) When "JPEG" is selected for "Recording format", still image data are recorded.
...;page 7) 2. This button is operable only when "Manual" is selected for "Save trigger" on the [SD memory card] tab on the "Basic" page of the setup menu. (®page 63) It is possible to select "JPEG", "H.264(1)", or "H.264(2)" on "Recording format" of ""Live" page (Initial display)". (®page 87) 1. When... from when the "Image capture mode" type is 2 Monitor (Max. 15 fps) become the type of image configured in the "Image capture size" of the setup menu. (®page 61) When "JPEG" is selected for "Recording format", still image data are recorded.

Operating Instructions
Page 37
The settings to save images on the SD memory card can be configured in the "Alarm output terminal setup" section of the [Alarm] tab of the "Alarm" page. (®page 131) Save images on the SD memory card When an alarm occurs, images (JPEG/H....: When motion is detected in the set VMD area, the alarm action will be performed. *VMD stands for "Video Motion Detection". • Command alarm: When a Panasonic alarm protocol is received from the alarm output terminal of the "Server" page (®page 150). For this reason, it may take a maximum of 30...
The settings to save images on the SD memory card can be configured in the "Alarm output terminal setup" section of the [Alarm] tab of the "Alarm" page. (®page 131) Save images on the SD memory card When an alarm occurs, images (JPEG/H....: When motion is detected in the set VMD area, the alarm action will be performed. *VMD stands for "Video Motion Detection". • Command alarm: When a Panasonic alarm protocol is received from the alarm output terminal of the "Server" page (®page 150). For this reason, it may take a maximum of 30...

Operating Instructions
Page 43
... mouse button is released, the increment of the log list will be displayed. The recording timing of logs is selected for "Recording format" of the setup menu. (®page 61) About the log list window Number of the listed logs Total number of the logs of the selected log type and...
... mouse button is released, the increment of the log list will be displayed. The recording timing of logs is selected for "Recording format" of the setup menu. (®page 61) About the log list window Number of the listed logs Total number of the logs of the selected log type and...

Operating Instructions
Page 51
...configure the access level. 9.1 How to display the setup menu 1. The default user name and password are as follows. IMPORTANT • The setup menu is only operable by users whose access level is "1. 9 Display the setup menu from a PC 9 Display the setup menu from a PC The settings of the camera can... be displayed. 3. Click the [Setup] button on the "Live" page. → The ...
...configure the access level. 9.1 How to display the setup menu 1. The default user name and password are as follows. IMPORTANT • The setup menu is only operable by users whose access level is "1. 9 Display the setup menu from a PC 9 Display the setup menu from a PC The settings of the camera can... be displayed. 3. Click the [Setup] button on the "Live" page. → The ...

Operating Instructions
Page 52
Refer to page 55 for further information about this menu. 52 Operating Instructions 9 Display the setup menu from a PC → The setup menu will be displayed.
Refer to page 55 for further information about this menu. 52 Operating Instructions 9 Display the setup menu from a PC → The setup menu will be displayed.

Operating Instructions
Page 53
... frame on the right of the window, click the desired tab to display and configure the setting items relating to the name of the "Setup" page displayed in the frame on the page, click the respective button to apply them. Operating Instructions 53 Complete each setting item, click ...the [Set] button to the edited setting item. Click the desired button in the frame on the right of the window to operate the setup menu A B Menu buttons Setup page 1. After completing each setting item displayed in field A, click the [Set] button (B) below field (A). IMPORTANT • When there are...
... frame on the right of the window, click the desired tab to display and configure the setting items relating to the name of the "Setup" page displayed in the frame on the page, click the respective button to apply them. Operating Instructions 53 Complete each setting item, click ...the [Set] button to the edited setting item. Click the desired button in the frame on the right of the window to operate the setup menu A B Menu buttons Setup page 1. After completing each setting item displayed in field A, click the [Set] button (B) below field (A). IMPORTANT • When there are...

Operating Instructions
Page 54
9 Display the setup menu from a PC The edited settings in field C. 54 Operating Instructions In the same manner as above, click the [Set] button (D) below field C when completing the setting items in field A will not be applied unless the [Set] button (B) below field (A) is clicked.
9 Display the setup menu from a PC The edited settings in field C. 54 Operating Instructions In the same manner as above, click the [Set] button (D) below field C when completing the setting items in field A will not be applied unless the [Set] button (B) below field (A) is clicked.

Operating Instructions
Page 55
The cameras from a PC 9.3 About the setup menu window A M B C D E F N G H I J K L [Setup] button Display the "Setup" page. [Live] button Display the "Live" page. [Basic] button Displays the "Basic" page. page. (®page 140) [User mng.] button Displays the "User mng."... and the VMD area settings can be configured on the "Alarm" page. (®page 125) [Advanced func.] button Displays the "Advanced func." 9 Display the setup menu from which the camera accesses can be configured on the "Advanced func." page. (®page 144) [Server] button Displays the "Server" page.
The cameras from a PC 9.3 About the setup menu window A M B C D E F N G H I J K L [Setup] button Display the "Setup" page. [Live] button Display the "Live" page. [Basic] button Displays the "Basic" page. page. (®page 140) [User mng.] button Displays the "User mng."... and the VMD area settings can be configured on the "Alarm" page. (®page 125) [Advanced func.] button Displays the "Advanced func." 9 Display the setup menu from which the camera accesses can be configured on the "Advanced func." page. (®page 144) [Server] button Displays the "Server" page.
Operating Instructions
Page 56
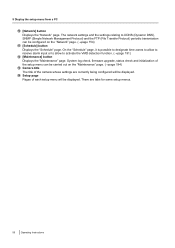
... can be configured on the "Maintenance" page. (®page 194) Camera title The title of each setup menu will be displayed. The network settings and the settings relating to activate the VMD detection function. (®page 191) [Maintenance] button Displays...Dynamic DNS), SNMP (Simple Network Management Protocol) and the FTP (File Transfer Protocol) periodic transmission can be displayed. Setup page Pages of the camera whose settings are tabs for some setup menus. 56 Operating Instructions There are currently being configured will be carried out on the "Network" page. (®...
... can be configured on the "Maintenance" page. (®page 194) Camera title The title of each setup menu will be displayed. The network settings and the settings relating to activate the VMD detection function. (®page 191) [Maintenance] button Displays...Dynamic DNS), SNMP (Simple Network Management Protocol) and the FTP (File Transfer Protocol) periodic transmission can be displayed. Setup page Pages of the camera whose settings are tabs for some setup menus. 56 Operating Instructions There are currently being configured will be carried out on the "Network" page. (®...

Operating Instructions
Page 98
... automatically be in the opposite direction from the first preset position again. When Quad PTZ is displayed. The self return function works even when the setup menu is displayed, preset positions 1, 2, 3, and 4 are used for "Image capture mode": The camera moves in the horizontal direction from the present position, and rotates...
... automatically be in the opposite direction from the first preset position again. When Quad PTZ is displayed. The self return function works even when the setup menu is displayed, preset positions 1, 2, 3, and 4 are used for "Image capture mode": The camera moves in the horizontal direction from the present position, and rotates...


