Spec Sheet
Page 1
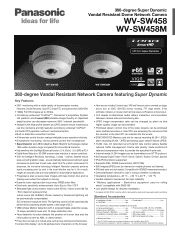
...1 pc. • Fixing screws (M4 x 8 mm) • Base cover 360-degree Super Dynamic Vandal Resistant Dome Network Camera WV-SW458 WV-SW458M WV-SW458 WV-SW458M VIQS 360-degree Vandal Resistant Network Camera featuring Super Dynamic Key Features • 360° monitoring with a wide variety of transmission ...8226; Camera title display: Up to 20 alphanumeric characters on the browser • Alarm sources including 3 terminal input, VMD and Panasonic alarm command can trigger actions such as SDXC/ SDHC/SD memory recording, FTP image transfer, E-mail notification, Indication on rolling ...
...1 pc. • Fixing screws (M4 x 8 mm) • Base cover 360-degree Super Dynamic Vandal Resistant Dome Network Camera WV-SW458 WV-SW458M WV-SW458 WV-SW458M VIQS 360-degree Vandal Resistant Network Camera featuring Super Dynamic Key Features • 360° monitoring with a wide variety of transmission ...8226; Camera title display: Up to 20 alphanumeric characters on the browser • Alarm sources including 3 terminal input, VMD and Panasonic alarm command can trigger actions such as SDXC/ SDHC/SD memory recording, FTP image transfer, E-mail notification, Indication on rolling ...
Spec Sheet
Page 2
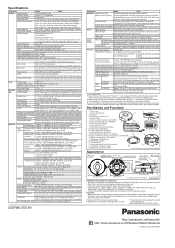
... Microsoft® Windows Vista®. *4 Transmission for the image type. iPad, iPhone and iPod touch are trademarks or registered trademarks of Panasonic Corporation. - All other manufacturers' products used on a newly opened window. UniPhier is faced toward spot light or other countries. - ...On/On with 50 J (IEC 60068-2-75)/IK10 (IEC 62262) Railway Application EN50155, EN50121 Dimensions WV-SW458 Main body:ø154 mm x 50.5 mm (H) {ø6-1/16 inches x 2 inches (H)} Including the mount bracket:ø164 mm x 88 mm (H) {ø6-15/32 inches x 3-15/32 inches (H)} 191...
... Microsoft® Windows Vista®. *4 Transmission for the image type. iPad, iPhone and iPod touch are trademarks or registered trademarks of Panasonic Corporation. - All other manufacturers' products used on a newly opened window. UniPhier is faced toward spot light or other countries. - ...On/On with 50 J (IEC 60068-2-75)/IK10 (IEC 62262) Railway Application EN50155, EN50121 Dimensions WV-SW458 Main body:ø154 mm x 50.5 mm (H) {ø6-1/16 inches x 2 inches (H)} Including the mount bracket:ø164 mm x 88 mm (H) {ø6-15/32 inches x 3-15/32 inches (H)} 191...

Installation Guide
Page 10
... unit. Avoid installing this product in the locations where salt damage occurs or corrosive gas is wrong with this product. The exclusively designed mount bracket shall be conducted. Failure to consult the dealer. Periodic inspections shall be used. Failure to this product. Do not strike or give ... not attempt to observe this may cause fire or electric shock. Failure to disassemble or modify this product. Use the exclusively designed mount bracket for service. Fire or electrical shock may be caused if water or any foreign objects. Turn the power off immediately and contact ...
... unit. Avoid installing this product in the locations where salt damage occurs or corrosive gas is wrong with this product. The exclusively designed mount bracket shall be conducted. Failure to consult the dealer. Periodic inspections shall be used. Failure to this product. Do not strike or give ... not attempt to observe this may cause fire or electric shock. Failure to disassemble or modify this product. Use the exclusively designed mount bracket for service. Fire or electrical shock may be caused if water or any foreign objects. Turn the power off immediately and contact ...

Installation Guide
Page 12
... such a case, wait until the temperature inside the camera has become extremely low. ADDITIONAL INFORMATION MAY BE OBTAINED FROM MPEG LA, L.L.C. Mount bracket (accessory) SW458 Do not use the mount bracket (accessory) when mounting the camera on the power again. It is recommended to be produced depending on the conditions of temperature, humidity, winds, and rain...
... such a case, wait until the temperature inside the camera has become extremely low. ADDITIONAL INFORMATION MAY BE OBTAINED FROM MPEG LA, L.L.C. Mount bracket (accessory) SW458 Do not use the mount bracket (accessory) when mounting the camera on the power again. It is recommended to be produced depending on the conditions of temperature, humidity, winds, and rain...
Installation Guide
Page 15
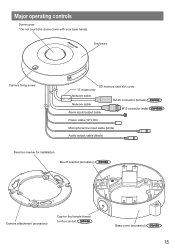
Enclosure Camera fixing screw SD memory card slot cover * E model only Network cable Network cable Alarm input/output cable RJ-45 connector (female) SW458 M12 connector (male) SW458M Power cable (12 V DC) Microphone/line input cable (white) Audio output cable (black) Direction marker for installation Mount bracket (accessory) SW458 Camera attachment (accessory) Cap for the female thread for the conduit SW458 Base cover (accessory) SW458 15 Major operating controls Dome cover * Do not touch the dome cover with your bare hands.
Enclosure Camera fixing screw SD memory card slot cover * E model only Network cable Network cable Alarm input/output cable RJ-45 connector (female) SW458 M12 connector (male) SW458M Power cable (12 V DC) Microphone/line input cable (white) Audio output cable (black) Direction marker for installation Mount bracket (accessory) SW458 Camera attachment (accessory) Cap for the female thread for the conduit SW458 Base cover (accessory) SW458 15 Major operating controls Dome cover * Do not touch the dome cover with your bare hands.
Installation Guide
Page 17
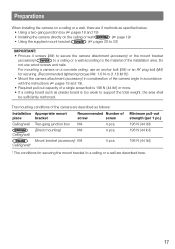
...SW458M (☞ page 19) • Using the supplied mount bracket SW458 (☞ pages 20 to 23) IMPORTANT: • Procure 4 screws (M4) to secure the camera attachment (accessory) or the mount bracket (accessory) SW458 to a ceiling or a wall according to the material of... the installation area. For mounting a camera on a concrete ceiling, use wood screws and nails. SW458 Mount bracket (accessory) M4 Ceiling/wall* 4 pcs. Preparations When ...
...SW458M (☞ page 19) • Using the supplied mount bracket SW458 (☞ pages 20 to 23) IMPORTANT: • Procure 4 screws (M4) to secure the camera attachment (accessory) or the mount bracket (accessory) SW458 to a ceiling or a wall according to the material of... the installation area. For mounting a camera on a concrete ceiling, use wood screws and nails. SW458 Mount bracket (accessory) M4 Ceiling/wall* 4 pcs. Preparations When ...

Installation Guide
Page 20
...mount bracket (accessory) SW458 Note: • When the camera is mounted on both ends of ISO 228-1. When using open wiring is conducted, be sure to use conduits and run the cables inside the tubes to protect the cables from direct sunlight. • Installation work shall be such that there is mounted... for the female thread for the conduit 20 Note: • The female thread for the conduit is used. Base cover xing screws Mount bracket (accessory) Base cover (accessory) Cap for the female thread for the conduit. perproof screw (accessory), and remove the base cover (...
...mount bracket (accessory) SW458 Note: • When the camera is mounted on both ends of ISO 228-1. When using open wiring is conducted, be sure to use conduits and run the cables inside the tubes to protect the cables from direct sunlight. • Installation work shall be such that there is mounted... for the female thread for the conduit 20 Note: • The female thread for the conduit is used. Base cover xing screws Mount bracket (accessory) Base cover (accessory) Cap for the female thread for the conduit. perproof screw (accessory), and remove the base cover (...

Installation Guide
Page 21
...procured) 21 cured). Align the cable hole of the mount bracket (accessory) to the hole, and mount the bracket to hole A or hole B on the ceiling or wall as shown in relation to the mount bracket c. Cable hole IMPORTANT: • For mounting a camera on a concrete surface, use an anchor bolt...• The camera's direction is the 4 directions as shown in the illustration. The direction of the camera attachment (accessory) mounted to the mount bracket is determined by the direction of the camera (4 directions) Female thread for the conduit Open the camera access hole on the ...
...procured) 21 cured). Align the cable hole of the mount bracket (accessory) to the hole, and mount the bracket to hole A or hole B on the ceiling or wall as shown in relation to the mount bracket c. Cable hole IMPORTANT: • For mounting a camera on a concrete surface, use an anchor bolt...• The camera's direction is the 4 directions as shown in the illustration. The direction of the camera attachment (accessory) mounted to the mount bracket is determined by the direction of the camera (4 directions) Female thread for the conduit Open the camera access hole on the ...

Installation Guide
Page 22
...}) ⡣ 85 mm {3-11/32 inches} Cable hole (ø27 mm {ø1-1/16 inches}) ⡣ 51 mm {2 inches} For use of the hole A] Conduit Mount bracket (accessory) Female thread for the conduit Fixing screws (4 pcs., locally procured) Note: • Only the same type of the hole ⡤ 138 mm {5-7/16 inches...11/32 inches} ⡣ ⡣ ⡤ 22 Align the direction of the conduit to the direction of the female thread for the conduit on the mount bracket, and mount the mount bracket to hole A or hole B on the ceiling or wall. [For use of holes, A or B, shall be used for...
...}) ⡣ 85 mm {3-11/32 inches} Cable hole (ø27 mm {ø1-1/16 inches}) ⡣ 51 mm {2 inches} For use of the hole A] Conduit Mount bracket (accessory) Female thread for the conduit Fixing screws (4 pcs., locally procured) Note: • Only the same type of the hole ⡤ 138 mm {5-7/16 inches...11/32 inches} ⡣ ⡣ ⡤ 22 Align the direction of the conduit to the direction of the female thread for the conduit on the mount bracket, and mount the mount bracket to hole A or hole B on the ceiling or wall. [For use of holes, A or B, shall be used for...

Installation Guide
Page 23
... direction that you want images to the outside. 23 c In the direction determined in x, fix the camera attachment (accessory) on the mount bracket using the fixing screws (accessory). (Recommended tightening torque: 0.78 N·m {0.58 lbf·ft}) TOP Camera attachment (accessory) Fixing ...cables between the camera attachment (accessory) and mount bracket to be displayed upwards on the PC monitor, and then mount the camera attachment (accessory) with "gTOP" facing this direction. • For wall mounting: The camera attachment (accessory) shall be mounted with "gTOP" facing upward. If water ...
... direction that you want images to the outside. 23 c In the direction determined in x, fix the camera attachment (accessory) on the mount bracket using the fixing screws (accessory). (Recommended tightening torque: 0.78 N·m {0.58 lbf·ft}) TOP Camera attachment (accessory) Fixing ...cables between the camera attachment (accessory) and mount bracket to be displayed upwards on the PC monitor, and then mount the camera attachment (accessory) with "gTOP" facing this direction. • For wall mounting: The camera attachment (accessory) shall be mounted with "gTOP" facing upward. If water ...
Installation Guide
Page 25
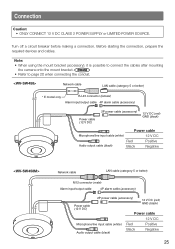
Note: • When using the mount bracket (accessory), it is possible to page 20 when connecting the conduit. Network cable LAN cable (category 5 or better) * E model only RJ-45 connector (female) Alarm ...) GND (black) Power cable 12 V DC Microphone/line input cable (white) Red Positive Audio output cable (black) Black Negative 25 SW458 • Refer to connect the cables after mounting the camera onto the mount bracket. Before starting the connection, prepare the required devices and cables. Turn off a circuit breaker before making a connection. Connection Caution...
Note: • When using the mount bracket (accessory), it is possible to page 20 when connecting the conduit. Network cable LAN cable (category 5 or better) * E model only RJ-45 connector (female) Alarm ...) GND (black) Power cable 12 V DC Microphone/line input cable (white) Red Positive Audio output cable (black) Black Negative 25 SW458 • Refer to connect the cables after mounting the camera onto the mount bracket. Before starting the connection, prepare the required devices and cables. Turn off a circuit breaker before making a connection. Connection Caution...

Installation Guide
Page 28
... equivalent) is applied to wind the tape so that it is applied. half-overlapping manner. Note: How to apply waterproof treatment in malfunction. SW458 2x hook 28 The mount brackets are connected to wind the supplied waterproof tape • Stretch the tape by approx. half-overlapping manner. Alarm input/output cable, power cable...
... equivalent) is applied to wind the tape so that it is applied. half-overlapping manner. Note: How to apply waterproof treatment in malfunction. SW458 2x hook 28 The mount brackets are connected to wind the supplied waterproof tape • Stretch the tape by approx. half-overlapping manner. Alarm input/output cable, power cable...

Installation Guide
Page 31
Projection IMPORTANT: • When mounting the camera body, cables shall be run between the camera attachment (accessory) and mount bracket as indicated by the arrows in the illustration. * Cable running shall be varied with the projection of the camera attachment (accessory). Cable running as indicated by the arrows in the illustration is an example. Using the mount bracket SW458 z Attach the camera onto the camera attachment (accessory) while aligning the "OPEN" mark of the camera with installation environment. 31
Projection IMPORTANT: • When mounting the camera body, cables shall be run between the camera attachment (accessory) and mount bracket as indicated by the arrows in the illustration. * Cable running shall be varied with the projection of the camera attachment (accessory). Cable running as indicated by the arrows in the illustration is an example. Using the mount bracket SW458 z Attach the camera onto the camera attachment (accessory) while aligning the "OPEN" mark of the camera with installation environment. 31

Installation Guide
Page 32
... connection and waterproof the connected section. 32 Failure to observe this may cause a malfunction or the product to fall, resulting in the direction of the mount bracket. (☞ Page 25) Waterproof the connecting portion. (☞ Page 28) IMPORTANT: • Disconnect the 12 V DC power supply and PoE device for power supply to...). ly secured. Camera fixing screw v Connect the cables on the side of the arrow to secure the camera to prevent power from being supplied during mounting work.
... connection and waterproof the connected section. 32 Failure to observe this may cause a malfunction or the product to fall, resulting in the direction of the mount bracket. (☞ Page 25) Waterproof the connecting portion. (☞ Page 28) IMPORTANT: • Disconnect the 12 V DC power supply and PoE device for power supply to...). ly secured. Camera fixing screw v Connect the cables on the side of the arrow to secure the camera to prevent power from being supplied during mounting work.

Installation Guide
Page 33
... in page 20. Base cover (accessory) m Use the bit for tamperproof screw (accessory) to tighten the fixing screws provided on both sides of the camera mount bracket. IMPORTANT: • To prevent the cables from the dome cover. 33
... in page 20. Base cover (accessory) m Use the bit for tamperproof screw (accessory) to tighten the fixing screws provided on both sides of the camera mount bracket. IMPORTANT: • To prevent the cables from the dome cover. 33

Installation Guide
Page 37
...ø3.5 mm stereo mini jack (monaural output) Output impedance: Approx. 600 Ω Line level Ceiling/ Wall SW458 Main body: ø154 mm x 50.5 mm (H) {ø6-1/16 inches x 2 inches (H)} Including the mount bracket: ø164 mm x 88 mm (H) {ø6-15/32 inches x 3-15/32 inches (H)} 191.5 mm... base cover fixing screw) SW458M ø154 mm x 50.5 mm (H) {ø6-1/16 inches x 2 inches (H)} SW458 Approx. 1.1 kg {2.43 lbs} (including the camera attachment and the mount bracket) SW458M Approx. 0.8 kg {1.76 lbs} (including the camera attachment) Main body: Aluminum die cast, light gray ...
...ø3.5 mm stereo mini jack (monaural output) Output impedance: Approx. 600 Ω Line level Ceiling/ Wall SW458 Main body: ø154 mm x 50.5 mm (H) {ø6-1/16 inches x 2 inches (H)} Including the mount bracket: ø164 mm x 88 mm (H) {ø6-15/32 inches x 3-15/32 inches (H)} 191.5 mm... base cover fixing screw) SW458M ø154 mm x 50.5 mm (H) {ø6-1/16 inches x 2 inches (H)} SW458 Approx. 1.1 kg {2.43 lbs} (including the camera attachment and the mount bracket) SW458M Approx. 0.8 kg {1.76 lbs} (including the camera attachment) Main body: Aluminum die cast, light gray ...

Installation Guide
Page 41
.... The network administrator shall retain the code label. Mount bracket SW458 1 pc. The following parts are used during installation procedures. Installation template label SW458M 1 pc. Code label*2 1 pc. Fixing screws (M4 x 8 mm) SW458 5 pcs. (incl. 1 spare) 4P alarm cable 1 pc. 2P power cable 1 pc. Base cover SW458 1 pc. Camera attachment 1 pc. Warranty card (P model only...
.... The network administrator shall retain the code label. Mount bracket SW458 1 pc. The following parts are used during installation procedures. Installation template label SW458M 1 pc. Code label*2 1 pc. Fixing screws (M4 x 8 mm) SW458 5 pcs. (incl. 1 spare) 4P alarm cable 1 pc. 2P power cable 1 pc. Base cover SW458 1 pc. Camera attachment 1 pc. Warranty card (P model only...
