
Operating Instructions
Page 3
...-VIEW-PTV (843-9788) consumerproducts@panasonic.com CANADIAN NOTICE: For Models TH-42PX600U, TH-50PX600U, TH-58PX600U This Class B digital apparatus complies with dry cloth. 7) Do not block any interference received, including interference that may cause instability which could result in harmful interference and would void the user's authority to sunlight or other logos Image displayed in 4:3 mode SD Card photo Video game...
...-VIEW-PTV (843-9788) consumerproducts@panasonic.com CANADIAN NOTICE: For Models TH-42PX600U, TH-50PX600U, TH-58PX600U This Class B digital apparatus complies with dry cloth. 7) Do not block any interference received, including interference that may cause instability which could result in harmful interference and would void the user's authority to sunlight or other logos Image displayed in 4:3 mode SD Card photo Video game...
Operating Instructions
Page 6
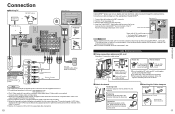
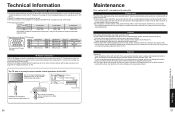
... release: Cable clamper Band Connect power plug to fix cables. ■Attach the bands Band Fastening band Insert the spigot on the screen. Fix the AC cord in till a clicking sound is heard. When receiving digital channel signals, all the other TV monitor. Consult your cable company on and try the controls again. Do not insert a PCMCIA card into the pedestal. Connection ■Watching TV VHF/UHF Antenna Cable TV...
... release: Cable clamper Band Connect power plug to fix cables. ■Attach the bands Band Fastening band Insert the spigot on the screen. Fix the AC cord in till a clicking sound is heard. When receiving digital channel signals, all the other TV monitor. Consult your cable company on and try the controls again. Do not insert a PCMCIA card into the pedestal. Connection ■Watching TV VHF/UHF Antenna Cable TV...

Operating Instructions
Page 7
... Quick Start Guide First Time Setup Identifying Controls Available only when "Auto power on TV Guide Sound mute On/Off Changes aspect ratio (p. 18) Switch to right or left during menu Input 3 mode.) connector Choose menu and Adjust the volume level. submenu entry. (Move cursor to previously viewed channel and input modes. sensor Plasma C.A.T.S. (Contrast Automatic Tracking System). (p. 32) Power indicator (on: red, off: no light) Viewing from SD Card (p. 26) Switches TV to On or Standby Sets the remote to...
... Quick Start Guide First Time Setup Identifying Controls Available only when "Auto power on TV Guide Sound mute On/Off Changes aspect ratio (p. 18) Switch to right or left during menu Input 3 mode.) connector Choose menu and Adjust the volume level. submenu entry. (Move cursor to previously viewed channel and input modes. sensor Plasma C.A.T.S. (Contrast Automatic Tracking System). (p. 32) Power indicator (on: red, off: no light) Viewing from SD Card (p. 26) Switches TV to On or Standby Sets the remote to...

Operating Instructions
Page 8
... GUIDE SETUP for TV Guide start select "Start scan" Now scanning analog channel ... Select Your Country b. Note •If you do not have configured all services you selected in Step 2, you are asked to check your area. First Time Setup 4 Auto channel setup Select "Auto program" First time setup Language Clock Auto program next select Select antenna and input modes Auto program ANT In Cable Mode All Start scan set . ■Press to enter a ZIP Code or Postal Code. 2 Select Your Service(s) Select the connected video source(s) for scanning) Auto program ANT In Cable Mode...
... GUIDE SETUP for TV Guide start select "Start scan" Now scanning analog channel ... Select Your Country b. Note •If you do not have configured all services you selected in Step 2, you are asked to check your area. First Time Setup 4 Auto channel setup Select "Auto program" First time setup Language Clock Auto program next select Select antenna and input modes Auto program ANT In Cable Mode All Start scan set . ■Press to enter a ZIP Code or Postal Code. 2 Select Your Service(s) Select the connected video source(s) for scanning) Auto program ANT In Cable Mode...

Operating Instructions
Page 9
... signal reception between cable TV and antenna. •(p. 14) The channel number and volume level remain the same even after the TV is displayed when you successfully complete Guide setup. 7 View Setup Progress Screen The setup progress screen appears each time you to • Confirm remote control options • Confirm the external connections. • Select the VCR brand. • Test and confirm the remote code. example: CH15-1: - When tuning a digital channel, press the button to TV mode 2 Turn power...
... signal reception between cable TV and antenna. •(p. 14) The channel number and volume level remain the same even after the TV is displayed when you successfully complete Guide setup. 7 View Setup Progress Screen The setup progress screen appears each time you to • Confirm remote control options • Confirm the external connections. • Select the VCR brand. • Test and confirm the remote code. example: CH15-1: - When tuning a digital channel, press the button to TV mode 2 Turn power...

Operating Instructions
Page 10
... Video input signal can be placed on the Favorites list. 2 Setting 1/3 [1] [2] [3] [4] [5] Hold down FAVORITE while its position is from the list with SAP (Secondary Audio Program) •Digital mode Press SAP to select the next audio track (if available) when receiving a digital channel. Pressing ◄ ► also changes the page. 3 Setting 1/3 [1] 26-1 [2] [3] [4] [5] select ok Press ▲▼to cycle through the audio modes. (Stereo/SAP/Mono). Then, press OK to memorize the displayed...
... Video input signal can be placed on the Favorites list. 2 Setting 1/3 [1] [2] [3] [4] [5] Hold down FAVORITE while its position is from the list with SAP (Secondary Audio Program) •Digital mode Press SAP to select the next audio track (if available) when receiving a digital channel. Pressing ◄ ► also changes the page. 3 Setting 1/3 [1] 26-1 [2] [3] [4] [5] select ok Press ▲▼to cycle through the audio modes. (Stereo/SAP/Mono). Then, press OK to memorize the displayed...
Operating Instructions
Page 12
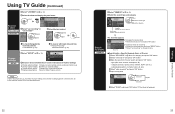
... (p. 24) ■To reserve with input date and time "Manual Recording" "Manual Reminder" (p. 25) Change settings SETUP Select "SETUP" in above for category and press "OK" button Select "new search" and press "OK" button Make the selections for further settings ••••Change system settings: Changes your system settings, selects an alternate channel lineup Change channel display: Modifies your channel settings Change default options: Changes your Guide default settings Display setup progress: Views the Setup Progress screen Note ••When reserving shows, you...
... (p. 24) ■To reserve with input date and time "Manual Recording" "Manual Reminder" (p. 25) Change settings SETUP Select "SETUP" in above for category and press "OK" button Select "new search" and press "OK" button Make the selections for further settings ••••Change system settings: Changes your system settings, selects an alternate channel lineup Change channel display: Modifies your channel settings Change default options: Changes your Guide default settings Display setup progress: Views the Setup Progress screen Note ••When reserving shows, you...

Operating Instructions
Page 15
... DVDs Some Panasonic equipment connected to select the input of the unit. (Panasonic is indicated. Programming the remote control is not inserted or this can be damaged). Electrical interference, static electricity, or erroneous operation may be operated with the remote control VCR VCR Record Rewind/Fast Forward Stop Pause Play (For other manufacturers' products. (p. 45) 1 With VCR or DVD turned On Switch to external input Press to display the Input select menu. 2 Select the input mode Input select [1] TV [2] Component 1 Press corresponding NUMBER...
... DVDs Some Panasonic equipment connected to select the input of the unit. (Panasonic is indicated. Programming the remote control is not inserted or this can be damaged). Electrical interference, static electricity, or erroneous operation may be operated with the remote control VCR VCR Record Rewind/Fast Forward Stop Pause Play (For other manufacturers' products. (p. 45) 1 With VCR or DVD turned On Switch to external input Press to display the Input select menu. 2 Select the input mode Input select [1] TV [2] Component 1 Press corresponding NUMBER...

Operating Instructions
Page 16
... input signals. Dot clock Alleviates the problem if a picture appears to be output from PROG. Viewing Displaying PC Screen on the Video G signal, which is input from XGA to flicker or is blurred. H-position Adjust the horizontal position. Note It may not be displayed on the TV. Input signal switched from VGA to PC sound with the audio cable connected. First adjust the Dot Clock to wide display. Input resolution Switches to get the best possible picture, then adjust...
... input signals. Dot clock Alleviates the problem if a picture appears to be output from PROG. Viewing Displaying PC Screen on the Video G signal, which is input from XGA to flicker or is blurred. H-position Adjust the horizontal position. Note It may not be displayed on the TV. Input signal switched from VGA to PC sound with the audio cable connected. First adjust the Dot Clock to wide display. Input resolution Switches to get the best possible picture, then adjust...

Operating Instructions
Page 17
... connected the VCR. Zoom adjust PC adjust Video NR 3D Y/C filter Color matrix MPEG NR Black level Normal Bass Treble Balance AI sound BBE VIVA 3D BBE Surround Speakers HDMI1 in HDMI2 in Audio leveler Sleep Memory card TV Guide CH scan Language Clock Program channel Input labels CC SD card LED Auto power on Side bar Prog-out stop Other adjust Setup Ctrl with HDMI Power off link Power on " is selected. for each picture mode...
... connected the VCR. Zoom adjust PC adjust Video NR 3D Y/C filter Color matrix MPEG NR Black level Normal Bass Treble Balance AI sound BBE VIVA 3D BBE Surround Speakers HDMI1 in HDMI2 in Audio leveler Sleep Memory card TV Guide CH scan Language Clock Program channel Input labels CC SD card LED Auto power on Side bar Prog-out stop Other adjust Setup Ctrl with HDMI Power off link Power on " is selected. for each picture mode...
Operating Instructions
Page 18
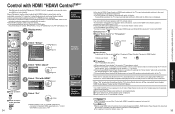
...link Set select 5 Select "On" change Timer Menu TV speakers Picture Audio Timer Lock TVG/Photo Lock MTVeGm/oPrhyoctoard Setup Setup ■Home theater: Adjustment for Panasonic Amplifier, Panasonic Player theater, Panasonic RAM theater Volume up / down Mute ■TV speakers: The TV speakers are available. "Control with HDMI" compatible DVD player/recorder is initially turned on and Play mode is pressed on screen. When "Set" is "On". Home theater/Player theater power switches On, and playback begins. Theater speaker Power on link Power off link Set Power...
...link Set select 5 Select "On" change Timer Menu TV speakers Picture Audio Timer Lock TVG/Photo Lock MTVeGm/oPrhyoctoard Setup Setup ■Home theater: Adjustment for Panasonic Amplifier, Panasonic Player theater, Panasonic RAM theater Volume up / down Mute ■TV speakers: The TV speakers are available. "Control with HDMI" compatible DVD player/recorder is initially turned on and Play mode is pressed on screen. When "Set" is "On". Home theater/Player theater power switches On, and playback begins. Theater speaker Power on link Power off link Set Power...

Operating Instructions
Page 20
...Suggested Parents Strongly Cautioned: Inappropriate for programs that allows you to view the channel if you select a locked channel, a message will be locked Lock next Mode CH select Channel Program Change password select Example of the program rating. Menu Picture Audio Timer Lock TMVeGm/oPrhyoctoard Setup - Input the new 4-digit password twice ■To cancel the "Channel lock" Select "Off" in "Program lock" menu ( ) Program lock MPAA U.S.TV C.E.L.R. These channels will be displayed that have been set is the first time to enter the password, enter the number twice...
...Suggested Parents Strongly Cautioned: Inappropriate for programs that allows you to view the channel if you select a locked channel, a message will be locked Lock next Mode CH select Channel Program Change password select Example of the program rating. Menu Picture Audio Timer Lock TMVeGm/oPrhyoctoard Setup - Input the new 4-digit password twice ■To cancel the "Channel lock" Select "Off" in "Program lock" menu ( ) Program lock MPAA U.S.TV C.E.L.R. These channels will be displayed that have been set is the first time to enter the password, enter the number twice...
Operating Instructions
Page 21
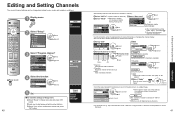
... 4-digit password with number buttons Select "Yes" on a digital image. Editing and Setting Channels The current channel settings can be changed according to your needs and reception conditions. 1 Display menu 2 Select "Setup" Menu Picture Audio Timer Lock TMVeGm/oPrhyoctoard Setup next select - 3 Select "Program channel" Setup next CH scan All Language select Clock Program channel Input labels CC Auto Set automatically Manual Set manually ■Press to exit 40 4 Select the function Program channel Auto Manual Signal meter next select 5 Set ■To reset the settings of...
... 4-digit password with number buttons Select "Yes" on a digital image. Editing and Setting Channels The current channel settings can be changed according to your needs and reception conditions. 1 Display menu 2 Select "Setup" Menu Picture Audio Timer Lock TMVeGm/oPrhyoctoard Setup next select - 3 Select "Program channel" Setup next CH scan All Language select Clock Program channel Input labels CC Auto Set automatically Manual Set manually ■Press to exit 40 4 Select the function Program channel Auto Manual Signal meter next select 5 Set ■To reset the settings of...

Operating Instructions
Page 22
... text box Outline: Outline color of Analog broadcasting.) CC1-4: Information related to view the digital captioning.) •Select the setting. Analog (Choose the closed caption service of text (Identify the setting options on the broadcaster. "Primary", "Second.", "Service 3", "Service 4", "Service 5", "Service 6" ■To make more in-depth display settings in digital programs Select "Digital setting" and press "OK" button Select the item and set Digital setting Size Automatic Font Automatic Style Automatic select set Comp. 2 SKIP Label Video 1 VCR Terminal HDMI...
... text box Outline: Outline color of Analog broadcasting.) CC1-4: Information related to view the digital captioning.) •Select the setting. Analog (Choose the closed caption service of text (Identify the setting options on the broadcaster. "Primary", "Second.", "Service 3", "Service 4", "Service 5", "Service 6" ■To make more in-depth display settings in digital programs Select "Digital setting" and press "OK" button Select the item and set Digital setting Size Automatic Font Automatic Style Automatic select set Comp. 2 SKIP Label Video 1 VCR Terminal HDMI...
Operating Instructions
Page 24
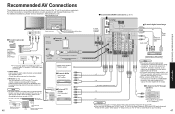
... Operating Instruction manual of VCR) Top shelf of TV stand VCR Mount with two-sided tape • Digital audio amplifier • Theater system ■To watch DVDs DVD Player Set Top Box (VCR Only) or RF OUT ■To record TV shows DVD Recorder / VCR RF IN 46 Signal-emitting area of remote control VCR Signal-emitting area Signal-receiving area of remote control ■Recommended HDMI Connections (p. 36-37) F-Type Antenna or Adapter ■To watch digital video image or or HDMI cable HDMI-DVI...
... Operating Instruction manual of VCR) Top shelf of TV stand VCR Mount with two-sided tape • Digital audio amplifier • Theater system ■To watch DVDs DVD Player Set Top Box (VCR Only) or RF OUT ■To record TV shows DVD Recorder / VCR RF IN 46 Signal-emitting area of remote control VCR Signal-emitting area Signal-receiving area of remote control ■Recommended HDMI Connections (p. 36-37) F-Type Antenna or Adapter ■To watch digital video image or or HDMI cable HDMI-DVI...
Operating Instructions
Page 27
.... Note •Folder structure viewed in analog format. Control with HDMI "HDAVI ControlTM" HDMI connections to enjoy the easy playback or home theater. Image or sound may occur from displaying it for the first few seconds when Input mode is used . Please confirm the latest information on the Picture menu. (p. 32) Vertical position adjustment Vertical size adjustment •To reset the aspect ratio (OK) 52 Photo: Data format: Max. External speakers cannot be available for...
.... Note •Folder structure viewed in analog format. Control with HDMI "HDAVI ControlTM" HDMI connections to enjoy the easy playback or home theater. Image or sound may occur from displaying it for the first few seconds when Input mode is used . Please confirm the latest information on the Picture menu. (p. 32) Vertical position adjustment Vertical size adjustment •To reset the aspect ratio (OK) 52 Photo: Data format: Max. External speakers cannot be available for...
Operating Instructions
Page 28
... displayed properly. Screen ••TV screen (RF input) cannot be used , connect the audio cable to set up later : Closes screen and displays reminder next time you power •On the TV Don't remind me to the audio input terminal. CableCARD Note Please contact your display. 54 Side Bar Do not display a picture in 4:3 mode for optimal viewing on the back of the applicable HDMI signals, see below . HDMI-compatible equipment (*1) with an HDMI or DVI output...
... displayed properly. Screen ••TV screen (RF input) cannot be used , connect the audio cable to set up later : Closes screen and displays reminder next time you power •On the TV Don't remind me to the audio input terminal. CableCARD Note Please contact your display. 54 Side Bar Do not display a picture in 4:3 mode for optimal viewing on the back of the applicable HDMI signals, see below . HDMI-compatible equipment (*1) with an HDMI or DVI output...
Operating Instructions
Page 29
... AC cord plug from the wall outlet. If the surface is no need to set recording time or channel on the TV to which can damage the surface •coating. (If using a chemically-treated cloth, follow the instructions supplied with a dry cloth. Furthermore, do not leave it G-LINK jack IR Blaster (Supplied) G-LINK CableCARDTM TV Video recorder (VCR) Infrared emitter VCR Setting the recording time, channel and recording mode...
... AC cord plug from the wall outlet. If the surface is no need to set recording time or channel on the TV to which can damage the surface •coating. (If using a chemically-treated cloth, follow the instructions supplied with a dry cloth. Furthermore, do not leave it G-LINK jack IR Blaster (Supplied) G-LINK CableCARDTM TV Video recorder (VCR) Infrared emitter VCR Setting the recording time, channel and recording mode...
Operating Instructions
Page 30
...? Set the audio setting of the HDMI device to "Stereo" or "Mono." Check "Signal meter" (p. 41). The remote control does not work •The sound is produced ••Check the channel settings. (p. 40) Check the antenna cables. ••••Is the AC power cord plugged into the outlet? Is "Speakers" set to "Off"? (p. 32) Change "SAP" settings. (p. 19) Check "HDMI1 in" or "HDMI2 in SD mode. Check an input signal from...
...? Set the audio setting of the HDMI device to "Stereo" or "Mono." Check "Signal meter" (p. 41). The remote control does not work •The sound is produced ••Check the channel settings. (p. 40) Check the antenna cables. ••••Is the AC power cord plugged into the outlet? Is "Speakers" set to "Off"? (p. 32) Change "SAP" settings. (p. 19) Check "HDMI1 in" or "HDMI2 in SD mode. Check an input signal from...

Operating Instructions
Page 31
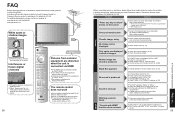
.... 61 Specifications Frequently Asked Questions FAQs, etc. TV Guide FAQ Problem Show list disappears after blackout Channel display is not correct Unable to execute the reserved recording Unable to receive the reserved broadcast No show is required for list downloading.) After initial setting, it takes a week to display the entire list •for 8 days. Check the connection of pixels) Speaker Audio Output PC signals Channel Capability (Digital/Analog) Operating Conditions INPUT 1-3 COMPONENT VIDEO INPUT 1-2 HDMI...
.... 61 Specifications Frequently Asked Questions FAQs, etc. TV Guide FAQ Problem Show list disappears after blackout Channel display is not correct Unable to execute the reserved recording Unable to receive the reserved broadcast No show is required for list downloading.) After initial setting, it takes a week to display the entire list •for 8 days. Check the connection of pixels) Speaker Audio Output PC signals Channel Capability (Digital/Analog) Operating Conditions INPUT 1-3 COMPONENT VIDEO INPUT 1-2 HDMI...


