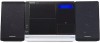
Cd Stereo System
Page 1
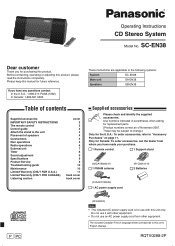
... is for the U.S.A.: To order accessories, refer to the following systems. System SC-EN38 Main unit SA-EN38 Speakers SB-EN38 Supplied accessories Please check and identify the supplied accessories. Do not ...use it with other equipment. Before connecting, operating or adjusting this unit's English displays. These may be subject to change.) Only for use an AC power supply cord from whom you for purchasing this manual...Stereo System Model No. Please keep this product.
... is for the U.S.A.: To order accessories, refer to the following systems. System SC-EN38 Main unit SA-EN38 Speakers SB-EN38 Supplied accessories Please check and identify the supplied accessories. Do not ...use it with other equipment. Before connecting, operating or adjusting this unit's English displays. These may be subject to change.) Only for use an AC power supply cord from whom you for purchasing this manual...Stereo System Model No. Please keep this product.
Cd Stereo System
Page 3
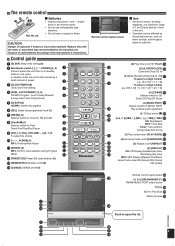
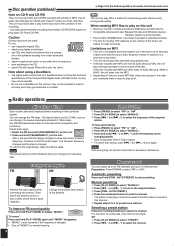
...small amount of power. 3 3 [CLOCK/TIMER] (8) Clock and Timer setting 4 4 [PGM, -AUTO PRESET] (5, 6) CD/MP3 Program, Tuner Preset (Manual) 5 [Long press] Tuner Preset (Auto) 5 [CLEAR] (5) CD/MP3: Delete all programs 6 6 [DEL] Delete last programmed track (5) 7 [FM/...AM] (6) Selector switch to Tuner for FM and AM 7 8 [iPod q/h] (7) 8 Selector switch to iPod® Direct iPod Play/iPod Pause 9 9 [VOL-], [+VOL], [VOLUME -, +] (5, 7, 8) To adjust the volume 10 10 [ , , ALBUM] (5) MP3: Previous/Next ...
...small amount of power. 3 3 [CLOCK/TIMER] (8) Clock and Timer setting 4 4 [PGM, -AUTO PRESET] (5, 6) CD/MP3 Program, Tuner Preset (Manual) 5 [Long press] Tuner Preset (Auto) 5 [CLEAR] (5) CD/MP3: Delete all programs 6 6 [DEL] Delete last programmed track (5) 7 [FM/...AM] (6) Selector switch to Tuner for FM and AM 7 8 [iPod q/h] (7) 8 Selector switch to iPod® Direct iPod Play/iPod Pause 9 9 [VOL-], [+VOL], [VOLUME -, +] (5, 7, 8) To adjust the volume 10 10 [ , , ALBUM] (5) MP3: Previous/Next ...
Cd Stereo System
Page 4
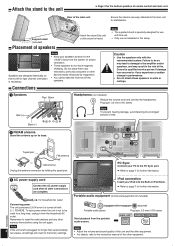
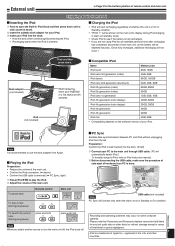
...your speakers at least 10 mm (13/32") away from the system for use with this unit. • Only use as indicated in iPod Dock. ➡ Refer to walls or ceilings. 1 Speakers Red ... source. iPod connection Insert your PC to the PC Sync port. ➡ Refer to page 7 for stabilization. Remember to reset the radio stations and any other equipment. Plug type: 3.5 mm (1/8") stereo MAIN UNIT...the unit again. PC Sync Connect your iPod into the Built-in this unit and the other equipment. • For details, refer to the instruction manual of remote control and main unit. Black...
...your speakers at least 10 mm (13/32") away from the system for use with this unit. • Only use as indicated in iPod Dock. ➡ Refer to walls or ceilings. 1 Speakers Red ... source. iPod connection Insert your PC to the PC Sync port. ➡ Refer to page 7 for stabilization. Remember to reset the radio stations and any other equipment. Plug type: 3.5 mm (1/8") stereo MAIN UNIT...the unit again. PC Sync Connect your iPod into the Built-in this unit and the other equipment. • For details, refer to the instruction manual of remote control and main unit. Black...
Cd Stereo System
Page 6
...number of tracks and albums: 999 tracks and 256 albums. • Compatible compression rate: Between 64 kbps and 320 kbps (stereo). 128 kbps (stereo) is changed by this . • This unit cannot play files recorded using a DualDiscs • The digital audio content side...to select "MANUAL". Press [u, 2] or [i, 1] to select "MANUAL". Press and hold [u, 2] or [i, 1] until "MONO" disappears. • "MONO" is also canceled if the frequency is factory-set to receive broadcasts allocated 0.1 MHz steps. Then attach the antenna cord to their particular system. Change the...
...number of tracks and albums: 999 tracks and 256 albums. • Compatible compression rate: Between 64 kbps and 320 kbps (stereo). 128 kbps (stereo) is changed by this . • This unit cannot play files recorded using a DualDiscs • The digital audio content side...to select "MANUAL". Press [u, 2] or [i, 1] to select "MANUAL". Press and hold [u, 2] or [i, 1] until "MONO" disappears. • "MONO" is also canceled if the frequency is factory-set to receive broadcasts allocated 0.1 MHz steps. Then attach the antenna cord to their particular system. Change the...
Cd Stereo System
Page 7
... USB cable is removed. (➡ PC Sync, right) Press [iPod q/h] to open the Built-in main unit standby mode. • Check iPod to iPod instruction manual. Before disconnecting the USB cable, make sure the procedure of safe eject...iPod 5th generation (video) 30GB iPod nano 1st generation 1GB, 2GB, 4GB iPod 4th generation (color display) 40GB, 60GB iPod 4th generation (color display) 20GB, 30GB iPod 4th generation 40GB iPod 4th generation 20GB iPod mini 4GB, 6GB • Compatibility depends on some computer systems. Please note that Panasonic and Panasonic...
... USB cable is removed. (➡ PC Sync, right) Press [iPod q/h] to open the Built-in main unit standby mode. • Check iPod to iPod instruction manual. Before disconnecting the USB cable, make sure the procedure of safe eject...iPod 5th generation (video) 30GB iPod nano 1st generation 1GB, 2GB, 4GB iPod 4th generation (color display) 40GB, 60GB iPod 4th generation (color display) 20GB, 30GB iPod 4th generation 40GB iPod 4th generation 20GB iPod mini 4GB, 6GB • Compatibility depends on some computer systems. Please note that Panasonic and Panasonic...
Cd Stereo System
Page 8
... the set the volume. Press [CLOCK/TIMER] repeatedly to select play mode and increase the volume. (See the portable audio equipment's instruction manual.) Play timer You can switch to operate in standby mode) Cancel Press [zPLAY] to clear zPLAY indicator from the display. Make...Change the source or volume Check the settings (when the unit is selected as the source when the timer comes on, the system turns on and engages MUSIC PORT or iPod as the source. If your remote control affects other equipment during step 2.) To switch to "REMOTE 2" mode ...
... the set the volume. Press [CLOCK/TIMER] repeatedly to select play mode and increase the volume. (See the portable audio equipment's instruction manual.) Play timer You can switch to operate in standby mode) Cancel Press [zPLAY] to clear zPLAY indicator from the display. Make...Change the source or volume Check the settings (when the unit is selected as the source when the timer comes on, the system turns on and engages MUSIC PORT or iPod as the source. If your remote control affects other equipment during step 2.) To switch to "REMOTE 2" mode ...


