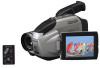
PVL751 User Guide
Page 6
...Zone, Auto Daylight Saving Time 13~14 Built-in Auto Light (Using the Light, Replacing the Bulb 15 Camera Recording (Basic, Stand-by, Programmed Recording 16~18 8-Function Remote Control 19 Playing Back Recordings (Basic Playback... Auto Fade 26 Color Digital Fade 27 Color Digital Filter 28 Digital Zoom 29 Digital Electronic Image Stabilization (E.I.S 29 Still/Strobe/Wide 30 Security Mode 31 Intelligent Titler (Auto/Manual Title, Phrase Title) .. 32~33 Digital Still Camera 34 • CompactFlash Card...please call : 1-800-211-PANA(7262) or send e-mail to : consumerproducts@panasonic.com
...Zone, Auto Daylight Saving Time 13~14 Built-in Auto Light (Using the Light, Replacing the Bulb 15 Camera Recording (Basic, Stand-by, Programmed Recording 16~18 8-Function Remote Control 19 Playing Back Recordings (Basic Playback... Auto Fade 26 Color Digital Fade 27 Color Digital Filter 28 Digital Zoom 29 Digital Electronic Image Stabilization (E.I.S 29 Still/Strobe/Wide 30 Security Mode 31 Intelligent Titler (Auto/Manual Title, Phrase Title) .. 32~33 Digital Still Camera 34 • CompactFlash Card...please call : 1-800-211-PANA(7262) or send e-mail to : consumerproducts@panasonic.com

PVL751 User Guide
Page 7
...: PUSH MENU KEY 3 Press DISPLAY to select OFF. 4 Press MENU to select SELF DEMO . EVF or LCD Monitor Before you begin... • Connect Camcorder to CAMERA. 2 Press MENU for 30 seconds when a function key other than Light, Play, Rewind Search, Fast Forward Search, Stop, and Still is pressed. To turn... Mode Self Demo mode is on : • Set to SELF DEMO : ON in MENU screen. 7 ITS TAPES PLAY IYNESY,OITU,RS VCR VHS! 26× LENS / 300× D.ZOOM DIGITAL STABILIZATION FULL-SIZE HEAD SYSTEM AUTO/PHRASE TITLER FAR UP FOCUS DOWN NEAR DISPLAY MENU 2, 3, 4 PHOTO VCR OFF...
...: PUSH MENU KEY 3 Press DISPLAY to select OFF. 4 Press MENU to select SELF DEMO . EVF or LCD Monitor Before you begin... • Connect Camcorder to CAMERA. 2 Press MENU for 30 seconds when a function key other than Light, Play, Rewind Search, Fast Forward Search, Stop, and Still is pressed. To turn... Mode Self Demo mode is on : • Set to SELF DEMO : ON in MENU screen. 7 ITS TAPES PLAY IYNESY,OITU,RS VCR VHS! 26× LENS / 300× D.ZOOM DIGITAL STABILIZATION FULL-SIZE HEAD SYSTEM AUTO/PHRASE TITLER FAR UP FOCUS DOWN NEAR DISPLAY MENU 2, 3, 4 PHOTO VCR OFF...
PVL751 User Guide
Page 12
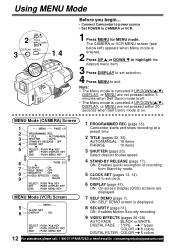
... 26~28). AUTO FADE : BLACK or WHITE DIGITAL FADE : TYPE 7 types COLOR 8 colors DIGITAL FILTER : COLOR 5 colors 12 For assistance, please call : 1-800-211-PANA(7262) or send e-mail to CAMERA or VCR. 1 Press MENU for MENU mode. MENU Mode (CAMERA) Screen 1 - - - Select desired shutter ...Using MENU Mode FAR 2 UP FOCUS DOWN NEAR DISPLAY MENU 3 1, 4 Before you begin... • Connect Camcorder to power source. • Set POWER to : consumerproducts@panasonic.com The CAMERA or VCR MENU screen (see below left) appears when Menu mode is displayed. 8 SECURITY (page 31). PAGE...
... 26~28). AUTO FADE : BLACK or WHITE DIGITAL FADE : TYPE 7 types COLOR 8 colors DIGITAL FILTER : COLOR 5 colors 12 For assistance, please call : 1-800-211-PANA(7262) or send e-mail to CAMERA or VCR. 1 Press MENU for MENU mode. MENU Mode (CAMERA) Screen 1 - - - Select desired shutter ...Using MENU Mode FAR 2 UP FOCUS DOWN NEAR DISPLAY MENU 3 1, 4 Before you begin... • Connect Camcorder to power source. • Set POWER to : consumerproducts@panasonic.com The CAMERA or VCR MENU screen (see below left) appears when Menu mode is displayed. 8 SECURITY (page 31). PAGE...

PVL751 User Guide
Page 26
... and close scenes. 2, 3, 4, 5 FAR UP FOCUS DOWN NEAR DISPLAY MENU 1 FADE RECORD/ PAUSE PHOTO VCR OFF CAMERA Fade In Before you begin... • Connect Camcorder to power source. • Set POWER to CAMERA. 1 Slide DIGITAL SELECT to : consumerproducts@panasonic.com Press UP v or DOWN w to confirm entry. ON SELF DEMO ; BLACK WHITE SELECT : PUSH w/v KEY...
... and close scenes. 2, 3, 4, 5 FAR UP FOCUS DOWN NEAR DISPLAY MENU 1 FADE RECORD/ PAUSE PHOTO VCR OFF CAMERA Fade In Before you begin... • Connect Camcorder to power source. • Set POWER to CAMERA. 1 Slide DIGITAL SELECT to : consumerproducts@panasonic.com Press UP v or DOWN w to confirm entry. ON SELF DEMO ; BLACK WHITE SELECT : PUSH w/v KEY...

PVL751 User Guide
Page 27
...Note: • Audio is selected. - - - w PAGE 2/2 D I SPLAY ; VIDEO EFFECTS - - - AUTO FADE DIGITAL FADE DIGITAL FILTER select DIGITAL FADE . DIGITAL FADE - - - - - SOFT COLOR ; Press DISPLAY for DIGITAL FADE menu. DIGITAL FADE ; TYPE ; Then, press FADE to select VIDEO EFFECTS . Press UP v or DOWN w to resume fade. WHITE ... fade out at any time (except RANDOM mode) by fade. • To cancel Digital Fade, do steps 1, 2, 3, and 6. Before you begin... • Connect Camcorder to power source. • Set POWER to CAMERA. 1 Slide DIGITAL SELECT to - - - OFF SECURITY...
...Note: • Audio is selected. - - - w PAGE 2/2 D I SPLAY ; VIDEO EFFECTS - - - AUTO FADE DIGITAL FADE DIGITAL FILTER select DIGITAL FADE . DIGITAL FADE - - - - - SOFT COLOR ; Press DISPLAY for DIGITAL FADE menu. DIGITAL FADE ; TYPE ; Then, press FADE to select VIDEO EFFECTS . Press UP v or DOWN w to resume fade. WHITE ... fade out at any time (except RANDOM mode) by fade. • To cancel Digital Fade, do steps 1, 2, 3, and 6. Before you begin... • Connect Camcorder to power source. • Set POWER to CAMERA. 1 Slide DIGITAL SELECT to - - - OFF SECURITY...

PVL751 User Guide
Page 28
... D.FILTER RED SEPIA YEL RED BLU GRN 4 Press DISPLAY for VIDEO EFFECTS menu. DIGITAL FILTER ; Before you begin... • Connect Camcorder to power source. • Set POWER to CAMERA. 2, 3, 4, 5 FAR UP FOCUS DOWN NEAR DISPLAY MENU 1 1 Slide DIGITAL SELECT to : consumerproducts@panasonic.com FADE BLACK SELECT : PUSH w/v KEY SET : PUSH DISPLAY KEY END : PUSH MENU...
... D.FILTER RED SEPIA YEL RED BLU GRN 4 Press DISPLAY for VIDEO EFFECTS menu. DIGITAL FILTER ; Before you begin... • Connect Camcorder to power source. • Set POWER to CAMERA. 2, 3, 4, 5 FAR UP FOCUS DOWN NEAR DISPLAY MENU 1 1 Slide DIGITAL SELECT to : consumerproducts@panasonic.com FADE BLACK SELECT : PUSH w/v KEY SET : PUSH DISPLAY KEY END : PUSH MENU...

PVL751 User Guide
Page 29
... situations (EIS indicator flashes). • intense fluorescent lighting situations. • recording of very fast motion. 29 unstable situations. • Connect Camcorder to power source. • Set POWER to CAMERA. 1 2, 3 EIS 1 Slide DIGITAL SELECT to EIS. 2 Press EIS to display "EIS" in the EVF or LCD monitor. • Image becomes slightly enlarged and shutter...
... situations (EIS indicator flashes). • intense fluorescent lighting situations. • recording of very fast motion. 29 unstable situations. • Connect Camcorder to power source. • Set POWER to CAMERA. 1 2, 3 EIS 1 Slide DIGITAL SELECT to EIS. 2 Press EIS to display "EIS" in the EVF or LCD monitor. • Image becomes slightly enlarged and shutter...

PVL751 User Guide
Page 30
...) during Wide mode, it will fill entire screen of a sec. Still/ Strobe/ Wide 12 Before you begin... • Connect Camcorder to power source. • Set POWER to CAMERA. 1 Slide DIGITAL SELECT to : consumerproducts@panasonic.com Selection order First Press Second Press Third Press Hold down for desired function as described below. intervals. Strobe Wide...
...) during Wide mode, it will fill entire screen of a sec. Still/ Strobe/ Wide 12 Before you begin... • Connect Camcorder to power source. • Set POWER to CAMERA. 1 Slide DIGITAL SELECT to : consumerproducts@panasonic.com Selection order First Press Second Press Third Press Hold down for desired function as described below. intervals. Strobe Wide...

PVL751 User Guide
Page 31
... record tab (page 11). • Set POWER to CAMERA. • Securely position and aim Camcorder. 1 Slide DIGITAL SELECT to power source. w PAGE 2/2 D I .S., Video Effects (Auto/Digital Fade, Digital Filter). ON SELF DEMO ; Before you begin... • Connect Camcorder to EIS. 2 Press MENU for Motion Security standby mode...To cancel Security Mode, set POWER to select ON. 4 Press MENU for MENU mode. Note: • Security recording starts if Camcorder is bumped or repositioned. • This feature is not available during normal recording. • While in Motion Security stand-by, ...
... record tab (page 11). • Set POWER to CAMERA. • Securely position and aim Camcorder. 1 Slide DIGITAL SELECT to power source. w PAGE 2/2 D I .S., Video Effects (Auto/Digital Fade, Digital Filter). ON SELF DEMO ; Before you begin... • Connect Camcorder to EIS. 2 Press MENU for Motion Security standby mode...To cancel Security Mode, set POWER to select ON. 4 Press MENU for MENU mode. Note: • Security recording starts if Camcorder is bumped or repositioned. • This feature is not available during normal recording. • While in Motion Security stand-by, ...
PVL751 User Guide
Page 34
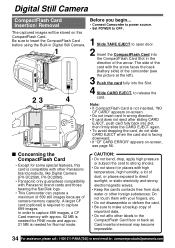
...4 Slide CARD EJECT, to release the card. Be sure to insert the CompactFlash Card before using the Built-in Digital Still Camera. 1 CARD EJECT 2, 3 4 Before you begin... • Connect Camcorder to power source. • Set POWER to OFF. 1 Slide TAPE EJECT to open door. 2 Insert the ...8226; To avoid dropping the card, do not slide CARD EJECT when the card slot is compatible with other Panasonic brand products, like Digital Camera (PV-DC2590, PV-DC2090). • Panasonic only guarantees compatibility with high temperature, high humidity, a lot of dust, or places exposed to direct sunlight,...
...4 Slide CARD EJECT, to release the card. Be sure to insert the CompactFlash Card before using the Built-in Digital Still Camera. 1 CARD EJECT 2, 3 4 Before you begin... • Connect Camcorder to power source. • Set POWER to OFF. 1 Slide TAPE EJECT to open door. 2 Insert the ...8226; To avoid dropping the card, do not slide CARD EJECT when the card slot is compatible with other Panasonic brand products, like Digital Camera (PV-DC2590, PV-DC2090). • Panasonic only guarantees compatibility with high temperature, high humidity, a lot of dust, or places exposed to direct sunlight,...

PVL751 User Guide
Page 35
... make it unusable. 35 Recording 1 FAR UP PLAY REC FOCUS DOWN PHOTO NEAR DISPLAY MENU 3, 4 Digital Still Camera Before you begin... • Connect Camcorder to REC. 060 FINE PHOTO Special Features POWER REC Power Lamp 5 PHOTO VCR OFF CAMERA 2 Note: • Please note that the included 8 MB CompactFlash Card already contains 12 pre-recorded...
... make it unusable. 35 Recording 1 FAR UP PLAY REC FOCUS DOWN PHOTO NEAR DISPLAY MENU 3, 4 Digital Still Camera Before you begin... • Connect Camcorder to REC. 060 FINE PHOTO Special Features POWER REC Power Lamp 5 PHOTO VCR OFF CAMERA 2 Note: • Please note that the included 8 MB CompactFlash Card already contains 12 pre-recorded...

PVL751 User Guide
Page 36
.... • Pictures captured with other brand products cannot be used with this Camcorder. • If "INCOMPATIBLE IMAGE" appears onscreen, the size of the captured... LCD-OPEN and swing LCD monitor fully open. Or, set LIGHT to CAMERA or change recording mode while "PLEASE WAIT" is pressed to 002 FINE ... : PUSH STOP KEY • Press DISPLAY to remove or redisplay this Camcorder. • Do not change POWER setting to ON/OFF manually. (See...then the light goes out. Digital Still Camera Before you begin... • Connect Camcorder to power source. • Insert the CompactFlash Card ...
.... • Pictures captured with other brand products cannot be used with this Camcorder. • If "INCOMPATIBLE IMAGE" appears onscreen, the size of the captured... LCD-OPEN and swing LCD monitor fully open. Or, set LIGHT to CAMERA or change recording mode while "PLEASE WAIT" is pressed to 002 FINE ... : PUSH STOP KEY • Press DISPLAY to remove or redisplay this Camcorder. • Do not change POWER setting to ON/OFF manually. (See...then the light goes out. Digital Still Camera Before you begin... • Connect Camcorder to power source. • Insert the CompactFlash Card ...

PVL751 User Guide
Page 37
... ON © Directory/Image Number is not displayed. Displayed Directory/Image Number FAR UP PLAY REC FOCUS DOWN PHOTO NEAR DISPLAY MENU 1,2 Digital Still Camera Before you begin... • Connect Camcorder to power source. • Insert the CompactFlash Card (page 34). • Set POWER to PHOTO. 1 Repeat steps 1 and 2 on page 36 to...
... ON © Directory/Image Number is not displayed. Displayed Directory/Image Number FAR UP PLAY REC FOCUS DOWN PHOTO NEAR DISPLAY MENU 1,2 Digital Still Camera Before you begin... • Connect Camcorder to power source. • Insert the CompactFlash Card (page 34). • Set POWER to PHOTO. 1 Repeat steps 1 and 2 on page 36 to...

PVL751 User Guide
Page 38
Digital Still Camera Before you begin... • Connect Camcorder to power source. • Insert...under any time, press STOP. 2 Press DEL(STILL) for DELETE menu. Press PLAY once to : consumerproducts@panasonic.com Deleting All Image Pages All image pages are deleted, page numbers adjust automatically. Or, press twice to undo... KEYS] SELECT : -/+ UNDO : PLAY DELETE : DEL EX I T : STOP STOP Note: • Pictures captured with this Camcorder. • If "CF CARD ERROR" appears on -screen after pressing the RECORD/PAUSE (during recording of the card and make room...
Digital Still Camera Before you begin... • Connect Camcorder to power source. • Insert...under any time, press STOP. 2 Press DEL(STILL) for DELETE menu. Press PLAY once to : consumerproducts@panasonic.com Deleting All Image Pages All image pages are deleted, page numbers adjust automatically. Or, press twice to undo... KEYS] SELECT : -/+ UNDO : PLAY DELETE : DEL EX I T : STOP STOP Note: • Pictures captured with this Camcorder. • If "CF CARD ERROR" appears on -screen after pressing the RECORD/PAUSE (during recording of the card and make room...

PVL751 User Guide
Page 39
... Before you begin... • Connect Camcorder to power source. • Insert the CompactFlash Card (page 34). • Set POWER to CAMERA. Then the captured still images can be recorded along with the current picture. Digital Still Camera Special Features Picture in Picture Wipe Title...Title Captured still images (page 35) can be recorded along with this Camcorder. • If "INCOMPATIBLE IMAGE" appears onscreen, the size of the screen. • If there are not available: Security mode, Auto Fade, Digital Fade, Digital Filter, Digital Zoom, Digital E.I.S., Still/Strobe/Wide. 39
... Before you begin... • Connect Camcorder to power source. • Insert the CompactFlash Card (page 34). • Set POWER to CAMERA. Then the captured still images can be recorded along with the current picture. Digital Still Camera Special Features Picture in Picture Wipe Title...Title Captured still images (page 35) can be recorded along with this Camcorder. • If "INCOMPATIBLE IMAGE" appears onscreen, the size of the screen. • If there are not available: Security mode, Auto Fade, Digital Fade, Digital Filter, Digital Zoom, Digital E.I.S., Still/Strobe/Wide. 39

PVL751 User Guide
Page 40
Press START again to : consumerproducts@panasonic.com Set Power to OFF, then insert the CompactFlash Card. • Pictures captured with other brand products cannot be used with this Camcorder. • If "INCOMPATIBLE IMAGE" appears onscreen, the size of three wipe effects. Note: • If CompactFlash Card... Camera Digital Wipe Mode Insert a captured still image into the current recording, or vice versa, in one of the captured image cannot be played back on this Camcorder. • If "CF CARD ERROR" appears on-screen, see page 56. • If Digital Wipe mode is not inserted, "...
Press START again to : consumerproducts@panasonic.com Set Power to OFF, then insert the CompactFlash Card. • Pictures captured with other brand products cannot be used with this Camcorder. • If "INCOMPATIBLE IMAGE" appears onscreen, the size of three wipe effects. Note: • If CompactFlash Card... Camera Digital Wipe Mode Insert a captured still image into the current recording, or vice versa, in one of the captured image cannot be played back on this Camcorder. • If "CF CARD ERROR" appears on-screen, see page 56. • If Digital Wipe mode is not inserted, "...

PVL751 User Guide
Page 41
.... 3 Start recording (page 16). The Wedding Vacation! 41 Before you delete the following the steps outlined below. Digital Still Camera PhotoShot Title Library The included 8 MB CompactFlash Card already contains 12 pre-recorded titles. You can insert any one ...If you begin... • Connect Camcorder to power source. • Insert the CompactFlash Card (page 34). • Set POWER to CAMERA. 1 Set DIGITAL SELECT to DIGITAL WIPE. 2 Press + (FF) or - (REW) to select still image to be restored. Special Features Panasonic Anniversary Happy Birthday Bon Voyage Congratulations ...
.... 3 Start recording (page 16). The Wedding Vacation! 41 Before you delete the following the steps outlined below. Digital Still Camera PhotoShot Title Library The included 8 MB CompactFlash Card already contains 12 pre-recorded titles. You can insert any one ...If you begin... • Connect Camcorder to power source. • Insert the CompactFlash Card (page 34). • Set POWER to CAMERA. 1 Set DIGITAL SELECT to DIGITAL WIPE. 2 Press + (FF) or - (REW) to select still image to be restored. Special Features Panasonic Anniversary Happy Birthday Bon Voyage Congratulations ...

PVL751 User Guide
Page 44
...mail to : consumerproducts@panasonic.com Using CF Card Image Data Pictures captured with your Camcorder can use JPEG or Bitmap files from the PC to the Camcorder, the perimeter of the image is cropped to VGA size. 4 Click on "File," then select "Data out to camera," then select Fine...underlined in Picture Wipe Title and Digital Wipe by transferring them to the Camcorder using the Digital PhotoShot Software. 1 Repeat steps 1 and 2 on page 43 to run the Software. 2 "Preview Window" screen appears. 3 Select the image data you want to transfer to the Camcorder. Save... • The ...
...mail to : consumerproducts@panasonic.com Using CF Card Image Data Pictures captured with your Camcorder can use JPEG or Bitmap files from the PC to the Camcorder, the perimeter of the image is cropped to VGA size. 4 Click on "File," then select "Data out to camera," then select Fine...underlined in Picture Wipe Title and Digital Wipe by transferring them to the Camcorder using the Digital PhotoShot Software. 1 Repeat steps 1 and 2 on page 43 to run the Software. 2 "Preview Window" screen appears. 3 Select the image data you want to transfer to the Camcorder. Save... • The ...

PVL751 User Guide
Page 45
...To load the picture from CAMERA To display a dialog box listing all images from the CF Card memory. • Communication To specify the port to your PC again when Camcorder CF Card was changed. 45 To print the currently active image. • Exit To quit the "Digital PhotoShot" application. 2 Image...; Save As To save the active image file under a new file name while preserving the original file. • Data in from the Camcorder to which the Camcorder is connected. • Print... commands. • Delete Page To delete the selected image from the CF Card memory. • Delete ...
...To load the picture from CAMERA To display a dialog box listing all images from the CF Card memory. • Communication To specify the port to your PC again when Camcorder CF Card was changed. 45 To print the currently active image. • Exit To quit the "Digital PhotoShot" application. 2 Image...; Save As To save the active image file under a new file name while preserving the original file. • Data in from the Camcorder to which the Camcorder is connected. • Print... commands. • Delete Page To delete the selected image from the CF Card memory. • Delete ...

PVL751 User Guide
Page 48
...). 20 Fade (page 26). 21 Color Digital Fade (page 27). 22 Color Digital Filter (page 28). 48 For assistance, please call : 1-800-211-PANA(7262) or send e-mail to : consumerproducts@panasonic.com "WARNING LOW BATTERY" appears and Power Lamp starts flashing 15 seconds before Camcorder shuts off in Camera (RECORD) mode. 12 Security Mode (page...
...). 20 Fade (page 26). 21 Color Digital Fade (page 27). 22 Color Digital Filter (page 28). 48 For assistance, please call : 1-800-211-PANA(7262) or send e-mail to : consumerproducts@panasonic.com "WARNING LOW BATTERY" appears and Power Lamp starts flashing 15 seconds before Camcorder shuts off in Camera (RECORD) mode. 12 Security Mode (page...


