Digital Video Camcorder
Page 2
...not cause harmful interference, and (2) this unit. Declaration of Conformity Model Number : PV-DV202/PV-DV402 Trade Name : Panasonic Responsibility Party : Matsushita Electric Corporation of America Address : One Panasonic Way Secaucus New Jersey 07094 Telephone Number : 1-800-211-PANA(7262) This device ...: consumerproducts@panasonic.com These limits are located on , use only the provided shielded interface cable when connecting digital video camcorder to computer in accordance with Part 15 of this equipment does cause interference to this manual as your Palmcorder. If ...
...not cause harmful interference, and (2) this unit. Declaration of Conformity Model Number : PV-DV202/PV-DV402 Trade Name : Panasonic Responsibility Party : Matsushita Electric Corporation of America Address : One Panasonic Way Secaucus New Jersey 07094 Telephone Number : 1-800-211-PANA(7262) This device ...: consumerproducts@panasonic.com These limits are located on , use only the provided shielded interface cable when connecting digital video camcorder to computer in accordance with Part 15 of this equipment does cause interference to this manual as your Palmcorder. If ...
Digital Video Camcorder
Page 4
... this video unit through openings as contact with your hand. Do not connect the power supply or operate your Palmcorder. Do not attempt to : consumerproducts@panasonic.com There are covered by the operating instructions, as , direct sunlight, inside . Store and handle your... Palmcorder body. Do not touch the surface of your Palmcorder if it to a heater, etc... Improper cleaning can fall into such power lines or circuits. ...
... this video unit through openings as contact with your hand. Do not connect the power supply or operate your Palmcorder. Do not attempt to : consumerproducts@panasonic.com There are covered by the operating instructions, as , direct sunlight, inside . Store and handle your... Palmcorder body. Do not touch the surface of your Palmcorder if it to a heater, etc... Improper cleaning can fall into such power lines or circuits. ...
Digital Video Camcorder
Page 5
...8226; Easy Cassette Eject ...7 Quick Guide ...11 Supplying Power ...14 Setting the Clock ...16 Using the Palmcorder Menu 17 Camera Recording ...18 • Simple Recording 18 • Digital PhotoShot™ Mode 20 • Zoom ...21 Special Effect Features 23 Advanced Settings ...28 Playback Your ...98SE, Me, 2000 users 80 • Warning Indications 89 PC Connection • Transferring Your Images (Macintosh 90 Palmcorder Accessory System 92 Palmcorder Accessory Order Form 93 Notes On Operations ...94 Specifications ...96 Before Requesting Service 97 On-Screen Display (OSD 99 ...
...8226; Easy Cassette Eject ...7 Quick Guide ...11 Supplying Power ...14 Setting the Clock ...16 Using the Palmcorder Menu 17 Camera Recording ...18 • Simple Recording 18 • Digital PhotoShot™ Mode 20 • Zoom ...21 Special Effect Features 23 Advanced Settings ...28 Playback Your ...98SE, Me, 2000 users 80 • Warning Indications 89 PC Connection • Transferring Your Images (Macintosh 90 Palmcorder Accessory System 92 Palmcorder Accessory Order Form 93 Notes On Operations ...94 Specifications ...96 Before Requesting Service 97 On-Screen Display (OSD 99 ...

Digital Video Camcorder
Page 6
... registered trademark. The PV-DV402 is a trademark. Differences between models Model Number PV-DV202 PV-DV402 LCD Monitor MagicVu™ IR Filter (0Lux) MIC IN EXTERNAL 63.5 mm (2.5 inch) Liquid Crystal Display NO NO 88.9 mm (3.5 inch) Liquid Crystal Display YES YES Unpack your Palmcorder 1 pc. A/V ... Messenger™ System is a trademark. 6 For assistance, please call : 1-800-211-PANA(7262) or send e-mail to : consumerproducts@panasonic.com Built-in the United States and other countries. USB Cable 1 pc. Macintosh, iMac, iBook, PowerBook, Power Macintosh, Power Mac, ...
... registered trademark. The PV-DV402 is a trademark. Differences between models Model Number PV-DV202 PV-DV402 LCD Monitor MagicVu™ IR Filter (0Lux) MIC IN EXTERNAL 63.5 mm (2.5 inch) Liquid Crystal Display NO NO 88.9 mm (3.5 inch) Liquid Crystal Display YES YES Unpack your Palmcorder 1 pc. A/V ... Messenger™ System is a trademark. 6 For assistance, please call : 1-800-211-PANA(7262) or send e-mail to : consumerproducts@panasonic.com Built-in the United States and other countries. USB Cable 1 pc. Macintosh, iMac, iBook, PowerBook, Power Macintosh, Power Mac, ...
Digital Video Camcorder
Page 7
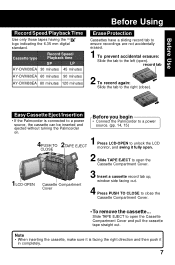
... only those tapes having the Mini logo indicating the 6.35 mm digital standard. Note • When inserting the cassette, make sure it is connected to unlock the LCD monitor, and swing it in completely. 7 Before you begin • Connect the Palmcorder to a power source. (pp. 14, 15) 4 2 1 ...the Cassette Compartment Cover and pull the cassette tape straight out. Slide TAPE EJECT to close ). Easy Cassette Eject/Insertion • If the Palmcorder is facing the right direction and then push it fully open. 2 Slide TAPE EJECT to open the Cassette Compartment Cover. 1LCD-OPEN Cassette ...
... only those tapes having the Mini logo indicating the 6.35 mm digital standard. Note • When inserting the cassette, make sure it is connected to unlock the LCD monitor, and swing it in completely. 7 Before you begin • Connect the Palmcorder to a power source. (pp. 14, 15) 4 2 1 ...the Cassette Compartment Cover and pull the cassette tape straight out. Slide TAPE EJECT to close ). Easy Cassette Eject/Insertion • If the Palmcorder is facing the right direction and then push it fully open. 2 Slide TAPE EJECT to open the Cassette Compartment Cover. 1LCD-OPEN Cassette ...

Digital Video Camcorder
Page 9
...; When replacing the bulb, see page 94. 1LIGHT Caution This light becomes hot during operation. Remote Control You can operate the major functions of the Palmcorder and press the desired buttons (Remote Sensor is located under the lens). Before Using Before you begin • Connect the... Palmcorder to a power source. (pp. 14, 15) • Set POWER to CAMERA or M-CARD. 1 Hold down LIGHT for a long time. • Set LIGHT to OFF when ...
...; When replacing the bulb, see page 94. 1LIGHT Caution This light becomes hot during operation. Remote Control You can operate the major functions of the Palmcorder and press the desired buttons (Remote Sensor is located under the lens). Before Using Before you begin • Connect the... Palmcorder to a power source. (pp. 14, 15) • Set POWER to CAMERA or M-CARD. 1 Hold down LIGHT for a long time. • Set LIGHT to OFF when ...

Digital Video Camcorder
Page 10
... screen. On the remote, press VCR 1 or VCR 2 to VCR 1. 10 Forassistance, pleasecall: 1-800-211-PANA(7262)orsende-mailto:consumerproducts@panasonic.com Remote Controlling Two Palmcorders You can control any two Panasonic Palmcorders with the + mark facing up. Before Using Replace the Battery B A + 1While pressing the tab in the direction of the arrow (A) with...
... screen. On the remote, press VCR 1 or VCR 2 to VCR 1. 10 Forassistance, pleasecall: 1-800-211-PANA(7262)orsende-mailto:consumerproducts@panasonic.com Remote Controlling Two Palmcorders You can control any two Panasonic Palmcorders with the + mark facing up. Before Using Replace the Battery B A + 1While pressing the tab in the direction of the arrow (A) with...

Digital Video Camcorder
Page 11
Insert Cassette These Palmcorders are equipped with a click. Before Use Insert the Battery Pack Quick Guide Before you begin • Charge the Battery. (p. 14) Protection Film Note • Remove ...
Insert Cassette These Palmcorders are equipped with a click. Before Use Insert the Battery Pack Quick Guide Before you begin • Charge the Battery. (p. 14) Protection Film Note • Remove ...

Digital Video Camcorder
Page 13
When inserting the Memory Card M-CARD Lock Note • By sliding M-CARD Lock to LOCK, you can be used in this Palmcorder. Memory Card Capacity SD Memory Card (RP-SD008BMKO) (supplied) 8 MB MultiMediaCard (SanDisk brand) 8 MB, 16 MB SD Memory Card (optional) (p. 92) 16 MB, 32 MB, ...
When inserting the Memory Card M-CARD Lock Note • By sliding M-CARD Lock to LOCK, you can be used in this Palmcorder. Memory Card Capacity SD Memory Card (RP-SD008BMKO) (supplied) 8 MB MultiMediaCard (SanDisk brand) 8 MB, 16 MB SD Memory Card (optional) (p. 92) 16 MB, 32 MB, ...

Digital Video Camcorder
Page 15
...; The Battery may be rechargeable. • Keep the Battery terminals clean. Safety precautions: • Do not place the Battery near, or dispose of in the Palmcorder or on how to remove the 2 Battery Pack. (p. 14) Insert the DC Cable into an AC outlet even when not in use, unplug the AC... Adaptor from the Palmcorder and AC Adaptor and store in extremely high temperatures, a safety device will no longer be warm after charging or just after use , remove Battery from...
...; The Battery may be rechargeable. • Keep the Battery terminals clean. Safety precautions: • Do not place the Battery near, or dispose of in the Palmcorder or on how to remove the 2 Battery Pack. (p. 14) Insert the DC Cable into an AC outlet even when not in use, unplug the AC... Adaptor from the Palmcorder and AC Adaptor and store in extremely high temperatures, a safety device will no longer be warm after charging or just after use , remove Battery from...

Digital Video Camcorder
Page 16
... (p. 99) When DATE/TIME setting is calculated, including leap year, up to DEC 31 2089. 2, 3, 4 JOG KEY 1MENU Before you begin • Connect the Palmcorder to a power source. (pp. 14, 15) • Set POWER to CAMERA or VCR. 1 Press MENU to display the Camera or VCR mode menu screen. ... date and time is completed, press MENU three times to start the clock and exit. 16 Forassistance, pleasecall: 1-800-211-PANA(7262)orsende-mailto:consumerproducts@panasonic.com EXAMPLE: YEAR : 2002 PUSH Push MONTH : JAN PUSH Rotate MONTH : FEB 2 Rotate JOG KEY to select DISPLAY SETTING , and then press...
... (p. 99) When DATE/TIME setting is calculated, including leap year, up to DEC 31 2089. 2, 3, 4 JOG KEY 1MENU Before you begin • Connect the Palmcorder to a power source. (pp. 14, 15) • Set POWER to CAMERA or VCR. 1 Press MENU to display the Camera or VCR mode menu screen. ... date and time is completed, press MENU three times to start the clock and exit. 16 Forassistance, pleasecall: 1-800-211-PANA(7262)orsende-mailto:consumerproducts@panasonic.com EXAMPLE: YEAR : 2002 PUSH Push MONTH : JAN PUSH Rotate MONTH : FEB 2 Rotate JOG KEY to select DISPLAY SETTING , and then press...

Digital Video Camcorder
Page 17
..., or CLOCK-SET. 6 : LCD/EVF SETTING LCD/EVF SETTING menu is displayed. To select TITLE or MODE. To select REMOTE, BEEP, or MAGICVU (PV-DV402 only). 5 : DISPLAY SETTING DISPLAY SETTING menu is displayed. To select D.FUNCTION, D.ZOOM, or PROGRESSIVE. 2 : ADJUST CAMERA ADJUST menu is displayed.... KEY 1, D MENU Displaying the MENU 1Press MENU to display the CAMERA or VCR menu (according to set your selection. Using the Palmcorder Menu Before Use The Palmcorder features three menu displays: one for CAMERA mode (recording), one for M-CARD (Memory Card Photo Mode) and one for VCR mode ...
..., or CLOCK-SET. 6 : LCD/EVF SETTING LCD/EVF SETTING menu is displayed. To select TITLE or MODE. To select REMOTE, BEEP, or MAGICVU (PV-DV402 only). 5 : DISPLAY SETTING DISPLAY SETTING menu is displayed. To select D.FUNCTION, D.ZOOM, or PROGRESSIVE. 2 : ADJUST CAMERA ADJUST menu is displayed.... KEY 1, D MENU Displaying the MENU 1Press MENU to display the CAMERA or VCR menu (according to set your selection. Using the Palmcorder Menu Before Use The Palmcorder features three menu displays: one for CAMERA mode (recording), one for M-CARD (Memory Card Photo Mode) and one for VCR mode ...

Digital Video Camcorder
Page 18
...avoid this may cause damage to OFF when finished. • To remove the cassette, slide TAPE EJECT. • When the Palmcorder is aimed at excessively bright objects, or bright lights, a vertical bar may appear in the CAMERA Mode Menu. (Menu OSD... here EVF REC/PAUSE mode POWER Lamp 1, 5 POWER 2Vision Adjustment Control 3MENU 4REC/PAUSE Before you begin • Connect the Palmcorder to a power source. (pp. 14, 15) • Insert a cassette with the EVF aimed directly at the sun as... ON again. 18 Forassistance, pleasecall: 1-800-211-PANA(7262)orsende-mailto:consumerproducts@panasonic.com
...avoid this may cause damage to OFF when finished. • To remove the cassette, slide TAPE EJECT. • When the Palmcorder is aimed at excessively bright objects, or bright lights, a vertical bar may appear in the CAMERA Mode Menu. (Menu OSD... here EVF REC/PAUSE mode POWER Lamp 1, 5 POWER 2Vision Adjustment Control 3MENU 4REC/PAUSE Before you begin • Connect the Palmcorder to a power source. (pp. 14, 15) • Insert a cassette with the EVF aimed directly at the sun as... ON again. 18 Forassistance, pleasecall: 1-800-211-PANA(7262)orsende-mailto:consumerproducts@panasonic.com

Digital Video Camcorder
Page 22
... seconds of any desired duration together with sound. 2 Press STILL once again to release the still picture. After checking, the Palmcorder returns to the REC/PAUSE mode. • For Recording Check, the Palmcorder must be recorded together with sound. 1, 2STILL 1 While in the same mode (SP or LP) as the lens to.... 1RECORDING CHECK 1Press RECORDING CHECK briefly in the LCD monitor will appear reversed. 5 Start recording. 22 Forassistance, pleasecall: 1-800-211-PANA(7262)orsende-mailto:consumerproducts@panasonic.com
... seconds of any desired duration together with sound. 2 Press STILL once again to release the still picture. After checking, the Palmcorder returns to the REC/PAUSE mode. • For Recording Check, the Palmcorder must be recorded together with sound. 1, 2STILL 1 While in the same mode (SP or LP) as the lens to.... 1RECORDING CHECK 1Press RECORDING CHECK briefly in the LCD monitor will appear reversed. 5 Start recording. 22 Forassistance, pleasecall: 1-800-211-PANA(7262)orsende-mailto:consumerproducts@panasonic.com

Digital Video Camcorder
Page 27
...appear before inserting a recorded Memory Card. (pp. 48, 49) 1 Set POWER to CAMERA. 2 Press MENU to "SET". Before you begin • Connect the Palmcorder to a power source. (pp. 14, 15) • Set POWER to OFF before each recording is set TITLE to display the CAMERA menu screen. Camera 2, ...TITLE SET" is displayed for approx. 3 seconds, and the screen goes back to the Camera mode screen. • After Photo Title is performed, Digital Function turns off. 5 Press REC/PAUSE to ON, the selected image and Title will be cleared automatically. 27 WIPE : The Photo title is replaced...
...appear before inserting a recorded Memory Card. (pp. 48, 49) 1 Set POWER to CAMERA. 2 Press MENU to "SET". Before you begin • Connect the Palmcorder to a power source. (pp. 14, 15) • Set POWER to OFF before each recording is set TITLE to display the CAMERA menu screen. Camera 2, ...TITLE SET" is displayed for approx. 3 seconds, and the screen goes back to the Camera mode screen. • After Photo Title is performed, Digital Function turns off. 5 Press REC/PAUSE to ON, the selected image and Title will be cleared automatically. 27 WIPE : The Photo title is replaced...

Digital Video Camcorder
Page 28
... flashing. • If " " indication flashes when the Palmcorder is turned on, the previous manual White Balance setting is in poor lighting. 28 Forassistance, pleasecall: 1-800-211-PANA(7262)orsende-mailto:consumerproducts@panasonic.com In the following cases, the " " indication flashes:... • The flashing indicates that the previously adjusted White Balance setting is set manually. Point the Palmcorder at left.) • Hold down AUTO/MANUAL for more than 0.7 seconds to select " " . However, when using Digital...
... flashing. • If " " indication flashes when the Palmcorder is turned on, the previous manual White Balance setting is in poor lighting. 28 Forassistance, pleasecall: 1-800-211-PANA(7262)orsende-mailto:consumerproducts@panasonic.com In the following cases, the " " indication flashes:... • The flashing indicates that the previously adjusted White Balance setting is set manually. Point the Palmcorder at left.) • Hold down AUTO/MANUAL for more than 0.7 seconds to select " " . However, when using Digital...

Digital Video Camcorder
Page 29
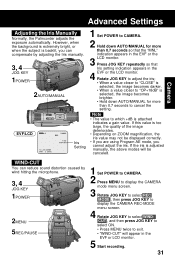
...when recording ... • a subject through glass. Auto Focus will remain in focus over the entire zoom range. Re-focusing may be required • when your Palmcorder is aimed at a new scene. 4 Press and hold POWER ZOOM, "T" side (Telephoto), until the lens is at 4, 6POWER ZOOM maximum zoom in. 5... is in focus. 5M.FOCUS DIAL • It may be necessary to the maximum wide angle position. Camera Advanced Settings Auto Focus The Palmcorder automatically adjusts the focus over 2AUTO/ MANUAL the entire zooming range. • It may be displayed on for more than 0.7 seconds so ...
...when recording ... • a subject through glass. Auto Focus will remain in focus over the entire zoom range. Re-focusing may be required • when your Palmcorder is aimed at a new scene. 4 Press and hold POWER ZOOM, "T" side (Telephoto), until the lens is at 4, 6POWER ZOOM maximum zoom in. 5... is in focus. 5M.FOCUS DIAL • It may be necessary to the maximum wide angle position. Camera Advanced Settings Auto Focus The Palmcorder automatically adjusts the focus over 2AUTO/ MANUAL the entire zooming range. • It may be displayed on for more than 0.7 seconds so ...
Digital Video Camcorder
Page 30
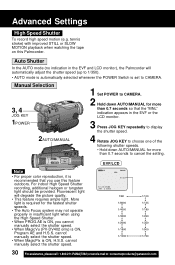
...than 0.7 seconds so that you cannot manually select the shutter speed. • When MagicVu (PV-DV402 only) is set to cancel the setting. Auto Shutter In the AUTO mode (no ...• The Auto Focus system may not operate properly in the EVF and LCD monitor), the Palmcorder will degrade the picture quality. • This feature requires ample light. For indoor High Speed...select the shutter speed. 30 Forassistance, pleasecall: 1-800-211-PANA(7262)orsende-mailto:consumerproducts@panasonic.com tennis stroke) with improved STILL or SLOW MOTION playback when watching the tape on this...
...than 0.7 seconds so that you cannot manually select the shutter speed. • When MagicVu (PV-DV402 only) is set to cancel the setting. Auto Shutter In the AUTO mode (no ...• The Auto Focus system may not operate properly in the EVF and LCD monitor), the Palmcorder will degrade the picture quality. • This feature requires ample light. For indoor High Speed...select the shutter speed. 30 Forassistance, pleasecall: 1-800-211-PANA(7262)orsende-mailto:consumerproducts@panasonic.com tennis stroke) with improved STILL or SLOW MOTION playback when watching the tape on this...
Digital Video Camcorder
Page 31
... repeatedly so that the "MNL" indication appears in the EVF or LCD monitor. 5 Start recording. 31 Advanced Settings Camera Adjusting the Iris Manually Normally, the Palmcorder adjusts the exposure automatically.
... repeatedly so that the "MNL" indication appears in the EVF or LCD monitor. 5 Start recording. 31 Advanced Settings Camera Adjusting the Iris Manually Normally, the Palmcorder adjusts the exposure automatically.
Digital Video Camcorder
Page 32
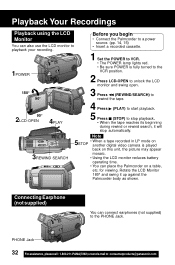
...tape reaches its beginning during rewind or rewind search, it up against the Palmcorder body as shown. PHONE Jack 32 Forassistance, pleasecall: 1-800-211-PANA(7262)orsende-mailto:consumerproducts@panasonic.com for viewing. Before you begin • Connect the Palmcorder to a power source. (pp. 14, 15) • Insert ...unit, the picture may appear mosaic. • Using the LCD monitor reduces battery operating time. • You can place the Palmcorder on STOP another digital video camera is fully turned to the VCR position. 2 Press LCD-OPEN to unlock the LCD monitor and swing open. 180...
...tape reaches its beginning during rewind or rewind search, it up against the Palmcorder body as shown. PHONE Jack 32 Forassistance, pleasecall: 1-800-211-PANA(7262)orsende-mailto:consumerproducts@panasonic.com for viewing. Before you begin • Connect the Palmcorder to a power source. (pp. 14, 15) • Insert ...unit, the picture may appear mosaic. • Using the LCD monitor reduces battery operating time. • You can place the Palmcorder on STOP another digital video camera is fully turned to the VCR position. 2 Press LCD-OPEN to unlock the LCD monitor and swing open. 180...


