Operating Instructions
Page 4
.../aperture adjustment........ 39 Playback mode Playing back tape 41 Slow-motion playback/ frame-by-frame playback 42 Variable-speed search function 42 Playback on TV 43 Playing back card 43 Deleting files recorded on a card 44 Formatting a card 45 Protecting files on a card 46 Writing the printing... DVD recorder or a VCR (Dubbing 47 Using the DV Cable for Recording (Digital Dubbing 48 Audio dubbing 49 Printing pictures by directly connecting to the printer (PictBridge 50 Menu Menu list 52 Menus related to recording 54 Menus related to playback 55 Other menus 55 Others Indications...
.../aperture adjustment........ 39 Playback mode Playing back tape 41 Slow-motion playback/ frame-by-frame playback 42 Variable-speed search function 42 Playback on TV 43 Playing back card 43 Deleting files recorded on a card 44 Formatting a card 45 Protecting files on a card 46 Writing the printing... DVD recorder or a VCR (Dubbing 47 Using the DV Cable for Recording (Digital Dubbing 48 Audio dubbing 49 Printing pictures by directly connecting to the printer (PictBridge 50 Menu Menu list 52 Menus related to recording 54 Menus related to playback 55 Other menus 55 Others Indications...

Operating Instructions
Page 25
...only displayed when you want to preserve the original sound recorded when audio dubbing (-49-), set to [16:9] for recording images compatible with a wide-screen TV. Recording on a tape Remove the lens cap. (-8-) (When the camera is indicated in minutes. (When it reaches less than 3 minutes, the ...may not be displayed correctly. ≥In some functions may be degraded in comparison with the SP mode, but mosaic noise may appear on the connected TV (-43-). ≥Set to Tape Recording Mode. 1 Press the recording start/stop button to start recording. 2 Press the recording start/stop button...
...only displayed when you want to preserve the original sound recorded when audio dubbing (-49-), set to [16:9] for recording images compatible with a wide-screen TV. Recording on a tape Remove the lens cap. (-8-) (When the camera is indicated in minutes. (When it reaches less than 3 minutes, the ...may not be displayed correctly. ≥In some functions may be degraded in comparison with the SP mode, but mosaic noise may appear on the connected TV (-43-). ≥Set to Tape Recording Mode. 1 Press the recording start/stop button to start recording. 2 Press the recording start/stop button...

Operating Instructions
Page 35
...≥After the recording lamp and the [ ] indication flashes for the TV. 35 VQT0T47 Move the joystick down until icon 1 appears. 2 Move the joystick left and right of the picture. ≥Concerning the TV to be connected and TV used for playback ≥When playing back images taken by this unit on... to select the self-timer recording icon [ ]. 1 ≥The [SELF-TIMER ON] indication appears on the settings of the TV connected, the images may deteriorate. ≥If still pictures recorded with more information, please read the operating instructions for approx. 10 seconds, recording ...
...≥After the recording lamp and the [ ] indication flashes for the TV. 35 VQT0T47 Move the joystick down until icon 1 appears. 2 Move the joystick left and right of the picture. ≥Concerning the TV to be connected and TV used for playback ≥When playing back images taken by this unit on... to select the self-timer recording icon [ ]. 1 ≥The [SELF-TIMER ON] indication appears on the settings of the TV connected, the images may deteriorate. ≥If still pictures recorded with more information, please read the operating instructions for approx. 10 seconds, recording ...
Operating Instructions
Page 43
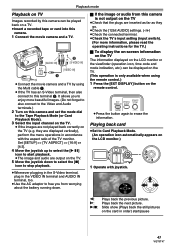
...time code and mode indication, etc.) can be played back on a TV. ≥Insert a recorded tape or card into this camera. 1 Connect the movie camera and a TV. [AUDIO IN] A/V 1 2 [S-VIDEO IN] [VIDEO IN] ≥Connect the movie camera and a TV by this camera is only available when using the Multi cable 1. .... they go. ≥Check the [12bit AUDIO] settings. (-50-) ≥Check the connected terminal. ≥Check the TV's input setting (input switch). (For more beautiful images. (Do not forget to also connect to the Video and Audio terminals.) 2 Turn on this camera and set the mode dial...
...time code and mode indication, etc.) can be played back on a TV. ≥Insert a recorded tape or card into this camera. 1 Connect the movie camera and a TV. [AUDIO IN] A/V 1 2 [S-VIDEO IN] [VIDEO IN] ≥Connect the movie camera and a TV by this camera is only available when using the Multi cable 1. .... they go. ≥Check the [12bit AUDIO] settings. (-50-) ≥Check the connected terminal. ≥Check the TV's input setting (input switch). (For more beautiful images. (Do not forget to also connect to the Video and Audio terminals.) 2 Turn on this camera and set the mode dial...

Operating Instructions
Page 47
... with the Multi cable 2 Pause at the scene you press the [PHOTO SHOT] button without pausing, blurred pictures may be recorded. ≥Connect the movie camera and the recorder by the movie camera can be recorded on a memory card from scenes that have already been recorded on a... card becomes [ 0.2 ] (16:9) or [ 0.3M ] (4:3). (This is not mega pixel still-picture recording.) ≥If you set [TV ASPECT] >> [4:3], black bands are recorded to the card. (-35-) ≥If you wish to record, and press the [PHOTO SHOT] button. [AUDIO IN] A/V 1 2 ...
... with the Multi cable 2 Pause at the scene you press the [PHOTO SHOT] button without pausing, blurred pictures may be recorded. ≥Connect the movie camera and the recorder by the movie camera can be recorded on a memory card from scenes that have already been recorded on a... card becomes [ 0.2 ] (16:9) or [ 0.3M ] (4:3). (This is not mega pixel still-picture recording.) ≥If you set [TV ASPECT] >> [4:3], black bands are recorded to the card. (-35-) ≥If you wish to record, and press the [PHOTO SHOT] button. [AUDIO IN] A/V 1 2 ...

Operating Instructions
Page 48
...information, refer to the operating instructions for your TV set and recorder. ≥When you do not have to follow this step when the remote control is used in digital format. ≥Set to Tape Playback Mode. (Player/recorder) 1 Connect the movie camera and digital video equipment with... the remote control: While pressing the [¥REC] button on the remote control, press the [PLAY 1] button. 48 VQT0T47 5 Move the joystick up to select the [¥/;] icon again or press the [;] button on the TV set and recorder...
...information, refer to the operating instructions for your TV set and recorder. ≥When you do not have to follow this step when the remote control is used in digital format. ≥Set to Tape Playback Mode. (Player/recorder) 1 Connect the movie camera and digital video equipment with... the remote control: While pressing the [¥REC] button on the remote control, press the [PLAY 1] button. 48 VQT0T47 5 Move the joystick up to select the [¥/;] icon again or press the [;] button on the TV set and recorder...

Operating Instructions
Page 49
... by mosaic-like patterns at playback. ≥Disconnect the USB cable since input signals from the external input terminal cannot be recorded while it is connected with DV terminals such as the [AUDIO REC] mode of the joystick. ≥While pictures are input from the DV terminal, the... using the remote control.) ≥Set to start audio dubbing. Edit mode ª To cancel the standby for recording When the camera is standby for [TV ASPECT] in microphone. 5 Press the [;] button on the remote control to stop audio dubbing. 49 VQT0T47 REMOTE/MIC 2 Find a scene that the sound is directed...
... by mosaic-like patterns at playback. ≥Disconnect the USB cable since input signals from the external input terminal cannot be recorded while it is connected with DV terminals such as the [AUDIO REC] mode of the joystick. ≥While pictures are input from the DV terminal, the... using the remote control.) ≥Set to start audio dubbing. Edit mode ª To cancel the standby for recording When the camera is standby for [TV ASPECT] in microphone. 5 Press the [;] button on the remote control to stop audio dubbing. 49 VQT0T47 REMOTE/MIC 2 Find a scene that the sound is directed...

Operating Instructions
Page 52
... the actual menu indications. ª [TAPE RECORDING MENU] ª [TAPE PLAYBACK MENU] 1) [BASIC] [DATE/TIME] -54[USB FUNCTION] (Refer to the operating instructions for PC connection.) 1) [BASIC] [SCENE MODE] -37[REC SPEED] -24[WIND CUT] -32[REC ASPECT] -35[CLOCK SET] -11- 2) [ADVANCED] [PICT.QUALITY] -28[PICTURE SIZE] -...] -32- 3) [SETUP] [12bit AUDIO] -50[AUDIO OUT] -55[DISPLAY] -54[REMOTE] -22[LCD AI] -20[LCD SET] -20[EVF SET] -20[POWER SAVE] -54[TV ASPECT] -43[JOYSTICK LED] -55- 4) [LANGUAGE] -18- 3) [SETUP] [DISPLAY] -54[DATE/TIME] -54[POWER SAVE] -54[QUICK START] -13[AGS] -33[REMOTE] -...
... the actual menu indications. ª [TAPE RECORDING MENU] ª [TAPE PLAYBACK MENU] 1) [BASIC] [DATE/TIME] -54[USB FUNCTION] (Refer to the operating instructions for PC connection.) 1) [BASIC] [SCENE MODE] -37[REC SPEED] -24[WIND CUT] -32[REC ASPECT] -35[CLOCK SET] -11- 2) [ADVANCED] [PICT.QUALITY] -28[PICTURE SIZE] -...] -32- 3) [SETUP] [12bit AUDIO] -50[AUDIO OUT] -55[DISPLAY] -54[REMOTE] -22[LCD AI] -20[LCD SET] -20[EVF SET] -20[POWER SAVE] -54[TV ASPECT] -43[JOYSTICK LED] -55- 4) [LANGUAGE] -18- 3) [SETUP] [DISPLAY] -54[DATE/TIME] -54[POWER SAVE] -54[QUICK START] -13[AGS] -33[REMOTE] -...

Operating Instructions
Page 61
...2: A file recorded on the remote control to cancel the variable speed search function. (-42-) Playback (Pictures) 1: Although the movie camera is correctly connected to a TV, playback images cannot be performed. (-14-) • Are you attempting to hear the sub sound. (-55-) 3: Audio dubbing cannot be damaged. ...picture is played back by using the head cleaner for digital video (Supplied). (-63-) • If the terminal for the connection. • Is the [TV ASPECT] setting correct? If recording is disabled. (-15-) 3: Photoshot playback images do not look normal. • The picture...
...2: A file recorded on the remote control to cancel the variable speed search function. (-42-) Playback (Pictures) 1: Although the movie camera is correctly connected to a TV, playback images cannot be performed. (-14-) • Are you attempting to hear the sub sound. (-55-) 3: Audio dubbing cannot be damaged. ...picture is played back by using the head cleaner for digital video (Supplied). (-63-) • If the terminal for the connection. • Is the [TV ASPECT] setting correct? If recording is disabled. (-15-) 3: Photoshot playback images do not look normal. • The picture...

Operating Instructions
Page 63
...long time. 63 VQT0T47 Keep the movie camera away from magnetized equipment such as a cellular phones, microwave ovens, TVs, and video game equipment. ≥If you record pictures near a TV, images or sounds may be disturbed due to electromagnetic wave radiation. ≥Recordings on the tape may be damaged..., and play it may become dirty, normal recording and playback are clean. Clean the heads, and perform recording and playback again. Then, connect the battery or AC adaptor again and turn off . Do not spray insecticides or volatile chemicals onto the movie camera. ≥If the ...
...long time. 63 VQT0T47 Keep the movie camera away from magnetized equipment such as a cellular phones, microwave ovens, TVs, and video game equipment. ≥If you record pictures near a TV, images or sounds may be disturbed due to electromagnetic wave radiation. ≥Recordings on the tape may be damaged..., and play it may become dirty, normal recording and playback are clean. Clean the heads, and perform recording and playback again. Then, connect the battery or AC adaptor again and turn off . Do not spray insecticides or volatile chemicals onto the movie camera. ≥If the ...


