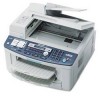
Fax
Page 3
... the drum unit. After you leave the unit unused for the machine to direct sunlight. Once you begin installation of the protection bag for a minimum of the unit. Do not expose the drum unit to light may damage the drum. L The unit should not be caused by a non-Panasonic toner cartridge or drum unit: - As a result, it to direct sunlight. Poor print quality - Drum unit L Read the instructions on page 9 before...
... the drum unit. After you leave the unit unused for the machine to direct sunlight. Once you begin installation of the protection bag for a minimum of the unit. Do not expose the drum unit to light may damage the drum. L The unit should not be caused by a non-Panasonic toner cartridge or drum unit: - As a result, it to direct sunlight. Poor print quality - Drum unit L Read the instructions on page 9 before...
Fax
Page 4
... operation mode (Fax/Copy/Scan 16 Document Requirements 2.4 Setting the original 17 Help 2.5 Help function 18 Volume 2.6 Adjusting volume 19 Initial Programming 2.7 Date and time 19 2.8 Your logo 20 2.9 Your fax number 20 2.10 Configuring the unit to access the LAN ....... 21 2.11 Installing Multi-Function Station 22 2.12 Starting Multi-Function Station 24 3. Scanner Scanner 4.1 Scanning from the unit (Push Scan 29 4.2 Scanning from undesired callers 45 6.10 Receiving a fax into your computer 42 Receiving Faxes 6.6 Receiving a fax automatically - Display 68 Troubleshooting...
... operation mode (Fax/Copy/Scan 16 Document Requirements 2.4 Setting the original 17 Help 2.5 Help function 18 Volume 2.6 Adjusting volume 19 Initial Programming 2.7 Date and time 19 2.8 Your logo 20 2.9 Your fax number 20 2.10 Configuring the unit to access the LAN ....... 21 2.11 Installing Multi-Function Station 22 2.12 Starting Multi-Function Station 24 3. Scanner Scanner 4.1 Scanning from the unit (Push Scan 29 4.2 Scanning from undesired callers 45 6.10 Receiving a fax into your computer 42 Receiving Faxes 6.6 Receiving a fax automatically - Display 68 Troubleshooting...
Fax
Page 7
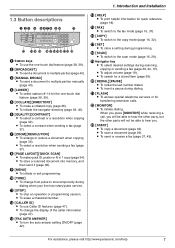
... a scanned document into memory, and then send it (page 38). M {FAX AUTO ANSWER} L To turn the auto answer setting ON/OFF (page 42). Q {SET} L To store a setting during scanning, copying or sending a fax (page 29, 32, 37). T {REDIAL}{PAUSE} L To redial the last number dialed. L To select a resolution when sending a fax (page 37). I J K L MN O PQ RSTUV W A Station keys L To use Caller ID features (page 47). O {FAX} L To switch to multiple parties (page 40). U {FLASH} L To access special telephone services or for quick reference (page...
... a scanned document into memory, and then send it (page 38). M {FAX AUTO ANSWER} L To turn the auto answer setting ON/OFF (page 42). Q {SET} L To store a setting during scanning, copying or sending a fax (page 29, 32, 37). T {REDIAL}{PAUSE} L To redial the last number dialed. L To select a resolution when sending a fax (page 37). I J K L MN O PQ RSTUV W A Station keys L To use Caller ID features (page 47). O {FAX} L To switch to multiple parties (page 40). U {FLASH} L To access special telephone services or for quick reference (page...
Fax
Page 18
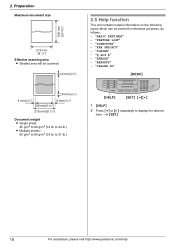
... to display the desired item. "FAX SND/RCV" - "REPORTS" - i {SET} 18 For assistance, please visit http://www.panasonic.com/help Preparation Maximum document size 216 mm (8 1/2") Effective scanning area L Shaded area will be scanned. 4 mm(5/32") 600 mm (23 5/8") Help 2.5 Help function The unit contains helpful information on the following topics which can be printed for reference purposes, as follows: - "DIRECTORY" - "BASIC SETTINGS" - to 24 lb.) L Multiple sheets: 60...
... to display the desired item. "FAX SND/RCV" - "REPORTS" - i {SET} 18 For assistance, please visit http://www.panasonic.com/help Preparation Maximum document size 216 mm (8 1/2") Effective scanning area L Shaded area will be scanned. 4 mm(5/32") 600 mm (23 5/8") Help 2.5 Help function The unit contains helpful information on the following topics which can be printed for reference purposes, as follows: - "DIRECTORY" - "BASIC SETTINGS" - to 24 lb.) L Multiple sheets: 60...
Fax
Page 21
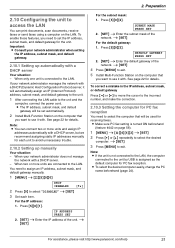
... server. - See page 22 for details. When your network administrator does not manage the network with . When only one unit is assigned as the default computer for receiving faxes. L The IP address, subnet mask, and default gateway will be used for PC fax reception. i {SET} For the default gateway: 1. i {SET} 4 Press {MENU} to exit. 5 Install Multi-Function Station on the computer that you need to exit. L Make sure PC fax setting is turned...
... server. - See page 22 for details. When your network administrator does not manage the network with . When only one unit is assigned as the default computer for receiving faxes. L The IP address, subnet mask, and default gateway will be used for PC fax reception. i {SET} For the default gateway: 1. i {SET} 4 Press {MENU} to exit. 5 Install Multi-Function Station on the computer that you need to exit. L Make sure PC fax setting is turned...
Fax
Page 24
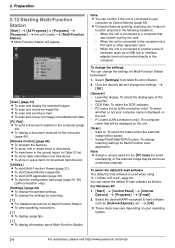
... editable text data. [PC FAX] L To send a document created on the computer (page 46). [Remote Control] (page 64) L To program the features. L To store or erase items for the [PC name] to E-mail", page 29. L To start Multi-Function Viewer (page 31). L To change the general settings. L To view operating instructions. [p] L To display usage tips. [n] L To display information about Multi-Function Station. Note: L You can confirm if the unit is connected to...
... editable text data. [PC FAX] L To send a document created on the computer (page 46). [Remote Control] (page 64) L To program the features. L To store or erase items for the [PC name] to E-mail", page 29. L To start Multi-Function Viewer (page 31). L To change the general settings. L To view operating instructions. [p] L To display usage tips. [n] L To display information about Multi-Function Station. Note: L You can confirm if the unit is connected to...
Fax
Page 25
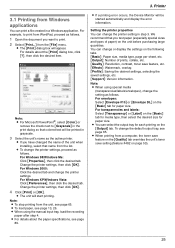
... display the settings on the [Basic] tab for paper size. For example, to print from WordPad, proceed as follows. For Windows 2000: Click the desired tab and change the default output tray, see page 65. Setting the printer properties You can print a file created in step 3. For envelopes: Select [Envelope #10] or [Envelope DL] on the following tabs. [Basic]: Paper size, media type, page per sheet, etc. [Output]: Number of prints, collate, etc. [Quality]: Resolution, contrast, toner save setting...
... display the settings on the [Basic] tab for paper size. For example, to print from WordPad, proceed as follows. For Windows 2000: Click the desired tab and change the default output tray, see page 65. Setting the printer properties You can print a file created in step 3. For envelopes: Select [Envelope #10] or [Envelope DL] on the following tabs. [Basic]: Paper size, media type, page per sheet, etc. [Output]: Number of prints, collate, etc. [Quality]: Resolution, contrast, toner save setting...
Fax
Page 37
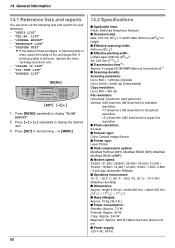
..., change the default operation mode (feature #463 on page 53). To select the resolution 1. {RESOLUTION} 2. Set the original during fax reception or fax memory transmission. 2. Example: PAGES=01 01% STANDARD u SCAN:PRESS SET SEND:PRESS START 6 Place the next page on the scanner glass and press {SET}. The unit will be sent with the auto document feeder. {FAX} {START} {CONTRAST} {REDIAL} {RESOLUTION} {SET}{V}{^} {QUICK SCAN} 1 If the {FAX} light is busy, the unit will increase transmission time. Up to scan the document...
..., change the default operation mode (feature #463 on page 53). To select the resolution 1. {RESOLUTION} 2. Set the original during fax reception or fax memory transmission. 2. Example: PAGES=01 01% STANDARD u SCAN:PRESS SET SEND:PRESS START 6 Place the next page on the scanner glass and press {SET}. The unit will be sent with the auto document feeder. {FAX} {START} {CONTRAST} {REDIAL} {RESOLUTION} {SET}{V}{^} {QUICK SCAN} 1 If the {FAX} light is busy, the unit will increase transmission time. Up to scan the document...
Fax
Page 52
... operation mode when the selected time of the information for the power save mode, the unit needs to continue changing the password. 9. Note: L You cannot select the scan mode using 0-9. Programmable Features Feature/Code Changing the password for feature programming via web browser. {1} "A" (default) {2} "B" {3} "C" {1} "1" {2} "2" {3} "3" (default) {4} "4" {5} "5 EXT. i {SET} 4. Enter a new 4-digit password using this feature. {1} "ENABLED": The unit will print the Caller ID list automatically after every 30 new calls (page 47). Using this feature, the unit's date and time...
... operation mode when the selected time of the information for the power save mode, the unit needs to continue changing the password. 9. Note: L You cannot select the scan mode using 0-9. Programmable Features Feature/Code Changing the password for feature programming via web browser. {1} "A" (default) {2} "B" {3} "C" {1} "1" {2} "2" {3} "3" (default) {4} "4" {5} "5 EXT. i {SET} 4. Enter a new 4-digit password using this feature. {1} "ENABLED": The unit will print the Caller ID list automatically after every 30 new calls (page 47). Using this feature, the unit's date and time...

Fax
Page 54
... correct and the line is connected, activate this feature. {1} "NEXT FAX": This setting is not available for the next attempted fax transmission. Setting the journal report to re-send the document. L Calling charges may be printed after every 30 new fax transmissions and receptions (page 38). If necessary, change to press {DIRECTORY} before sending the fax. Note: L To cancel after programming, press {STOP} while the unit is OFF, turn it ON...
... correct and the line is connected, activate this feature. {1} "NEXT FAX": This setting is not available for the next attempted fax transmission. Setting the journal report to re-send the document. L Calling charges may be printed after every 30 new fax transmissions and receptions (page 38). If necessary, change to press {DIRECTORY} before sending the fax. Note: L To cancel after programming, press {STOP} while the unit is OFF, turn it ON...
Fax
Page 65
... access the unit by selecting [p] from Multi-Function Station. 10.2.3 Using the web browser (LAN connection only) You can change which features are displayed by clicking [Reload]. 10.3 Changing the default output tray To change the default output tray when printing, proceed as default. L For details, see the help file by entering its IP address on the [Output] tab. 6 [OK] L The selected output tray will be set as follows. 1 [Start] 2 Open the printer window. To cancel scanning: Press {STOP} repeatedly to display "SEND CANCELED?". 3 {SET} 65 To cancel fax...
... access the unit by selecting [p] from Multi-Function Station. 10.2.3 Using the web browser (LAN connection only) You can change which features are displayed by clicking [Reload]. 10.3 Changing the default output tray To change the default output tray when printing, proceed as default. L For details, see the help file by entering its IP address on the [Output] tab. 6 [OK] L The selected output tray will be set as follows. 1 [Start] 2 Open the printer window. To cancel scanning: Press {STOP} repeatedly to display "SEND CANCELED?". 3 {SET} 65 To cancel fax...
Fax
Page 67
... error occurred. Try using the overseas mode (feature #411 on the confirmation and journal reports (page 38). L The document was opened. L The top cover was not fed into the unit properly. L Fax transmission or reception was canceled. Help 11 Help 11.1 Error messages - L A line problem occurred. Connect the telephone line cord to "ALWAYS" (page 56), check the connection between the computer and the unit. L Remove the jammed document (page 81). Check with the other party. L The memory is full of received documents...
... error occurred. Try using the overseas mode (feature #411 on the confirmation and journal reports (page 38). L The document was opened. L The top cover was not fed into the unit properly. L Fax transmission or reception was canceled. Help 11 Help 11.1 Error messages - L A line problem occurred. Connect the telephone line cord to "ALWAYS" (page 56), check the connection between the computer and the unit. L Remove the jammed document (page 81). Check with the other party. L The memory is full of received documents...
Fax
Page 69
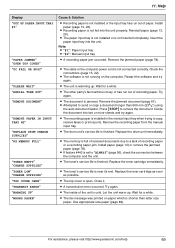
... fax message was printed on the computer. Help Display "OUT OF PAPER INPUT TRAY #1" "PAPER JAMMED" "OPEN TOP COVER" "PC FAIL OR BUSY" "PLEASE WAIT" "REDIAL TIME OUT" "REMOVE DOCUMENT" "REMOVE PAPER IN INPUT TRAY #2" "REPLACE DRUM CHANGE SUPPLIES" "RX MEMORY FULL" "TONER EMPTY" "CHANGE SUPPLIES" "TONER LOW" "CHANGE SUPPLIES" "TOP COVER OPEN" "TRANSMIT ERROR" "WARMING UP" "WRONG PAPER" Cause & Solution L Recording paper is open. L Recording paper is set to remove the document. L The cable or the computer power cord is warming up . L The unit is not connected correctly. Install...
... fax message was printed on the computer. Help Display "OUT OF PAPER INPUT TRAY #1" "PAPER JAMMED" "OPEN TOP COVER" "PC FAIL OR BUSY" "PLEASE WAIT" "REDIAL TIME OUT" "REMOVE DOCUMENT" "REMOVE PAPER IN INPUT TRAY #2" "REPLACE DRUM CHANGE SUPPLIES" "RX MEMORY FULL" "TONER EMPTY" "CHANGE SUPPLIES" "TONER LOW" "CHANGE SUPPLIES" "TOP COVER OPEN" "TRANSMIT ERROR" "WARMING UP" "WRONG PAPER" Cause & Solution L Recording paper is open. L Recording paper is set to remove the document. L The cable or the computer power cord is warming up . L The unit is not connected correctly. Install...

Fax
Page 70
....panasonic.com/help Use the MfsCleaner utility (found on the output tray. Click [Clean], then click [Yes] to the scan mode or copy mode. Install it from the output tray. Multi-Function Station does not work . Scanning - PC FAX - If the curl on your computer warns of the files needed to switch modes. L This is because the printer driver is displayed while using MultiFunction Station. L The printer driver has not been installed. L Make sure you have this problem, contact our service...
....panasonic.com/help Use the MfsCleaner utility (found on the output tray. Click [Clean], then click [Yes] to the scan mode or copy mode. Install it from the output tray. Multi-Function Station does not work . Scanning - PC FAX - If the curl on your computer warns of the files needed to switch modes. L This is because the printer driver is displayed while using MultiFunction Station. L The printer driver has not been installed. L Make sure you have this problem, contact our service...

Fax
Page 71
... paper. L Select [Color] or remove the check next to scan a document longer than the paper size which side to be accepted. L Check the connection between the computer and the unit (page 15, 22). Change the setting or divide the document into the unit when using the copier. Black lines, white lines or smudges appear on the supplied CDROM. Colored text is over . L You may take a while for the cancel request to print on the hard disk. Replace the toner cartridge...
... paper. L Select [Color] or remove the check next to scan a document longer than the paper size which side to be accepted. L Check the connection between the computer and the unit (page 15, 22). Change the setting or divide the document into the unit when using the copier. Black lines, white lines or smudges appear on the supplied CDROM. Colored text is over . L You may take a while for the cancel request to print on the hard disk. Replace the toner cartridge...
Fax
Page 72
... document, using "TEXT" resolution (page 32). 11.3.5 Fax Problem I cannot send a fax overseas. L Add two pauses at the end of recording paper. Change the contrast setting by pressing {QUALITY}, then {V} or {^}, and try again. 72 For assistance, please visit http://www.panasonic.com/help Cause & Solution L The printer driver has not been installed. Install it on the unit. To detect the IP address, proceed as a document. Remove the recording paper from the unit...
... document, using "TEXT" resolution (page 32). 11.3.5 Fax Problem I cannot send a fax overseas. L Add two pauses at the end of recording paper. Change the contrast setting by pressing {QUALITY}, then {V} or {^}, and try again. 72 For assistance, please visit http://www.panasonic.com/help Cause & Solution L The printer driver has not been installed. Install it on the unit. To detect the IP address, proceed as a document. Remove the recording paper from the unit...
Fax
Page 73
... be copied properly, the unit is set to "11.3.2 Printing problems", page 71. L The receiving mode is working normally. The other party's machine. Install paper (page 13) or remove the jammed paper (page 78). Press {FAX AUTO ANSWER} repeatedly to turn ON the {FAX AUTO ANSWER} indicator. press {FAX AUTO ANSWER} repeatedly to turn OFF the {FAX AUTO ANSWER} indicator. For assistance, please visit http://www.panasonic.com/help 73 L You may have changed the remote fax activation code from the manual input tray...
... be copied properly, the unit is set to "11.3.2 Printing problems", page 71. L The receiving mode is working normally. The other party's machine. Install paper (page 13) or remove the jammed paper (page 78). Press {FAX AUTO ANSWER} repeatedly to turn ON the {FAX AUTO ANSWER} indicator. press {FAX AUTO ANSWER} repeatedly to turn OFF the {FAX AUTO ANSWER} indicator. For assistance, please visit http://www.panasonic.com/help 73 L You may have changed the remote fax activation code from the manual input tray...

Fax
Page 76
... use the following functions after installing the Microsoft Windows XP Service Pack 2. - L The code may include "#" which fax items in the memory (i.e. L You set the answering machine to access the answering machine remotely, but the line was disconnected. LPD Manager (Network communication tool) The Windows Firewall Setting Tool enables you want to block [PCCMFLPD] and I pressed the remote access code to only give a greeting message. 11.3.8 If a power failure occurs L The unit...
... use the following functions after installing the Microsoft Windows XP Service Pack 2. - L The code may include "#" which fax items in the memory (i.e. L You set the answering machine to access the answering machine remotely, but the line was disconnected. LPD Manager (Network communication tool) The Windows Firewall Setting Tool enables you want to block [PCCMFLPD] and I pressed the remote access code to only give a greeting message. 11.3.8 If a power failure occurs L The unit...
Fax
Page 88
...: Standby: Approx. 7.5 W Preheat: Approx. 65 W Copy: Approx. 340 W Maximum: Approx. 900 W (When the fuser lamp turns on) ■ Power supply: 120 V AC, 60 Hz "TEL NO. LIST" - If printing quality is still poor, replace the toner cartridge and drum unit. - "ADDRESS LIST" {MENU} {SET} {} 1 Press {MENU} repeatedly to display "PRINT REPORT". 2 Press {} repeatedly to display the desired item. 3 Press {SET} to 600 × 600 dpi Fax resolution: Horizontal: 8 pels/mm (203 pels...
...: Standby: Approx. 7.5 W Preheat: Approx. 65 W Copy: Approx. 340 W Maximum: Approx. 900 W (When the fuser lamp turns on) ■ Power supply: 120 V AC, 60 Hz "TEL NO. LIST" - If printing quality is still poor, replace the toner cartridge and drum unit. - "ADDRESS LIST" {MENU} {SET} {} 1 Press {MENU} repeatedly to display "PRINT REPORT". 2 Press {} repeatedly to display the desired item. 3 Press {SET} to 600 × 600 dpi Fax resolution: Horizontal: 8 pels/mm (203 pels...
Fax
Page 99
... scan: 29 Q Quick scan: 38 Quick setup (Feature #100): 51 R Receiving faxes Automatically: 42 Manually: 43 Recording paper: 13 Recording paper size: 89 Redialing: 37, 39 Reports Address: 88 Broadcast programming: 88 Broadcast sending: 41 Caller ID: 52, 88 Confirmation: 38, 54 Journal: 38, 88 PCL font: 88 Power down: 76 Printer test: 88 Setup: 88 Telephone number: 88 Reset fax features (Feature #459): 56 Resolution: 32, 37 99 Display Contrast (Feature #145): 51 Error messages...
... scan: 29 Q Quick scan: 38 Quick setup (Feature #100): 51 R Receiving faxes Automatically: 42 Manually: 43 Recording paper: 13 Recording paper size: 89 Redialing: 37, 39 Reports Address: 88 Broadcast programming: 88 Broadcast sending: 41 Caller ID: 52, 88 Confirmation: 38, 54 Journal: 38, 88 PCL font: 88 Power down: 76 Printer test: 88 Setup: 88 Telephone number: 88 Reset fax features (Feature #459): 56 Resolution: 32, 37 99 Display Contrast (Feature #145): 51 Error messages...


