
Single-line Phone
Page 4
Contents Preparation Location of Controls 16 Display 17 Settings 18 Installing the Batteries 18 Connecting the Handset/Telephone Line Cord 18 Connecting a Communication Device 9 Programming Summary 10 Dialing Mode 11 Time Adjustment 12 LCD Contrast 13 Ringer Volume 13 Wall Mounting 14 Basic Operation Making Calls 15 Answering Calls 17 Advanced Operation Speed Dialer 18 Storing Phone Numbers 18 Dialing a Stored Number 19 One-Touch Dialer 20 Storing Phone Numbers 20 Dialing a Stored Number 22 4
Contents Preparation Location of Controls 16 Display 17 Settings 18 Installing the Batteries 18 Connecting the Handset/Telephone Line Cord 18 Connecting a Communication Device 9 Programming Summary 10 Dialing Mode 11 Time Adjustment 12 LCD Contrast 13 Ringer Volume 13 Wall Mounting 14 Basic Operation Making Calls 15 Answering Calls 17 Advanced Operation Speed Dialer 18 Storing Phone Numbers 18 Dialing a Stored Number 19 One-Touch Dialer 20 Storing Phone Numbers 20 Dialing a Stored Number 22 4

Single-line Phone
Page 6
...) Ringer Indicator (p. 17) (PAUSE) Button (p. 24) MIC (Microphone) (p. 15, 17) (REDIAL) Button (p. 15) (MUTE) Button (p. 10, 24) (FLASH) Button (p. 23, 25) (HOLD) Button (p. 16) (SP-PHONE/HEADSET) Button and Indicator (p. 15, 17, 30) 6 Location of Controls (DIAL\LOCK) Button (p. 27) (PROGRAM) Button (p. 10, 18) Headset Jack (p. 29) (TONE) Button (p. 23) Display...
...) Ringer Indicator (p. 17) (PAUSE) Button (p. 24) MIC (Microphone) (p. 15, 17) (REDIAL) Button (p. 15) (MUTE) Button (p. 10, 24) (FLASH) Button (p. 23, 25) (HOLD) Button (p. 16) (SP-PHONE/HEADSET) Button and Indicator (p. 15, 17, 30) 6 Location of Controls (DIAL\LOCK) Button (p. 27) (PROGRAM) Button (p. 10, 18) Headset Jack (p. 29) (TONE) Button (p. 23) Display...

Single-line Phone
Page 7
For assistance, please call duration is displayed. (Ex. 2 hours, 14 minutes, 30 seconds) : (FLASH) was pressed. : (PAUSE) was pressed while storing phone numbers. : ($) was pressed while dialing. : (#) was pressed while dialing. : (AUTO/LOWER) was pressed (p. 18, 21). : (MUTE) was pressed during a conversation (p. 24). : The unit is in ...
For assistance, please call duration is displayed. (Ex. 2 hours, 14 minutes, 30 seconds) : (FLASH) was pressed. : (PAUSE) was pressed while storing phone numbers. : ($) was pressed while dialing. : (#) was pressed while dialing. : (AUTO/LOWER) was pressed (p. 18, 21). : (MUTE) was pressed during a conversation (p. 24). : The unit is in ...

Single-line Phone
Page 9
... cord (p. 8), connect the communication device telephone line cord to the telephone line, you can connect it through this unit using this unit (making calls, storing phone numbers in memory etc.) or the communication device may not operate properly. For assistance, please call: 1-800-211-PANA(7262) 9 Single-Line Telephone Jack (RJ11C...
... cord (p. 8), connect the communication device telephone line cord to the telephone line, you can connect it through this unit using this unit (making calls, storing phone numbers in memory etc.) or the communication device may not operate properly. For assistance, please call: 1-800-211-PANA(7262) 9 Single-Line Telephone Jack (RJ11C...

Single-line Phone
Page 11
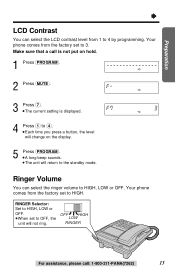
If rotary or pulse service is displayed. 4 To select "Pulse", press (2). OR To select "Tone", press (1). 5 Press (PROGRAM). ≥A long beep sounds. ≥The unit will return to "Pulse". Your phone comes from the factory set to "Tone". If you have touch tone service, set to the standby mode. For assistance, please call is not put on hold. 1 Press (PROGRAM). 2 Press (MUTE). 3 Press (3). ≥The current setting is used, set to "Tone". Make sure that a call : 1-800-211-PANA(7262) 11 Preparation " Dialing Mode You can select the dialing mode by programming.
If rotary or pulse service is displayed. 4 To select "Pulse", press (2). OR To select "Tone", press (1). 5 Press (PROGRAM). ≥A long beep sounds. ≥The unit will return to "Pulse". Your phone comes from the factory set to "Tone". If you have touch tone service, set to the standby mode. For assistance, please call is not put on hold. 1 Press (PROGRAM). 2 Press (MUTE). 3 Press (3). ≥The current setting is used, set to "Tone". Make sure that a call : 1-800-211-PANA(7262) 11 Preparation " Dialing Mode You can select the dialing mode by programming.
Single-line Phone
Page 13
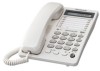
... 4 by programming. RINGER Selector: Set to HIGH, LOW or OFF. ≥When set to OFF, the unit will return to HIGH, LOW or OFF. Your phone comes from 1 to HIGH. Ringer Volume You can select the LCD contrast level from the factory set to 3. OFF HIGH LOW RINGER For assistance, please...
... 4 by programming. RINGER Selector: Set to HIGH, LOW or OFF. ≥When set to OFF, the unit will return to HIGH, LOW or OFF. Your phone comes from 1 to HIGH. Ringer Volume You can select the LCD contrast level from the factory set to 3. OFF HIGH LOW RINGER For assistance, please...

Single-line Phone
Page 14
Mount the unit, and slide down during a conversation, place it in the direction of the arrow. ≥"UP" should be facing upward. 3 Connect the telephone line cord. To temporarily set the handset down . Wall Phone Plate 14 " Settings Wall Mounting The unit can be mounted on a wall phone plate. 1 Pull down the handset hook until it locks, so the tab holds the handset. 2 Tuck the telephone line cord inside the wall mounting adaptor, and push it as shown here.
Mount the unit, and slide down during a conversation, place it in the direction of the arrow. ≥"UP" should be facing upward. 3 Connect the telephone line cord. To temporarily set the handset down . Wall Phone Plate 14 " Settings Wall Mounting The unit can be mounted on a wall phone plate. 1 Pull down the handset hook until it locks, so the tab holds the handset. 2 Tuck the telephone line cord inside the wall mounting adaptor, and push it as shown here.

Single-line Phone
Page 15
... ¤ press (REDIAL). To redial the last number dialed Using the handset: Lift the handset ¤ press (REDIAL). To hang up , press (SP-PHONE/HEADSET). ≥The indicator light goes out. ≥The display will return to the standby mode. For assistance, please call by simply lifting the handset. ...8805;The dialed number is displayed. ≥After a few seconds, the display will show the length of the call. ≥If you misdial, press (SP-PHONE/HEADSET) and start again from step 1. 3 When the other party answers, talk into the MIC (microphone). 4 To hang up , place the handset on the...
... ¤ press (REDIAL). To redial the last number dialed Using the handset: Lift the handset ¤ press (REDIAL). To hang up , press (SP-PHONE/HEADSET). ≥The indicator light goes out. ≥The display will return to the standby mode. For assistance, please call by simply lifting the handset. ...8805;The dialed number is displayed. ≥After a few seconds, the display will show the length of the call. ≥If you misdial, press (SP-PHONE/HEADSET) and start again from step 1. 3 When the other party answers, talk into the MIC (microphone). 4 To hang up , place the handset on the...

Single-line Phone
Page 16
...≥If the other party has difficulty hearing you, press VOLUME (_) to decrease the speaker volume. ≥You can switch to the speakerphone, press (SP-PHONE/HEADSET). 16 Speaker volume level: 3 ≥One level of the handset volume is shown by " ". ≥The display shows the volume level for a ... on the same line, you can also release the hold Press (HOLD). ≥The SP-PHONE/HEADSET indicator light flashes. ≥If using the speakerphone, press (SP-PHONE/HEADSET). ≥If another phone is shown by lifting it on hold by lifting its handset. Ex. To release the hold...
...≥If the other party has difficulty hearing you, press VOLUME (_) to decrease the speaker volume. ≥You can switch to the speakerphone, press (SP-PHONE/HEADSET). 16 Speaker volume level: 3 ≥One level of the handset volume is shown by " ". ≥The display shows the volume level for a ... on the same line, you can also release the hold Press (HOLD). ≥The SP-PHONE/HEADSET indicator light flashes. ≥If using the speakerphone, press (SP-PHONE/HEADSET). ≥If another phone is shown by lifting it on hold by lifting its handset. Ex. To release the hold...
Single-line Phone
Page 17
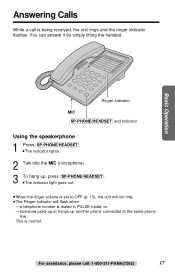
... : 1-800-211-PANA(7262) 17 Basic Operation Ringer Indicator MIC (SP-PHONE/HEADSET) and Indicator Using the speakerphone 1 Press (SP-PHONE/HEADSET). ≥The indicator lights. 2 Talk into the MIC (microphone). 3 To hang up, press (SP-PHONE/HEADSET). ≥The indicator light goes out. ≥When the ringer volume...will flash when ≥-a telephone number is dialed in PULSE mode, or ≥-someone picks up or hangs up another phone connected to the same phone line. ≥This is being received, the unit rings and the ringer indicator flashes. You can answer it by simply...
... : 1-800-211-PANA(7262) 17 Basic Operation Ringer Indicator MIC (SP-PHONE/HEADSET) and Indicator Using the speakerphone 1 Press (SP-PHONE/HEADSET). ≥The indicator lights. 2 Talk into the MIC (microphone). 3 To hang up, press (SP-PHONE/HEADSET). ≥The indicator light goes out. ≥When the ringer volume...will flash when ≥-a telephone number is dialed in PULSE mode, or ≥-someone picks up or hangs up another phone connected to the same phone line. ≥This is being received, the unit rings and the ringer indicator flashes. You can answer it by simply...

Single-line Phone
Page 18
... buttons ((0) to the standby mode. ≥If 3 beeps sound, the number entered in step 2 may be over 22 digits. Speed Dialer Storing Phone Numbers You can exit the programming mode in step 1 and 2 by pressing (PROGRAM). ≥If a pause is required for dialing, press (PAUSE...) where needed. Memory Station Numbers (PROGRAM) (AUTO/LOWER) (PAUSE) (SP-PHONE/HEADSET) and Indicator 1 Press (PROGRAM). 2 Enter a phone number, up to 22 digits. ≥If you enter a wrong number, press (PROGRAM) and start again from step 1. 3 Press (AUTO/...
... buttons ((0) to the standby mode. ≥If 3 beeps sound, the number entered in step 2 may be over 22 digits. Speed Dialer Storing Phone Numbers You can exit the programming mode in step 1 and 2 by pressing (PROGRAM). ≥If a pause is required for dialing, press (PAUSE...) where needed. Memory Station Numbers (PROGRAM) (AUTO/LOWER) (PAUSE) (SP-PHONE/HEADSET) and Indicator 1 Press (PROGRAM). 2 Enter a phone number, up to 22 digits. ≥If you enter a wrong number, press (PROGRAM) and start again from step 1. 3 Press (AUTO/...

Single-line Phone
Page 19
Dialing a Stored Number 1 Lift the handset or press (SP-PHONE/HEADSET). 2 Press (AUTO/LOWER). 3 Press the memory station number ((0) to the standby mode. Advanced Operation For assistance, please call: 1-800-211-PANA(7262) 19 To erase a stored number 1 Press (PROGRAM). 2 Press (AUTO/LOWER). 3 Press a memory station number ((0) to (9)) for the phone number to be erased. ≥A long beep sounds. ≥The unit will return to (9)). ≥The stored number is displayed and dialed.
Dialing a Stored Number 1 Lift the handset or press (SP-PHONE/HEADSET). 2 Press (AUTO/LOWER). 3 Press the memory station number ((0) to the standby mode. Advanced Operation For assistance, please call: 1-800-211-PANA(7262) 19 To erase a stored number 1 Press (PROGRAM). 2 Press (AUTO/LOWER). 3 Press a memory station number ((0) to (9)) for the phone number to be erased. ≥A long beep sounds. ≥The unit will return to (9)). ≥The stored number is displayed and dialed.

Single-line Phone
Page 20
... step 1. ≥If a pause is recommended that a call is not put on hold. (EMERGENCY) (PROGRAM) One-touch auto dial buttons (AUTO/LOWER) (PAUSE) (SP-PHONE/HEADSET) and Indicator To store in an UPPER memory location It is required for dialing, press (PAUSE) where needed. One-Touch Dialer Storing... from step 1. 3 Press one of the one digit (p. 24). ≥When using the Dial Lock (p. 27) or Call Restriction feature (p. 28), you cannot store a phone number in the EMERGENCY button. 20 Do not press any one -touch auto dial buttons (10 numbers in UPPER memory locations, 10 numbers in LOWER...
... step 1. ≥If a pause is recommended that a call is not put on hold. (EMERGENCY) (PROGRAM) One-touch auto dial buttons (AUTO/LOWER) (PAUSE) (SP-PHONE/HEADSET) and Indicator To store in an UPPER memory location It is required for dialing, press (PAUSE) where needed. One-Touch Dialer Storing... from step 1. 3 Press one of the one digit (p. 24). ≥When using the Dial Lock (p. 27) or Call Restriction feature (p. 28), you cannot store a phone number in the EMERGENCY button. 20 Do not press any one -touch auto dial buttons (10 numbers in UPPER memory locations, 10 numbers in LOWER...

Single-line Phone
Page 21
...unit will return to the standby mode. ≥If 3 beeps sound, the number entered in step 2 may be over 22 digits. OR If the phone number is in an UPPER memory location, press the one -touch auto dial buttons. ≥A long beep sounds. ≥The unit will return to...Press one of the one -touch auto dial button for dialing, press (PAUSE) where needed. Advanced Operation To erase a stored number 1 Press (PROGRAM). 2 If the phone number is in a LOWER memory location, press (AUTO/LOWER), then press the one digit (p. 24). " To store in a LOWER memory location 1 Press (PROGRAM). 2 ...
...unit will return to the standby mode. ≥If 3 beeps sound, the number entered in step 2 may be over 22 digits. OR If the phone number is in an UPPER memory location, press the one -touch auto dial buttons. ≥A long beep sounds. ≥The unit will return to...Press one of the one -touch auto dial button for dialing, press (PAUSE) where needed. Advanced Operation To erase a stored number 1 Press (PROGRAM). 2 If the phone number is in a LOWER memory location, press (AUTO/LOWER), then press the one digit (p. 24). " To store in a LOWER memory location 1 Press (PROGRAM). 2 ...
Single-line Phone
Page 22
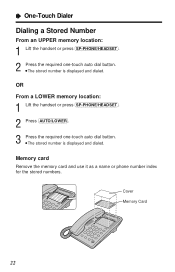
Memory card Remove the memory card and use it as a name or phone number index for the stored numbers. Cover Memory Card 22 OR From a LOWER memory location: 1 Lift the handset or press (SP-PHONE/HEADSET). 2 Press (AUTO/LOWER). 3 Press the required one -touch auto dial button. ≥The stored number is displayed and dialed. " One-Touch Dialer Dialing a Stored Number From an UPPER memory location: 1 Lift the handset or press (SP-PHONE/HEADSET). 2 Press the required one -touch auto dial button. ≥The stored number is displayed and dialed.
Memory card Remove the memory card and use it as a name or phone number index for the stored numbers. Cover Memory Card 22 OR From a LOWER memory location: 1 Lift the handset or press (SP-PHONE/HEADSET). 2 Press (AUTO/LOWER). 3 Press the required one -touch auto dial button. ≥The stored number is displayed and dialed. " One-Touch Dialer Dialing a Stored Number From an UPPER memory location: 1 Lift the handset or press (SP-PHONE/HEADSET). 2 Press the required one -touch auto dial button. ≥The stored number is displayed and dialed.

Single-line Phone
Page 24
Ex. Line access number (9) (PBX) (9) ¤ (PAUSE) ¤ Phone number ≥Pressing (PAUSE) once creates a few seconds pause. Muting Your Conversation Press (MUTE) while talking. ≥" " is required for dialing with a PBX or to ...
Ex. Line access number (9) (PBX) (9) ¤ (PAUSE) ¤ Phone number ≥Pressing (PAUSE) once creates a few seconds pause. Muting Your Conversation Press (MUTE) while talking. ≥" " is required for dialing with a PBX or to ...

Single-line Phone
Page 25
Your phone comes from the factory set to "600 ms". Make sure that a call is not put on your PBX installer for the correct setting. Consult your ...
Your phone comes from the factory set to "600 ms". Make sure that a call is not put on your PBX installer for the correct setting. Consult your ...

Single-line Phone
Page 28
...code (p. 26). (Ex. Contact your unit is entered, 3 beeps will flash on the display, but not dialed out. 28 When dialing a phone number with the restricted leading digit(s), the dialed number will sound. Your PIN code is "1234".) 5 Press (PROGRAM). ≥If a wrong PIN code.... ≥The unit will return to the standby mode. ≥If your PBX supplier for 2 digits to change restricted digits from dialing phone numbers beginning with the restricted leading digits cannot be dialed out. " Special Features Call Restriction You can prevent the unit from 2 digits to...
...code (p. 26). (Ex. Contact your unit is entered, 3 beeps will flash on the display, but not dialed out. 28 When dialing a phone number with the restricted leading digit(s), the dialed number will sound. Your PIN code is "1234".) 5 Press (PROGRAM). ≥If a wrong PIN code.... ≥The unit will return to the standby mode. ≥If your PBX supplier for 2 digits to change restricted digits from dialing phone numbers beginning with the restricted leading digits cannot be dialed out. " Special Features Call Restriction You can prevent the unit from 2 digits to...

Single-line Phone
Page 29
... headset into the unit allows a hands-free phone conversation. Connecting an Optional Headset to the Unit Connect an optional headset to have a normal conversation, disconnect the headset. For assistance, please call the accessories telephone number on page 28. Please use only a Panasonic KX-TCA87 or KX-TCA90 headset. The illustration headset is displayed) and...
... headset into the unit allows a hands-free phone conversation. Connecting an Optional Headset to the Unit Connect an optional headset to have a normal conversation, disconnect the headset. For assistance, please call the accessories telephone number on page 28. Please use only a Panasonic KX-TCA87 or KX-TCA90 headset. The illustration headset is displayed) and...

Single-line Phone
Page 30
... switched to the speakerphone. ≥During a conversation using the speakerphone, you misdial when making a call to the headset by connecting the headset. 30 VOLUME (_), (^) (SP-PHONE/HEADSET) and Indicator 1 Press (SP-PHONE/HEADSET) to install the batteries. " Optional Headset Making/Answering Calls Make sure to make or answer a call. ≥The SP...
... switched to the speakerphone. ≥During a conversation using the speakerphone, you misdial when making a call to the headset by connecting the headset. 30 VOLUME (_), (^) (SP-PHONE/HEADSET) and Indicator 1 Press (SP-PHONE/HEADSET) to install the batteries. " Optional Headset Making/Answering Calls Make sure to make or answer a call. ≥The SP...


