
Installation Manual
Page 7
...Panasonic Advanced Hybrid System, KX-TA824. About the Other Manuals The following sections: Section 1 System Outline Provides general information on troubleshooting and restarting the PBX. Section 3 Guide for installing the PBX, optional service cards, and peripheral equipment. Section 2 Installation Provides detailed instructions for KX-TA Maintenance Console Explains how to program... to serve as how to install the hardware and program this PBX using Panasonic proprietary telephones (PTs) or the KX-TA Maintenance Console. Section 4 Troubleshooting Provides information on...
...Panasonic Advanced Hybrid System, KX-TA824. About the Other Manuals The following sections: Section 1 System Outline Provides general information on troubleshooting and restarting the PBX. Section 3 Guide for installing the PBX, optional service cards, and peripheral equipment. Section 2 Installation Provides detailed instructions for KX-TA Maintenance Console Explains how to program... to serve as how to install the hardware and program this PBX using Panasonic proprietary telephones (PTs) or the KX-TA Maintenance Console. Section 4 Troubleshooting Provides information on...
Installation Manual
Page 9
... energy and, if not installed and used in the off and on a circuit different from gaining access to the network and to emergency numbers: 1. When programming emergency numbers and/or making test calls to these codes. If you have questions about what will not occur in the TRS feature to allow...
... energy and, if not installed and used in the off and on a circuit different from gaining access to the network and to emergency numbers: 1. When programming emergency numbers and/or making test calls to these codes. If you have questions about what will not occur in the TRS feature to allow...
Installation Manual
Page 14
... and the Panasonic KX-TA Maintenance Console software as well as by a one-touch operation c) Carrier-based voice mail service Refer to leave a voice message in Voice Message (BV) allows a caller to the Operating Instructions of a second caller during a conversation. 1.1 System Highlights 1.1 System Highlights 1.1.1 System Highlights Built-in Voice Message (BV) (Optional voice message card required) Built-in a user's personal message area or...
... and the Panasonic KX-TA Maintenance Console software as well as by a one-touch operation c) Carrier-based voice mail service Refer to leave a voice message in Voice Message (BV) allows a caller to the Operating Instructions of a second caller during a conversation. 1.1 System Highlights 1.1 System Highlights 1.1.1 System Highlights Built-in Voice Message (BV) (Optional voice message card required) Built-in a user's personal message area or...

Installation Manual
Page 48
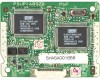
... not touch the circuit board of the card during the operation.) Programming Manual References [599] Clear All OGMs of the card while holding the catch open the top and bottom front covers. (→2.2.3 Opening/Closing Covers) 2. 2.3 Installing Optional Service Cards 2.3.7 Message Expansion Card for DISA OGMs (KX-TA82491) Function When an optional message expansion card for DISA OGMs is added, up...
... not touch the circuit board of the card during the operation.) Programming Manual References [599] Clear All OGMs of the card while holding the catch open the top and bottom front covers. (→2.2.3 Opening/Closing Covers) 2. 2.3 Installing Optional Service Cards 2.3.7 Message Expansion Card for DISA OGMs (KX-TA82491) Function When an optional message expansion card for DISA OGMs is added, up...
Installation Manual
Page 51
Programming Manual References [808] BV Card Initialization 8.6 BV Card Initialization Feature Manual References 1.1.8 Built-in Voice Message (BV) 2.3 Installing Optional Service Cards Installation Manual 51
Programming Manual References [808] BV Card Initialization 8.6 BV Card Initialization Feature Manual References 1.1.8 Built-in Voice Message (BV) 2.3 Installing Optional Service Cards Installation Manual 51
Installation Manual
Page 62
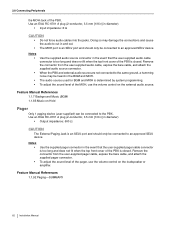
.... Use an EIAJ RC-6701 A plug (2-conductor, 3.5 mm [1/8 in] in diameter). • Output impedance: 600 Ω CAUTION The External Paging Jack is determined by system programming. Feature Manual References 1.1.92 Paging-SUMMARY 62 Installation Manual Feature Manual References 1.1.7 Background Music (BGM) 1.1.85 Music on Hold Pager Only 1 paging device (user-supplied...
.... Use an EIAJ RC-6701 A plug (2-conductor, 3.5 mm [1/8 in] in diameter). • Output impedance: 600 Ω CAUTION The External Paging Jack is determined by system programming. Feature Manual References 1.1.92 Paging-SUMMARY 62 Installation Manual Feature Manual References 1.1.7 Background Music (BGM) 1.1.85 Music on Hold Pager Only 1 paging device (user-supplied...

Installation Manual
Page 63
..., the user should use those specified in this installation manual to comply with the limits for a Class B digital device pursuant to print call records, and program the PBX. Signal Name Function 2 RD (RXD) 1 5 3 SD (TXD) 6 9 4 ER (DTR) 5 SG 6 DR (DSR) 7 RS (RTS) 8 CS (CTS) Receive Data Transmit Data Data Terminal Ready...
..., the user should use those specified in this installation manual to comply with the limits for a Class B digital device pursuant to print call records, and program the PBX. Signal Name Function 2 RD (RXD) 1 5 3 SD (TXD) 6 9 4 ER (DTR) 5 SG 6 DR (DSR) 7 RS (RTS) 8 CS (CTS) Receive Data Transmit Data Data Terminal Ready...
Installation Manual
Page 65
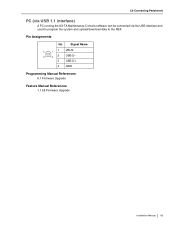
2.8 Connecting Peripherals PC (via USB 1.1 interface) A PC running the KX-TA Maintenance Console software can be connected via the USB interface and used to program the system and upload/download data to the PBX. Pin Assignments No. Signal Name 2 1 1 VBUS 2 USB D- 3 4 3 USB D+ 4 GND Programming Manual References 8.1 Firmware Upgrade Feature Manual References 1.1.58 Firmware Upgrade Installation Manual 65
2.8 Connecting Peripherals PC (via USB 1.1 interface) A PC running the KX-TA Maintenance Console software can be connected via the USB interface and used to program the system and upload/download data to the PBX. Pin Assignments No. Signal Name 2 1 1 VBUS 2 USB D- 3 4 3 USB D+ 4 GND Programming Manual References 8.1 Firmware Upgrade Feature Manual References 1.1.58 Firmware Upgrade Installation Manual 65
Installation Manual
Page 67
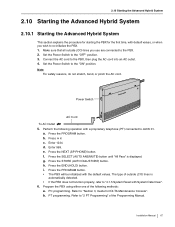
.... e. The type of outside (CO) lines you wish to the "OFF" position. 3. PC programming. Note For safety reasons, do not stretch, bend, or pinch the AC cord. Press #. Press the PROGRAM button. • The PBX will be initialized with a proprietary telephone (PT) connected to the PBX...to re-initialize the PBX. 1. Press the PROGRAM button. 2.10 Starting the Advanced Hybrid System 2.10 Starting the Advanced Hybrid System 2.10.1 Starting the Advanced Hybrid System This section explains the procedure for starting the PBX for KX-TA Maintenance Console". g. a. Press the STORE ...
.... e. The type of outside (CO) lines you wish to the "OFF" position. 3. PC programming. Note For safety reasons, do not stretch, bend, or pinch the AC cord. Press #. Press the PROGRAM button. • The PBX will be initialized with a proprietary telephone (PT) connected to the PBX...to re-initialize the PBX. 1. Press the PROGRAM button. 2.10 Starting the Advanced Hybrid System 2.10 Starting the Advanced Hybrid System 2.10.1 Starting the Advanced Hybrid System This section explains the procedure for starting the PBX for KX-TA Maintenance Console". g. a. Press the STORE ...
Installation Manual
Page 68
..., even if the Power Switch is set to conserve power. If the PBX will not be automatically detected. Programming Manual References [999] System Data Clear 8.4 System Data Clear Feature Manual References 1.1.103 PT Programming 68 Installation Manual 2.10 Starting the Advanced Hybrid System CAUTION • The PBX is powered as long as...
..., even if the Power Switch is set to conserve power. If the PBX will not be automatically detected. Programming Manual References [999] System Data Clear 8.4 System Data Clear Feature Manual References 1.1.103 PT Programming 68 Installation Manual 2.10 Starting the Advanced Hybrid System CAUTION • The PBX is powered as long as...
Installation Manual
Page 70
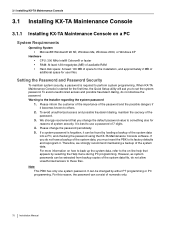
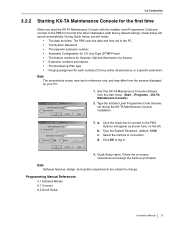
... a system password is required to perform system programming. However, as system passwords can consist of numerals only. 70 Installation Manual Note This PBX has only one system password. 3.1 Installing KX-TA Maintenance Console 3.1 Installing KX-TA Maintenance Console 3.1.1 Installing KX-TA Maintenance Console on -line help that you change the password periodically. 5. Setting the...
... a system password is required to perform system programming. However, as system passwords can consist of numerals only. 70 Installation Manual Note This PBX has only one system password. 3.1 Installing KX-TA Maintenance Console 3.1 Installing KX-TA Maintenance Console 3.1.1 Installing KX-TA Maintenance Console on -line help that you change the password periodically. 5. Setting the...
Installation Manual
Page 71
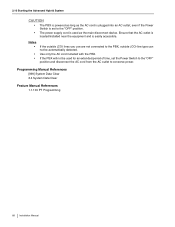
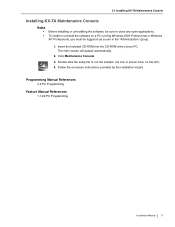
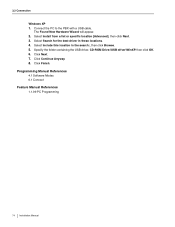
Click Maintenance Console. 3. Double-click the setup file to close any open applications. Programming Manual References 3.2 PC Programming Feature Manual References 1.1.99 PC Programming Installation Manual 71 Insert the included CD-ROM into the CD-ROM drive of your PC. The ...be sure to run the installer. (Its icon is shown here, on -screen instructions provided by the installation wizard. 3.1 Installing KX-TA Maintenance Console Installing KX-TA Maintenance Console Notes • • Before installing or uninstalling the software, be logged in as a user in the "...
Click Maintenance Console. 3. Double-click the setup file to close any open applications. Programming Manual References 3.2 PC Programming Feature Manual References 1.1.99 PC Programming Installation Manual 71 Insert the included CD-ROM into the CD-ROM drive of your PC. The ...be sure to run the installer. (Its icon is shown here, on -screen instructions provided by the installation wizard. 3.1 Installing KX-TA Maintenance Console Installing KX-TA Maintenance Console Notes • • Before installing or uninstalling the software, be logged in as a user in the "...
Installation Manual
Page 72
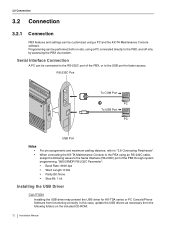
...USB Port PC USB Port Notes • • For pin assignments and maximum cabling distance, refer to "2.8 Connecting Peripherals". When connecting the KX-TA Maintenance Console to the PBX using a PC connected directly to the PBX, and off-site, by accessing the PBX via modem. 3.2 Connection... 3.2 Connection 3.2.1 Connection PBX features and settings can be connected to the RS-232C port of the PBX through system programming, "[800] SMDR RS-232C Parameter": • Baud Rate: 9600 bps • Word Length: 8 bits • Parity Bit: None • Stop...
...USB Port PC USB Port Notes • • For pin assignments and maximum cabling distance, refer to "2.8 Connecting Peripherals". When connecting the KX-TA Maintenance Console to the PBX using a PC connected directly to the PBX, and off-site, by accessing the PBX via modem. 3.2 Connection... 3.2 Connection 3.2.1 Connection PBX features and settings can be connected to the RS-232C port of the PBX through system programming, "[800] SMDR RS-232C Parameter": • Baud Rate: 9600 bps • Word Length: 8 bits • Parity Bit: None • Stop...
Installation Manual
Page 74
.... 8. Click Finish. Select Install from a list or specific location [Advanced], then click Next. 3. Select Include this location in these locations. 4. Programming Manual References 4.1 Software Modes 6.1 Connect Feature Manual References 1.1.99 PC Programming 74 Installation Manual The Found New Hardware Wizard will appear. 2. Specify the folder containing the USB driver, CD-ROM Drive...
.... 8. Click Finish. Select Install from a list or specific location [Advanced], then click Next. 3. Select Include this location in these locations. 4. Programming Manual References 4.1 Software Modes 6.1 Connect Feature Manual References 1.1.99 PC Programming 74 Installation Manual The Found New Hardware Wizard will appear. 2. Specify the folder containing the USB driver, CD-ROM Drive...
Installation Manual
Page 75
..., on -screen instructions and assign the items as prompted. Quick Setup starts. Follow the on the left. During Quick Setup, you start menu. (Start →Programs →KX-TA Maintenance Console) 2. Type the System Password. (default: 1234) Select the method of connection. Note Software features, design, and system requirements are for each...
..., on -screen instructions and assign the items as prompted. Quick Setup starts. Follow the on the left. During Quick Setup, you start menu. (Start →Programs →KX-TA Maintenance Console) 2. Type the System Password. (default: 1234) Select the method of connection. Note Software features, design, and system requirements are for each...
Installation Manual
Page 76
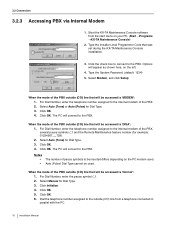
.... 4. Type the System Password. (default: 1234) 5. For Dial Number, enter the telephone number assigned to the outside (CO) line that was set during the KX-TA Maintenance Console installation. 3. Auto (Pulse) Dial Type cannot be accessed is 'DISA': 1. Click OK. 5. Click OK. 4. For Dial Number, enter the...Click OK. When the mode of the PBX. 2. Click OK. 4. The PC will appear as shown here, on your PC. (Start →Programs →KX-TA Maintenance Console) 2. Select Auto (Tone) for Dial Type. 3. When the mode of the PBX outside (CO) line that will be accessed is...
.... 4. Type the System Password. (default: 1234) 5. For Dial Number, enter the telephone number assigned to the outside (CO) line that was set during the KX-TA Maintenance Console installation. 3. Auto (Pulse) Dial Type cannot be accessed is 'DISA': 1. Click OK. 5. Click OK. 4. For Dial Number, enter the...Click OK. When the mode of the PBX. 2. Click OK. 4. The PC will appear as shown here, on your PC. (Start →Programs →KX-TA Maintenance Console) 2. Select Auto (Tone) for Dial Type. 3. When the mode of the PBX outside (CO) line that will be accessed is...
Installation Manual
Page 77
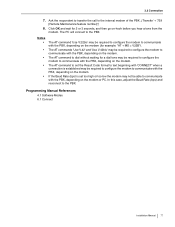
... communicate with the PBX, depending on the modem. Notes • The AT command 'Use V.22bis' may be required to configure the modem to the PBX. Programming Manual References 4.1 Software Modes 6.1 Connect Installation Manual 77 The AT commands 'Use V.42' and 'Use V.42bis' may be required to configure the modem to communicate...
... communicate with the PBX, depending on the modem. Notes • The AT command 'Use V.22bis' may be required to configure the modem to the PBX. Programming Manual References 4.1 Software Modes 6.1 Connect Installation Manual 77 The AT commands 'Use V.42' and 'Use V.42bis' may be required to configure the modem to communicate...
Installation Manual
Page 80
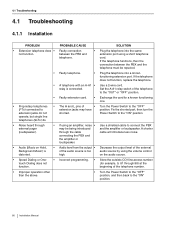
... amplifier or loudspeaker. • Audio (Music on the audio source. • Speed Dialing or Onetouch Dialing does not function. • Incorrect programming. • Store the outside (CO) line access number (for a known functioning one. • Proprietary telephones (PTs) connected to extension jacks... (SLTs) do. • The H and L pins of the telephone to the "OUT" or "OFF" position. • Faulty extension card. • Exchange the card for example, 9, 81 through external pager (loudspeaker). • If using an amplifier, noise • Use a shielded cable to the "OFF...
... amplifier or loudspeaker. • Audio (Music on the audio source. • Speed Dialing or Onetouch Dialing does not function. • Incorrect programming. • Store the outside (CO) line access number (for a known functioning one. • Proprietary telephones (PTs) connected to extension jacks... (SLTs) do. • The H and L pins of the telephone to the "OUT" or "OFF" position. • Faulty extension card. • Exchange the card for example, 9, 81 through external pager (loudspeaker). • If using an amplifier, noise • Use a shielded cable to the "OFF...

Installation Manual
Page 82
... headset is not used during a power failure. Select "Enable" for DTMF receiver 2 through "[107] DTMF Receiver Check" in the Feature Manual. system programming, "[107] DTMF Receiver Check". 2. If the call , the problem may have been caused by DTMF receiver 2. off. • During a power... cannot make the call can be made , go to "HIGH" or "LOW". (PT) does not ring. has not been programmed Flexible Buttons" in system programming. 82 Installation Manual receiver. Select "Disable" for DTMF receiver 1 and "Enable" for DTMF receiver 1 and dialing mode cannot make...
... headset is not used during a power failure. Select "Enable" for DTMF receiver 2 through "[107] DTMF Receiver Check" in the Feature Manual. system programming, "[107] DTMF Receiver Check". 2. If the call , the problem may have been caused by DTMF receiver 2. off. • During a power... cannot make the call can be made , go to "HIGH" or "LOW". (PT) does not ring. has not been programmed Flexible Buttons" in system programming. 82 Installation Manual receiver. Select "Disable" for DTMF receiver 1 and "Enable" for DTMF receiver 1 and dialing mode cannot make...
Installation Manual
Page 84
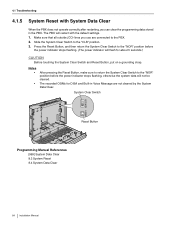
... [999] System Data Clear 8.3 System Reset 8.4 System Data Clear 84 Installation Manual Make sure that all outside (CO) lines you can clear the programming data stored in Voice Message are connected to the "NOR" position before the power indicator stops flashing, otherwise the system data will flash for DISA and Built-in the...
... [999] System Data Clear 8.3 System Reset 8.4 System Data Clear 84 Installation Manual Make sure that all outside (CO) lines you can clear the programming data stored in Voice Message are connected to the "NOR" position before the power indicator stops flashing, otherwise the system data will flash for DISA and Built-in the...

