Installation Manual
Page 2
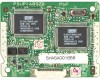
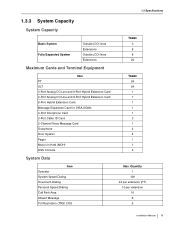
... Model KX-TA824 Optional Service Cards Proprietary Equipment KX-TA82461 KX-TA82470 KX-TA82481 KX-TA82483 KX-TA82491 KX-TA82492 KX-TA82493 KX-T30865 Description Advanced Hybrid System: 3 to 8 Outside (CO) Lines, 8 to 24 Extensions 4-Port Doorphone Card 8-Port Hybrid Extension Card 2-Port Analog CO Line and 8-Port Hybrid Extension Card 3-Port Analog CO Line and 8-Port Hybrid Extension Card Message Expansion Card for DISA OGMs 2-Channel Voice Message Card 3-Port...
... Model KX-TA824 Optional Service Cards Proprietary Equipment KX-TA82461 KX-TA82470 KX-TA82481 KX-TA82483 KX-TA82491 KX-TA82492 KX-TA82493 KX-T30865 Description Advanced Hybrid System: 3 to 8 Outside (CO) Lines, 8 to 24 Extensions 4-Port Doorphone Card 8-Port Hybrid Extension Card 2-Port Analog CO Line and 8-Port Hybrid Extension Card 3-Port Analog CO Line and 8-Port Hybrid Extension Card Message Expansion Card for DISA OGMs 2-Channel Voice Message Card 3-Port...

Installation Manual
Page 7
... other countries. Programming Manual The Programming Manual explains how to install the hardware and program this PBX using Panasonic proprietary telephones (PTs) or the KX-TA Maintenance Console. Operating Manual The Operating Manual describes how users can do, as well as an overall... technical reference for installing the PBX, optional service cards, and peripheral equipment. Celeron and Intel are either registered trademarks or...
... other countries. Programming Manual The Programming Manual explains how to install the hardware and program this PBX using Panasonic proprietary telephones (PTs) or the KX-TA Maintenance Console. Operating Manual The Operating Manual describes how users can do, as well as an overall... technical reference for installing the PBX, optional service cards, and peripheral equipment. Celeron and Intel are either registered trademarks or...
Installation Manual
Page 10
...Analog CO Line and 8-Port Hybrid Extension Card (KX-TA82483 38 2.3.3 2-Port Analog CO Line and 8-Port Hybrid Extension Card (KX-TA82481 40 2.3.4 8-Port Hybrid Extension Card (KX-TA82470 43 2.3.5 3-Port Caller ID Card (KX-TA82493 45 2.3.6 4-Port Doorphone Card (KX-TA82461 47 2.3.7 Message Expansion Card for DISA OGMs (KX-TA82491 48 2.3.8 2-Channel Voice Message Card (KX-TA82492 50 2.4 Connecting Outside (CO) Lines 52... Connections 66 2.10 Starting the Advanced Hybrid System 67 2.10.1 Starting the Advanced Hybrid System 67 3 Guide for KX-TA Maintenance Console 69 10 Installation Manual
...Analog CO Line and 8-Port Hybrid Extension Card (KX-TA82483 38 2.3.3 2-Port Analog CO Line and 8-Port Hybrid Extension Card (KX-TA82481 40 2.3.4 8-Port Hybrid Extension Card (KX-TA82470 43 2.3.5 3-Port Caller ID Card (KX-TA82493 45 2.3.6 4-Port Doorphone Card (KX-TA82461 47 2.3.7 Message Expansion Card for DISA OGMs (KX-TA82491 48 2.3.8 2-Channel Voice Message Card (KX-TA82492 50 2.4 Connecting Outside (CO) Lines 52... Connections 66 2.10 Starting the Advanced Hybrid System 67 2.10.1 Starting the Advanced Hybrid System 67 3 Guide for KX-TA Maintenance Console 69 10 Installation Manual
Installation Manual
Page 14
... Highlights 1.1 System Highlights 1.1.1 System Highlights Built-in Voice Message (BV) (Optional voice message card required) Built-in Voice Message (BV) allows a caller to the Operating Instructions of a second caller during a conversation. Caller ID Display on SLT The PBX can be shown on outside (CO) lines by using a PC and the Panasonic KX-TA Maintenance Console software as well as...
... Highlights 1.1 System Highlights 1.1.1 System Highlights Built-in Voice Message (BV) (Optional voice message card required) Built-in Voice Message (BV) allows a caller to the Operating Instructions of a second caller during a conversation. Caller ID Display on SLT The PBX can be shown on outside (CO) lines by using a PC and the Panasonic KX-TA Maintenance Console software as well as...

Installation Manual
Page 15
... as single line telephones (SLTs), fax machines and data terminals. Installation Manual 15 1.2 Basic System Construction 1.2 Basic System Construction 1.2.1 Main Unit The KX-TA824 has a basic capacity of supporting Panasonic proprietary telephones (PTs), and single line devices such as a radio or CD player. It is installed by default to support the Caller...
... as single line telephones (SLTs), fax machines and data terminals. Installation Manual 15 1.2 Basic System Construction 1.2 Basic System Construction 1.2.1 Main Unit The KX-TA824 has a basic capacity of supporting Panasonic proprietary telephones (PTs), and single line devices such as a radio or CD player. It is installed by default to support the Caller...
Installation Manual
Page 19
... Terminal Equipment Item PT SLT 3-Port Analog CO Line and 8-Port Hybrid Extension Card 2-Port Analog CO Line and 8-Port Hybrid Extension Card 8-Port Hybrid Extension Card Message Expansion Card for DISA OGMs 4-Port Doorphone Card 3-Port Caller ID Card 2-Channel Voice Message Card Doorphone Door Opener Pager Music on Hold (MOH) DSS Console System Data Item Operator System Speed Dialing...
... Terminal Equipment Item PT SLT 3-Port Analog CO Line and 8-Port Hybrid Extension Card 2-Port Analog CO Line and 8-Port Hybrid Extension Card 8-Port Hybrid Extension Card Message Expansion Card for DISA OGMs 4-Port Doorphone Card 3-Port Caller ID Card 2-Channel Voice Message Card Doorphone Door Opener Pager Music on Hold (MOH) DSS Console System Data Item Operator System Speed Dialing...
Installation Manual
Page 21
Detailed instructions for installing the main unit and optional service cards, and cabling of peripheral equipment are provided. Installation Manual 21 Information on system expansion and peripheral equipment installation is included. Section 2 Installation This section describes how to install the PBX.
Detailed instructions for installing the main unit and optional service cards, and cabling of peripheral equipment are provided. Installation Manual 21 Information on system expansion and peripheral equipment installation is included. Section 2 Installation This section describes how to install the PBX.
Installation Manual
Page 37
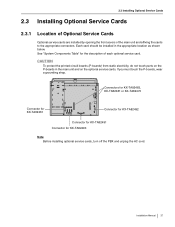
... appropriate location as shown below. 2.3 Installing Optional Service Cards 2.3 Installing Optional Service Cards 2.3.1 Location of Optional Service Cards Optional service cards are installed by opening the front covers of each optional service card. Connectors for KX-TA82483, KX-TA82481 or KX-TA82470 Connector for KX-TA82461 Connector for KX-TA82492 Connector for KX-TA82491 Connector for the description of the main unit...
... appropriate location as shown below. 2.3 Installing Optional Service Cards 2.3 Installing Optional Service Cards 2.3.1 Location of Optional Service Cards Optional service cards are installed by opening the front covers of each optional service card. Connectors for KX-TA82483, KX-TA82481 or KX-TA82470 Connector for KX-TA82461 Connector for KX-TA82492 Connector for KX-TA82491 Connector for the description of the main unit...
Installation Manual
Page 38
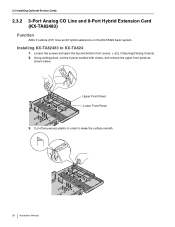
2.3 Installing Optional Service Cards 2.3.2 3-Port Analog CO Line and 8-Port Hybrid Extension Card (KX-TA82483) Function Adds 3 outside (CO) lines and 8 hybrid extensions on the KX-TA824 basic system. Upper Front Panel Lower Front Panel 3. Installing KX-TA82483 to make the surface smooth. 38 Installation Manual Using cutting pliers, cut the 6 parts marked with circles, and remove the upper front panel as shown below. Cut off any excess plastic in order to KX-TA824 1. Loosen the screws and open the top and bottom front covers. (→2.2.3 Opening/Closing Covers) 2.
2.3 Installing Optional Service Cards 2.3.2 3-Port Analog CO Line and 8-Port Hybrid Extension Card (KX-TA82483) Function Adds 3 outside (CO) lines and 8 hybrid extensions on the KX-TA824 basic system. Upper Front Panel Lower Front Panel 3. Installing KX-TA82483 to make the surface smooth. 38 Installation Manual Using cutting pliers, cut the 6 parts marked with circles, and remove the upper front panel as shown below. Cut off any excess plastic in order to KX-TA824 1. Loosen the screws and open the top and bottom front covers. (→2.2.3 Opening/Closing Covers) 2.

Installation Manual
Page 39
... Opening/Closing Covers) Installation Manual 39 Wrap the strap around all of the telephone line cords (2-conductor wiring) into the card's modular extension jacks. (→2.5.1 Connecting Extensions) 8. Connect the line cords to the main unit, install the... card as shown below, and secure the 3 extension bolts. 2.3 Installing Optional Service Cards 4. Attach the 2 extension connectors to the terminal board or the modular jacks from the telephone company. 7. Extension Bolts KX-TA82483 Extension Connectors 5. Insert the modular plugs of...
... Opening/Closing Covers) Installation Manual 39 Wrap the strap around all of the telephone line cords (2-conductor wiring) into the card's modular extension jacks. (→2.5.1 Connecting Extensions) 8. Connect the line cords to the main unit, install the... card as shown below, and secure the 3 extension bolts. 2.3 Installing Optional Service Cards 4. Attach the 2 extension connectors to the terminal board or the modular jacks from the telephone company. 7. Extension Bolts KX-TA82483 Extension Connectors 5. Insert the modular plugs of...
Installation Manual
Page 40
...strap around all of the telephone line cords (2-conductor wiring) into the card's modular extension jacks. (→2.5.1 Connecting Extensions) 7. 2.3 Installing Optional Service Cards 2.3.3 2-Port Analog CO Line and 8-Port Hybrid Extension Card (KX-TA82481) Function Adds 2 outside (CO) lines and 8 hybrid extensions... on the basic system of the telephone line cords (2- Refer to KX-TA824 1. Insert the modular plugs of KX-TA824. or 4-conductor wiring) into the card's modular CO ports. (→2.4.1 Connecting Outside (CO) Lines) 5. Close the covers and ...
...strap around all of the telephone line cords (2-conductor wiring) into the card's modular extension jacks. (→2.5.1 Connecting Extensions) 7. 2.3 Installing Optional Service Cards 2.3.3 2-Port Analog CO Line and 8-Port Hybrid Extension Card (KX-TA82481) Function Adds 2 outside (CO) lines and 8 hybrid extensions... on the basic system of the telephone line cords (2- Refer to KX-TA824 1. Insert the modular plugs of KX-TA824. or 4-conductor wiring) into the card's modular CO ports. (→2.4.1 Connecting Outside (CO) Lines) 5. Close the covers and ...
Installation Manual
Page 41
Installation Manual 41 Cut off any excess plastic in order to KX-TA824 Note Install the KX-TA82481 on 3-Port Analog CO Line and 8-Port Hybrid Extension Card (KX-TA82483) installed to make the surface smooth. Using cutting pliers, cut the 6 parts marked with circles, and remove the lower front panel or both upper and lower front panels as shown below. (Upper Front Panel) Lower Front Panel 3. Loosen the screws and open the top and bottom front covers. (→2.2.3 Opening/Closing Covers) 2. 2.3 Installing Optional Service Cards Installing KX-TA82481 on top of the KX-TA82483. 1.
Installation Manual 41 Cut off any excess plastic in order to KX-TA824 Note Install the KX-TA82481 on 3-Port Analog CO Line and 8-Port Hybrid Extension Card (KX-TA82483) installed to make the surface smooth. Using cutting pliers, cut the 6 parts marked with circles, and remove the lower front panel or both upper and lower front panels as shown below. (Upper Front Panel) Lower Front Panel 3. Loosen the screws and open the top and bottom front covers. (→2.2.3 Opening/Closing Covers) 2. 2.3 Installing Optional Service Cards Installing KX-TA82481 on top of the KX-TA82483. 1.

Installation Manual
Page 42
... Extension Connectors KX-TA82483 Extension Connectors Extension Bolts 5. or 4-conductor wiring) into the card's modular CO ports. (→2.4.1 Connecting Outside (CO) Lines) 6. Wrap the strap around all of the telephone line cords (2-conductor wiring) into the card's modular extension jacks. (→2.5.1 ... the terminal board or the modular jacks from the telephone company. 7. 2.3 Installing Optional Service Cards 4. Attach the extension connectors and extension bolts, install the cards as shown below, and secure the 3 screws. Insert the modular plugs of the telephone line...
... Extension Connectors KX-TA82483 Extension Connectors Extension Bolts 5. or 4-conductor wiring) into the card's modular CO ports. (→2.4.1 Connecting Outside (CO) Lines) 6. Wrap the strap around all of the telephone line cords (2-conductor wiring) into the card's modular extension jacks. (→2.5.1 ... the terminal board or the modular jacks from the telephone company. 7. 2.3 Installing Optional Service Cards 4. Attach the extension connectors and extension bolts, install the cards as shown below, and secure the 3 screws. Insert the modular plugs of the telephone line...

Installation Manual
Page 43
... section for the cutting procedure. (→2.3.2 3-Port Analog CO Line and 8-Port Hybrid Extension Card (KX-TA82483)) 3. Installing KX-TA82470 to the main unit, install the card as shown below, and secure the 3 screws. Insert the modular plugs of the cords. ...telephone line cords (2-conductor wiring) into the card's modular extension jacks. (→2.5.1 Connecting Extensions) 7. Insert the modular plugs of KX-TA824. KX-TA82470 Screws Extension Connectors 4. 2.3 Installing Optional Service Cards 2.3.4 8-Port Hybrid Extension Card (KX-TA82470) Function Adds 8 hybrid extensions on ...
... section for the cutting procedure. (→2.3.2 3-Port Analog CO Line and 8-Port Hybrid Extension Card (KX-TA82483)) 3. Installing KX-TA82470 to the main unit, install the card as shown below, and secure the 3 screws. Insert the modular plugs of the cords. ...telephone line cords (2-conductor wiring) into the card's modular extension jacks. (→2.5.1 Connecting Extensions) 7. Insert the modular plugs of KX-TA824. KX-TA82470 Screws Extension Connectors 4. 2.3 Installing Optional Service Cards 2.3.4 8-Port Hybrid Extension Card (KX-TA82470) Function Adds 8 hybrid extensions on ...
Installation Manual
Page 44
... cutting procedure, refer to "Installing KX-TA82481 on 3-Port Analog CO Line and 8-Port Hybrid Extension Card (KXTA82483) installed to KX-TA824 Note Install the KX-TA82470 on 3-Port Analog CO Line and 8-Port Hybrid Extension Card (KX-TA82483) installed to KX-TA824". (→2.3.3 2-Port Analog CO... Line and 8-Port Hybrid Extension Card (KX-TA82481)) 3. Wrap the strap...
... cutting procedure, refer to "Installing KX-TA82481 on 3-Port Analog CO Line and 8-Port Hybrid Extension Card (KXTA82483) installed to KX-TA824 Note Install the KX-TA82470 on 3-Port Analog CO Line and 8-Port Hybrid Extension Card (KX-TA82483) installed to KX-TA824". (→2.3.3 2-Port Analog CO... Line and 8-Port Hybrid Extension Card (KX-TA82481)) 3. Wrap the strap...
Installation Manual
Page 45
... and bottom front covers. (→2.2.3 Opening/Closing Covers) 2. FSK and DTMF Caller ID types are supported. 2.3 Installing Optional Service Cards 2.3.5 3-Port Caller ID Card (KX-TA82493) Function Adds Caller ID support for 3 outside (CO) lines. 1 card is installed by default for Outside (CO) Lines 1-3 For Outside (CO) Lines 7 and 8 For Outside (CO) Lines 4-6 Note...
... and bottom front covers. (→2.2.3 Opening/Closing Covers) 2. FSK and DTMF Caller ID types are supported. 2.3 Installing Optional Service Cards 2.3.5 3-Port Caller ID Card (KX-TA82493) Function Adds Caller ID support for 3 outside (CO) lines. 1 card is installed by default for Outside (CO) Lines 1-3 For Outside (CO) Lines 7 and 8 For Outside (CO) Lines 4-6 Note...

Installation Manual
Page 46
2.3 Installing Optional Service Cards Feature Manual References 1.1.30 Caller ID 1.1.78 Local Carrier-based Voice Mail Service 46 Installation Manual
2.3 Installing Optional Service Cards Feature Manual References 1.1.30 Caller ID 1.1.78 Local Carrier-based Voice Mail Service 46 Installation Manual
Installation Manual
Page 47
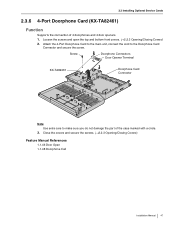
...the screws. (→2.2.3 Opening/Closing Covers) Feature Manual References 1.1.46 Door Open 1.1.48 Doorphone Call Installation Manual 47 Attach the 4-Port Doorphone Card to the main unit, connect the cord to make sure you do not damage the part of 4 doorphones and 4 door openers. 1. ...Screw Doorphone Connectors Door Opener Terminal KX-TA82461 Doorphone Card Connector Note Use extra care to the Doorphone Card Connector and secure the screw. Loosen the screws and open the top and bottom front covers. (→2.2.3 ...
...the screws. (→2.2.3 Opening/Closing Covers) Feature Manual References 1.1.46 Door Open 1.1.48 Doorphone Call Installation Manual 47 Attach the 4-Port Doorphone Card to the main unit, connect the cord to make sure you do not damage the part of 4 doorphones and 4 door openers. 1. ...Screw Doorphone Connectors Door Opener Terminal KX-TA82461 Doorphone Card Connector Note Use extra care to the Doorphone Card Connector and secure the screw. Loosen the screws and open the top and bottom front covers. (→2.2.3 ...

Installation Manual
Page 48
... with a circle. 3. Close the covers and secure the screws. (→2.2.3 Opening/Closing Covers) Note To uninstall the card, follow the instructions illustrated below. 2 1 1. 2.3 Installing Optional Service Cards 2.3.7 Message Expansion Card for DISA OGMs (KX-TA82491) Function When an optional message expansion card for DISA OGMs is increased from 3 to 6 minutes. 1. Loosen the screws and open . (Do not touch the...
... with a circle. 3. Close the covers and secure the screws. (→2.2.3 Opening/Closing Covers) Note To uninstall the card, follow the instructions illustrated below. 2 1 1. 2.3 Installing Optional Service Cards 2.3.7 Message Expansion Card for DISA OGMs (KX-TA82491) Function When an optional message expansion card for DISA OGMs is increased from 3 to 6 minutes. 1. Loosen the screws and open . (Do not touch the...

Installation Manual
Page 49
8.5 DISA OGM Clear Feature Manual References 1.1.41 Direct Inward System Access (DISA) 1.1.88 Outgoing Message (OGM) for DISA 2.3 Installing Optional Service Cards Installation Manual 49
8.5 DISA OGM Clear Feature Manual References 1.1.41 Direct Inward System Access (DISA) 1.1.88 Outgoing Message (OGM) for DISA 2.3 Installing Optional Service Cards Installation Manual 49


