

Operating Instructions
Page 2
...unit •Ribbon Cassette (installed on the carriage 1 *0perating Instruction Manual •Correction Tape (installed on the carriage 1 •Hard Cover • Daisywheel [KX-R101(Installed on the label at the right side of the unit when the Top Cover is opened. KX-R530 SERIAL NO...THE SOCKET-OUTLET SHALL BE INSTALLED NEAR THE EQUIPMENT AND SHALL BE EASILY ACCESSIBLE. MODEL NO. The serial number of the Panasonic Electronic Typewriter KX-R530. NAME OF DEALER ADDRESS OF DEALER DATE OF PURCHASE Accessories (Included) Make sure that the following parts have been included ...
...unit •Ribbon Cassette (installed on the carriage 1 *0perating Instruction Manual •Correction Tape (installed on the carriage 1 •Hard Cover • Daisywheel [KX-R101(Installed on the label at the right side of the unit when the Top Cover is opened. KX-R530 SERIAL NO...THE SOCKET-OUTLET SHALL BE INSTALLED NEAR THE EQUIPMENT AND SHALL BE EASILY ACCESSIBLE. MODEL NO. The serial number of the Panasonic Electronic Typewriter KX-R530. NAME OF DEALER ADDRESS OF DEALER DATE OF PURCHASE Accessories (Included) Make sure that the following parts have been included ...

Operating Instructions
Page 3
... right side of the carriage while removing the carriage stopper and the ribbon cassette stopper. *Do not place your typewriter where it is turned OFF, open the paper support and the top cover then remove the ribbon cassette stopper installed on the ribbon cassette and the carriage stopper installed on the carriage shaft. N )t (Be...
... right side of the carriage while removing the carriage stopper and the ribbon cassette stopper. *Do not place your typewriter where it is turned OFF, open the paper support and the top cover then remove the ribbon cassette stopper installed on the ribbon cassette and the carriage stopper installed on the carriage shaft. N )t (Be...

Operating Instructions
Page 5
Permanent Hyphen O. Caps Lock 22-23 Q. Operation 6-4 OPTIONAL ACCESSORIES 41 C. Centering L. Half Space 25 24 S. Right Margin Flush M. Stop Code B. Reference 47 6-5 SPECIFICATIONS 42-43 47 5 Permanent Space P. Typing Impression Control 25 24 24 25 3-3 APPLICATION A. 1-3 CHANGING THE RIBBON CASSETTE 1-4 CHANGING THE CORRECTION TAPE 1-5 CHANGING THE DAISYWHEEL 10 9 1-6 INSERTING THE PAPER 11 10 K. Paragraph Indent N. Micro Spacing 25 23 R. To Store Information with No Print 37-38 37-38 38 B.
Permanent Hyphen O. Caps Lock 22-23 Q. Operation 6-4 OPTIONAL ACCESSORIES 41 C. Centering L. Half Space 25 24 S. Right Margin Flush M. Stop Code B. Reference 47 6-5 SPECIFICATIONS 42-43 47 5 Permanent Space P. Typing Impression Control 25 24 24 25 3-3 APPLICATION A. 1-3 CHANGING THE RIBBON CASSETTE 1-4 CHANGING THE CORRECTION TAPE 1-5 CHANGING THE DAISYWHEEL 10 9 1-6 INSERTING THE PAPER 11 10 K. Paragraph Indent N. Micro Spacing 25 23 R. To Store Information with No Print 37-38 37-38 38 B.

Operating Instructions
Page 6
Be sure to move this unit as a printer by connecting the optional Interface Adaptor KX-R60 to the width of the paper being used. CM. Platen Knob This is used to adjust the contrast of 10, 12 and 15 are ... the paper before typing. 1 -1 NAMES AND OPERATION OF THE KX-R530 PARTS Paper Support Carriage• The ribbon cassette, correction tape and daisywheel are shown. Paper Bail Lever Pulling this lever toward you change the daisywheel, ribbon cassette or correction tape. LCD Covers LCD Your typewriter has a 15-character Liquid Crystal Display (LCD) which helps...
Be sure to move this unit as a printer by connecting the optional Interface Adaptor KX-R60 to the width of the paper being used. CM. Platen Knob This is used to adjust the contrast of 10, 12 and 15 are ... the paper before typing. 1 -1 NAMES AND OPERATION OF THE KX-R530 PARTS Paper Support Carriage• The ribbon cassette, correction tape and daisywheel are shown. Paper Bail Lever Pulling this lever toward you change the daisywheel, ribbon cassette or correction tape. LCD Covers LCD Your typewriter has a 15-character Liquid Crystal Display (LCD) which helps...
Operating Instructions
Page 9
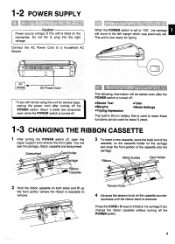
... a new cassette, place the back end of the cassette onto the carriage. The unit is now ready for about 5 years. 1-3 CHANGING THE RIBBON CASSETTE After turning the POWER switch off the POWER switch. 9 1-2 POWER SUPPLY Caution Power source voltage of this unit is listed on the carriage ...the front portion of the cassette, on the cassette holder on the nameplate. O IMMIOH011iall00011C0NIIIIIHRE0 I AC Socket AC Power Cord If you change the ribbon cassette without turning off , open the paper support and remove the front plate. You will not be used to "ON", the carriage will...
... a new cassette, place the back end of the cassette onto the carriage. The unit is now ready for about 5 years. 1-3 CHANGING THE RIBBON CASSETTE After turning the POWER switch off the POWER switch. 9 1-2 POWER SUPPLY Caution Power source voltage of this unit is listed on the carriage ...the front portion of the cassette, on the cassette holder on the nameplate. O IMMIOH011iall00011C0NIIIIIHRE0 I AC Socket AC Power Cord If you change the ribbon cassette without turning off , open the paper support and remove the front plate. You will not be used to "ON", the carriage will...
Operating Instructions
Page 10
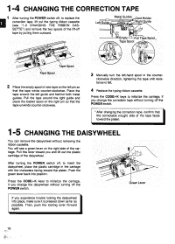
... without turning off tape by pulling them outward. Push the green lever back into place, make sure it is felt. 4 Replace the typing ribbon cassette. After changing the correction tape, confirm that the tape unwinds counter-clockwise. 3 Manually turn the left-hand spool in the carriage with...off the POWER switch. 1-4 CHANGING THE CORRECTION TAPE After turning the POWER switch off, to replace the correction tape, lift out the typing ribbon cassette (see a green lever on the right side of the carriage. After turning the POWER switch off the POWER switch. Green Lever If...
... without turning off tape by pulling them outward. Push the green lever back into place, make sure it is felt. 4 Replace the typing ribbon cassette. After changing the correction tape, confirm that the tape unwinds counter-clockwise. 3 Manually turn the left-hand spool in the carriage with...off the POWER switch. 1-4 CHANGING THE CORRECTION TAPE After turning the POWER switch off, to replace the correction tape, lift out the typing ribbon cassette (see a green lever on the right side of the carriage. After turning the POWER switch off the POWER switch. Green Lever If...
Operating Instructions
Page 14
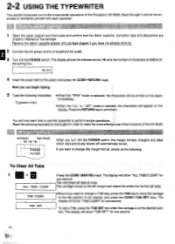
...the entire line format (all tabs at the desired position. wir Rat 1 Open the paper support and front plate and confirm that the ribbon cassette, correction tape and daisywheel are properly installed on the writing line. 41 100 4 Insert the paper behind the platen and press the...14 The display shows the indicator arrow (1) and the number of the Panasonic KX-R530. Press the RETURN key to familiarize yourself with each operation. The display will show "ALL TABS CLEAR" for one second. 2-2 USING THE TYPEWRITER This section introduces you have not already done so. Read through it ...
...the entire line format (all tabs at the desired position. wir Rat 1 Open the paper support and front plate and confirm that the ribbon cassette, correction tape and daisywheel are properly installed on the writing line. 41 100 4 Insert the paper behind the platen and press the...14 The display shows the indicator arrow (1) and the number of the Panasonic KX-R530. Press the RETURN key to familiarize yourself with each operation. The display will show "ALL TABS CLEAR" for one second. 2-2 USING THE TYPEWRITER This section introduces you have not already done so. Read through it ...
Operating Instructions
Page 46
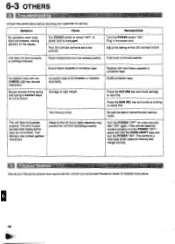
...printing Is blurred. Replace with the CANCEL (0 key; Text memory is not installed, or installed incorrectly. Should your Panasonic product ever require service, consult your typewriter for service. Plug in the release position. Noise on the AC line or static electricity may contain garbled characters....again. Turn the POWER switch "ON". The error buzzer sounds when typing and/or keys do not function). Adjust the setting of ribbon cassette or correction tape. This performs a total reset which clears all memory and margin formats. Correction tape is full. Re-edit...
...printing Is blurred. Replace with the CANCEL (0 key; Text memory is not installed, or installed incorrectly. Should your Panasonic product ever require service, consult your typewriter for service. Plug in the release position. Noise on the AC line or static electricity may contain garbled characters....again. Turn the POWER switch "ON". The error buzzer sounds when typing and/or keys do not function). Adjust the setting of ribbon cassette or correction tape. This performs a total reset which clears all memory and margin formats. Correction tape is full. Re-edit...

Operating Instructions
Page 47
.../4" (D)x 43/8" (H) (427 x 365x 112 mm) 11 lbs. (5 kg) 47 Description KX-R10 KX-R11 KX-R12 KX-R13 KX-R14 KX-R20 KX-R21 Daisywheel Printing Element COURIER 10 PRESTIGE PICA 10 PRESTIGE ELITE 12 SCRIPT 10/12 GOTHIC 15 Correctable Film-Ribbon Cassette Fabric Ribbon Cassette KX-R30 KX-R31 Lift-off ) 41°F (5°C) to 95°F (35°...
.../4" (D)x 43/8" (H) (427 x 365x 112 mm) 11 lbs. (5 kg) 47 Description KX-R10 KX-R11 KX-R12 KX-R13 KX-R14 KX-R20 KX-R21 Daisywheel Printing Element COURIER 10 PRESTIGE PICA 10 PRESTIGE ELITE 12 SCRIPT 10/12 GOTHIC 15 Correctable Film-Ribbon Cassette Fabric Ribbon Cassette KX-R30 KX-R31 Lift-off ) 41°F (5°C) to 95°F (35°...

