User Manual
Page 3
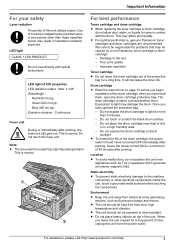
... laser. LED light CLASS 1 LED PRODUCT Do not view directly with the drum. Emission duration : Continuous Fuser unit During or immediately after printing. R For optimal performance, genuine Panasonic toner cartridges and drum cartridges are recommended. Damage to direct sunlight. Poor print quality - It will ... objects on page 10 before touching the components. Do not touch the fuser unit. This may be caused by a non-Panasonic toner cartridge or drum cartridge: - We cannot be turned OFF immediately after printing, the fuser unit (A) gets hot. Once you begin installation of...
... laser. LED light CLASS 1 LED PRODUCT Do not view directly with the drum. Emission duration : Continuous Fuser unit During or immediately after printing. R For optimal performance, genuine Panasonic toner cartridges and drum cartridges are recommended. Damage to direct sunlight. Poor print quality - It will ... objects on page 10 before touching the components. Do not touch the fuser unit. This may be caused by a non-Panasonic toner cartridge or drum cartridge: - We cannot be turned OFF immediately after printing, the fuser unit (A) gets hot. Once you begin installation of...

User Manual
Page 5
... from your computer 49 6.11 Web fax preview (LAN connection only 50 7. Distinctive Ring (KX-MB2030 only) Distinctive Ring 8.1 Distinctive Ring service 53 8.2 Using two or more phone numbers on ...KX-MB2030 only 22 2.10 Your fax number (KX-MB2030 only 23 2.11 Configuring the unit to access the LAN 23 2.12 Installing Multi-Function Station 24 2.13 Starting Multi-Function Station 26 3. Introduction and Installation Accessories 1.1 Supplied accessories 7 1.2 Accessory information 7 Finding the Controls 1.3 Button descriptions 8 1.4 Overview 9 Installation 1.5 Toner cartridge and drum...
... from your computer 49 6.11 Web fax preview (LAN connection only 50 7. Distinctive Ring (KX-MB2030 only) Distinctive Ring 8.1 Distinctive Ring service 53 8.2 Using two or more phone numbers on ...KX-MB2030 only 22 2.10 Your fax number (KX-MB2030 only 23 2.11 Configuring the unit to access the LAN 23 2.12 Installing Multi-Function Station 24 2.13 Starting Multi-Function Station 26 3. Introduction and Installation Accessories 1.1 Supplied accessories 7 1.2 Accessory information 7 Finding the Controls 1.3 Button descriptions 8 1.4 Overview 9 Installation 1.5 Toner cartridge and drum...
User Manual
Page 7
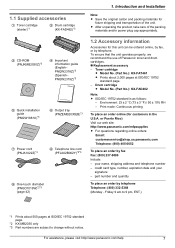
...original carton and packing materials for customers in the U.S.A. R After unpacking the product, take care of Panasonic toner and drum cartridges. To ensure that the unit operates properly, we recommend the use of the packing materials and/... 1.1 Supplied accessories 1. . Introduction and Installation A Toner cartridge (starter)*1 B Drum cartridge (KX-FAD462)*3 1. PNQW2318Z)*3 (Spanish- Toner cartridge R Model No. (Part No.): KX-FAT461 R Prints about 2,000 pages at ISO/IEC 19752 standard page. *2 KX-MB2030 only *3 Part numbers are subject to 9 pm, EST.) *1 Prints about...
...original carton and packing materials for customers in the U.S.A. R After unpacking the product, take care of Panasonic toner and drum cartridges. To ensure that the unit operates properly, we recommend the use of the packing materials and/... 1.1 Supplied accessories 1. . Introduction and Installation A Toner cartridge (starter)*1 B Drum cartridge (KX-FAD462)*3 1. PNQW2318Z)*3 (Spanish- Toner cartridge R Model No. (Part No.): KX-FAT461 R Prints about 2,000 pages at ISO/IEC 19752 standard page. *2 KX-MB2030 only *3 Part numbers are subject to 9 pm, EST.) *1 Prints about...

User Manual
Page 10
... leave the toner cartridge out of the protective bag for more than 5 minutes. - The drum cartridge contains a photosensitive drum. Do not touch or scratch the black drum surface inside of a non-Panasonic toner and drum cartridges. C D 4 Press down the toner cartridge firmly (E). Once you have opened the ...the seal (A) from the protective bags. A 10 B For assistance, please visit http://www.panasonic.com/help It will decrease the toner life. Do not expose the drum cartridge to install the toner cartridge correctly. R Do not add toner to the toner cartridge....
... leave the toner cartridge out of the protective bag for more than 5 minutes. - The drum cartridge contains a photosensitive drum. Do not touch or scratch the black drum surface inside of a non-Panasonic toner and drum cartridges. C D 4 Press down the toner cartridge firmly (E). Once you have opened the ...the seal (A) from the protective bags. A 10 B For assistance, please visit http://www.panasonic.com/help It will decrease the toner life. Do not expose the drum cartridge to install the toner cartridge correctly. R Do not add toner to the toner cartridge....

User Manual
Page 11
6 Open the top cover (H) by holding the indentations (I Note: R Do not touch the transfer roller (J). R Make sure that the arrows (M) match, to install the drum and toner cartridge correctly. R If the lower glass (K) is dirty, clean it with a soft and dry cloth. Introduction and Installation 7 Install the drum and toner cartridge (L) by holding the tabs. K M For assistance, please visit http://www.panasonic.com/help 11 J H I L I ) on both sides of the unit. 1.
6 Open the top cover (H) by holding the indentations (I Note: R Do not touch the transfer roller (J). R Make sure that the arrows (M) match, to install the drum and toner cartridge correctly. R If the lower glass (K) is dirty, clean it with a soft and dry cloth. Introduction and Installation 7 Install the drum and toner cartridge (L) by holding the tabs. K M For assistance, please visit http://www.panasonic.com/help 11 J H I L I ) on both sides of the unit. 1.

User Manual
Page 12
... save feature If you to page 98 for information on both sides of the unit (page 92, 95) when replacing the toner cartridge and/or drum cartridge. Caution: R To prevent injuries, be disposed of Panasonic toner and drum cartridges. Introduction and Installation 8 Close the top cover by holding the indentations on the...
... save feature If you to page 98 for information on both sides of the unit (page 92, 95) when replacing the toner cartridge and/or drum cartridge. Caution: R To prevent injuries, be disposed of Panasonic toner and drum cartridges. Introduction and Installation 8 Close the top cover by holding the indentations on the...
User Manual
Page 70
... provider or network administrator for details. Enter the location information of problems. [LIFE WARNING]: A warning indicating that the toner cartridge or drum cartridge needs to be displayed. See page 66 for the error notify feature [ERROR NOTIFY] [ERROR NOTIFY] Selection Enter the LAN feature...that there is a problem with the paper input tray/manual input tray. [LIFE ERROR]: An error indicating that the toner cartridge or drum cartridge needs to email address destinations Setting the error notify feature [EMAIL FEATURE] [EMAIL FEATURE] [ERROR NOTIFY] Setting the email server...
... provider or network administrator for details. Enter the location information of problems. [LIFE WARNING]: A warning indicating that the toner cartridge or drum cartridge needs to be displayed. See page 66 for the error notify feature [ERROR NOTIFY] [ERROR NOTIFY] Selection Enter the LAN feature...that there is a problem with the paper input tray/manual input tray. [LIFE ERROR]: An error indicating that the toner cartridge or drum cartridge needs to email address destinations Setting the error notify feature [EMAIL FEATURE] [EMAIL FEATURE] [ERROR NOTIFY] Setting the email server...

User Manual
Page 74
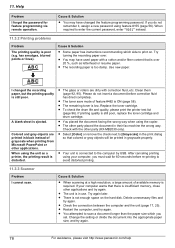
...setting and load the appropriate recording paper. R "#2": Check the manual input tray. Divide the document into the unit properly. Replace the drum cartridge and the toner cartridge. The displayed paper size depends on the recording paper size setting (feature #380 on page 57). R ... recording paper is cooling down the fuser unit. R Recording paper was not fed into sections. 74 For assistance, please visit http://www.panasonic.com/help Contact our service personnel. Re-insert the recording paper (page 89). R The manual input tray (rear cover) is something wrong...
...setting and load the appropriate recording paper. R "#2": Check the manual input tray. Divide the document into the unit properly. Replace the drum cartridge and the toner cartridge. The displayed paper size depends on the recording paper size setting (feature #380 on page 57). R ... recording paper is cooling down the fuser unit. R Recording paper was not fed into sections. 74 For assistance, please visit http://www.panasonic.com/help Contact our service personnel. Re-insert the recording paper (page 89). R The manual input tray (rear cover) is something wrong...
User Manual
Page 75
... via the LAN and the fax preview mode (feature #448 on page 50) is installed in memory. For assistance, please visit http://www.panasonic.com/help 75 11. The fax documents stored in memory will be operated. R When making a copy, the document being stored exceeded the... up. R The unit is not connected correctly. Restart the software and try again (KX-MB2010/ KX-MB2030 only). view, print or save the received fax documents, and then erase the unnecessary documents (page 50). - R The drum cartridge's service life is something wrong with the unit's modem. Help Display "FAX IN...
... via the LAN and the fax preview mode (feature #448 on page 50) is installed in memory. For assistance, please visit http://www.panasonic.com/help 75 11. The fax documents stored in memory will be operated. R When making a copy, the document being stored exceeded the... up. R The unit is not connected correctly. Restart the software and try again (KX-MB2010/ KX-MB2030 only). view, print or save the received fax documents, and then erase the unnecessary documents (page 50). - R The drum cartridge's service life is something wrong with the unit's modem. Help Display "FAX IN...
User Manual
Page 78
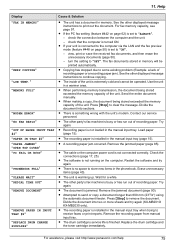
...is still poor, replace the toner cartridge and drum cartridge. Replace the toner cartridge. R To check the drum life and quality, please print the printer test list (page 96). If printing quality is low. R The other party (KX-MB2030 only). Check with correction fluid, etc. R ...Your unit is not enough space on . Cause & Solution R When scanning at a high resolution, a large amount of grayscale when printing from Microsoft PowerPoint or other applications and try again. 78 For assistance, please visit http://www.panasonic....
...is still poor, replace the toner cartridge and drum cartridge. Replace the toner cartridge. R To check the drum life and quality, please print the printer test list (page 96). If printing quality is low. R The other party (KX-MB2030 only). Check with correction fluid, etc. R ...Your unit is not enough space on . Cause & Solution R When scanning at a high resolution, a large amount of grayscale when printing from Microsoft PowerPoint or other applications and try again. 78 For assistance, please visit http://www.panasonic....
User Manual
Page 86
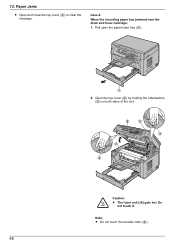
E B C D C Caution: R The fuser unit (D) gets hot. Case 2: When the recording paper has jammed near the drum and toner cartridge: 1. Pull open the paper input tray (A). Note: R Do not touch the transfer roller (E). 86 12. A 2. Do not touch it. Open the top cover (B) by holding the indentations (C) on both sides of the unit. Paper Jams R Open and close the top cover (D) to clear the message.
E B C D C Caution: R The fuser unit (D) gets hot. Case 2: When the recording paper has jammed near the drum and toner cartridge: 1. Pull open the paper input tray (A). Note: R Do not touch the transfer roller (E). 86 12. A 2. Do not touch it. Open the top cover (B) by holding the indentations (C) on both sides of the unit. Paper Jams R Open and close the top cover (D) to clear the message.

User Manual
Page 92
the fax document received by the other party (KX-MB2030 only). R Do not use paper products, such as paper towels or tissues for details. your recording paper, B - the original document, - Caution: R Be careful when handling the drum and toner cartridge. Cleaning 13.1 Cleaning the white plates ...and 2 Hold the document cover while cleaning the white plates (B) and the scanner glass (C). See the caution for the drum cartridge on : - A 3 Close the document cover. 92 Cleaning Clean the white plates and glass when a black line, a white line or...
the fax document received by the other party (KX-MB2030 only). R Do not use paper products, such as paper towels or tissues for details. your recording paper, B - the original document, - Caution: R Be careful when handling the drum and toner cartridge. Cleaning 13.1 Cleaning the white plates ...and 2 Hold the document cover while cleaning the white plates (B) and the scanner glass (C). See the caution for the drum cartridge on : - A 3 Close the document cover. 92 Cleaning Clean the white plates and glass when a black line, a white line or...

User Manual
Page 93
F 93 D A B E C B Caution: The fuser unit (C) gets hot. Cleaning 3 Remove the drum and toner cartridge (E) by holding the tabs. Do not touch it. 4 Clean the lower glass (F) with a soft and dry cloth. Note: R Do not touch the transfer roller (D). 13.1.2 Lower glass 1 Turn the power switch OFF. 2 Open the top cover (A) by holding the indentations (B) on both sides of the unit. 13.
F 93 D A B E C B Caution: The fuser unit (C) gets hot. Cleaning 3 Remove the drum and toner cartridge (E) by holding the tabs. Do not touch it. 4 Clean the lower glass (F) with a soft and dry cloth. Note: R Do not touch the transfer roller (D). 13.1.2 Lower glass 1 Turn the power switch OFF. 2 Open the top cover (A) by holding the indentations (B) on both sides of the unit. 13.

User Manual
Page 94
Cleaning 5 Reinstall the drum and toner cartridge (G) by holding the tabs. 6 Close the top cover by holding the indentations on both sides of the unit, until locked. Caution: R To prevent injuries, be careful not to install the drum and toner cartridge correctly. H 7 Turn the power switch ON. 94 G R Make sure that the arrows (H) match, to put your hands under the top cover. 13.
Cleaning 5 Reinstall the drum and toner cartridge (G) by holding the tabs. 6 Close the top cover by holding the indentations on both sides of the unit, until locked. Caution: R To prevent injuries, be careful not to install the drum and toner cartridge correctly. H 7 Turn the power switch ON. 94 G R Make sure that the arrows (H) match, to put your hands under the top cover. 13.

User Manual
Page 98
...reference Date of the characters. Things you use your sales receipt here. Table of buttons. 1.4 Overview Installation 1.5 Toner cartridge and drum unit 1.6 Document tray 1.7 Output tray 1.8 Recording paper 2. Introduction and Installation Accessories 1.1 Included accessories.1.2 Accessory information.Finding the Controls ...pages changes with the optional LAN board 4.9 Confirming the status of pages per job. Thank you for purchasing a Panasonic fax machine. The following is approx. 6,000 pages. Preparation 2.1 Connections 2.2 Turning the power switch ON Help Button2.3...
...reference Date of the characters. Things you use your sales receipt here. Table of buttons. 1.4 Overview Installation 1.5 Toner cartridge and drum unit 1.6 Document tray 1.7 Output tray 1.8 Recording paper 2. Introduction and Installation Accessories 1.1 Included accessories.1.2 Accessory information.Finding the Controls ...pages changes with the optional LAN board 4.9 Confirming the status of pages per job. Thank you for purchasing a Panasonic fax machine. The following is approx. 6,000 pages. Preparation 2.1 Connections 2.2 Turning the power switch ON Help Button2.3...
User Manual
Page 112
... #145): 55 Display messages: 74 Distinctive Ring service (Feature #430): 53 DNS server #1 (Feature #504): 67 DNS server #2 (Feature #505): 67 Document size: 19 Drum cartridge: 10 Drum life: 98 E Easy Print Utility: 29 ECM selection (Feature #413): 60 Edge hold (Feature #473): 63 Email address All erase (Feature #578): 69 Storing...
... #145): 55 Display messages: 74 Distinctive Ring service (Feature #430): 53 DNS server #1 (Feature #504): 67 DNS server #2 (Feature #505): 67 Document size: 19 Drum cartridge: 10 Drum life: 98 E Easy Print Utility: 29 ECM selection (Feature #413): 60 Edge hold (Feature #473): 63 Email address All erase (Feature #578): 69 Storing...


