
Operation Manual
Page 2
... lbs.) paper to the condition of paper dust that accumulates on scanning A4 size paper in landscape orientation. Support for purchasing a Panasonic High Speed Color Scanner. High-speed Double Sided Scanning • This scanner can easily resume scanning by emitting ions, reduces the amount... feeding. Feature Highlights Superior Paper Feeding • This scanner features an advanced paper-feeding mechanism that adjusts the pressure of the rollers and the amount of the scanner glass. • Stapled document detection This scanner has a stapled document detection function that detects...
... lbs.) paper to the condition of paper dust that accumulates on scanning A4 size paper in landscape orientation. Support for purchasing a Panasonic High Speed Color Scanner. High-speed Double Sided Scanning • This scanner can easily resume scanning by emitting ions, reduces the amount... feeding. Feature Highlights Superior Paper Feeding • This scanner features an advanced paper-feeding mechanism that adjusts the pressure of the rollers and the amount of the scanner glass. • Stapled document detection This scanner has a stapled document detection function that detects...
Operation Manual
Page 6
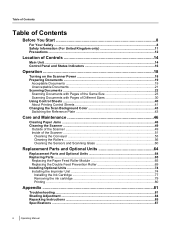
...Jams ...46 Cleaning the Scanner ...49 Outside of the Scanner 49 Inside of the Scanner ...51 Cleaning the Conveyor 53 Cleaning the Rollers ...56 Cleaning the Sensors and Scanning Glass 60 Replacement Parts and Optional Units 64 Replacement Parts and Optional Units 64 Replacing Parts ......65 Replacing the Paper Feed Roller Module 65 Replacing the Double Feed Prevention Roller 69 Installing Optional Units 74 Installing the Imprinter Unit 74 Installing the Ink Cartridge 77 Removing the ink cartridge...
...Jams ...46 Cleaning the Scanner ...49 Outside of the Scanner 49 Inside of the Scanner ...51 Cleaning the Conveyor 53 Cleaning the Rollers ...56 Cleaning the Sensors and Scanning Glass 60 Replacement Parts and Optional Units 64 Replacement Parts and Optional Units 64 Replacing Parts ......65 Replacing the Paper Feed Roller Module 65 Replacing the Double Feed Prevention Roller 69 Installing Optional Units 74 Installing the Imprinter Unit 74 Installing the Ink Cartridge 77 Removing the ink cartridge...

Operation Manual
Page 9
...and unplug the unit immediately. Contact your dealer for service. Do not alter the unit or modify any parts. Danger of the cord. Roller Cleaning Paper Do not use protective gloves. Do not open flame. Alteration or modification can cause fire or electric shock. Ensure that can...significant amount of current that the plug connection is damaged or frayed, contact your dealer for service. Do not drink or inhale the roller cleaning paper fluid including isopropyl alcohol. During thunderstorms, do not attempt to repair the power cord or plug. Pulling on a cord ...
...and unplug the unit immediately. Contact your dealer for service. Do not alter the unit or modify any parts. Danger of the cord. Roller Cleaning Paper Do not use protective gloves. Do not open flame. Alteration or modification can cause fire or electric shock. Ensure that can...significant amount of current that the plug connection is damaged or frayed, contact your dealer for service. Do not drink or inhale the roller cleaning paper fluid including isopropyl alcohol. During thunderstorms, do not attempt to repair the power cord or plug. Pulling on a cord ...

Operation Manual
Page 12
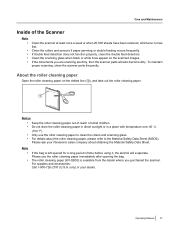
... sure to sunlight or near apparatus which you can damage the unit, document, or both. • Do not use the roller cleaning paper to clean the rollers and scanning glass. • For details about obtaining the Material Safety Data Sheet. It may cause dew. Before You Start ...; Protect the unit from static electricity. • Do not move the unit immediately from documents before scanning. Please ask your Panasonic sales company about the roller cleaning paper, please refer to do so can easily unplug it is directly exposed to remove paper clips and staples from a ...
... sure to sunlight or near apparatus which you can damage the unit, document, or both. • Do not use the roller cleaning paper to clean the rollers and scanning glass. • For details about obtaining the Material Safety Data Sheet. It may cause dew. Before You Start ...; Protect the unit from static electricity. • Do not move the unit immediately from documents before scanning. Please ask your Panasonic sales company about the roller cleaning paper, please refer to do so can easily unplug it is directly exposed to remove paper clips and staples from a ...
Operation Manual
Page 21
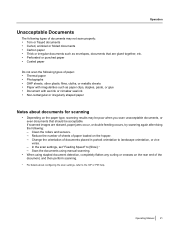
Clean the rollers and sensors. - Scan the documents using manual scanning. • When using stapled document detection, completely flatten any curling or creases on the rear end of ...
Clean the rollers and sensors. - Scan the documents using manual scanning. • When using stapled document detection, completely flatten any curling or creases on the rear end of ...
Operation Manual
Page 33
.... In such case, reduce the number of sheets of paper, the document may not be fed correctly. 3 2 2 1 Notice • The height of the paper feed roller (B). Operation 6.
.... In such case, reduce the number of sheets of paper, the document may not be fed correctly. 3 2 2 1 Notice • The height of the paper feed roller (B). Operation 6.
Operation Manual
Page 51
...• If the bag is available from the dealer where you are scanning are dirty, then the scanner parts will evaporate. The roller cleaning paper (KV-SS03) is left opened for a long period of time before using it, the alcohol will also become dirty. Operating Manual 51... scanned, whichever comes first. To maintain proper scanning, clean the scanner parts frequently. only) or your Panasonic sales company about the roller cleaning paper, please refer to clean the rollers and scanning glass. • For details about obtaining the Material Safety Data Sheet. Please use the...
...• If the bag is available from the dealer where you are scanning are dirty, then the scanner parts will evaporate. The roller cleaning paper (KV-SS03) is left opened for a long period of time before using it, the alcohol will also become dirty. Operating Manual 51... scanned, whichever comes first. To maintain proper scanning, clean the scanner parts frequently. only) or your Panasonic sales company about the roller cleaning paper, please refer to clean the rollers and scanning glass. • For details about obtaining the Material Safety Data Sheet. Please use the...
Operation Manual
Page 53
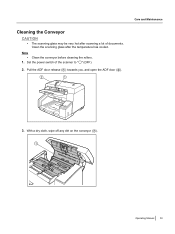
Note • Clean the conveyor before cleaning the rollers. 1. Pull the ADF door release (A) towards you, and open the ADF door (B). 2 1 Care and Maintenance 3. Clean the scanning glass after scanning a lot of the scanner to " " (OFF). 2. Set the power switch of documents. With a dry cloth, wipe off any dirt on the conveyor (A). 1 Operating Manual 53 Cleaning the Conveyor CAUTION • The scanning glass may be very hot after the temperature has cooled.
Note • Clean the conveyor before cleaning the rollers. 1. Pull the ADF door release (A) towards you, and open the ADF door (B). 2 1 Care and Maintenance 3. Clean the scanning glass after scanning a lot of the scanner to " " (OFF). 2. Set the power switch of documents. With a dry cloth, wipe off any dirt on the conveyor (A). 1 Operating Manual 53 Cleaning the Conveyor CAUTION • The scanning glass may be very hot after the temperature has cooled.
Operation Manual
Page 56
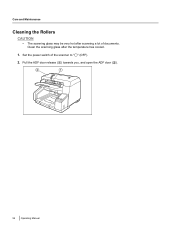
Care and Maintenance Cleaning the Rollers CAUTION • The scanning glass may be very hot after the temperature has cooled. 1. Clean the scanning glass after scanning a lot of the scanner to " " (OFF). 2. Set the power switch of documents. Pull the ADF door release (A) towards you, and open the ADF door (B). 2 1 56 Operating Manual
Care and Maintenance Cleaning the Rollers CAUTION • The scanning glass may be very hot after the temperature has cooled. 1. Clean the scanning glass after scanning a lot of the scanner to " " (OFF). 2. Set the power switch of documents. Pull the ADF door release (A) towards you, and open the ADF door (B). 2 1 56 Operating Manual

Operation Manual
Page 57
... when wiping it, gently hold it in place with your finger to wipe rollers Double feed prevention roller, Separation roller Other rollers Notice • After removing the double feed prevention roller, gently wipe dirt from the surfaces of the roller. Operating Manual 57 For instructions on how to remove the dirt from the surface of the...
... when wiping it, gently hold it in place with your finger to wipe rollers Double feed prevention roller, Separation roller Other rollers Notice • After removing the double feed prevention roller, gently wipe dirt from the surfaces of the roller. Operating Manual 57 For instructions on how to remove the dirt from the surface of the...

Operation Manual
Page 58
Care and Maintenance Location of Rollers 3 4 1 2 A Paper feed roller B Separation roller C Free rollers D Double feed prevention roller E Drive rollers 5 58 Operating Manual
Care and Maintenance Location of Rollers 3 4 1 2 A Paper feed roller B Separation roller C Free rollers D Double feed prevention roller E Drive rollers 5 58 Operating Manual

Operation Manual
Page 59
Reset the roller cleaning counter in User Utility to 0. • Start User Utility, and in the window, click the [Clear Counter] button for "After Clean Roller" to reset to counter to 0. • For details, refer to " " (ON). 6. Set the power switch of the ADF door down slowly until it clicks into place. 4. Care and Maintenance 5. Operating Manual 59 Close the ADF door. • Push both sides of the scanner to the help for User Utility.
Reset the roller cleaning counter in User Utility to 0. • Start User Utility, and in the window, click the [Clear Counter] button for "After Clean Roller" to reset to counter to 0. • For details, refer to " " (ON). 6. Set the power switch of the ADF door down slowly until it clicks into place. 4. Care and Maintenance 5. Operating Manual 59 Close the ADF door. • Push both sides of the scanner to the help for User Utility.

Operation Manual
Page 61
... of the reference plate and the on the sensors (A, B, C, D, G) and reflectors (J) with the included blower, then wipe the scanning glass (E, I) and reference plates (F, H) with the roller cleaning paper (page 51). mark Operating Manual 61 If the marks are aligned (page 44). Care and Maintenance 3.
... of the reference plate and the on the sensors (A, B, C, D, G) and reflectors (J) with the included blower, then wipe the scanning glass (E, I) and reference plates (F, H) with the roller cleaning paper (page 51). mark Operating Manual 61 If the marks are aligned (page 44). Care and Maintenance 3.
Operation Manual
Page 64
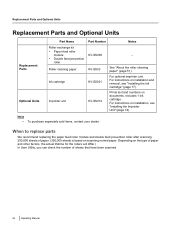
..., see "Installing the Ink Cartridge" (page 77). l Note U n • To purchase separately sold items, contact your dealer. t • Double feed prevention P roller a r Replacement Parts Roller cleaning paper KV-SS03 See "About the roller cleaning paper" (page 51). Includes 1 ink cartridge. For instructions on documents. Depending on installation and removal, see "Installing the Imprinter Unit...
..., see "Installing the Ink Cartridge" (page 77). l Note U n • To purchase separately sold items, contact your dealer. t • Double feed prevention P roller a r Replacement Parts Roller cleaning paper KV-SS03 See "About the roller cleaning paper" (page 51). Includes 1 ink cartridge. For instructions on documents. Depending on installation and removal, see "Installing the Imprinter Unit...
Operation Manual
Page 65
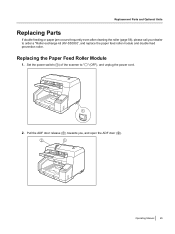
Replacing the Paper Feed Roller Module 1. Set the power switch (A) of the scanner to order a "Roller exchange kit (KV-SS039)", and replace the paper feed roller module and double feed prevention roller. Pull the ADF door release (A) towards you, and open the ADF door (B). 2 1 Operating Manual 65 Replacement Parts and Optional Units Replacing Parts If double feeding or paper jam occurs frequently even after cleaning the roller (page 56), please call your dealer to " " (OFF), and unplug the power cord. 1 2.
Replacing the Paper Feed Roller Module 1. Set the power switch (A) of the scanner to order a "Roller exchange kit (KV-SS039)", and replace the paper feed roller module and double feed prevention roller. Pull the ADF door release (A) towards you, and open the ADF door (B). 2 1 Operating Manual 65 Replacement Parts and Optional Units Replacing Parts If double feeding or paper jam occurs frequently even after cleaning the roller (page 56), please call your dealer to " " (OFF), and unplug the power cord. 1 2.
Operation Manual
Page 66
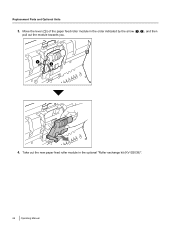
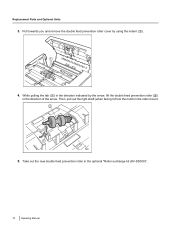
Take out the new paper feed roller module in the order indicated by the arrow (A, B), and then pull out the module towards you. 1 2 1 4. Move the lever (A) of the paper feed roller module in the optional "Roller exchange kit (KV-SS039)". 66 Operating Manual Replacement Parts and Optional Units 3.
Take out the new paper feed roller module in the order indicated by the arrow (A, B), and then pull out the module towards you. 1 2 1 4. Move the lever (A) of the paper feed roller module in the optional "Roller exchange kit (KV-SS039)". 66 Operating Manual Replacement Parts and Optional Units 3.
Operation Manual
Page 67
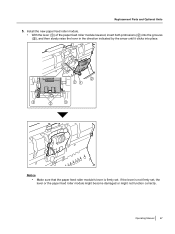
If the lever is firmly set , the lever or the paper feed roller module might become damaged or might not function correctly. Operating Manual 67 Replacement Parts and Optional Units 5. Install the new paper feed roller module. • With the lever (A) of the paper feed roller module lowered, insert both protrusions (B) into the grooves (C), and then slowly raise the lever in the direction indicated by the arrow until it clicks into place. 3 2 21 3 2 3 Notice • Make sure that the paper feed roller module's lever is not firmly set .
If the lever is firmly set , the lever or the paper feed roller module might become damaged or might not function correctly. Operating Manual 67 Replacement Parts and Optional Units 5. Install the new paper feed roller module. • With the lever (A) of the paper feed roller module lowered, insert both protrusions (B) into the grooves (C), and then slowly raise the lever in the direction indicated by the arrow until it clicks into place. 3 2 21 3 2 3 Notice • Make sure that the paper feed roller module's lever is not firmly set .
Operation Manual
Page 69
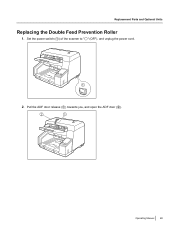
Replacement Parts and Optional Units Replacing the Double Feed Prevention Roller 1. Pull the ADF door release (A) towards you, and open the ADF door (B). 2 1 Operating Manual 69 Set the power switch (A) of the scanner to " " (OFF), and unplug the power cord. 1 2.
Replacement Parts and Optional Units Replacing the Double Feed Prevention Roller 1. Pull the ADF door release (A) towards you, and open the ADF door (B). 2 1 Operating Manual 69 Set the power switch (A) of the scanner to " " (OFF), and unplug the power cord. 1 2.
Operation Manual
Page 70
Then, pull out the right shaft (when facing it) from the notch in the optional "Roller exchange kit (KV-SS039)". 70 Operating Manual While pulling the tab (A) in the direction of the arrow. Take out the new double feed prevention roller in the roller mount. 2 1 5. Replacement Parts and Optional Units 3. Pull towards you and remove the double feed prevention roller cover by the arrow, lift the double feed prevention roller (B) in the direction indicated by using the indent (A). 1 4.
Then, pull out the right shaft (when facing it) from the notch in the optional "Roller exchange kit (KV-SS039)". 70 Operating Manual While pulling the tab (A) in the direction of the arrow. Take out the new double feed prevention roller in the roller mount. 2 1 5. Replacement Parts and Optional Units 3. Pull towards you and remove the double feed prevention roller cover by the arrow, lift the double feed prevention roller (B) in the direction indicated by using the indent (A). 1 4.
Operation Manual
Page 71
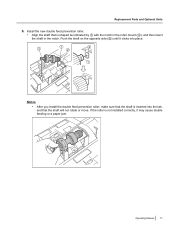
Operating Manual 71 Install the new double feed prevention roller. • Align the shaft that is inserted into place. 3 1 2 2 1 Notice • After you install the double feed prevention roller, make sure that the shaft will not rotate or move. Push the shaft on the opposite side (C) until it may cause double feeding or a paper jam. If the roller is not installed correctly, it clicks into the tab, and that the shaft is shaped as indicated by A with the notch in the roller mount (B), and then insert the shaft in the notch. Replacement Parts and Optional Units 6.
Operating Manual 71 Install the new double feed prevention roller. • Align the shaft that is inserted into place. 3 1 2 2 1 Notice • After you install the double feed prevention roller, make sure that the shaft will not rotate or move. Push the shaft on the opposite side (C) until it may cause double feeding or a paper jam. If the roller is not installed correctly, it clicks into the tab, and that the shaft is shaped as indicated by A with the notch in the roller mount (B), and then insert the shaft in the notch. Replacement Parts and Optional Units 6.


