Scanner
Page 1
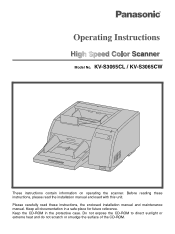
Before reading these instructions, please read these instructions, the enclosed installation manual and maintenance manual. Keep the CD-ROM in a safe place for future reference. Do not expose the CD-ROM to direct sunlight or extreme heat and do not scratch or smudge the surface of the CD-ROM. Keep all documentation in the protective case. Please carefully read the installation manual enclosed with this unit. KV-S3065CL / KV-S3065CW These instructions contain information on operating the scanner. Model No.
Before reading these instructions, please read these instructions, the enclosed installation manual and maintenance manual. Keep the CD-ROM in a safe place for future reference. Do not expose the CD-ROM to direct sunlight or extreme heat and do not scratch or smudge the surface of the CD-ROM. Keep all documentation in the protective case. Please carefully read the installation manual enclosed with this unit. KV-S3065CL / KV-S3065CW These instructions contain information on operating the scanner. Model No.
Scanner
Page 3
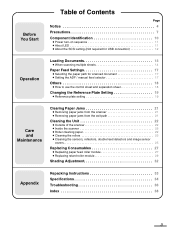
...≥ When scanning multiple sheets 14 Paper Feed Settings 17 ≥ Selecting the paper path for scanned document 17 ≥ Setting the ADF / manual feed selector 17 Others 18 ≥ How to use the control sheet and separation sheet 18 Changing the Reference Plate Setting 19 ≥ Reference plate... ≥ Removing paper jams from the exit path 21 Cleaning the Unit 22 ≥ Outside of the scanner 22 ≥ Inside the scanner 22 ≥ Roller cleaning paper 22 ≥ Cleaning the rollers 23 ≥ Cleaning the sensors, reflectors, double feed detectors and image sensor ...
...≥ When scanning multiple sheets 14 Paper Feed Settings 17 ≥ Selecting the paper path for scanned document 17 ≥ Setting the ADF / manual feed selector 17 Others 18 ≥ How to use the control sheet and separation sheet 18 Changing the Reference Plate Setting 19 ≥ Reference plate... ≥ Removing paper jams from the exit path 21 Cleaning the Unit 22 ≥ Outside of the scanner 22 ≥ Inside the scanner 22 ≥ Roller cleaning paper 22 ≥ Cleaning the rollers 23 ≥ Cleaning the sensors, reflectors, double feed detectors and image sensor ...
Scanner
Page 4
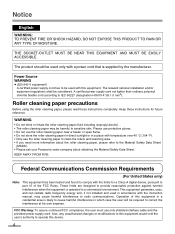
... can radiate radio frequency energy and, if not installed and used in which case the user will be used only with the instruction manual, may be considered. Operation of the FCC Rules. Keep these instructions completely. Also, any unauthorized changes or modifications to this equipment...please read these instructions for a Class A digital device, pursuant to the Material Safety Data Sheet (MSDS). • Please ask your Panasonic sales company about obtaining the Material Safety Data Sheet. Notice English WARNING: TO PREVENT FIRE OR SHOCK HAZARD, DO NOT EXPOSE THIS PRODUCT...
... can radiate radio frequency energy and, if not installed and used in which case the user will be used only with the instruction manual, may be considered. Operation of the FCC Rules. Keep these instructions completely. Also, any unauthorized changes or modifications to this equipment...please read these instructions for a Class A digital device, pursuant to the Material Safety Data Sheet (MSDS). • Please ask your Panasonic sales company about obtaining the Material Safety Data Sheet. Notice English WARNING: TO PREVENT FIRE OR SHOCK HAZARD, DO NOT EXPOSE THIS PRODUCT...

Scanner
Page 10
Fan exhaust vent USB connector Used to connect the scanner unit to stop or start scanning a document. An imprinter unit installed here is turned on, the green indicator lights. ADF / manual feed selector To prevent double feeding, adjust the selector to feed the scanning document properly. (Refer to page 17.) Paper path selector... ± : off position Front door Pre-imprinter door (Exit tray) Used for attaching optional imprinter unit and ink cartridge. SCSI connector Used to connect the scanner unit to page 17.) An imprinter unit installed here is for 100-200 V.
Fan exhaust vent USB connector Used to connect the scanner unit to stop or start scanning a document. An imprinter unit installed here is turned on, the green indicator lights. ADF / manual feed selector To prevent double feeding, adjust the selector to feed the scanning document properly. (Refer to page 17.) Paper path selector... ± : off position Front door Pre-imprinter door (Exit tray) Used for attaching optional imprinter unit and ink cartridge. SCSI connector Used to connect the scanner unit to page 17.) An imprinter unit installed here is for 100-200 V.
Scanner
Page 11
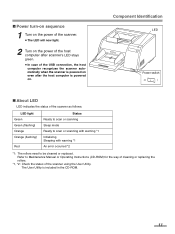
...∫ Power turn-on sequence 1 Turn on the power of the scanner. ≥ The LED will now light. 2 Turn on the power of the host computer after scanner's LED stays green. ≥ In case of the scanner using the User Utility. Component Identification LED Power switch ∫ About LED...or scanning Sleep mode Ready to scan or scanning with warning *1 Initializing Sleeping with warning *1 An error occurred *2 *1: The rollers need to Maintenance Manual or Operating Instructions (CD-ROM) for the way of cleaning or replacing the rollers. *1, *2: Check the status of the USB connection, the host...
...∫ Power turn-on sequence 1 Turn on the power of the scanner. ≥ The LED will now light. 2 Turn on the power of the host computer after scanner's LED stays green. ≥ In case of the scanner using the User Utility. Component Identification LED Power switch ∫ About LED...or scanning Sleep mode Ready to scan or scanning with warning *1 Initializing Sleeping with warning *1 An error occurred *2 *1: The rollers need to Maintenance Manual or Operating Instructions (CD-ROM) for the way of cleaning or replacing the rollers. *1, *2: Check the status of the USB connection, the host...

Scanner
Page 13
...number of sheets indicates a guideline for optimum performance. The following methods: ≥ Set the feed speed to "Slow". ≥ Scan the documents by fed manually one sheet at the document feeder, reduce the number of the document loaded on the hopper tray: g/m2 40 52 64 75 80 90 104...documents ≥ Tracing paper ≥ Thermal paper When scanning is not performed properly, try the following types of the document should be scanned by manual feeding. ≥ Set the paper path selector to about 20. Be sure to remove the document from the exit tray after it is highly ...
...number of sheets indicates a guideline for optimum performance. The following methods: ≥ Set the feed speed to "Slow". ≥ Scan the documents by fed manually one sheet at the document feeder, reduce the number of the document loaded on the hopper tray: g/m2 40 52 64 75 80 90 104...documents ≥ Tracing paper ≥ Thermal paper When scanning is not performed properly, try the following types of the document should be scanned by manual feeding. ≥ Set the paper path selector to about 20. Be sure to remove the document from the exit tray after it is highly ...
Scanner
Page 17
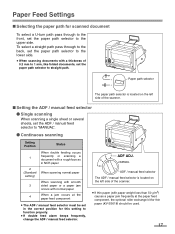
... ADF ADJ. Paper path selector The paper path selector is located on the left side of the scanner. ≥ If thin paper (with a thickness of the scanner. ∫ Setting the ADF / manual feed selector ¥ Single scanning When scanning a single sheet or several sheets, set in NCR paper... 4 When a jam occurs at the paper feed component, the optional roller exchange kit for thin paper (KV-SS018) should be set the ADF / manual feed selector to "MANUAL". ¥ Continuous scanning Setting Position Status When double feeding occurs 1 frequently or scanning a document with a...
... ADF ADJ. Paper path selector The paper path selector is located on the left side of the scanner. ≥ If thin paper (with a thickness of the scanner. ∫ Setting the ADF / manual feed selector ¥ Single scanning When scanning a single sheet or several sheets, set in NCR paper... 4 When a jam occurs at the paper feed component, the optional roller exchange kit for thin paper (KV-SS018) should be set the ADF / manual feed selector to "MANUAL". ¥ Continuous scanning Setting Position Status When double feeding occurs 1 frequently or scanning a document with a...
Scanner
Page 18
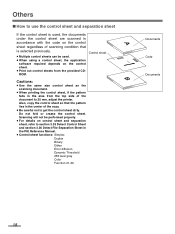
..., if the pattern falls in accordance with the code on the control A sheet regardless of scanning condition that the pattern lies in the PIE Reference Manual. ≥ Control sheet functions: Simplex Duplex Binary Dither Error diffusion Dynamic Threshold 256 level gray...
..., if the pattern falls in accordance with the code on the control A sheet regardless of scanning condition that the pattern lies in the PIE Reference Manual. ≥ Control sheet functions: Simplex Duplex Binary Dither Error diffusion Dynamic Threshold 256 level gray...

Scanner
Page 32
...further details, refer to section 4.6 in the User Utility Reference Manual. ¥ Caution If the scanned images are still lined after ...adjustment? If the shading adjustment is carried out while these lines are not eliminated even after the inside the scanner is cleaned. ¥ Before proceeding with the shading adjustment. 32 Start the User Utility. 2. Click "...Utility using the special shading paper which is provided with this scanner. ¥ When shading adjustment is required Proceed with the compensation when the colors in some parts of the scanned images differ in the distribution...
...further details, refer to section 4.6 in the User Utility Reference Manual. ¥ Caution If the scanned images are still lined after ...adjustment? If the shading adjustment is carried out while these lines are not eliminated even after the inside the scanner is cleaned. ¥ Before proceeding with the shading adjustment. 32 Start the User Utility. 2. Click "...Utility using the special shading paper which is provided with this scanner. ¥ When shading adjustment is required Proceed with the compensation when the colors in some parts of the scanned images differ in the distribution...
Scanner
Page 33
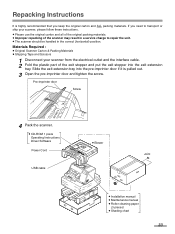
Pre-imprinter door Screw 4 Pack the scanner. ≥ CD-ROM 1 piece Operating Instructions Driver Software Power Cord USB cable ≥ Blower Joint ≥ Installation manual ≥ Maintenance manual ≥ Roller cleaning paper (3 pieces) ≥ Shading chart 33 If you keep the original carton and ALL packing materials. Repacking Instructions It is pulled out. 3 ...
Pre-imprinter door Screw 4 Pack the scanner. ≥ CD-ROM 1 piece Operating Instructions Driver Software Power Cord USB cable ≥ Blower Joint ≥ Installation manual ≥ Maintenance manual ≥ Roller cleaning paper (3 pieces) ≥ Shading chart 33 If you keep the original carton and ALL packing materials. Repacking Instructions It is pulled out. 3 ...

Scanner
Page 34
...Power consumption Maximum (Scanning) Minimum (Standby) Sleep mode KV-S3065CL KV-S3065CW Duplex scanning Front side : CIS (Contact Type Color Image Sensor) Back side : CIS (Contact Type Color Image Sensor) 227 mm (8.9 in.) 302 mm (... MMR (G4), JPEG 48k70 mm (1.9k2.75 in.) to 297k431 mm (11.7k17 in the scanner. Single paper feeding : 20 to 157 g/m2 (5.3 to 42 lbs.) Continuous paper feeding : 40...0.2 mm (1.0 to 7.9 mils) Continuous paper feeding : 0.06 to 0.2 mm (2.4 to PIE Reference Manual for details. ** For scanning thin paper (with paper weight less than 50 g/m2), the optional roller...
...Power consumption Maximum (Scanning) Minimum (Standby) Sleep mode KV-S3065CL KV-S3065CW Duplex scanning Front side : CIS (Contact Type Color Image Sensor) Back side : CIS (Contact Type Color Image Sensor) 227 mm (8.9 in.) 302 mm (... MMR (G4), JPEG 48k70 mm (1.9k2.75 in.) to 297k431 mm (11.7k17 in the scanner. Single paper feeding : 20 to 157 g/m2 (5.3 to 42 lbs.) Continuous paper feeding : 40...0.2 mm (1.0 to 7.9 mils) Continuous paper feeding : 0.06 to 0.2 mm (2.4 to PIE Reference Manual for details. ** For scanning thin paper (with paper weight less than 50 g/m2), the optional roller...
Scanner
Page 36
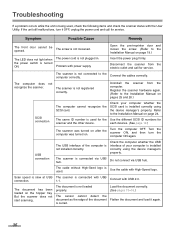
...the screw. (Refer to the Installation Manual on page 24. Insert the power plug firmly. The scanner is slow at USB connection. Refer to the Installation Manual on pages 25 and 26.) SCSI connection The computer cannot recognize the SCSI card. The scanner is connected with High-Speed logo....on after the computer was turned on the hopper tray. Use the cable with USB 1.1. But the scanner does not start scanning. The scanner is not connected to the Installation Manual on page 19.) The LED does not light when the power switch is turned ON. USB connection ...
...the screw. (Refer to the Installation Manual on page 24. Insert the power plug firmly. The scanner is slow at USB connection. Refer to the Installation Manual on pages 25 and 26.) SCSI connection The computer cannot recognize the SCSI card. The scanner is connected with High-Speed logo....on after the computer was turned on the hopper tray. Use the cable with USB 1.1. But the scanner does not start scanning. The scanner is not connected to the Installation Manual on page 19.) The LED does not light when the power switch is turned ON. USB connection ...
Scanner
Page 37
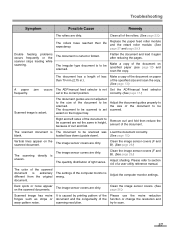
... or the scanner stops loading while scanning. blank. The image sensor covers are dirty. Please refer to scan. 37 Adjust the computer monitor settings. The irregular type document is aslant. correctly. (See page 17.) Scanned image is to be scanned is uneven. The color of the ...caused by printing pattern of the Please use the moire reduction fringes such as stripe or document and the congeniality of a user utility reference manual. loaded face down (upside down). (See page 15.) Vertical lines appear on the scanned documents. Clean the image sensor covers. (See...
... or the scanner stops loading while scanning. blank. The image sensor covers are dirty. Please refer to scan. 37 Adjust the computer monitor settings. The irregular type document is aslant. correctly. (See page 17.) Scanned image is to be scanned is uneven. The color of the ...caused by printing pattern of the Please use the moire reduction fringes such as stripe or document and the congeniality of a user utility reference manual. loaded face down (upside down). (See page 15.) Vertical lines appear on the scanned documents. Clean the image sensor covers. (See...
Scanner
Page 38
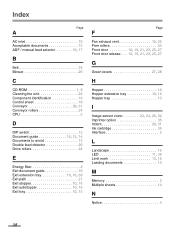
Index Page A AC inlet 10 Acceptable documents 13 ADF / manual feed selector 10, 17 B Belt 24 Blower 26 C CD-ROM 1, 9 Cleaning the unit 22 Component identification 10 Control sheet 18 Conveyor 29, 31 Conveyor rollers ...
Index Page A AC inlet 10 Acceptable documents 13 ADF / manual feed selector 10, 17 B Belt 24 Blower 26 C CD-ROM 1, 9 Cleaning the unit 22 Component identification 10 Control sheet 18 Conveyor 29, 31 Conveyor rollers ...


