Scanner
Page 1
KV-S3065CL / KV-S3065CW These instructions contain information on operating the scanner. Before reading these instructions, please read these instructions, the enclosed installation manual and maintenance manual. Keep all documentation in the protective case. Do not expose the CD-ROM to direct sunlight or extreme heat and do not scratch or smudge the surface of the CD-ROM. Keep the CD-ROM in a safe place for future reference. Please carefully read the installation manual enclosed with this unit. Model No.
KV-S3065CL / KV-S3065CW These instructions contain information on operating the scanner. Before reading these instructions, please read these instructions, the enclosed installation manual and maintenance manual. Keep all documentation in the protective case. Do not expose the CD-ROM to direct sunlight or extreme heat and do not scratch or smudge the surface of the CD-ROM. Keep the CD-ROM in a safe place for future reference. Please carefully read the installation manual enclosed with this unit. Model No.

Scanner
Page 2
... Windows NT 4.0, you must install the ASPI layer software that this product meets the ENERGY STAR guidelines for purchasing a Panasonic "High Speed Color Scanner." ≥ Panasonic supports your original document. ∫ System requirements When using the scanner with a reliable and easy to change without notice. 2 Important ≥ Do not duplicate currency. ≥ Do not duplicate copyrighted...
... Windows NT 4.0, you must install the ASPI layer software that this product meets the ENERGY STAR guidelines for purchasing a Panasonic "High Speed Color Scanner." ≥ Panasonic supports your original document. ∫ System requirements When using the scanner with a reliable and easy to change without notice. 2 Important ≥ Do not duplicate currency. ≥ Do not duplicate copyrighted...
Scanner
Page 3
... ≥ About the SCSI setting (Not required for USB connection 12 Operation Loading Documents 13 ≥ When scanning multiple sheets 14 Paper Feed Settings 17 ≥ Selecting the paper path for scanned document 17 ≥ Setting the ADF / manual feed selector 17 Others 18 ≥...; How to use the control sheet and separation sheet 18 Changing the Reference Plate Setting 19 ≥ Reference plate setting 19 Care and Maintenance Clearing Paper Jams 21 ≥ Removing paper jams from the scanner...
... ≥ About the SCSI setting (Not required for USB connection 12 Operation Loading Documents 13 ≥ When scanning multiple sheets 14 Paper Feed Settings 17 ≥ Selecting the paper path for scanned document 17 ≥ Setting the ADF / manual feed selector 17 Others 18 ≥...; How to use the control sheet and separation sheet 18 Changing the Reference Plate Setting 19 ≥ Reference plate setting 19 Care and Maintenance Clearing Paper Jams 21 ≥ Removing paper jams from the scanner...

Scanner
Page 10
...attaching optional imprinter unit and ink cartridge. Fan exhaust vent USB connector Used to connect the scanner unit to stop or start scanning a document. When an error occurs, the indicator will change the scanning document's path direction (front side/back side). (Refer to page 17.) An imprinter unit ...extension tray Front door release Inside the front door. An imprinter unit installed here is for 100-200 V. SCSI connector Used to connect the scanner unit to red, and light steadily or flash. AC inlet Power cord Power cord shown on , the green indicator lights. Power switch [ ...
...attaching optional imprinter unit and ink cartridge. Fan exhaust vent USB connector Used to connect the scanner unit to stop or start scanning a document. When an error occurs, the indicator will change the scanning document's path direction (front side/back side). (Refer to page 17.) An imprinter unit ...extension tray Front door release Inside the front door. An imprinter unit installed here is for 100-200 V. SCSI connector Used to connect the scanner unit to red, and light steadily or flash. AC inlet Power cord Power cord shown on , the green indicator lights. Power switch [ ...

Scanner
Page 13
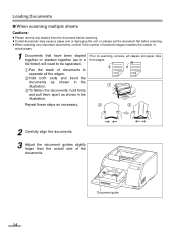
...feeding. ≥ Set the paper path selector to about 20. When a jam occurs at a time. 13 Thick, thin or important document should not exceed the limit mark on the hopper to straight. number Width less than A4 short edge 350 320 300 250 240 210 ... clean the rollers. Recommendable paper: Plain paper The following types of documents to "Slow". ≥ Scan the documents by fed manually one sheet at the document feeder, reduce the number of sheets loaded on the document guide. Loading Documents Acceptable documents Document size: 48~297 mm (1.9~11.7 in.) 70~431 mm (2.75~...
...feeding. ≥ Set the paper path selector to about 20. When a jam occurs at a time. 13 Thick, thin or important document should not exceed the limit mark on the hopper to straight. number Width less than A4 short edge 350 320 300 250 240 210 ... clean the rollers. Recommendable paper: Plain paper The following types of documents to "Slow". ≥ Scan the documents by fed manually one sheet at the document feeder, reduce the number of sheets loaded on the document guide. Loading Documents Acceptable documents Document size: 48~297 mm (1.9~11.7 in.) 70~431 mm (2.75~...
Scanner
Page 14
...file folder) will need to be separated. 1 Fan the stack of documents to scanning, remove, all the edges. 2 Hold both ends and bend the documents as shown in the illustration. 1 3 To flatten the documents, hold firmly and pull them apart as in the illustration. Repeat these... steps as necessary. 2 3 2 Carefully align the documents. 3 Adjust the document guides slightly larger than the actual size of actual pages. 1 Documents that have been stapled Prior to separate all staples and paper clips together or stacked together (as ...
...file folder) will need to be separated. 1 Fan the stack of documents to scanning, remove, all the edges. 2 Hold both ends and bend the documents as shown in the illustration. 1 3 To flatten the documents, hold firmly and pull them apart as in the illustration. Repeat these... steps as necessary. 2 3 2 Carefully align the documents. 3 Adjust the document guides slightly larger than the actual size of actual pages. 1 Documents that have been stapled Prior to separate all staples and paper clips together or stacked together (as ...

Scanner
Page 15
...ledger size, up to 200 sheets of 64 g/m2 (17 lbs.) paper can be output, if required. Landscape A 5 Adjust the document guides to the size of the document to be scanned facing up to 300 sheets of the arrow until they stop. ≥ Be sure to page 34 "Specifications" A for the KV-S3065CL and KV-S3065CW.... Adjust the exit document guides to the size of the document to be placed at the A4, LTR B4TA3 Fill indicator (Limit mark) right. A4, LTR A3 ...
...ledger size, up to 200 sheets of 64 g/m2 (17 lbs.) paper can be output, if required. Landscape A 5 Adjust the document guides to the size of the document to be scanned facing up to 300 sheets of the arrow until they stop. ≥ Be sure to page 34 "Specifications" A for the KV-S3065CL and KV-S3065CW.... Adjust the exit document guides to the size of the document to be placed at the A4, LTR B4TA3 Fill indicator (Limit mark) right. A4, LTR A3 ...
Scanner
Page 16
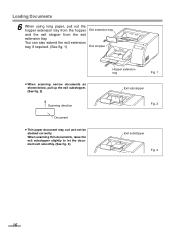
...hopper extension tray from the hopper Exit extension tray and the exit stopper from the exit extension tray. When scanning thin documents, raise the exit substopper slightly to let the document exit smoothly. (See fig. 3) Hopper extension tray Fig. 1 Exit substopper Fig. 2 Exit substopper Fig. 3... 16 You can also extend the exit extension tray, if required. (See fig. 1) Exit stopper ≥ When scanning narrow documents as shown below, pull up the exit substopper. (See fig. 2) Scanning direction Document ≥ Thin paper document may curl and not be stacked correctly.
...hopper extension tray from the hopper Exit extension tray and the exit stopper from the exit extension tray. When scanning thin documents, raise the exit substopper slightly to let the document exit smoothly. (See fig. 3) Hopper extension tray Fig. 1 Exit substopper Fig. 2 Exit substopper Fig. 3... 16 You can also extend the exit extension tray, if required. (See fig. 1) Exit stopper ≥ When scanning narrow documents as shown below, pull up the exit substopper. (See fig. 2) Scanning direction Document ≥ Thin paper document may curl and not be stacked correctly.
Scanner
Page 17
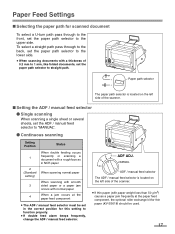
... feed selector must be used. 17 Paper path selector The paper path selector is located on the left side of the scanner. ≥ If thin paper (with a thickness of the scanner. ∫ Setting the ADF / manual feed selector ¥ Single scanning When scanning a single sheet or several sheets, ...feed selector The ADF / manual feed selector is located on the left side of 0.2 mm to 1 mm, like folded documents, set in the correct position for thin paper (KV-SS018) should be set the paper path selector to function properly. ≥ If double feed alarm beeps frequently, change the...
... feed selector must be used. 17 Paper path selector The paper path selector is located on the left side of the scanner. ≥ If thin paper (with a thickness of the scanner. ∫ Setting the ADF / manual feed selector ¥ Single scanning When scanning a single sheet or several sheets, ...feed selector The ADF / manual feed selector is located on the left side of 0.2 mm to 1 mm, like folded documents, set in the correct position for thin paper (KV-SS018) should be set the paper path selector to function properly. ≥ If double feed alarm beeps frequently, change the...
Scanner
Page 18
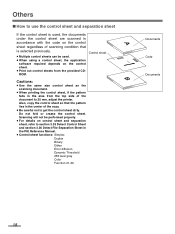
... File Separation Sheet in the area from the provided CD- ROM. B Cautions: ≥ Use the same size control sheet as the scanning document. ≥ When printing the control sheet, if the pattern falls in the PIE Reference Manual. ≥ Control sheet functions: Simplex Duplex Binary... Dither Error diffusion Dynamic Threshold 256 level gray Color Function #1-#9 Documents Code Documents 18 Do not fold or crease the control sheet. Scanning will not be used , the documents under the control sheet are scanned in the center of the document to 25 mm, adjust the printer. Also, ...
... File Separation Sheet in the area from the provided CD- ROM. B Cautions: ≥ Use the same size control sheet as the scanning document. ≥ When printing the control sheet, if the pattern falls in the PIE Reference Manual. ≥ Control sheet functions: Simplex Duplex Binary... Dither Error diffusion Dynamic Threshold 256 level gray Color Function #1-#9 Documents Code Documents 18 Do not fold or crease the control sheet. Scanning will not be used , the documents under the control sheet are scanned in the center of the document to 25 mm, adjust the printer. Also, ...
Scanner
Page 21
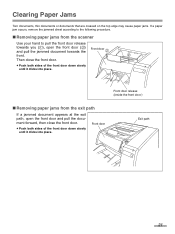
... door.) ∫ Removing paper jams from the scanner Use your hand to the following procedure. ∫ Removing paper jams from the exit path If a jammed document appears at the exit path, open the front door (2) and pull the jammed document towards the front. Front door Exit path 21 Then...the front door. ≥ Push both sides of the front door down slowly until it clicks into place. Clearing Paper Jams Torn documents, thin documents or documents that are creased on the top edge may cause paper jams. If a paper jam occurs, remove the jammed sheet according to pull...
... door.) ∫ Removing paper jams from the scanner Use your hand to the following procedure. ∫ Removing paper jams from the exit path If a jammed document appears at the exit path, open the front door (2) and pull the jammed document towards the front. Front door Exit path 21 Then...the front door. ≥ Push both sides of the front door down slowly until it clicks into place. Clearing Paper Jams Torn documents, thin documents or documents that are creased on the top edge may cause paper jams. If a paper jam occurs, remove the jammed sheet according to pull...
Scanner
Page 22
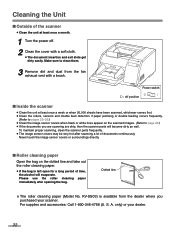
... slots get dirty easily. Dotted line § The roller cleaning paper (Model No. KV-SS03) is left open for a long period of documents continuously. A. S. For supplies and accessories: Call 1-800-346-4768 (U. To maintain proper scanning, clean the scanner parts frequently. ≥ The image sensor covers may be very hot after opening the...
... slots get dirty easily. Dotted line § The roller cleaning paper (Model No. KV-SS03) is left open for a long period of documents continuously. A. S. For supplies and accessories: Call 1-800-346-4768 (U. To maintain proper scanning, clean the scanner parts frequently. ≥ The image sensor covers may be very hot after opening the...

Scanner
Page 24
... the diagram to the right. ≥ Perform the retard roller cleaning only in the left side of the scanner. Left side view ≥ Wipe in the direction of the arrow to rotate the rollers. If cleaned in... the right direction, the roller may be very hot after scanning a lot of documents. Set the paper path selector as shown below. Never touch the image sensor covers or surroundings directly. Other... of the arrows. Cleaning the Unit 3 Use the roller cleaning paper (KV-SS03) to remove the dirt from the surfaces of all the way around from rotating.
... the diagram to the right. ≥ Perform the retard roller cleaning only in the left side of the scanner. Left side view ≥ Wipe in the direction of the arrow to rotate the rollers. If cleaned in... the right direction, the roller may be very hot after scanning a lot of documents. Set the paper path selector as shown below. Never touch the image sensor covers or surroundings directly. Other... of the arrows. Cleaning the Unit 3 Use the roller cleaning paper (KV-SS03) to remove the dirt from the surfaces of all the way around from rotating.
Scanner
Page 26
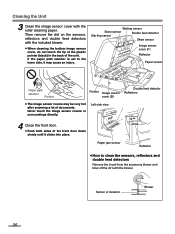
... the included blower. ≥ When cleaning the bottom image sensor cover, do not touch the tip of the plastic pointer (black) in the back of documents.
... the included blower. ≥ When cleaning the bottom image sensor cover, do not touch the tip of the plastic pointer (black) in the back of documents.
Scanner
Page 36
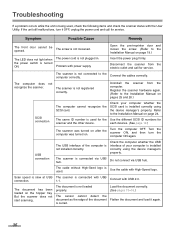
...numbers for service. USB connection The USB interface of the computer is not loaded properly. Connect with USB 1.1. But the scanner does not start scanning. The document is not installed correctly. Open the pre-imprinter door and loosen the screw. (Refer to the Installation Manual on pages ... service. each devices. (See page 12.) The scanner was turned on after the computer was turned on the hopper tray. Use the cable with High-Speed logo. The document has been loaded on . The sensor cannot detect the document as the edge of your computer whether the SCSI...
...numbers for service. USB connection The USB interface of the computer is not loaded properly. Connect with USB 1.1. But the scanner does not start scanning. The document is not installed correctly. Open the pre-imprinter door and loosen the screw. (Refer to the Installation Manual on pages ... service. each devices. (See page 12.) The scanner was turned on after the computer was turned on the hopper tray. Use the cable with High-Speed logo. The document has been loaded on . The sensor cannot detect the document as the edge of your computer whether the SCSI...
Scanner
Page 37
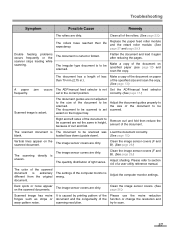
...module and the retard roller module. (See page 27 and page 29.) Double feeding problems occurs frequently or the scanner stops loading while scanning. The document is uneven. Flatten the document and load it again after reducing the pages. Make a copy of curl and fold. correctly. (See page ...by printing pattern of the Please use the moire reduction fringes such as stripe or document and the congeniality of the scanned document is aslant. The image sensor covers are dirty. The color of the function or change the resolution and wavy pattern noise. Dark spots or ...
...module and the retard roller module. (See page 27 and page 29.) Double feeding problems occurs frequently or the scanner stops loading while scanning. The document is uneven. Flatten the document and load it again after reducing the pages. Make a copy of curl and fold. correctly. (See page ...by printing pattern of the Please use the moire reduction fringes such as stripe or document and the congeniality of the scanned document is aslant. The image sensor covers are dirty. The color of the function or change the resolution and wavy pattern noise. Dark spots or ...
Scanner
Page 38
... A AC inlet 10 Acceptable documents 13 ADF / manual feed selector 10, 17 B Belt 24 Blower 26 C CD-ROM 1, 9 Cleaning the unit 22 Component identification 10 Control sheet 18 Conveyor 29, 31 Conveyor rollers 24 CPU 2 D DIP switch 12 Document guide 10, 13, 14 Documents to avoid 13 Double feed detector... 26 Drive rollers 24 E Energy Star 2 Exit document guide 10 Exit extension tray 10, 16, 33 Exit path 21 Exit stopper 10, 16 ...
... A AC inlet 10 Acceptable documents 13 ADF / manual feed selector 10, 17 B Belt 24 Blower 26 C CD-ROM 1, 9 Cleaning the unit 22 Component identification 10 Control sheet 18 Conveyor 29, 31 Conveyor rollers 24 CPU 2 D DIP switch 12 Document guide 10, 13, 14 Documents to avoid 13 Double feed detector... 26 Drive rollers 24 E Energy Star 2 Exit document guide 10 Exit extension tray 10, 16, 33 Exit path 21 Exit stopper 10, 16 ...


