Scanner
Page 3
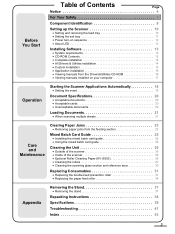
... installed on your computer 17 Operation Starting the Scanner Applications Automatically 18 • Setting the event 18 Document Specifications 20 • Acceptable documents 20 • Acceptable cards 20 • Unacceptable documents 20 Loading Documents 21 • When scanning multiple sheets 21 Care and Maintenance Clearing Paper Jams 23 • Removing paper jams from the feeding section 23 Mixed Batch...
... installed on your computer 17 Operation Starting the Scanner Applications Automatically 18 • Setting the event 18 Document Specifications 20 • Acceptable documents 20 • Acceptable cards 20 • Unacceptable documents 20 Loading Documents 21 • When scanning multiple sheets 21 Care and Maintenance Clearing Paper Jams 23 • Removing paper jams from the feeding section 23 Mixed Batch...
Scanner
Page 9
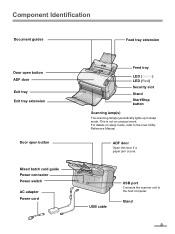
USB cable USB port Connects the scanner unit to the User Utility Reference Manual. Component Identification Document guides Feed tray extension Door open button ADF door Exit tray Exit tray extension Door open button Mixed batch card guide Power connector Power switch AC adaptor Power cord Feed tray LED (Green) LED (Red) Security slot Stand Start/Stop button Scanning lamp(s) The scanning lamp(s) periodically lights up in sleep mode. Stand 9 For details on sleep mode, refer to the host computer. This is not an unusual event. ADF door Open this door if a paper jam occurs.
USB cable USB port Connects the scanner unit to the User Utility Reference Manual. Component Identification Document guides Feed tray extension Door open button ADF door Exit tray Exit tray extension Door open button Mixed batch card guide Power connector Power switch AC adaptor Power cord Feed tray LED (Green) LED (Red) Security slot Stand Start/Stop button Scanning lamp(s) The scanning lamp(s) periodically lights up in sleep mode. Stand 9 For details on sleep mode, refer to the host computer. This is not an unusual event. ADF door Open this door if a paper jam occurs.
Scanner
Page 21
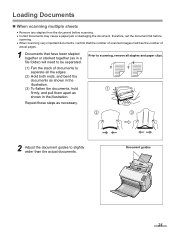
... • Remove any staples from the document before scanning. • Curled documents may cause a paper jam or damaging the document, therefore, set the document flat before scanning. • When scanning very important documents, confirm that the number of scanned images matches the number of documents to slightly wider than the actual documents. Document guides 21 file folder) will need to...
... • Remove any staples from the document before scanning. • Curled documents may cause a paper jam or damaging the document, therefore, set the document flat before scanning. • When scanning very important documents, confirm that the number of scanned images matches the number of documents to slightly wider than the actual documents. Document guides 21 file folder) will need to...
Scanner
Page 22
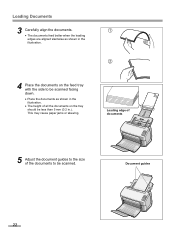
Document guides 22 This may cause paper jams or skewing. 1 2 Leading edge of documents 5 Adjust the document guides to the size of all the documents on the tray should be scanned. Loading Documents 3 Carefully align the documents. • The documents feed better when the leading edges are aligned slantwise as shown in the illustration. 4 Place the documents on the feed tray with the side to be less than 5 mm (0.2 in the illustration. • The height of the documents to be scanned facing down. • Place the documents as shown in .).
Document guides 22 This may cause paper jams or skewing. 1 2 Leading edge of documents 5 Adjust the document guides to the size of all the documents on the tray should be scanned. Loading Documents 3 Carefully align the documents. • The documents feed better when the leading edges are aligned slantwise as shown in the illustration. 4 Place the documents on the feed tray with the side to be less than 5 mm (0.2 in the illustration. • The height of the documents to be scanned facing down. • Place the documents as shown in .).

Scanner
Page 23
...until the target glasses cool down before removing paper. „ Removing paper jams from the feeding section 1 Remove all documents from the feed tray. 2 Press the door open button, and open button ADF door 3 Remove the jammed document. • If the document jammed in the feed tray area, pull it ...backwards as shown in the illustration. 23 Door open the ADF door. When the glasses are hot, don't touch around them. Remove the jammed sheet according to the following instructions...
...until the target glasses cool down before removing paper. „ Removing paper jams from the feeding section 1 Remove all documents from the feed tray. 2 Press the door open button, and open button ADF door 3 Remove the jammed document. • If the document jammed in the feed tray area, pull it ...backwards as shown in the illustration. 23 Door open the ADF door. When the glasses are hot, don't touch around them. Remove the jammed sheet according to the following instructions...

Scanner
Page 24
Clearing Paper Jams • If the document jammed in the exit area, pull it forward as shown in the illustration. 4 Close the ADF door. • Push down on both sides of the ADF door gently until it clicks into place. 24
Clearing Paper Jams • If the document jammed in the exit area, pull it forward as shown in the illustration. 4 Close the ADF door. • Push down on both sides of the ADF door gently until it clicks into place. 24
Scanner
Page 26
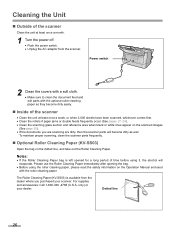
... Cleaning Paper (KV-SS03) Open the bag on the dotted line, and take out the Roller Cleaning Paper. Cleaning the Unit „ Outside of the scanner Clean the unit at least once a week, or when 2,000 sheets have been scanned, whichever comes first. • Clean the rollers if paper jams or double... feeds frequently occur (See pages 27-29). • Clean the scanning glass section and reference area when black or white lines appear on the scanned images (See page 30). • If the documents you purchased your dealer. Power switch 2 ...
... Cleaning Paper (KV-SS03) Open the bag on the dotted line, and take out the Roller Cleaning Paper. Cleaning the Unit „ Outside of the scanner Clean the unit at least once a week, or when 2,000 sheets have been scanned, whichever comes first. • Clean the rollers if paper jams or double... feeds frequently occur (See pages 27-29). • Clean the scanning glass section and reference area when black or white lines appear on the scanned images (See page 30). • If the documents you purchased your dealer. Power switch 2 ...

Scanner
Page 41
... correctly. But the scanner does not start scanning. The document is used , check the following items, and check the scanner status with USB 1.1. Troubleshooting If a problem occurs while the unit is being used . Disconnect the scanner from becoming curled on the feed tray. The scanner is connected to be scanned may cause paper jams or skewing. Connect...
... correctly. But the scanner does not start scanning. The document is used , check the following items, and check the scanner status with USB 1.1. Troubleshooting If a problem occurs while the unit is being used . Disconnect the scanner from becoming curled on the feed tray. The scanner is connected to be scanned may cause paper jams or skewing. Connect...
Scanner
Page 44
..., 34 All Drivers & Utilities installation 14 C Caution labels 8 CD-ROM 1, 40 Cleaning the unit 26 Clearing paper jams 23 Complete installation 14 Component identification 9 Conveyor roller 29 Custom installation 15 D Document guides 9, 21, 22 Door open button . . . . . 9, 23, 27, 30, 31, 34 Double... 10 Free rollers 29 Page L LED (Green 9, 12 LED (Red 9, 12 Loading Documents 21 M Mixed batch card guide 9, 25 Multiple sheets 21 O Option/consumables 40 P Paper feed roller 28, 34, 35 Paper jams 23 Power connector 9 Power cord 9, 12 Power switch 9, 12 Precautions 8 R Reference...
..., 34 All Drivers & Utilities installation 14 C Caution labels 8 CD-ROM 1, 40 Cleaning the unit 26 Clearing paper jams 23 Complete installation 14 Component identification 9 Conveyor roller 29 Custom installation 15 D Document guides 9, 21, 22 Door open button . . . . . 9, 23, 27, 30, 31, 34 Double... 10 Free rollers 29 Page L LED (Green 9, 12 LED (Red 9, 12 Loading Documents 21 M Mixed batch card guide 9, 25 Multiple sheets 21 O Option/consumables 40 P Paper feed roller 28, 34, 35 Paper jams 23 Power connector 9 Power cord 9, 12 Power switch 9, 12 Precautions 8 R Reference...


