Scanner
Page 3
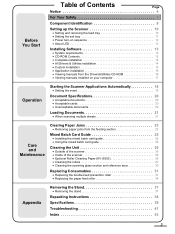
...manuals installed on your computer 17 Operation Starting the Scanner Applications Automatically 18 • Setting the event 18 Document Specifications 20 • Acceptable documents 20 • Acceptable cards 20 • Unacceptable documents 20 Loading Documents 21 • When scanning multiple sheets 21 Care...batch card guide 25 Cleaning the Unit 26 • Outside of the scanner 26 • Inside of the scanner 26 • Optional Roller Cleaning Paper (KV-SS03 26 • Cleaning the rollers 27 • Cleaning the scanning glass section and reference area 30 Replacing...
...manuals installed on your computer 17 Operation Starting the Scanner Applications Automatically 18 • Setting the event 18 Document Specifications 20 • Acceptable documents 20 • Acceptable cards 20 • Unacceptable documents 20 Loading Documents 21 • When scanning multiple sheets 21 Care...batch card guide 25 Cleaning the Unit 26 • Outside of the scanner 26 • Inside of the scanner 26 • Optional Roller Cleaning Paper (KV-SS03 26 • Cleaning the rollers 27 • Cleaning the scanning glass section and reference area 30 Replacing...
Scanner
Page 26
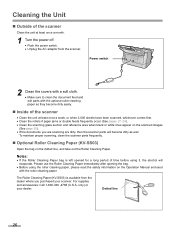
... appear on the scanned images (See page 30). • If the documents you purchased your dealer. To maintain proper scanning, clean the scanner parts frequently. „ Optional Roller Cleaning Paper (KV-SS03) Open the bag on the Operation Manual enclosed with the optional roller cleaning paper as they become dirty as well. For supplies and...
... appear on the scanned images (See page 30). • If the documents you purchased your dealer. To maintain proper scanning, clean the scanner parts frequently. „ Optional Roller Cleaning Paper (KV-SS03) Open the bag on the Operation Manual enclosed with the optional roller cleaning paper as they become dirty as well. For supplies and...
Scanner
Page 27
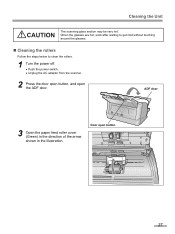
Cleaning the Unit CAUTION The scanning glass section may be very hot. ADF door 3 Open the paper feed roller cover (Green) in the direction of the arrow shown in the illustration. When the glasses are hot, work after waiting to get cold without touching around the glasses. „ Cleaning the rollers Follow the steps below to clean the rollers. 1 Turn the power off. • Push the power switch. • Unplug the AC adaptor from the scanner. 2 Press the door open button, and open button 27 Door open the ADF door.
Cleaning the Unit CAUTION The scanning glass section may be very hot. ADF door 3 Open the paper feed roller cover (Green) in the direction of the arrow shown in the illustration. When the glasses are hot, work after waiting to get cold without touching around the glasses. „ Cleaning the rollers Follow the steps below to clean the rollers. 1 Turn the power off. • Push the power switch. • Unplug the AC adaptor from the scanner. 2 Press the door open button, and open button 27 Door open the ADF door.
Scanner
Page 28
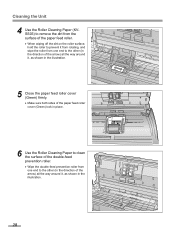
... Paper (KVSS03) to remove the dirt from the surface of the paper feed roller. • When wiping off the dirt on the roller surface, hold the roller to prevent it from rotating, and wipe the roller from one end to the other (in the direction of the arrow) all the way around it, as... (Green) firmly. • Make sure both sides of the paper feed roller cover (Green) lock in place. 6 Use the Roller Cleaning Paper to clean the surface of the double-feed prevention roller. • Wipe the double-feed prevention roller from one end to the other (in the direction of the arrow) all the way...
... Paper (KVSS03) to remove the dirt from the surface of the paper feed roller. • When wiping off the dirt on the roller surface, hold the roller to prevent it from rotating, and wipe the roller from one end to the other (in the direction of the arrow) all the way around it, as... (Green) firmly. • Make sure both sides of the paper feed roller cover (Green) lock in place. 6 Use the Roller Cleaning Paper to clean the surface of the double-feed prevention roller. • Wipe the double-feed prevention roller from one end to the other (in the direction of the arrow) all the way...
Scanner
Page 29
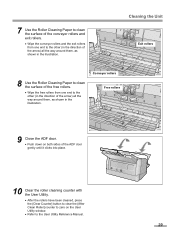
... one end to the other (in the direction of the arrow) all the way around them , as shown in the illustration. Conveyor rollers Free rollers 9 Close the ADF door. • Push down on the User Utility window. • Refer to the other (in the direction of the ADF door gently ...until it clicks into place. 10 Clear the roller cleaning counter with the User Utility. • After the rollers have been cleaned, press the [Clear Counter] button to clear the [After Clean Roller] counter to zero on both sides of the arrow) all the way around them...
... one end to the other (in the direction of the arrow) all the way around them , as shown in the illustration. Conveyor rollers Free rollers 9 Close the ADF door. • Push down on the User Utility window. • Refer to the other (in the direction of the ADF door gently ...until it clicks into place. 10 Clear the roller cleaning counter with the User Utility. • After the rollers have been cleaned, press the [Clear Counter] button to clear the [After Clean Roller] counter to zero on both sides of the arrow) all the way around them...
Scanner
Page 30
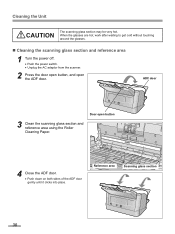
...„ Cleaning the scanning glass section and reference area 1 Turn the power off. • Push the power switch. • Unplug the AC adaptor from the scanner. 2 Press the door open button, and open button 4 Close the ADF door. • Push down on both sides of the ADF door gently until it... clicks into place. ADF door 3 Clean the scanning glass section and reference area using the Roller Cleaning Paper. Door open the ADF door. Cleaning the Unit CAUTION The scanning glass section may be very hot. Reference area Scanning glass section ...
...„ Cleaning the scanning glass section and reference area 1 Turn the power off. • Push the power switch. • Unplug the AC adaptor from the scanner. 2 Press the door open button, and open button 4 Close the ADF door. • Push down on both sides of the ADF door gently until it... clicks into place. ADF door 3 Clean the scanning glass section and reference area using the Roller Cleaning Paper. Door open the ADF door. Cleaning the Unit CAUTION The scanning glass section may be very hot. Reference area Scanning glass section ...
Scanner
Page 31
...; Double-feed prevention roller : 50,000 sheets • Paper feed roller : 100,000 sheets The scanner counter can be confirmed by using the A4 or Letter sized standard paper (64 g/m2 or 80 g/m2 (20 lb.)). Please purchase the Roller Exchange Kit (KV-SS030), and replace each roller periodically. Please keep the unused rollers in a safe place...
...; Double-feed prevention roller : 50,000 sheets • Paper feed roller : 100,000 sheets The scanner counter can be confirmed by using the A4 or Letter sized standard paper (64 g/m2 or 80 g/m2 (20 lb.)). Please purchase the Roller Exchange Kit (KV-SS030), and replace each roller periodically. Please keep the unused rollers in a safe place...
Scanner
Page 32
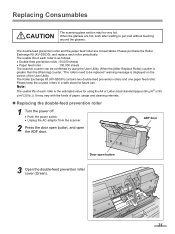
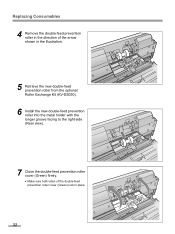
Replacing Consumables 4 Remove the double-feed prevention roller in the direction of the arrow shown in the illustration. 5 Retrieve the new double-feed prevention roller from the optional Roller Exchange Kit (KV-SS030). 6 Install the new double-feed prevention roller into the metal holder with the longer groove facing to the right-side (Rear view). 7 Close the double-feed prevention roller cover (Green) firmly. • Make sure both sides of the double-feed prevention roller cover (Green) lock in place. 32
Replacing Consumables 4 Remove the double-feed prevention roller in the direction of the arrow shown in the illustration. 5 Retrieve the new double-feed prevention roller from the optional Roller Exchange Kit (KV-SS030). 6 Install the new double-feed prevention roller into the metal holder with the longer groove facing to the right-side (Rear view). 7 Close the double-feed prevention roller cover (Green) firmly. • Make sure both sides of the double-feed prevention roller cover (Green) lock in place. 32
Scanner
Page 33
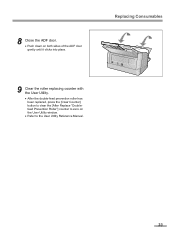
8 Close the ADF door. • Push down on the User Utility window. • Refer to zero on both sides of the ADF door gently until it clicks into place. Replacing Consumables 9 Clear the roller replacing counter with the User Utility. • After the double-feed prevention roller has been replaced, press the [Clear Counter] button to clear the [After Replace "Doublefeed Prevention Roller"] counter to the User Utility Reference Manual. 33
8 Close the ADF door. • Push down on the User Utility window. • Refer to zero on both sides of the ADF door gently until it clicks into place. Replacing Consumables 9 Clear the roller replacing counter with the User Utility. • After the double-feed prevention roller has been replaced, press the [Clear Counter] button to clear the [After Replace "Doublefeed Prevention Roller"] counter to the User Utility Reference Manual. 33
Scanner
Page 34
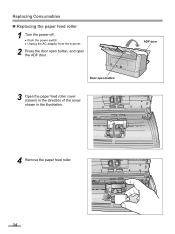
Door open the ADF door. ADF door 4 Remove the paper feed roller. 34 Replacing Consumables „ Replacing the paper feed roller 1 Turn the power off. • Push the power switch. • Unplug the AC adaptor from the scanner. 2 Press the door open button, and open button 3 Open the paper feed roller cover (Green) in the direction of the arrow shown in the illustration.
Door open the ADF door. ADF door 4 Remove the paper feed roller. 34 Replacing Consumables „ Replacing the paper feed roller 1 Turn the power off. • Push the power switch. • Unplug the AC adaptor from the scanner. 2 Press the door open button, and open button 3 Open the paper feed roller cover (Green) in the direction of the arrow shown in the illustration.
Scanner
Page 35
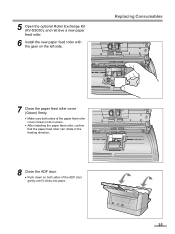
5 Open the optional Roller Exchange Kit (KV-SS030), and retrieve a new paper feed roller. 6 Install the new paper feed roller with the gear on both sides of the ADF door gently until it clicks into place. 35 Replacing Consumables 7 Close the paper feed roller cover (Green) firmly. • Make sure both sides of the paper feed roller cover (Green) lock in place. • After installing the paper feed roller, confirm that the paper feed roller can rotate in the feeding direction. 8 Close the ADF door. • Push down on the left side.
5 Open the optional Roller Exchange Kit (KV-SS030), and retrieve a new paper feed roller. 6 Install the new paper feed roller with the gear on both sides of the ADF door gently until it clicks into place. 35 Replacing Consumables 7 Close the paper feed roller cover (Green) firmly. • Make sure both sides of the paper feed roller cover (Green) lock in place. • After installing the paper feed roller, confirm that the paper feed roller can rotate in the feeding direction. 8 Close the ADF door. • Push down on the left side.

Scanner
Page 36
Replacing Consumables 9 Clear the roller replacing counter with the User Utility. • After the paper feed roller has been replaced, press the [Clear Counter] button to clear the [After Replace "Paper Feed Roller"] counter to zero on the User Utility window. • Refer to the User Utility Reference Manual. 36
Replacing Consumables 9 Clear the roller replacing counter with the User Utility. • After the paper feed roller has been replaced, press the [Clear Counter] button to clear the [After Replace "Paper Feed Roller"] counter to zero on the User Utility window. • Refer to the User Utility Reference Manual. 36
Scanner
Page 39
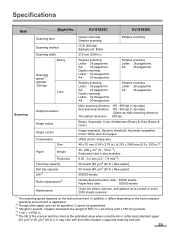
... Letter: 26 pages/min. Duplex scanning Letter: 52 images/min. Simplex scanning Letter: 26 pages/min. It may vary with the kinds of the scanner and the rollers is also available. 0.05 - 0.2 mm (2.0 - 7.9 mils*4) 50 sheets [80 g/m2 (20 lb.) New paper] 50 sheets [80 g/m2 (20...Sub-scanning direction: 100 - 600 dpi (1 dpi step) (Same as main scanning direction) The optical resolution: 600 dpi. A4: 25 pages/min. KV-S1025C KV-S1020C Scanning face Duplex scanning Simplex scanning Simplex scanning Scanning method CCD (600 dpi) Background: Black Scanning width 218 mm (8.58 in . *5 The life ...
... Letter: 26 pages/min. Duplex scanning Letter: 52 images/min. Simplex scanning Letter: 26 pages/min. It may vary with the kinds of the scanner and the rollers is also available. 0.05 - 0.2 mm (2.0 - 7.9 mils*4) 50 sheets [80 g/m2 (20 lb.) New paper] 50 sheets [80 g/m2 (20...Sub-scanning direction: 100 - 600 dpi (1 dpi step) (Same as main scanning direction) The optical resolution: 600 dpi. A4: 25 pages/min. KV-S1025C KV-S1020C Scanning face Duplex scanning Simplex scanning Simplex scanning Scanning method CCD (600 dpi) Background: Black Scanning width 218 mm (8.58 in . *5 The life ...

Scanner
Page 40
... mode consumption Sleep mode When the power switch is OFF Operating Operating temperature and Environment humidity Storage Storage temperature and Environment humidity Accessories Option/Consumables KV-S1025C KV-S1020C 317 x 196 x 218 mm (12.5 x 7.8 x 8.6 in.) (When closing the exit tray with the stand, without the feed tray) 4.2 kg (9.3 lbs.) 4.1 kg (9.1 lbs.) External power... 80 % RH 0 to 35 °C (32 to 95 °F), 10 to 80 % RH CD-ROM, Installation Guide, AC adaptor, Power cord, USB cable, Feed tray Roller Exchange Kit (KV-SS030) Roller Cleaning Paper (KV-SS03) 40
... mode consumption Sleep mode When the power switch is OFF Operating Operating temperature and Environment humidity Storage Storage temperature and Environment humidity Accessories Option/Consumables KV-S1025C KV-S1020C 317 x 196 x 218 mm (12.5 x 7.8 x 8.6 in.) (When closing the exit tray with the stand, without the feed tray) 4.2 kg (9.3 lbs.) 4.1 kg (9.1 lbs.) External power... 80 % RH 0 to 35 °C (32 to 95 °F), 10 to 80 % RH CD-ROM, Installation Guide, AC adaptor, Power cord, USB cable, Feed tray Roller Exchange Kit (KV-SS030) Roller Cleaning Paper (KV-SS03) 40
Scanner
Page 42
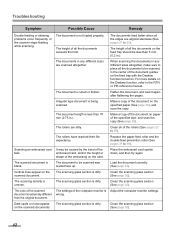
... dirty. Troubleshooting Symptom Possible Cause Remedy Double feeding or skewing problems occur frequently, or the scanner stops feeding while scanning. The rollers have reached their life expectancy. The document to place all of the document guides on the feed tray with the Deskew function turned on the card. Clean the scanning glass section (See...
... dirty. Troubleshooting Symptom Possible Cause Remedy Double feeding or skewing problems occur frequently, or the scanner stops feeding while scanning. The rollers have reached their life expectancy. The document to place all of the document guides on the feed tray with the Deskew function turned on the card. Clean the scanning glass section (See...
Scanner
Page 44
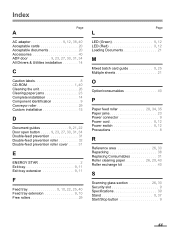
... Caution labels 8 CD-ROM 1, 40 Cleaning the unit 26 Clearing paper jams 23 Complete installation 14 Component identification 9 Conveyor roller 29 Custom installation 15 D Document guides 9, 21, 22 Door open button . . . . . 9, 23, 27, 30, 31, 34 Double-feed prevention 31 Double-feed prevention... tray 9, 10, 22, 25, 40 Feed tray extension 9, 10 Free rollers 29 Page L LED (Green 9, 12 LED (Red 9, 12 Loading Documents 21 M Mixed batch card guide 9, 25 Multiple sheets 21 O Option/consumables 40 P Paper feed roller 28, 34, 35 Paper jams 23 Power connector 9 Power cord 9, 12...
... Caution labels 8 CD-ROM 1, 40 Cleaning the unit 26 Clearing paper jams 23 Complete installation 14 Component identification 9 Conveyor roller 29 Custom installation 15 D Document guides 9, 21, 22 Door open button . . . . . 9, 23, 27, 30, 31, 34 Double-feed prevention 31 Double-feed prevention... tray 9, 10, 22, 25, 40 Feed tray extension 9, 10 Free rollers 29 Page L LED (Green 9, 12 LED (Red 9, 12 Loading Documents 21 M Mixed batch card guide 9, 25 Multiple sheets 21 O Option/consumables 40 P Paper feed roller 28, 34, 35 Paper jams 23 Power connector 9 Power cord 9, 12...


