E12RKUA Installation Manual
Page 1
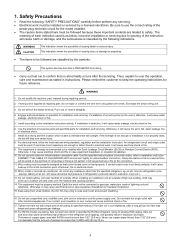
..., it may cling to use a drain elbow, for the drain water freezes and the fan will cause suck-in of the power plug and main circuit for the model to the outdoor side. 3 TO DRILL A HOLE IN THE WALL AND INSTALL A SLEEVE OF PIPING 1. Do not joint wires Indoor/outdoor connection terminal board 7/32" (5 mm) or more than 2. Please cut edge. Please make sure that control board cover is hollow, please be...
..., it may cling to use a drain elbow, for the drain water freezes and the fan will cause suck-in of the power plug and main circuit for the model to the outdoor side. 3 TO DRILL A HOLE IN THE WALL AND INSTALL A SLEEVE OF PIPING 1. Do not joint wires Indoor/outdoor connection terminal board 7/32" (5 mm) or more than 2. Please cut edge. Please make sure that control board cover is hollow, please be...

E12RKUA Operating Manual
Page 3
... improvement. Quick guide 1 3 Inserting the batteries 2 1 Pull out the back cover of remote control 2 Insert AAA or R03 batteries (can be used ~ 1 year) 3 Close the cover 2 3 Clock setting TIMER ON SET 1 Press CLOCK 1 2 3 2 Set the time OFF CANCEL 1 AC RC SET CHECK CLOCK RESET 3 Confirm Basic operation 1 Select the desired mode AUTO HEAT FAN DRY COOL AUTO FAN HEAT COOL SPEED AIR 2 Start/stop the operation DRY SWING FAN 2 OFF/ON AUTO ECONAVI COMFORT 3 MODE 1 TEMP AIR SWING POWERFUL/ QUIET FAN SPEED TIMER ON SET 1 2 3 OFF...
... improvement. Quick guide 1 3 Inserting the batteries 2 1 Pull out the back cover of remote control 2 Insert AAA or R03 batteries (can be used ~ 1 year) 3 Close the cover 2 3 Clock setting TIMER ON SET 1 Press CLOCK 1 2 3 2 Set the time OFF CANCEL 1 AC RC SET CHECK CLOCK RESET 3 Confirm Basic operation 1 Select the desired mode AUTO HEAT FAN DRY COOL AUTO FAN HEAT COOL SPEED AIR 2 Start/stop the operation DRY SWING FAN 2 OFF/ON AUTO ECONAVI COMFORT 3 MODE 1 TEMP AIR SWING POWERFUL/ QUIET FAN SPEED TIMER ON SET 1 2 3 OFF...
E12RKUA Operating Manual
Page 4
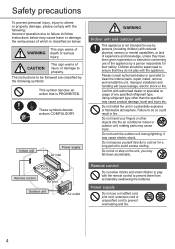
...remote control to prevent them from accidentally swallowing the batteries. Using refrigerant type other objects into the air conditioner indoor or outdoor unit, rotating parts may cause electric shock. Do not sit or step on usage of any specified refrigerant type. Do not touch the outdoor unit... supervision or instruction concerning use a modified cord, joint cord, extension cord or unspecified cord to prevent overheating and fire. 4 The instructions to be supervised to clean the internal parts, repair, install, remove and reinstall the unit. Children should...
...remote control to prevent them from accidentally swallowing the batteries. Using refrigerant type other objects into the air conditioner indoor or outdoor unit, rotating parts may cause electric shock. Do not sit or step on usage of any specified refrigerant type. Do not touch the outdoor unit... supervision or instruction concerning use a modified cord, joint cord, extension cord or unspecified cord to prevent overheating and fire. 4 The instructions to be supervised to clean the internal parts, repair, install, remove and reinstall the unit. Children should...

E12RKUA Operating Manual
Page 5
... water leakage by switching off the power switch and breaker. (Risk of smoke/fire/electric shock) Examples of abnormality/failure • The ELCB or GFCI or ALCI trip frequently. • Burning smell is : - CAUTION Indoor unit and outdoor unit Do not wash the indoor unit with any combustible equipment, aerate the room regularly. Remote control Do not use , or - Stop using an Earth Leakage Circuit Breaker (ELCB) or Ground Fault...
... water leakage by switching off the power switch and breaker. (Risk of smoke/fire/electric shock) Examples of abnormality/failure • The ELCB or GFCI or ALCI trip frequently. • Burning smell is : - CAUTION Indoor unit and outdoor unit Do not wash the indoor unit with any combustible equipment, aerate the room regularly. Remote control Do not use , or - Stop using an Earth Leakage Circuit Breaker (ELCB) or Ground Fault...

E12RKUA Operating Manual
Page 7
... the same time. How to use English Note POWERFUL/ AUTO ECONAVI QUIET COMFORT , , • Can be activated in all modes and can restore the timer again by ON pressing or to Quick guide. AUTO COMFORT To maximize comfort AUTO COMFORT AIR SWING To adjust vertical airflow direction (Remote control display) • Keeps the room ventilated. • In COOL/DRY mode, if AUTO is set, the flap swings...
... the same time. How to use English Note POWERFUL/ AUTO ECONAVI QUIET COMFORT , , • Can be activated in all modes and can restore the timer again by ON pressing or to Quick guide. AUTO COMFORT To maximize comfort AUTO COMFORT AIR SWING To adjust vertical airflow direction (Remote control display) • Keeps the room ventilated. • In COOL/DRY mode, if AUTO is set, the flap swings...

E12RKUA Operating Manual
Page 8
... comfort cooling to setting temperature, outdoor temperature and room temperature. Human activity sensor operation ECONAVI ; Mode COOL/DRY HEAT Human Low activity Normal activity High activity Set temperature +2°F / +1°C -4°F / -2°C Absent +4°F / +2°C -4°F / -2°C AUTO COMFORT ; Single Single split system Multi Multi split system Operation mode AUTO : During operation mode selection the POWER indicator blinks. HEAT : Unit takes a while to detect. ECONAVI and AUTO COMFORT ECONAVI AUTO or COMFORT The unit will start to...
... comfort cooling to setting temperature, outdoor temperature and room temperature. Human activity sensor operation ECONAVI ; Mode COOL/DRY HEAT Human Low activity Normal activity High activity Set temperature +2°F / +1°C -4°F / -2°C Absent +4°F / +2°C -4°F / -2°C AUTO COMFORT ; Single Single split system Multi Multi split system Operation mode AUTO : During operation mode selection the POWER indicator blinks. HEAT : Unit takes a while to detect. ECONAVI and AUTO COMFORT ECONAVI AUTO or COMFORT The unit will start to...

E12RKUA Operating Manual
Page 10
... types used in HEAT/COOL mode is closed). efficiently. • Close all doors and windows. • Clean or replace the filters. • Clear any obstruction at an incline. • Close the front panel properly. control. • Water leaks from indoor unit. • Condensation effect due to with signal transmitter. fan speed setting. Outdoor unit emits water/steam. • Condensation or evaporation occurs on . operation when the ON timer has been set...
... types used in HEAT/COOL mode is closed). efficiently. • Close all doors and windows. • Clean or replace the filters. • Clear any obstruction at an incline. • Close the front panel properly. control. • Water leaks from indoor unit. • Condensation effect due to with signal transmitter. fan speed setting. Outdoor unit emits water/steam. • Condensation or evaporation occurs on . operation when the ON timer has been set...
E12RKUA Service Manual
Page 2
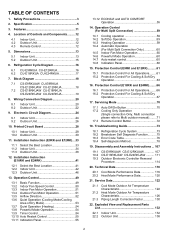
...-E24RKUA 19 8. Installation Instruction (E9RK and E12RK)....33 11.1 Select the Best Location 33 11.2 Indoor Unit 34 11.3 Outdoor Unit 38 12. Operation Control (For Multi Split Connection 59 14.1 Cooling operation 59 14.2 Soft Dry Operation 59 14.3 Heating Operation 59 14.4 Automatic Operation (For Multi Split Connection Only 60 14.5 Indoor Fan Motor Operation 60 14.6 Powerful Mode Operation 60 14.7 Auto restart control 60 14.8 Indication Panel 60 15. Troubleshooting Guide 73 18.1 Refrigeration Cycle System 73...
...-E24RKUA 19 8. Installation Instruction (E9RK and E12RK)....33 11.1 Select the Best Location 33 11.2 Indoor Unit 34 11.3 Outdoor Unit 38 12. Operation Control (For Multi Split Connection 59 14.1 Cooling operation 59 14.2 Soft Dry Operation 59 14.3 Heating Operation 59 14.4 Automatic Operation (For Multi Split Connection Only 60 14.5 Indoor Fan Motor Operation 60 14.6 Powerful Mode Operation 60 14.7 Auto restart control 60 14.8 Indication Panel 60 15. Troubleshooting Guide 73 18.1 Refrigeration Cycle System 73...
E12RKUA Service Manual
Page 3
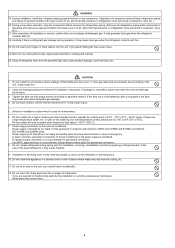
... indoor/outdoor connection. Install according to user the operation, care and maintenance as stated in explosion, injury etc.). 13. For electrical work , it will cause the set 's weight. If connecting or fixing is supplied as below. When install or relocate air conditioner, do not repair or connect the wire even only partial wire break. Keep away from doing. Carry out test run to use copper pipes...
... indoor/outdoor connection. Install according to user the operation, care and maintenance as stated in explosion, injury etc.). 13. For electrical work , it will cause the set 's weight. If connecting or fixing is supplied as below. When install or relocate air conditioner, do not repair or connect the wire even only partial wire break. Keep away from doing. Carry out test run to use copper pipes...
E12RKUA Service Manual
Page 4
.... Use NRTL approved fuse or circuit breaker (rating refers to the room air conditioner. Do not touch the sharp aluminium fins or edges of the liquid refrigerant, it to handle sharp parts during operation. Carry out drainage piping as mentioned in an easily accessible place for maintenance. 6. WARNING 19. During pump down accidentally. 12. It may cause toxic gas when the refrigerant contacts with temperature control, please set it...
.... Use NRTL approved fuse or circuit breaker (rating refers to the room air conditioner. Do not touch the sharp aluminium fins or edges of the liquid refrigerant, it to handle sharp parts during operation. Carry out drainage piping as mentioned in an easily accessible place for maintenance. 6. WARNING 19. During pump down accidentally. 12. It may cause toxic gas when the refrigerant contacts with temperature control, please set it...

E12RKUA Service Manual
Page 33
.../1)6" Conduit (Power supply cord ()) Conduit (Connection cable) Liquid side piping () Gas side piping () Additional drain hose () Control Board cover 33 gas E9RKUAW E12RKUAW 9000 11500 3/8" (9.52 mm) 1/4" 24.6 ft 1/2" (6.35 mm) (7.5 m) (12.7 mm) 49.2 ft (15 m) 9.8 ft 65.6 ft (3 m) (20 m) 0.2 oz/ft (20 g/m) 24.6 ft (7.5 m) Example: For E9RKUAW If the unit is installed at least 8 ft (2.4 m). 11.1.2 Outdoor Unit If...
.../1)6" Conduit (Power supply cord ()) Conduit (Connection cable) Liquid side piping () Gas side piping () Additional drain hose () Control Board cover 33 gas E9RKUAW E12RKUAW 9000 11500 3/8" (9.52 mm) 1/4" 24.6 ft 1/2" (6.35 mm) (7.5 m) (12.7 mm) 49.2 ft (15 m) 9.8 ft 65.6 ft (3 m) (20 m) 0.2 oz/ft (20 g/m) 24.6 ft (7.5 m) Example: For E9RKUAW If the unit is installed at least 8 ft (2.4 m). 11.1.2 Outdoor Unit If...
E12RKUA Service Manual
Page 39
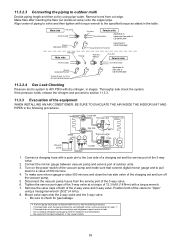
... outdoor units. 3. Connect the micron gauge between vacuum pump and service port of the equipment WHEN INSTALLING AN AIR CONDITIONER, BE SURE TO EVACUATE THE AIR INSIDE THE INDOOR UNIT AND PIPES in the table. Disconnect the vacuum pump house from the service port of leak. - If the leak does not stop when the connections are tightened further, continue working from cut by using a hexagonal wrench (5/32" (4 mm)). 8. Thoroughly leak...
... outdoor units. 3. Connect the micron gauge between vacuum pump and service port of the equipment WHEN INSTALLING AN AIR CONDITIONER, BE SURE TO EVACUATE THE AIR INSIDE THE INDOOR UNIT AND PIPES in the table. Disconnect the vacuum pump house from the service port of leak. - If the leak does not stop when the connections are tightened further, continue working from cut by using a hexagonal wrench (5/32" (4 mm)). 8. Thoroughly leak...

E12RKUA Service Manual
Page 47
... valve. If the leak stops when the piping connections are retightened, repair location of a charging set and turn off the vacuum pump. 5. Remove burrs from step 3. - Make flare after inserting the flare nut (locate at a torque of 500 microns. 4. Remove the valve caps of both of the 3-way valve. 2. o Be sure to "Open" using pipe cutter. Do not release refrigerant during piping work for gas leakage. •...
... valve. If the leak stops when the piping connections are retightened, repair location of a charging set and turn off the vacuum pump. 5. Remove burrs from step 3. - Make flare after inserting the flare nut (locate at a torque of 500 microns. 4. Remove the valve caps of both of the 3-way valve. 2. o Be sure to "Open" using pipe cutter. Do not release refrigerant during piping work for gas leakage. •...
E12RKUA Service Manual
Page 55
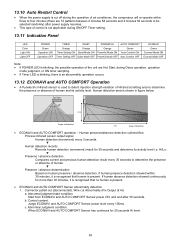
... activity level. Start from ECONAVI and AUTO COMFORT Sensor power ON, and end after power supply resumes. This type of control is not applicable during ON/OFF Timer setting. 13.11 Indication Panel LED Color Light ON Light OFF POWER Green Operation ON Operation OFF TIMER QUIET POWERFUL Orange Orange Orange Timer Setting ON Quiet Mode ON Powerful Mode ON Timer Setting OFF Quiet Mode OFF Powerful Mode OFF AUTO COMFORT Green Auto Comfort ON Auto Comfort OFF ECONAVI...
... activity level. Start from ECONAVI and AUTO COMFORT Sensor power ON, and end after power supply resumes. This type of control is not applicable during ON/OFF Timer setting. 13.11 Indication Panel LED Color Light ON Light OFF POWER Green Operation ON Operation OFF TIMER QUIET POWERFUL Orange Orange Orange Timer Setting ON Quiet Mode ON Powerful Mode ON Timer Setting OFF Quiet Mode OFF Powerful Mode OFF AUTO COMFORT Green Auto Comfort ON Auto Comfort OFF ECONAVI...

E12RKUA Service Manual
Page 56
... power supply reset or AC Reset button on the remote control is pressed. ECONAVI and AUTO COMFORT Demo Mode To enable ECO DEMO mode, during unit is OFF (power standby): Remote control normal mode Press continously for 25 seconds. 3. 2. When ECONAVI and AUTO COMFORT Sensor has continues at Lo level for 5s SET SET Transmit ECO demo code and after 30 seconds return to normal mode. Abnormal judgment start condition...
... power supply reset or AC Reset button on the remote control is pressed. ECONAVI and AUTO COMFORT Demo Mode To enable ECO DEMO mode, during unit is OFF (power standby): Remote control normal mode Press continously for 25 seconds. 3. 2. When ECONAVI and AUTO COMFORT Sensor has continues at Lo level for 5s SET SET Transmit ECO demo code and after 30 seconds return to normal mode. Abnormal judgment start condition...
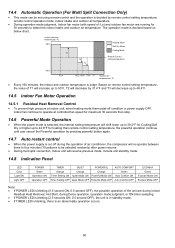
E12RKUA Service Manual
Page 60
....5 Indoor Fan Motor Operation 14.5.1 Residual Heat Removal Control To prevent high pressure at indoor unit, when heating mode thermostat-off condition or power supply OFF, indoor fan continue to operate at controlled fan speed for maximum 30 seconds then stop. 14.6 Powerful Mode Operation When the power mode is selected, the internal setting temperature will shift lower up to 39.2F for Cooling/Soft Dry or higher up to 42.8°F for heating than remote control setting temperature, the powerful operation continue until user...
....5 Indoor Fan Motor Operation 14.5.1 Residual Heat Removal Control To prevent high pressure at indoor unit, when heating mode thermostat-off condition or power supply OFF, indoor fan continue to operate at controlled fan speed for maximum 30 seconds then stop. 14.6 Powerful Mode Operation When the power mode is selected, the internal setting temperature will shift lower up to 39.2F for Cooling/Soft Dry or higher up to 42.8°F for heating than remote control setting temperature, the powerful operation continue until user...

E12RKUA Service Manual
Page 70
... RESET" button and then press any button at the remote control printed circuit board. Remote Control Printed Circuit Board J1 Jumper A (J1) Short Jumper B (D2) Open Remote Control No. To change the advance setting of Forced heating operation. There are 4 types of remote control transmission code could prevent signal interference when there are 2 or more than 5 seconds. Servicing Mode 17.1 Auto Off/On Button Auto OFF/ON Button pressed Auto OFF/ON Button pressed Auto OFF/ON Button pressed Auto Operation 5 sec Test Run Operation...
... RESET" button and then press any button at the remote control printed circuit board. Remote Control Printed Circuit Board J1 Jumper A (J1) Short Jumper B (D2) Open Remote Control No. To change the advance setting of Forced heating operation. There are 4 types of remote control transmission code could prevent signal interference when there are 2 or more than 5 seconds. Servicing Mode 17.1 Auto Off/On Button Auto OFF/ON Button pressed Auto OFF/ON Button pressed Auto OFF/ON Button pressed Auto Operation 5 sec Test Run Operation...

E12RKUA Service Manual
Page 71
... and Indoor Intake Sensor (New Auto Mode) or Outdoor Intake Sensor (Old Auto Mode) The unit will turn ON by the timer and run Cooling Dry Operation. 71 AUTO (with Timer) HEAT (with Timer) COOL (with Timer) The unit will turn ON by the timer and run Cooling Operation. COOL The unit will run Heating operation. The unit will run Force Cooling operation. Power LED blinking. After 30s sampling, the unit will judge the operation mode base on remote controller temperature setting and Indoor Intake Sensor (New Auto Mode) or Outdoor Intake Sensor (Old Auto Mode) The unit will...
... and Indoor Intake Sensor (New Auto Mode) or Outdoor Intake Sensor (Old Auto Mode) The unit will turn ON by the timer and run Cooling Dry Operation. 71 AUTO (with Timer) HEAT (with Timer) COOL (with Timer) The unit will turn ON by the timer and run Cooling Operation. COOL The unit will run Heating operation. The unit will run Force Cooling operation. Power LED blinking. After 30s sampling, the unit will judge the operation mode base on remote controller temperature setting and Indoor Intake Sensor (New Auto Mode) or Outdoor Intake Sensor (Old Auto Mode) The unit will...

E12RKUA Service Manual
Page 75
...;) will increase error code number and transmit error code signal to the main unit. 6 When the latest abnormality code on the remote control. AUTO HEAT COOL DRY FAN FAN SPEED AIR SWING Note: Display only for "- -" (No signal transmission, no receiving sound and no abnormality) will be displayed and signal will be used until repaired. The last error code (abnormality) will increase error code number and transmit error code signal to blink and the unit automatically stops the operation. 2 Press the...
...;) will increase error code number and transmit error code signal to the main unit. 6 When the latest abnormality code on the remote control. AUTO HEAT COOL DRY FAN FAN SPEED AIR SWING Note: Display only for "- -" (No signal transmission, no receiving sound and no abnormality) will be displayed and signal will be used until repaired. The last error code (abnormality) will increase error code number and transmit error code signal to blink and the unit automatically stops the operation. 2 Press the...
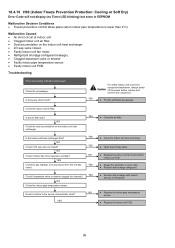
E12RKUA Service Manual
Page 96
... of refrigerant. ● Replace the indoor pipe temperature sensor. ● Replace the indoor unit PCB. 96 Check the indoor unit air filter. YES NO Check if 2/3 way valve is lower than 2°C). 18.4.19 H99 (Indoor Freeze Prevention Protection: Cooling or Soft Dry) Error Code will not display (no Timer LED blinking) but store in EEPROM Malfunction Decision Conditions Freeze prevention control takes place (when indoor pipe temperature is closed . Faulty indoor unit fan motor. Refrigerant shortage (refrigerant leakage...
... of refrigerant. ● Replace the indoor pipe temperature sensor. ● Replace the indoor unit PCB. 96 Check the indoor unit air filter. YES NO Check if 2/3 way valve is lower than 2°C). 18.4.19 H99 (Indoor Freeze Prevention Protection: Cooling or Soft Dry) Error Code will not display (no Timer LED blinking) but store in EEPROM Malfunction Decision Conditions Freeze prevention control takes place (when indoor pipe temperature is closed . Faulty indoor unit fan motor. Refrigerant shortage (refrigerant leakage...


