
CQC3303U User Guide
Page 2
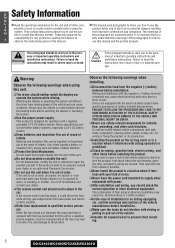
... consult your car audio system carefully before watching the display or operating the system. ❑ Use the proper power supply. This product is out of your dealer. ❑ The remote control unit should neither watch the display nor operate the system while driving. Never operate this unit by a qualified service engineer. Do not insert any problems resulting from the negative (-) battery terminal before installation. Wiring and installation with the fuse prescribed...
... consult your car audio system carefully before watching the display or operating the system. ❑ Use the proper power supply. This product is out of your dealer. ❑ The remote control unit should neither watch the display nor operate the system while driving. Never operate this unit by a qualified service engineer. Do not insert any problems resulting from the negative (-) battery terminal before installation. Wiring and installation with the fuse prescribed...
CQC3303U User Guide
Page 3
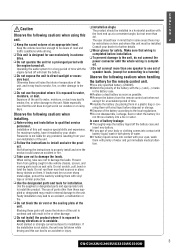
... parts such as possible. ● Remove the battery from your own installation of time with the be installed in a horizontal position with vinyl tape) before installation. ❑ To prevent damage to the unit, do not connect the power connector until the whole wiring is completed. ❑ Do not connect more than 30˚. Panasonic is designed for a prolonged period with the engine turned off the battery...
... parts such as possible. ● Remove the battery from your own installation of time with the be installed in a horizontal position with vinyl tape) before installation. ❑ To prevent damage to the unit, do not connect the power connector until the whole wiring is completed. ❑ Do not connect more than 30˚. Panasonic is designed for a prolonged period with the engine turned off the battery...
CQC3303U User Guide
Page 5
... users, TTY : 1-866-6051277 Service in the original carton. We H know this manual represent model CQ-C3433U unless otherwise specified. The following table describes the differences among 4 Models ¡ This operating instruction manual is for 4 models CQ-C3433U, CQ-C3403U, CQ-C3333U and CQ-C3303U. For hearing or speech impaired TTY users, TTY : 1-877-8338855 Accessory Purchases: Purchase Parts, Accessories and Instruction Books online...
... users, TTY : 1-866-6051277 Service in the original carton. We H know this manual represent model CQ-C3433U unless otherwise specified. The following table describes the differences among 4 Models ¡ This operating instruction manual is for 4 models CQ-C3433U, CQ-C3403U, CQ-C3333U and CQ-C3303U. For hearing or speech impaired TTY users, TTY : 1-877-8338855 Accessory Purchases: Purchase Parts, Accessories and Instruction Books online...
CQC3303U User Guide
Page 6
...CAR AUDIO PRODUCT - This warranty is performed. PANASONIC AUTO PRODUCTS LIMITED WARRANTY LIMITED WARRANTY COVERAGE If your product during shipment, failures which has been altered or repaired in any product which has been improperly installed, subjected to acts of the period indicated in the chart below ) Speakers..., alteration, faulty installation, set-up adjustment, maladjustment of consumer control, improper maintenance, improper antenna, inadequate signal reception or pickup, power line surge, improper voltage supply, lightning, modification, commercial use of the original ...
...CAR AUDIO PRODUCT - This warranty is performed. PANASONIC AUTO PRODUCTS LIMITED WARRANTY LIMITED WARRANTY COVERAGE If your product during shipment, failures which has been altered or repaired in any product which has been improperly installed, subjected to acts of the period indicated in the chart below ) Speakers..., alteration, faulty installation, set-up adjustment, maladjustment of consumer control, improper maintenance, improper antenna, inadequate signal reception or pickup, power line surge, improper voltage supply, lightning, modification, commercial use of the original ...
CQC3303U User Guide
Page 7
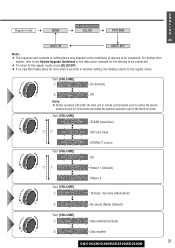
.../WMA Player 16 Notes on Discs 25 Troubleshooting 26 Specifications 31 Note: ¡ Refer to simultaneously connect optional devices mentioned before as well as a CD changer and iPod. 7 CQ-C3433U/C3403U/C3333U/C3303U Audio Settings 20 ¡ Volume ¡ Bass/Treble ¡ Balance/Fader ¡ Sub-Woofer Level CQ-C3433U/C3403U/C3333U Function Settings 22 ¡ Demonstration ¡ Display Color Selection CQ-C3433U/C3333U ¡ Level Meter Display Patterns (PATTERN) ¡ Mute/Attenuation ¡ AUX Skip...
.../WMA Player 16 Notes on Discs 25 Troubleshooting 26 Specifications 31 Note: ¡ Refer to simultaneously connect optional devices mentioned before as well as a CD changer and iPod. 7 CQ-C3433U/C3403U/C3333U/C3303U Audio Settings 20 ¡ Volume ¡ Bass/Treble ¡ Balance/Fader ¡ Sub-Woofer Level CQ-C3433U/C3403U/C3333U Function Settings 22 ¡ Demonstration ¡ Display Color Selection CQ-C3433U/C3333U ¡ Level Meter Display Patterns (PATTERN) ¡ Mute/Attenuation ¡ AUX Skip...
CQC3303U User Guide
Page 8
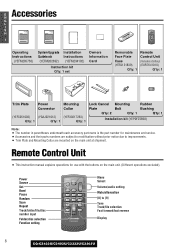
... part name is the part number for use with the buttons on the main unit at shipment. Remote Control Unit ¡ This instruction manual explains operations for maintenance and service. ¡ Accessories and their parts numbers are mounted on the main unit. (Different operations excluded) Power Source Set Band Pause Random Scan Repeat Track/folder/file/disc number input Folder/disc selection Function setting POWER SOURCE MENU SRC SEL SET VOL BAND MUTE 12 RANDOM SCAN 45 3 REPEAT 6 78 TUNE #0 NUMBER 9 TUNE DISP CAR AUDIO Menu Select Volume/audio setting Mute/attenuation...
... part name is the part number for use with the buttons on the main unit at shipment. Remote Control Unit ¡ This instruction manual explains operations for maintenance and service. ¡ Accessories and their parts numbers are mounted on the main unit. (Different operations excluded) Power Source Set Band Pause Random Scan Repeat Track/folder/file/disc number input Folder/disc selection Function setting POWER SOURCE MENU SRC SEL SET VOL BAND MUTE 12 RANDOM SCAN 45 3 REPEAT 6 78 TUNE #0 NUMBER 9 TUNE DISP CAR AUDIO Menu Select Volume/audio setting Mute/attenuation...
CQC3303U User Guide
Page 9
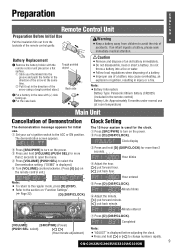
...: select) []] [[] (Hour/minute adjustment) Completed Note: ¡"ADJUST" is displayed.) t Turn [VOLUME] counterclockwise. (Press [0] ({) on the remote control unit.) Note: ¡ To return to the regular mode, press [D] (DISP). ¡ Refer to the section on the power. H Warning 8 ¡Keep a battery away from the backside of the remote control gently. Clock display w Press [SRC/PWR] to turn on "Function Settings". (a Page 22) [D] (DISP/CLOCK) e Press and hold [[] or []] to change numbers rapidly...
...: select) []] [[] (Hour/minute adjustment) Completed Note: ¡"ADJUST" is displayed.) t Turn [VOLUME] counterclockwise. (Press [0] ({) on the remote control unit.) Note: ¡ To return to the regular mode, press [D] (DISP). ¡ Refer to the section on the power. H Warning 8 ¡Keep a battery away from the backside of the remote control gently. Clock display w Press [SRC/PWR] to turn on "Function Settings". (a Page 22) [D] (DISP/CLOCK) e Press and hold [[] or []] to change numbers rapidly...
CQC3303U User Guide
Page 10
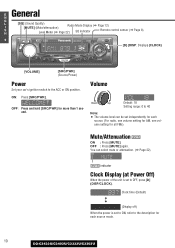
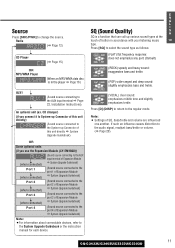
...] (Sound Quality) Radio Mode Display (a Page 12) [MUTE] (Mute/attenuation) Level Meter (a Page 22) SQ indicator Remote control sensor (a Page 8) 9 [D] (DISP: Display) (CLOCK) [VOLUME] [SRC/PWR] (Source/Power) Power Set your car's ignition switch to 40 Note: ¡ The volume level can select mute or attenuation. (a Page 22) indicator Clock Display (at Power Off) When the power of the unit is set to the description for more than 1 second. ON: Press [SRC/PWR]. Volume Down Up Default: 18 Setting range...
...] (Sound Quality) Radio Mode Display (a Page 12) [MUTE] (Mute/attenuation) Level Meter (a Page 22) SQ indicator Remote control sensor (a Page 8) 9 [D] (DISP: Display) (CLOCK) [VOLUME] [SRC/PWR] (Source/Power) Power Set your car's ignition switch to 40 Note: ¡ The volume level can select mute or attenuation. (a Page 22) indicator Clock Display (at Power Off) When the power of the unit is set to the description for more than 1 second. ON: Press [SRC/PWR]. Volume Down Up Default: 18 Setting range...
CQC3303U User Guide
Page 11
... Upgrade Guidebook) (Sound source connected to the port 4 of SQ, bass/treble and volume are influenced one another. Press [D] (DISP) to return to the System Upgrade Guidebook or the instruction manual for each device. CD changer) (if you connect it to System-up Connector of this unit directly) (Sound source connected to the System-up various sound types at the touch of button in the player a Page 16) AUX1 (Sound source connecting to change the source. E N G L I SQ (Sound Quality...
... Upgrade Guidebook) (Sound source connected to the port 4 of SQ, bass/treble and volume are influenced one another. Press [D] (DISP) to return to the System Upgrade Guidebook or the instruction manual for each device. CD changer) (if you connect it to System-up Connector of this unit directly) (Sound source connected to the System-up various sound types at the touch of button in the player a Page 16) AUX1 (Sound source connecting to change the source. E N G L I SQ (Sound Quality...
CQC3303U User Guide
Page 12
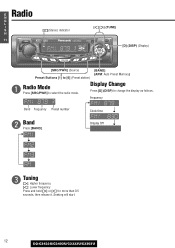
Frequency Band Frequency Preset number w Band Press [BAND]. Seeking will start. 12 CQ-C3433U/C3403U/C3333U/C3303U Clock time Display Off e Tuning [[]: Higher frequency []]: Lower frequency Press and hold [[] or []] for more than 0.5 seconds, then release it. Display Change Press [D] (DISP) to select the radio mode. E Radio N G L I S H 11 (Stereo) indicator []] [[] (TUNE) [D] (DISP) (Display) [SRC/PWR] (Source) [BAND] (APM: Auto Preset Memory) Preset Buttons [1] to [6] (Preset station) q Radio Mode Press [SRC/PWR] to change the display as follows.
Frequency Band Frequency Preset number w Band Press [BAND]. Seeking will start. 12 CQ-C3433U/C3403U/C3333U/C3303U Clock time Display Off e Tuning [[]: Higher frequency []]: Lower frequency Press and hold [[] or []] for more than 0.5 seconds, then release it. Display Change Press [D] (DISP) to select the radio mode. E Radio N G L I S H 11 (Stereo) indicator []] [[] (TUNE) [D] (DISP) (Display) [SRC/PWR] (Source) [BAND] (APM: Auto Preset Memory) Preset Buttons [1] to [6] (Preset station) q Radio Mode Press [SRC/PWR] to change the display as follows.
CQC3303U User Guide
Page 13
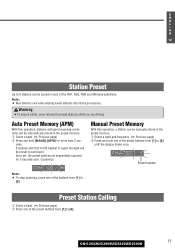
Auto Preset Memory (APM) With this operation, a station can be manually stored in the preset memory. Warning ¡To ensure safety, never attempt to preset stations while you are sequentially scanned for more than 2 sec- onds. 6 stations with good receiving conditions can be automatically stored in the preset memory. Once set, the preset stations are driving. q Select a band. (a Previous page) w Press and hold one of the FM1, FM2, FM3 and...
Auto Preset Memory (APM) With this operation, a station can be manually stored in the preset memory. Warning ¡To ensure safety, never attempt to preset stations while you are sequentially scanned for more than 2 sec- onds. 6 stations with good receiving conditions can be automatically stored in the preset memory. Once set, the preset stations are driving. q Select a band. (a Previous page) w Press and hold one of the FM1, FM2, FM3 and...
CQC3303U User Guide
Page 15
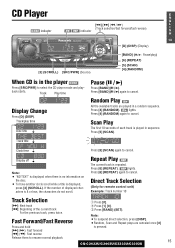
... the previous track, press twice. Track title Clock time Press [5] (SCAN) again to cancel. Display off Note: ¡ "NO TEXT" is displayed when there is no information on the disc. ¡ To have another circle scroll while a title is played in sequence. Direct Track Selection (Only for remote control unit) Example: Track number 10 Track Selection q Press [#]. [d]: Next track [s]: Beginning of each track...
... the previous track, press twice. Track title Clock time Press [5] (SCAN) again to cancel. Display off Note: ¡ "NO TEXT" is displayed when there is no information on the disc. ¡ To have another circle scroll while a title is played in sequence. Direct Track Selection (Only for remote control unit) Example: Track number 10 Track Selection q Press [#]. [d]: Next track [s]: Beginning of each track...
CQC3303U User Guide
Page 18
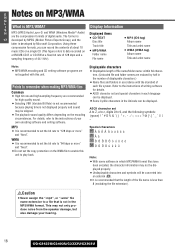
... ¡ CD-TEXT Disc title Track title ¡ MP3 (ID3 tag) Album name Title and artist name music CDs on a single CD (This figure refers to play back. Using these compression formats, you can be displayed. Points to the instructions of 44.1...set and special characters in accordance with this unit to data recorded on ¡ MP3/WMA ¡ WMA (WMA tag) a 650 MB CD-R or CD-RW at a fixed bit rate of 128 kbps and a Folder name Album name sampling frequency of writing software for high quality sound. ¡ Selecting VBR (Variable Bit Rate) is not recommended because playing time...
... ¡ CD-TEXT Disc title Track title ¡ MP3 (ID3 tag) Album name Title and artist name music CDs on a single CD (This figure refers to play back. Using these compression formats, you can be displayed. Points to the instructions of 44.1...set and special characters in accordance with this unit to data recorded on ¡ MP3/WMA ¡ WMA (WMA tag) a 650 MB CD-R or CD-RW at a fixed bit rate of 128 kbps and a Folder name Album name sampling frequency of writing software for high quality sound. ¡ Selecting VBR (Variable Bit Rate) is not recommended because playing time...
CQC3303U User Guide
Page 20
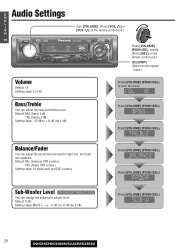
.../C3303U Balance/Fader You can change the subwoofer volume level. Press [VOLUME] (PUSH SEL). Default: BAL (balance) CNT (center) FAD (fader) CNT (center) Setting range: 15 levels each and CNT (center) Press [VOLUME] (PUSH SEL). Press [VOLUME] (PUSH SEL). Sub-Woofer Level CQ-C3433U/C3403U/C3333U You can adjust the sound level among the right, left, front and rear speakers. Bass/Treble You can adjust the bass and treble sound. Default: 0 dB Setting range: MUTE (- ∞...
.../C3303U Balance/Fader You can change the subwoofer volume level. Press [VOLUME] (PUSH SEL). Default: BAL (balance) CNT (center) FAD (fader) CNT (center) Setting range: 15 levels each and CNT (center) Press [VOLUME] (PUSH SEL). Press [VOLUME] (PUSH SEL). Sub-Woofer Level CQ-C3433U/C3403U/C3333U You can adjust the sound level among the right, left, front and rear speakers. Bass/Treble You can adjust the bass and treble sound. Default: 0 dB Setting range: MUTE (- ∞...
CQC3303U User Guide
Page 21
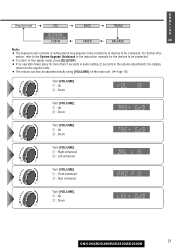
... the instruction manuals for the devices to be connected. ¡ To return to the regular mode, press [D] (DISP). ¡ If no operation takes place for more than 5 seconds in audio setting (2 seconds in the volume adjustment), the display returns to be adjusted directly using [VOLUME] on the conditions of setting items may depend on the main unit. (a Page 10) w q Turn [VOLUME]. E N G Regular mode VOL BASS TREBLE L I S CQ-C3433U/ H C3403U/C3333U SUB-W FADER BALANCE 20...
... the instruction manuals for the devices to be connected. ¡ To return to the regular mode, press [D] (DISP). ¡ If no operation takes place for more than 5 seconds in audio setting (2 seconds in the volume adjustment), the display returns to be adjusted directly using [VOLUME] on the conditions of setting items may depend on the main unit. (a Page 10) w q Turn [VOLUME]. E N G Regular mode VOL BASS TREBLE L I S CQ-C3433U/ H C3403U/C3333U SUB-W FADER BALANCE 20...
CQC3303U User Guide
Page 22
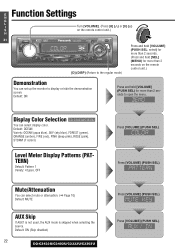
..., OFF Mute/Attenuation You can select display color. Press [VOLUME] (PUSH SEL). Default: ON Press and hold [SEL] (MENU) for more than 2 seconds to display or hide the demonstration screen. Press [VOLUME] (PUSH SEL). Display Color Selection CQ-C3433U/C3333U You can select mute or attenuation. (a Page 10) Default: MUTE AUX Skip If AUX1 is not used, the AUX mode is skipped when selecting the source. E Function Settings N G L I Turn [VOLUME]. (Press [8] (}) or [0] ({) S on the remote control unit.) H 21...
..., OFF Mute/Attenuation You can select display color. Press [VOLUME] (PUSH SEL). Default: ON Press and hold [SEL] (MENU) for more than 2 seconds to display or hide the demonstration screen. Press [VOLUME] (PUSH SEL). Display Color Selection CQ-C3433U/C3333U You can select mute or attenuation. (a Page 10) Default: MUTE AUX Skip If AUX1 is not used, the AUX mode is skipped when selecting the source. E Function Settings N G L I Turn [VOLUME]. (Press [8] (}) or [0] ({) S on the remote control unit.) H 21...
CQC3303U User Guide
Page 23
... instruction manuals for the devices to be connected. Turn [VOLUME]. q : On (Default) w q w : Off Note: ¡ Button operation with either the main unit or remote control allows users to be connected. ¡ To return to the regular mode, press [D] (DISP). ¡ If no operation takes place for 20 seconds and enable the selected operation even in function setting, the display returns to the regular mode. q w : Pattern 4 : 10 steps decrease (Attenuation) : No sound (Mute) (Default) Turn [VOLUME...
... instruction manuals for the devices to be connected. Turn [VOLUME]. q : On (Default) w q w : Off Note: ¡ Button operation with either the main unit or remote control allows users to be connected. ¡ To return to the regular mode, press [D] (DISP). ¡ If no operation takes place for 20 seconds and enable the selected operation even in function setting, the display returns to the regular mode. q w : Pattern 4 : 10 steps decrease (Attenuation) : No sound (Mute) (Default) Turn [VOLUME...
CQC3303U User Guide
Page 26
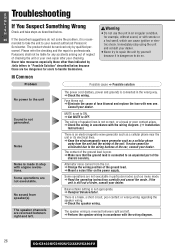
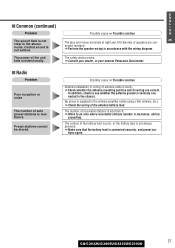
... wiring harness of fuse blowout and replace the fuse with the wiring diagram. (a Installation Instructions) There is poor. Some operations are reversed between right and left . The wiring of the ground lead is an electromagnetic-wave generator such as a cellular phone near the unit or its electrical lines. Balance/fader setting is not generated. aCheck the wiring. aEliminate the cause of the car, consult your nearest authorized Panasonic...
... wiring harness of fuse blowout and replace the fuse with the wiring diagram. (a Installation Instructions) There is poor. Some operations are reversed between right and left . The wiring of the ground lead is an electromagnetic-wave generator such as a cellular phone near the unit or its electrical lines. Balance/fader setting is not generated. aCheck the wiring. aEliminate the cause of the car, consult your nearest authorized Panasonic...
CQC3303U User Guide
Page 27
... an area where receivable stations number is connected securely, and preset sta- aMove to the chassis. aPerform the speaker wiring in the stereo mode. Preset stations cannot be stored. The safety device works. aMake sure that the battery lead is maximum, and try presetting. E N G ■ Common (continued) L I S Problem Possible cause a Possible solution H The sound field is not clear in accordance with the wiring diagram. The contact of auto preset stations is less...
... an area where receivable stations number is connected securely, and preset sta- aMove to the chassis. aPerform the speaker wiring in the stereo mode. Preset stations cannot be stored. The safety device works. aMake sure that the battery lead is maximum, and try presetting. E N G ■ Common (continued) L I S Problem Possible cause a Possible solution H The sound field is not clear in accordance with the wiring diagram. The contact of auto preset stations is less...
CQC3303U User Guide
Page 31
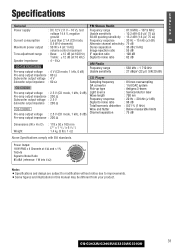
... dB) Pre-amp output impedance : 60 Ω Subwoofer output voltage : 4 V CD Player Subwoofer output impedance : 60 Ω Sampling frequency : 8 times oversampling CQ-C3333U DA converter Pick-up type : 1 bit DAC system : Astigma 3-beam Pre-amp output voltage : 2.5 V (CD mode, 1 kHz, 0 dB) Pre-amp output impedance : 200 Ω Subwoofer output voltage : 2.5 V Subwoofer output impedance : 200 Ω Light source Wave length Frequency response Signal to improvements. ¡Some figures and illustrations in this manual may be...
... dB) Pre-amp output impedance : 60 Ω Subwoofer output voltage : 4 V CD Player Subwoofer output impedance : 60 Ω Sampling frequency : 8 times oversampling CQ-C3333U DA converter Pick-up type : 1 bit DAC system : Astigma 3-beam Pre-amp output voltage : 2.5 V (CD mode, 1 kHz, 0 dB) Pre-amp output impedance : 200 Ω Subwoofer output voltage : 2.5 V Subwoofer output impedance : 200 Ω Light source Wave length Frequency response Signal to improvements. ¡Some figures and illustrations in this manual may be...


