
Operating Instructions
Page 2
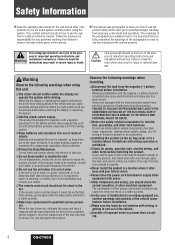
...Some cars equipped with power. ❑ After installation and wiring, you to potential dangers resulting from improper connections and operations. Panasonic assumes no sound) or in an abnormal state (has foreign objects in it is important that you need to open the hole...proper power supply. Safety Information ■ Read the operating instructions for the unit and all exposed wires to prevent short circuiting. 2 CQ-C700U Failure to an airbag equipped car, confirm warnings and cautions of the pictographs in order to use safety-related vehicle components (fuel tank,...
...Some cars equipped with power. ❑ After installation and wiring, you to potential dangers resulting from improper connections and operations. Panasonic assumes no sound) or in an abnormal state (has foreign objects in it is important that you need to open the hole...proper power supply. Safety Information ■ Read the operating instructions for the unit and all exposed wires to prevent short circuiting. 2 CQ-C700U Failure to an airbag equipped car, confirm warnings and cautions of the pictographs in order to use safety-related vehicle components (fuel tank,...
Operating Instructions
Page 3
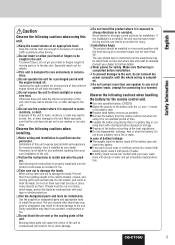
... that wiring is completed. ❑ Do not connect more than those supplied or designated may result in the unit. Installation of the unit. Panasonic is not stable, the unit may lead to the unit. Do not run over sharp metal edges, protect the leads by your hand or... problems resulting from getting caught in car washes or on them with vinyl tape) before installation. ❑ To prevent damage to damage the leads. CQ-C700U 3 Especially watch out for infants. ❑ This unit is unstable. Use the supplied or designated parts and appropriate tools to damage the leads. ...
... that wiring is completed. ❑ Do not connect more than those supplied or designated may result in the unit. Installation of the unit. Panasonic is not stable, the unit may lead to the unit. Do not run over sharp metal edges, protect the leads by your hand or... problems resulting from getting caught in car washes or on them with vinyl tape) before installation. ❑ To prevent damage to damage the leads. CQ-C700U 3 Especially watch out for infants. ❑ This unit is unstable. Use the supplied or designated parts and appropriate tools to damage the leads. ...

Operating Instructions
Page 4
... of precise electronic and mechanical engineering, manufactured with carefully selected components, and assembled by people who are proud of our family. 4 CQ-C700U Safety Information (continued) Caution THIS PRODUCT IS A CLASS I LASER PRODUCT. REFER SERVICING TO QUALIFIED PERSONNEL. We know this product will...REPAIR BY YOURSELF. The following applies only in the U.S.A. See www.dtsc.ca.gov/hazardouswaste/perchlorate. Before Reading These Instructions Panasonic welcomes you too will bring you many hours of enjoyment, and after you discover the quality, value and reliability we have...
... of precise electronic and mechanical engineering, manufactured with carefully selected components, and assembled by people who are proud of our family. 4 CQ-C700U Safety Information (continued) Caution THIS PRODUCT IS A CLASS I LASER PRODUCT. REFER SERVICING TO QUALIFIED PERSONNEL. We know this product will...REPAIR BY YOURSELF. The following applies only in the U.S.A. See www.dtsc.ca.gov/hazardouswaste/perchlorate. Before Reading These Instructions Panasonic welcomes you too will bring you many hours of enjoyment, and after you discover the quality, value and reliability we have...
Operating Instructions
Page 5
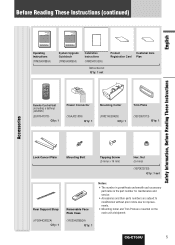
... subject to modification without prior notice due to improvements. ¡ Mounting Collar and Trim Plate are mounted on the main unit at shipment. (YFC054C089CA) Q'ty: 1 CQ-C700U 5
... subject to modification without prior notice due to improvements. ¡ Mounting Collar and Trim Plate are mounted on the main unit at shipment. (YFC054C089CA) Q'ty: 1 CQ-C700U 5

Operating Instructions
Page 6
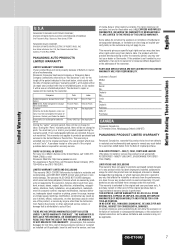
... of the defect claimed, and proof of date of Puerto Rico, Inc. or make Customer Service and Literature requests by E-mail to: npcparts@panasonic.com You may also contact us directly at : 1-800-211-PANA (7262), Monday-Friday 9 am -7 pm, EST. Obtain Product Information ...and Operating Assistance; Customer Services Directory 6 CQ-C700U Saturday-Sunday 10 am -9 pm; For hearing or speech impaired TTY users, TTY : 1-877-833-8855 Accessory Purchases: Purchase Parts, Accessories and Instruction...
... of the defect claimed, and proof of date of Puerto Rico, Inc. or make Customer Service and Literature requests by E-mail to: npcparts@panasonic.com You may also contact us directly at : 1-800-211-PANA (7262), Monday-Friday 9 am -7 pm, EST. Obtain Product Information ...and Operating Assistance; Customer Services Directory 6 CQ-C700U Saturday-Sunday 10 am -9 pm; For hearing or speech impaired TTY users, TTY : 1-877-833-8855 Accessory Purchases: Purchase Parts, Accessories and Instruction...
Operating Instructions
Page 7
...purchase date is required for lost time, cost of the original purchase date is required before warranty service is not warranted) ACCESSORIES - CQ-C700U 7 Contact your satisfaction, then write to install or remove the product is performed. of media, data or other proof of having ... (in any such defect for labor. THERE ARE NO EXPRESS WARRANTIES EXCEPT AS LISTED UNDER "LIMITED WARRANTY COVERAGE". IN NO EVENT WILL PANASONIC CANADA INC. Categories Parts Labor Audio Components (except items listed below) MXE Series Audio Components (except items listed below , which are...
...purchase date is required for lost time, cost of the original purchase date is required before warranty service is not warranted) ACCESSORIES - CQ-C700U 7 Contact your satisfaction, then write to install or remove the product is performed. of media, data or other proof of having ... (in any such defect for labor. THERE ARE NO EXPRESS WARRANTIES EXCEPT AS LISTED UNDER "LIMITED WARRANTY COVERAGE". IN NO EVENT WILL PANASONIC CANADA INC. Categories Parts Labor Audio Components (except items listed below) MXE Series Audio Components (except items listed below , which are...
Operating Instructions
Page 8
...preset modes (FLAT, ROCK, POP, VOCAL, JAZZ, CLUB). D·M (Direct Memory) You can connect the optional Sirius Satellite radio receiver (SIR-PAN1). 8 CQ-C700U Note: This unit is feasible. is 7-band equalizer with optional Digital Adapter. Note: A hub unit is adjustable between -12 dB...adapter (Conversion Cable for DVD/CD Changer: CA-CC30U) allows you to connect the optional Panasonic DVD changer unit (CX-DH801U). ¡ CD Changer The optional adapter (Conversion Cable for DVD/CD Changer: CA-CC30U) allows you to connect the optional Panasonic CD changer unit (CX-DP880U). &#...
...preset modes (FLAT, ROCK, POP, VOCAL, JAZZ, CLUB). D·M (Direct Memory) You can connect the optional Sirius Satellite radio receiver (SIR-PAN1). 8 CQ-C700U Note: This unit is feasible. is 7-band equalizer with optional Digital Adapter. Note: A hub unit is adjustable between -12 dB...adapter (Conversion Cable for DVD/CD Changer: CA-CC30U) allows you to connect the optional Panasonic DVD changer unit (CX-DH801U). ¡ CD Changer The optional adapter (Conversion Cable for DVD/CD Changer: CA-CC30U) allows you to connect the optional Panasonic CD changer unit (CX-DP880U). &#...
Operating Instructions
Page 9
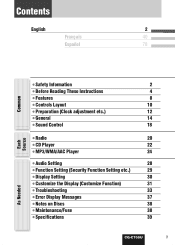
...;Before Reading These Instructions 4 ¡Features 8 ¡Controls Layout 10 ¡Preparation (Clock adjustment etc.) 12 ¡General 14 ¡Sound Control 18 ¡Radio 20 ¡CD Player 22 ¡MP3/WMA/AAC Player 24 ¡Audio Setting 28 ¡Function Setting (Security Function Setting etc.) 29 ¡Display Setting 30... the Display (Customize Function) 31 ¡Troubleshooting 33 ¡Error Display Messages 37 ¡Notes on Discs 38 ¡Maintenance/Fuse 38 ¡Specifications 39 CQ-C700U 9 As Needed
...;Before Reading These Instructions 4 ¡Features 8 ¡Controls Layout 10 ¡Preparation (Clock adjustment etc.) 12 ¡General 14 ¡Sound Control 18 ¡Radio 20 ¡CD Player 22 ¡MP3/WMA/AAC Player 24 ¡Audio Setting 28 ¡Function Setting (Security Function Setting etc.) 29 ¡Display Setting 30... the Display (Customize Function) 31 ¡Troubleshooting 33 ¡Error Display Messages 37 ¡Notes on Discs 38 ¡Maintenance/Fuse 38 ¡Specifications 39 CQ-C700U 9 As Needed
Operating Instructions
Page 10
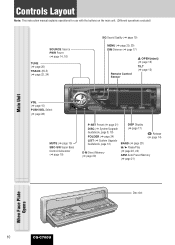
... 22, 24) SQ Sound Quality (a page 19) MENU (a page 29, 30) DIM Dimmer (a page 17) Remote Control Sensor u OPEN (eject) (a page 15) TILT (a page 15) CQ-C700U VOL (a page 15) PUSH SEL Select (a page 28) MUTE (a page 15) SBC-SW Super Bass Control-Subwoofer (a page 19) P-SET Preset (a page 21) DISP Display... (a page 20) y / 5 Pause/Play D·M Direct Memory (a page 20) (a page 22, 24) APM Auto Preset Memory (a page 21) Disc slot When Face Plate Opens 10 CQ-C700U
... 22, 24) SQ Sound Quality (a page 19) MENU (a page 29, 30) DIM Dimmer (a page 17) Remote Control Sensor u OPEN (eject) (a page 15) TILT (a page 15) CQ-C700U VOL (a page 15) PUSH SEL Select (a page 28) MUTE (a page 15) SBC-SW Super Bass Control-Subwoofer (a page 19) P-SET Preset (a page 21) DISP Display... (a page 20) y / 5 Pause/Play D·M Direct Memory (a page 20) (a page 22, 24) APM Auto Preset Memory (a page 21) Disc slot When Face Plate Opens 10 CQ-C700U

Operating Instructions
Page 11
...executable only with main unit/ operations executable only with both the main unit and remote control, the following functions are executable with remote control CQ-C700U 11 Operations executable only with main unit ¡ Face panel's opening, closing, tilting, and removal actions (a page 15) ¡ Disc... ejection (a page 15) ¡ Dimmer (a page 17) ¡ SQ on CDs (a page 23, 25) ¡ Random and repeat play with one -touch operation (a page 21) ¡ Direct access to 9 # NUMBER Number RANDOM 4 RANDOM...
...executable only with main unit/ operations executable only with both the main unit and remote control, the following functions are executable with remote control CQ-C700U 11 Operations executable only with main unit ¡ Face panel's opening, closing, tilting, and removal actions (a page 15) ¡ Disc... ejection (a page 15) ¡ Dimmer (a page 17) ¡ SQ on CDs (a page 23, 25) ¡ Random and repeat play with one -touch operation (a page 21) ¡ Direct access to 9 # NUMBER Number RANDOM 4 RANDOM...

Operating Instructions
Page 12
...throw a battery into the groove, and push the holder in the direction of the arrow, and at room temperature) Remote Control Preparation 3 12 CQ-C700U or more . Insulation film Battery Replacement q Remove the battery holder with (+) side facing up. 2 e Put the case back. Tough pointed ... out in the remote control) Battery Life: Approximately 6 months under normal use (at the same time. Note: Battery Information: Battery Type: Panasonic lithium battery (CR2025) (Included in the direction of the arrow using the remote control, hold down [SEL] (MENU) for 2 sec. If...
...throw a battery into the groove, and push the holder in the direction of the arrow, and at room temperature) Remote Control Preparation 3 12 CQ-C700U or more . Insulation film Battery Replacement q Remove the battery holder with (+) side facing up. 2 e Put the case back. Tough pointed ... out in the remote control) Battery Life: Approximately 6 months under normal use (at the same time. Note: Battery Information: Battery Type: Panasonic lithium battery (CR2025) (Included in the direction of the arrow using the remote control, hold down [SEL] (MENU) for 2 sec. If...

Operating Instructions
Page 13
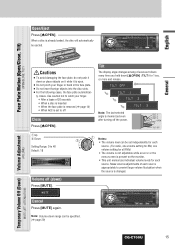
... [BAND] (SET). 7 Press [MENU] to close the menu screen. For using the remote control, use [}] or [{]. 4 Press [PUSH SEL], and the clock adjustment screen appears. CQ-C700U 13 Clock adjustment English Security Function Setting The following depending on the devices to be connected. Security Indicator Preparation Other Settings You may need to...
... [BAND] (SET). 7 Press [MENU] to close the menu screen. For using the remote control, use [}] or [{]. 4 Press [PUSH SEL], and the clock adjustment screen appears. CQ-C700U 13 Clock adjustment English Security Function Setting The following depending on the devices to be connected. Security Indicator Preparation Other Settings You may need to...

Operating Instructions
Page 14
...not remove the face plate while driving your car. ¡ Do not place the face plate on Press [SOURCE] (PWR: POWER). CQ-C700U gages with clean and dry cloth. ¡ To avoid damaging the face plate, do not push it is open . Cautions ¡... It is recommended to adjust the volume, etc. CQ-C700U Power On/off (PWR: POWER) Power off Hold down or place objects on it while it down [SOURCE] (PWR: POWER) until ... (a page 14) 2 Press [ ] (Release). (The face plate disen- Do not expose it is open . 14 CQ-C700U
...not remove the face plate while driving your car. ¡ Do not place the face plate on Press [SOURCE] (PWR: POWER). CQ-C700U gages with clean and dry cloth. ¡ To avoid damaging the face plate, do not push it is open . Cautions ¡... It is recommended to adjust the volume, etc. CQ-C700U Power On/off (PWR: POWER) Power off Hold down or place objects on it while it down [SOURCE] (PWR: POWER) until ... (a page 14) 2 Press [ ] (Release). (The face plate disen- Do not expose it is open . 14 CQ-C700U
Operating Instructions
Page 15
...the face plate is removed (a page 14) ¡ When ACC is set independently for each source. (For radio, one volume setting for AM, one volume setting for each source appropriately to off the power. CQ-C700U Cancel Press [MUTE] again. ly closes. TILT 1 TILT 2 TILT 3 OPEN TILT OFF Notes: ¡... The volume is not adjustable while an error or the menu screen is present on it while it down range can be specified. (a page 29) CQ-C700U 15 Temporary Volume Off (Down) MUTE (ATT: ATTENUATION) Tilt The display angle changes among 4 levels as follows every time you hold down ) Press...
...the face plate is removed (a page 14) ¡ When ACC is set independently for each source. (For radio, one volume setting for AM, one volume setting for each source appropriately to off the power. CQ-C700U Cancel Press [MUTE] again. ly closes. TILT 1 TILT 2 TILT 3 OPEN TILT OFF Notes: ¡... The volume is not adjustable while an error or the menu screen is present on it while it down range can be specified. (a page 29) CQ-C700U 15 Temporary Volume Off (Down) MUTE (ATT: ATTENUATION) Tilt The display angle changes among 4 levels as follows every time you hold down ) Press...
Operating Instructions
Page 16
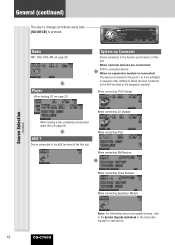
... source changes as follows every time CQ-C700U [SOURCE] is connected: The devices connected to the ports 1 to 4 are connected: Shift to connected devices When an expansion module is pressed. Radio FM1, FM2, FM3, AM (a page 20) Player When loading CD (a page 22) System-up Connector...Device connected to the AUX terminal of the this unit When connecting CD Changer When connecting iPod When connecting XM Receiver Source Selection (SOURCE) When connecting Sirius Receiver When connecting Expansion Module 16 CQ-C700U Note: For information about connectable devices, refer to the AUX terminal...
... source changes as follows every time CQ-C700U [SOURCE] is connected: The devices connected to the ports 1 to 4 are connected: Shift to connected devices When an expansion module is pressed. Radio FM1, FM2, FM3, AM (a page 20) Player When loading CD (a page 22) System-up Connector...Device connected to the AUX terminal of the this unit When connecting CD Changer When connecting iPod When connecting XM Receiver Source Selection (SOURCE) When connecting Sirius Receiver When connecting Expansion Module 16 CQ-C700U Note: For information about connectable devices, refer to the AUX terminal...

Operating Instructions
Page 17
...default) Dimmer Control (DIM: DIMMER) Off The dimmer level changes as follows every time [DISP: DISPLAY] is pressed. or more. CQ-C700U 17 Folder hierarchy (Compressed Audio Player mode only.) Ordinary display + clock General Display Change (DISP: DISPLAY) Ordinary display + graphic pattern... pattern Ordinary display + still image Note: The graphic equalizer of 19 bands (S.A.) is not adjustable with the remote control. CQ-C700U Brighter (default) Medium Darker Note: This setting is selectable when selecting a graphic pattern. English The display changes as follows every...
...default) Dimmer Control (DIM: DIMMER) Off The dimmer level changes as follows every time [DISP: DISPLAY] is pressed. or more. CQ-C700U 17 Folder hierarchy (Compressed Audio Player mode only.) Ordinary display + clock General Display Change (DISP: DISPLAY) Ordinary display + graphic pattern... pattern Ordinary display + still image Note: The graphic equalizer of 19 bands (S.A.) is not adjustable with the remote control. CQ-C700U Brighter (default) Medium Darker Note: This setting is selectable when selecting a graphic pattern. English The display changes as follows every...

Operating Instructions
Page 18
... above causes distortion to display "SOUND QUALITY MENU". 2 Press [PUSH SEL]. The regular screen appears again. The targeted SQ preset appears. CQ-C700U Lights when SQ is pressed. For using the remote control, use [BAND] (SET). 3 Adjust each band. Note: If [PUSH SEL...SQ is adjustable in the category name after adjustment. For using the remote control, use [BAND] (SET). 5 Press [DISP: DISPLAY]. CQ-C700U 18 CQ-C700U SQ adjustment (USER) SQ Selection Based on Genre (SQ: SOUND QUALITY) Sound Control The equalizer curve is selectable from among preset 6 types ...
... above causes distortion to display "SOUND QUALITY MENU". 2 Press [PUSH SEL]. The regular screen appears again. The targeted SQ preset appears. CQ-C700U Lights when SQ is pressed. For using the remote control, use [BAND] (SET). 3 Adjust each band. Note: If [PUSH SEL...SQ is adjustable in the category name after adjustment. For using the remote control, use [BAND] (SET). 5 Press [DISP: DISPLAY]. CQ-C700U 18 CQ-C700U SQ adjustment (USER) SQ Selection Based on Genre (SQ: SOUND QUALITY) Sound Control The equalizer curve is selectable from among preset 6 types ...

Operating Instructions
Page 19
Off (default) Lights when SBC-SW is not connected. English Substitutional Subwoofer (SBC-SW: SUPER BASS CONTROL-SUBWOOFER) The rear speaker can be used as a substitutional subwoofer when a subwoofer is activated. Notes: ¡ If ON is selected, the settings of subwoofer level adjustment and subwoofer low pass filter are activatOn ed. (a page 28) Sound Control CQ-C700U 19 CQ-C700U Holding down [SBC-SW] for 2 sec. or more toggles SBC-SW on and off.
Off (default) Lights when SBC-SW is not connected. English Substitutional Subwoofer (SBC-SW: SUPER BASS CONTROL-SUBWOOFER) The rear speaker can be used as a substitutional subwoofer when a subwoofer is activated. Notes: ¡ If ON is selected, the settings of subwoofer level adjustment and subwoofer low pass filter are activatOn ed. (a page 28) Sound Control CQ-C700U 19 CQ-C700U Holding down [SBC-SW] for 2 sec. or more toggles SBC-SW on and off.

Operating Instructions
Page 20
...): Lower preset number [}] (P-SET: Preset): Higher preset number Notes: ¡ Direct selection can be received even if the unit is in the CD mode or other modes. (Default: FM 87.9 MHz) Note: For the use of an FM transmitter, it is useful for 2 sec. Direct... Memory D.M station Calling Press [D.M] (DIRECT MEMORY). Frequency Radio Mode Display Preset Number Lights while receiving an FM stereo signal. or more and release for 0.5 sec. As the result of doing that, your CQ-C700U favorite broadcasting station can assign your favorite broadcasting station to select a band...
...): Lower preset number [}] (P-SET: Preset): Higher preset number Notes: ¡ Direct selection can be received even if the unit is in the CD mode or other modes. (Default: FM 87.9 MHz) Note: For the use of an FM transmitter, it is useful for 2 sec. Direct... Memory D.M station Calling Press [D.M] (DIRECT MEMORY). Frequency Radio Mode Display Preset Number Lights while receiving an FM stereo signal. or more and release for 0.5 sec. As the result of doing that, your CQ-C700U favorite broadcasting station can assign your favorite broadcasting station to select a band...
Operating Instructions
Page 21
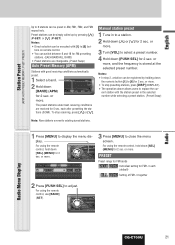
...] to [6] but- PRESET Preset range for FM bands : Individual setting for FM1-3 each after presetting the stations (SCAN). Radio Radio Menu Display CQ-C700U 21 The preset stations under best receiving conditions are changeable. (Preset Swap) Auto Preset Memory (APM) Stations with the station ... In step 2, a station can be registered by pressing [}] (P-SET) or [{] (P-SET). or more . ¡ To stop scanning, press [}] or [{]. CQ-C700U 2 Hold down [PUSH SEL] for 2 sec. English Station Preset (APM: AUTO PRESET MEMORY, P·SET: PRESET) Up to 6 stations can be preset...
...] to [6] but- PRESET Preset range for FM bands : Individual setting for FM1-3 each after presetting the stations (SCAN). Radio Radio Menu Display CQ-C700U 21 The preset stations under best receiving conditions are changeable. (Preset Swap) Auto Preset Memory (APM) Stations with the station ... In step 2, a station can be registered by pressing [}] (P-SET) or [{] (P-SET). or more . ¡ To stop scanning, press [}] or [{]. CQ-C700U 2 Hold down [PUSH SEL] for 2 sec. English Station Preset (APM: AUTO PRESET MEMORY, P·SET: PRESET) Up to 6 stations can be preset...


