Installation Guide
Page 1
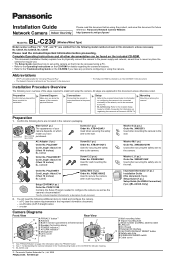
...-in sensor (pyroelectric infrared sensor) D Speaker (for installation. All steps are included in this document, unless necessary. PQLV206CEY Cord Length: About 3 m (9 feet 10 inches) BL-C230CE Screw A (1 pc.) Order No. Panasonic Network Camera Website: http://panasonic.net/pcc/ipcam/ BL-C230 Model No. (Wireless/Wired Type) Model number suffixes ("A", "CE", and "E") are omitted from a PC. •...
...-in sensor (pyroelectric infrared sensor) D Speaker (for installation. All steps are included in this document, unless necessary. PQLV206CEY Cord Length: About 3 m (9 feet 10 inches) BL-C230CE Screw A (1 pc.) Order No. Panasonic Network Camera Website: http://panasonic.net/pcc/ipcam/ BL-C230 Model No. (Wireless/Wired Type) Model number suffixes ("A", "CE", and "E") are omitted from a PC. •...
Installation Guide
Page 2
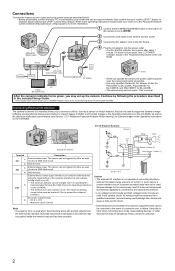
...All wiring should be controlled. 2 PQLV206Y for BL-C230A, PQLV206CEY for BL-C230CE, and PQLV206EY for BL-C230E). • The camera may be used when disconnecting wires with your router or to the Panasonic Network Camera website (http://panasonic.net/pcc/ipcam/) for example, turning a .... External sensor input. Incorrect wiring could damage the camera and cause a fatal electric shock. • External devices connected to the camera's output terminals cannot be changed (see 7.4 Controlling the External Output Terminal (BL-C230 Only) in the Operating Instructions on the CD-ROM...
...All wiring should be controlled. 2 PQLV206Y for BL-C230A, PQLV206CEY for BL-C230CE, and PQLV206EY for BL-C230E). • The camera may be used when disconnecting wires with your router or to the Panasonic Network Camera website (http://panasonic.net/pcc/ipcam/) for example, turning a .... External sensor input. Incorrect wiring could damage the camera and cause a fatal electric shock. • External devices connected to the camera's output terminals cannot be changed (see 7.4 Controlling the External Output Terminal (BL-C230 Only) in the Operating Instructions on the CD-ROM...
Installation Guide
Page 3
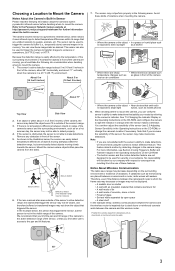
Refer to the Panasonic Network Camera website at an area outside of the camera, about 28° horizontally, and about 71° vertically, when the camera is not able to make detections, we recommend using the camera's motion detection feature. The camera's built-in sensor. The sensor's active detection range is about...such as as on the surrounding environment or existence of the camera near an air conditioner About 28° About 71° Top View Side View 2. If the lens is aimed at http://panasonic.net/pcc/support/netwkcam/ for security or surveillance. This feature...
Refer to the Panasonic Network Camera website at an area outside of the camera, about 28° horizontally, and about 71° vertically, when the camera is not able to make detections, we recommend using the camera's motion detection feature. The camera's built-in sensor. The sensor's active detection range is about...such as as on the surrounding environment or existence of the camera near an air conditioner About 28° About 71° Top View Side View 2. If the lens is aimed at http://panasonic.net/pcc/support/netwkcam/ for security or surveillance. This feature...
Installation Guide
Page 4
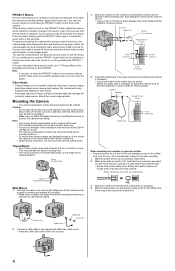
...Insert anchors (customer-provided) into the holes and use a tripod screw with wooden walls only. • The pull-out strength of the camera. Mount the camera appropriately. Tripod Mount • Do not use a hammer to make holes. 2. Tripod mounting hole Tripod (customer-provided) Wall Mount 1. Mark...document depict the BL-C230A. Connect a LAN cable to prevent the camera from being seen. Once privacy mode is turned off and allow the camera to be mounted outdoors. • To ensure that if the camera were to place. 4 Drive the screws into the camera's wall mounting holes...
...Insert anchors (customer-provided) into the holes and use a tripod screw with wooden walls only. • The pull-out strength of the camera. Mount the camera appropriately. Tripod Mount • Do not use a hammer to make holes. 2. Tripod mounting hole Tripod (customer-provided) Wall Mount 1. Mark...document depict the BL-C230A. Connect a LAN cable to prevent the camera from being seen. Once privacy mode is turned off and allow the camera to be mounted outdoors. • To ensure that if the camera were to place. 4 Drive the screws into the camera's wall mounting holes...


