Network Camera
Page 1
Panasonic Network Camera Website: http://www.panasonic.com/netcam for future reference. Operating Instructions Network Camera Model No. BL-C10A Please read this manual before using and save this manual for customers in the USA or Puerto Rico
Panasonic Network Camera Website: http://www.panasonic.com/netcam for future reference. Operating Instructions Network Camera Model No. BL-C10A Please read this manual before using and save this manual for customers in the USA or Puerto Rico
Network Camera
Page 2
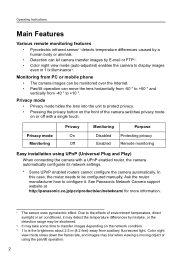
...the brightness about 2.5 m (8.2 feet) away from -40 ° to +10 °. See Panasonic Network Camera support website at http://panasonic.co.jp/pcc/products/en/netwkcam/ for more information. *1 The sensor uses pyroelectric effect. Privacy mode • Privacy mode hides the lens into the unit to protect privacy....sunlight or air conditioner, it . Monitoring from PC or mobile phone • The camera images can be monitored over the Internet. • Pan/tilt operation can let camera transfer images by mistake, or the detection range may be configured manually. Privacy mode ...
...the brightness about 2.5 m (8.2 feet) away from -40 ° to +10 °. See Panasonic Network Camera support website at http://panasonic.co.jp/pcc/products/en/netwkcam/ for more information. *1 The sensor uses pyroelectric effect. Privacy mode • Privacy mode hides the lens into the unit to protect privacy....sunlight or air conditioner, it . Monitoring from PC or mobile phone • The camera images can be monitored over the Internet. • Pan/tilt operation can let camera transfer images by mistake, or the detection range may be configured manually. Privacy mode ...

Network Camera
Page 5
...on or pinched particularly at plugs, convenience receptacles, and the point where they exit from the unit. 8. SAVE THESE INSTRUCTIONS Network Camera Memo Attach your future reference Date of purchase Serial Number (Found on the rear side of the main unit) Name and ... registers, stoves, or other devices (including amplifiers) that produce heat. 7. Refer all instructions. 5. IMPORTANT SAFETY INSTRUCTIONS Operating Instructions When using this unit, basic safety precautions should be followed to reduce the risk of time. 11. Prolonged exposure to qualified service personnel. After ...
...on or pinched particularly at plugs, convenience receptacles, and the point where they exit from the unit. 8. SAVE THESE INSTRUCTIONS Network Camera Memo Attach your future reference Date of purchase Serial Number (Found on the rear side of the main unit) Name and ... registers, stoves, or other devices (including amplifiers) that produce heat. 7. Refer all instructions. 5. IMPORTANT SAFETY INSTRUCTIONS Operating Instructions When using this unit, basic safety precautions should be followed to reduce the risk of time. 11. Prolonged exposure to qualified service personnel. After ...

Network Camera
Page 6
... Images 23 1.5 Viewing Still Images on Your Mobile Phone 24 2 Various Camera Features 26 2.1 Using Camera Features 26 2.2 Connecting the Camera to Your Network 28 2.3 Using UPnP (Universal Plug and Play 32 2.4 Registering with the Viewnetcam.com service 33 2.5 Setting Date and Time 35 2.6 Changing Camera Settings 37 2.7 Changing Authentication Setting and Administrator User Name and Password...
... Images 23 1.5 Viewing Still Images on Your Mobile Phone 24 2 Various Camera Features 26 2.1 Using Camera Features 26 2.2 Connecting the Camera to Your Network 28 2.3 Using UPnP (Universal Plug and Play 32 2.4 Registering with the Viewnetcam.com service 33 2.5 Setting Date and Time 35 2.6 Changing Camera Settings 37 2.7 Changing Authentication Setting and Administrator User Name and Password...

Network Camera
Page 7
... Unit 88 Cleaning the Lens 88 Setting an IP Address on Your PC 89 3.7 Using Setup Program 90 3.8 3.8.1 3.8.2 3.8.3 3.9 Setting Your PC 92 Setting the Proxy Server Settings on Web Browser 92 Setting UPnP to Display Camera Shortcut in My Network Places .......... 95 Setting the Internet Temporary File Setting on Web Browser 95 ASCII...
... Unit 88 Cleaning the Lens 88 Setting an IP Address on Your PC 89 3.7 Using Setup Program 90 3.8 3.8.1 3.8.2 3.8.3 3.9 Setting Your PC 92 Setting the Proxy Server Settings on Web Browser 92 Setting UPnP to Display Camera Shortcut in My Network Places .......... 95 Setting the Internet Temporary File Setting on Web Browser 95 ASCII...

Network Camera
Page 11
If you cannot install ActiveX Controls or you use a proxy server, set the web browser not to install it. Wait for a while. • If you cannot see page 92). • In some corporate network environments a firewall may not be displayed quickly. Operating Instructions Security Warning window ...-ROM. (1) Restart the PC. (2) Confirm that Internet Explorer is possible that this situation we suggest: • Contact your network administrator. • Try using Windows 2000 or Windows XP, log in as an administrator to access the proxy server (see the video in the Internet Explorer...
If you cannot install ActiveX Controls or you use a proxy server, set the web browser not to install it. Wait for a while. • If you cannot see page 92). • In some corporate network environments a firewall may not be displayed quickly. Operating Instructions Security Warning window ...-ROM. (1) Restart the PC. (2) Confirm that Internet Explorer is possible that this situation we suggest: • Contact your network administrator. • Try using Windows 2000 or Windows XP, log in as an administrator to access the proxy server (see the video in the Internet Explorer...

Network Camera
Page 14
... a temperature difference, the camera can be refreshed. 14 Only an administrator can preset 8 positions (see page 16). Brightness: Changes brightness in nine steps including [STD] (Standard). Operating Instructions 1.2.3 Using Operation Bar End Display When the pan/tilt has reached the end...see page 16-page 19). When clicking a preset button, the preset name appears. Pan ( : Left, : Right), Tilt ( : Up, : Down) and Home Position ( : Center) Preset Button: Applies the camera direction to the original position. Image Quality: Selects the image quality. • ...
... a temperature difference, the camera can be refreshed. 14 Only an administrator can preset 8 positions (see page 16). Brightness: Changes brightness in nine steps including [STD] (Standard). Operating Instructions 1.2.3 Using Operation Bar End Display When the pan/tilt has reached the end...see page 16-page 19). When clicking a preset button, the preset name appears. Pan ( : Left, : Right), Tilt ( : Up, : Down) and Home Position ( : Center) Preset Button: Applies the camera direction to the original position. Image Quality: Selects the image quality. • ...

Network Camera
Page 21
...page • An authentication window is displayed in video display. • Due to the network congestion or the number of the configured cameras are not playing images on the Multi-Camera page, all authentication windows of accesses, the refresh interval may slow down . For Internet... degradation in camera access. The refresh interval may need 3 to refreshing still images (see page 92). When setting [Do not permit unregistered users] on the Network page (see page 13). Operating Instructions • When viewing video (Motion JPEG), we recommend using the capture image...
...page • An authentication window is displayed in video display. • Due to the network congestion or the number of the configured cameras are not playing images on the Multi-Camera page, all authentication windows of accesses, the refresh interval may slow down . For Internet... degradation in camera access. The refresh interval may need 3 to refreshing still images (see page 92). When setting [Do not permit unregistered users] on the Network page (see page 13). Operating Instructions • When viewing video (Motion JPEG), we recommend using the capture image...

Network Camera
Page 24
Pressing 0 switches the resolution to use the first four registered preset buttons. Pressing 1, 3, 7 or 9 on ...password. • A still image is set to privacy mode. E.g. Executing [Home Position] moves the lens to pan or tilt the camera in four directions: Left, Up, Down or Right. Enter "http://IP address (or URL):Port Number/mobile" ....) Pressing 2, 4, 6 or 8 on the keypad allows you execute [Privacy Mode] here, the camera switches to 80 (default), it , access the camera again and execute [Disable Privacy Mode] (see page 70). 24 Operating Instructions 1.5 Viewing Still Images on...
Pressing 0 switches the resolution to use the first four registered preset buttons. Pressing 1, 3, 7 or 9 on ...password. • A still image is set to privacy mode. E.g. Executing [Home Position] moves the lens to pan or tilt the camera in four directions: Left, Up, Down or Right. Enter "http://IP address (or URL):Port Number/mobile" ....) Pressing 2, 4, 6 or 8 on the keypad allows you execute [Privacy Mode] here, the camera switches to 80 (default), it , access the camera again and execute [Disable Privacy Mode] (see page 70). 24 Operating Instructions 1.5 Viewing Still Images on...

Network Camera
Page 26
Notes • When [Allowing unregistered users] is set on the Security: Administrator page, click [login] button and log in as an administrator. • When users other than an administrator are accessing the camera, the [Setup] and [Maintenance] tabs are not displayed. • The Top page is displayed. 2. Click [Setup] tab at the top of the page. (1) (2) (3) (4) (5) (6) (7) (8) (9) (10) (11) (12) (13) 26 Access the camera (see page 8). Operating Instructions 2 Various Camera Features 2.1 Using Camera Features 1.
Notes • When [Allowing unregistered users] is set on the Security: Administrator page, click [login] button and log in as an administrator. • When users other than an administrator are accessing the camera, the [Setup] and [Maintenance] tabs are not displayed. • The Top page is displayed. 2. Click [Setup] tab at the top of the page. (1) (2) (3) (4) (5) (6) (7) (8) (9) (10) (11) (12) (13) 26 Access the camera (see page 8). Operating Instructions 2 Various Camera Features 2.1 Using Camera Features 1.

Network Camera
Page 28
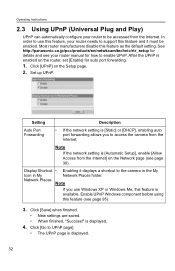
... automatically searches the unused IP address on the Setup page. 2. Operating Instructions 2.2 Connecting the Camera to Your Network The Network page offers three options to configure the camera. • [Automatic Setup] automatically assigns an unused IP address to the camera, and uses UPnP (Universal Plug and Play) to configure your router. • [Static] allows the user...
... automatically searches the unused IP address on the Setup page. 2. Operating Instructions 2.2 Connecting the Camera to Your Network The Network page offers three options to configure the camera. • [Automatic Setup] automatically assigns an unused IP address to the camera, and uses UPnP (Universal Plug and Play) to configure your router. • [Static] allows the user...

Network Camera
Page 29
... section (see page 90). [For assistance, please call: 1-800-272-7033] 29 Note The current network settings are saved. • When finished, the following page is displayed. Click [Restart]. • The camera restarts, and the Top page is displayed. Note When you do not know the... camera IP address while setting [Automatic Setup] or [DHCP Setup], you back to the previous page without saving changes. 4. DHCP Setup Static Setup Operating Instructions • Clicking [Cancel] takes you can search the camera IP address by using the Setup Program (see page 72...
... section (see page 90). [For assistance, please call: 1-800-272-7033] 29 Note The current network settings are saved. • When finished, the following page is displayed. Click [Restart]. • The camera restarts, and the Top page is displayed. Note When you do not know the... camera IP address while setting [Automatic Setup] or [DHCP Setup], you back to the previous page without saving changes. 4. DHCP Setup Static Setup Operating Instructions • Clicking [Cancel] takes you can search the camera IP address by using the Setup Program (see page 72...

Network Camera
Page 30
...in the same class as your ISP or network administrator specifies the IP address and subnet mask, enter them in the Installation/Troubleshooting). Some ISPs do not allow you use multiple cameras with a router on your network in the order from 50000 to the camera, check [No]. If your PC (see... page 11 "1.5 Connecting the Camera to a Router Not Supporting UPnP" in each camera must be used as "192.168.0.253". If you use port 80. Do not...
...in the same class as your ISP or network administrator specifies the IP address and subnet mask, enter them in the Installation/Troubleshooting). Some ISPs do not allow you use multiple cameras with a router on your network in the order from 50000 to the camera, check [No]. If your PC (see... page 11 "1.5 Connecting the Camera to a Router Not Supporting UPnP" in each camera must be used as "192.168.0.253". If you use port 80. Do not...

Network Camera
Page 31
... assigned DNS server addresses by your ISP or network administrator, enter them in this data field. Note Set the maximum bandwidth usage seeing the following conditions. • Transferring camera images by E-mail or FTP • Setting cameras by their host names on the image quality or...18 KB (144 Kbit) Connection Type • Select [Auto Negotiation] normally. File sizes may change depending on the MultiCamera Setup page • Using the Viewnetcam.com service If you automatically obtain the IP address from [Unlimited] to set it in the following file sizes. Set 4 digits ...
... assigned DNS server addresses by your ISP or network administrator, enter them in this data field. Note Set the maximum bandwidth usage seeing the following conditions. • Transferring camera images by E-mail or FTP • Setting cameras by their host names on the image quality or...18 KB (144 Kbit) Connection Type • Select [Auto Negotiation] normally. File sizes may change depending on the MultiCamera Setup page • Using the Viewnetcam.com service If you automatically obtain the IP address from [Unlimited] to set it in the following file sizes. Set 4 digits ...
Network Camera
Page 32
... support this feature is [Static] or [DHCP], enabling auto port forwarding allows you use Windows XP or Windows Me, this feature and it displays a shortcut to the camera in the My Icon in My Network Places folder. Click [UPnP] on the router, set [Enable] for auto port forwarding.... 1. Setting Description Auto Port Forwarding • If the network setting is available. See http://panasonic.co.jp/pcc/products/en/netwkcam/technic...
... support this feature is [Static] or [DHCP], enabling auto port forwarding allows you use Windows XP or Windows Me, this feature and it displays a shortcut to the camera in the My Icon in My Network Places folder. Click [UPnP] on the router, set [Enable] for auto port forwarding.... 1. Setting Description Auto Port Forwarding • If the network setting is available. See http://panasonic.co.jp/pcc/products/en/netwkcam/technic...

Network Camera
Page 35
Note Saving the date and time settings deletes all buffered images. 1. Click [Date and Time] on the buffered image. Set each parameter. • Clicking [Cancel] cancels your settings without saving changes. [For assistance, please call: 1-800-272-7033] 35 Date and time are used for image buffer/transfer, operation time and time stamps on the Setup page. 2. Operating Instructions 2.5 Setting Date and Time The Date and Time page allows you to set date and time.
Note Saving the date and time settings deletes all buffered images. 1. Click [Date and Time] on the buffered image. Set each parameter. • Clicking [Cancel] cancels your settings without saving changes. [For assistance, please call: 1-800-272-7033] 35 Date and time are used for image buffer/transfer, operation time and time stamps on the Setup page. 2. Operating Instructions 2.5 Setting Date and Time The Date and Time page allows you to set date and time.

Network Camera
Page 36
Automatic Time • Adjustment • • NTP (Network Time Protocol) server synchronizes the camera's internal clock. Set the NTP server IP address, set a host name (1-255 characters). Select your time zone. The clock will be attached to the transferred images by E-mail or FTP transfer uses only 24 h format. Click [Save] when finished. •... set time on the Start Day, and move back one hour at the set time on the buffered image. Note Date and time settings are used for • Daylight Saving Time During the daylight saving time, the internal clock is displayed.
Automatic Time • Adjustment • • NTP (Network Time Protocol) server synchronizes the camera's internal clock. Set the NTP server IP address, set a host name (1-255 characters). Select your time zone. The clock will be attached to the transferred images by E-mail or FTP transfer uses only 24 h format. Click [Save] when finished. •... set time on the Start Day, and move back one hour at the set time on the buffered image. Note Date and time settings are used for • Daylight Saving Time During the daylight saving time, the internal clock is displayed.

Network Camera
Page 46
... password. Access level is displayed. 5. Click [Save] when finished. • New settings are not available. Note The password must be registered. • The list is used to modify or delete general user settings. • User Name (6 to 15 characters): Enter the user name. • Password (6 to General User page]. 46 Each...
... password. Access level is displayed. 5. Click [Save] when finished. • New settings are not available. Note The password must be registered. • The list is used to modify or delete general user settings. • User Name (6 to 15 characters): Enter the user name. • Password (6 to General User page]. 46 Each...

Network Camera
Page 49
...: 1-800-272-7033] 49 Notes • If you to configure the camera IP addresses and camera names to use the Multi-Camera page. 1. The camera setting can change the camera number. Select the number, and click [Move]. 3. Operating Instructions 2.11 Configuring Multiple Cameras The Multi-Camera Setup page allows you click the camera number, the modification page is displayed.
...: 1-800-272-7033] 49 Notes • If you to configure the camera IP addresses and camera names to use the Multi-Camera page. 1. The camera setting can change the camera number. Select the number, and click [Move]. 3. Operating Instructions 2.11 Configuring Multiple Cameras The Multi-Camera Setup page allows you click the camera number, the modification page is displayed.

Network Camera
Page 52
Operating Instructions 4. Set the time, and click [Next>]. Set the date and time before using timer buffer/transfer (see page 35). • Clicking []. • Clicking [ Note The timer works by an internal clock.
Operating Instructions 4. Set the time, and click [Next>]. Set the date and time before using timer buffer/transfer (see page 35). • Clicking []. • Clicking [ Note The timer works by an internal clock.
