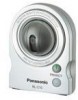
Network Camera
Page 3
..., Spanish, Russian, Simplified Chinese or Japanese. bob.viewnetcam.com) instead of a global IP address. * Viewnetcam.com service is the service for more information. See Viewnetcam.com website (http://www.viewnetcam.com) for Panasonic Network Camera. But if you to access the camera over the Internet with your favorite domain name (e.g. If you select English or...
..., Spanish, Russian, Simplified Chinese or Japanese. bob.viewnetcam.com) instead of a global IP address. * Viewnetcam.com service is the service for more information. See Viewnetcam.com website (http://www.viewnetcam.com) for Panasonic Network Camera. But if you to access the camera over the Internet with your favorite domain name (e.g. If you select English or...

Network Camera
Page 5
...accessible. 9. Prolonged exposure to qualified service personnel. SAVE THESE INSTRUCTIONS Network Camera Memo Attach your future reference Date of purchase Serial Number (Found on the rear side of the main unit) Name and address of dealer MAC Address (Found on the lens, wipe the lens with a cotton bud...unit, basic safety precautions should be followed to reduce the risk of fire, electric shock, or personal injury. 1. When you operate the camera, the power outlet should always be near any way, such as radiators, heat registers, stoves, or other devices (including amplifiers) that ...
...accessible. 9. Prolonged exposure to qualified service personnel. SAVE THESE INSTRUCTIONS Network Camera Memo Attach your future reference Date of purchase Serial Number (Found on the rear side of the main unit) Name and address of dealer MAC Address (Found on the lens, wipe the lens with a cotton bud...unit, basic safety precautions should be followed to reduce the risk of fire, electric shock, or personal injury. 1. When you operate the camera, the power outlet should always be near any way, such as radiators, heat registers, stoves, or other devices (including amplifiers) that ...

Network Camera
Page 7
... the Main Unit 88 Cleaning the Lens 88 Setting an IP Address on Your PC 89 3.7 Using Setup Program 90 3.8 3.8.1 3.8.2 3.8.3 3.9 Setting Your PC 92 Setting the Proxy Server Settings on Web Browser 92 Setting UPnP to Display Camera Shortcut in My Network Places .......... 95 Setting the Internet Temporary File Setting on Web Browser...
... the Main Unit 88 Cleaning the Lens 88 Setting an IP Address on Your PC 89 3.7 Using Setup Program 90 3.8 3.8.1 3.8.2 3.8.3 3.9 Setting Your PC 92 Setting the Proxy Server Settings on Web Browser 92 Setting UPnP to Display Camera Shortcut in My Network Places .......... 95 Setting the Internet Temporary File Setting on Web Browser...

Network Camera
Page 8
... number is 80 (default), you do not need to 50050. Start up the web browser on the keyboard. Operating Instructions 1 Camera Monitoring 1.1 Accessing the Camera 1. Note When [Prohibiting unregistered users] is desired, the port number will be changed because some ISPs block port 80. E.g. ... number, and page 11 in the Installation/ Troubleshooting. • If the Internet access to the camera is set on the Security: Administrator page, authentication window will be displayed. Enter "http://IP Address (or URL):Port Number" on the address bar, and press [Enter] on your PC. 2.
... number is 80 (default), you do not need to 50050. Start up the web browser on the keyboard. Operating Instructions 1 Camera Monitoring 1.1 Accessing the Camera 1. Note When [Prohibiting unregistered users] is desired, the port number will be changed because some ISPs block port 80. E.g. ... number, and page 11 in the Installation/ Troubleshooting. • If the Internet access to the camera is set on the Security: Administrator page, authentication window will be displayed. Enter "http://IP Address (or URL):Port Number" on the address bar, and press [Enter] on your PC. 2.

Network Camera
Page 21
... the cursor on the Security: Administrator page • An authentication window is specified for each camera and that the Internet IP address is displayed in video display. • Due to the network congestion or the number of the repeater hub to refreshing still images (see page 47). &#...8226; When viewing 4 cameras on the Multi-Camera page • Confirm that each camera is not accessing the proxy...
... the cursor on the Security: Administrator page • An authentication window is specified for each camera and that the Internet IP address is displayed in video display. • Due to the network congestion or the number of the repeater hub to refreshing still images (see page 47). &#...8226; When viewing 4 cameras on the Multi-Camera page • Confirm that each camera is not accessing the proxy...

Network Camera
Page 24
... first four registered preset buttons. Executing [Home Position] moves the lens to pan or tilt the camera in four directions: Left, Up, Down or Right. To disable it is displayed at the first access. Enter "http://IP address (or URL):Port Number/mobile" on a mobile phone and press [OK].... • When the port number is displayed. (Video [Motion JPEG] cannot be displayed.) Pressing 2, 4, 6 or 8 on the keypad allows you to 80 (default), it , access the camera again and execute [Disable Privacy...
... first four registered preset buttons. Executing [Home Position] moves the lens to pan or tilt the camera in four directions: Left, Up, Down or Right. To disable it is displayed at the first access. Enter "http://IP address (or URL):Port Number/mobile" on a mobile phone and press [OK].... • When the port number is displayed. (Video [Motion JPEG] cannot be displayed.) Pressing 2, 4, 6 or 8 on the keypad allows you to 80 (default), it , access the camera again and execute [Disable Privacy...

Network Camera
Page 25
...Execute [Privacy Mode] (see some may not support password authentication. http:// IP address(or URL):Port Number/mobileh for a mobile phone model list, and the compatibility level which has been verified with Panasonic Network Cameras. Log in to privacy mode and stops E-mail transfer (Image Buffer/Transfer). ...; When pan/tilt reaches the end, the keypad number and character disappear. "(4)L" disappears. • Some mobile phones are restricted to level 1 or 2 on the General User page (see page 45), the users do not see page 24). • The camera switches to the camera as an...
...Execute [Privacy Mode] (see some may not support password authentication. http:// IP address(or URL):Port Number/mobileh for a mobile phone model list, and the compatibility level which has been verified with Panasonic Network Cameras. Log in to privacy mode and stops E-mail transfer (Image Buffer/Transfer). ...; When pan/tilt reaches the end, the keypad number and character disappear. "(4)L" disappears. • Some mobile phones are restricted to level 1 or 2 on the General User page (see page 45), the users do not see page 24). • The camera switches to the camera as an...

Network Camera
Page 27
Operating Instructions Basic (1) Network Configures the network settings such as connection mode to connect the camera to the network (see page 28). (2) UPnP Enables automatic port forwarding or shortcut to the video (Motion JPEG) viewers. com (4) Date and ...and pan/tilt range (see page 45). Advanced (8) Image Display Sets resolution, image quality and refresh interval of Single Camera and Multi-Camera page, limit continuous motion JPEG*1, and language (see page 47). (9) Multi-Camera*1 Sets the camera IP address or host name, camera name on the Multi-Camera page (maximum 12 cameras) ...
Operating Instructions Basic (1) Network Configures the network settings such as connection mode to connect the camera to the network (see page 28). (2) UPnP Enables automatic port forwarding or shortcut to the video (Motion JPEG) viewers. com (4) Date and ...and pan/tilt range (see page 45). Advanced (8) Image Display Sets resolution, image quality and refresh interval of Single Camera and Multi-Camera page, limit continuous motion JPEG*1, and language (see page 47). (9) Multi-Camera*1 Sets the camera IP address or host name, camera name on the Multi-Camera page (maximum 12 cameras) ...

Network Camera
Page 28
... 50050. • Clicking [Cancel] takes you back to the previous page without saving changes. 28 Click [Network] on your network. In this option. 1. Automatic Setup The camera automatically obtains the network settings (subnet mask, default gateway and DNS server address) utilizing a DHCP feature on your router. • [Static] allows the user to use a specific IP...
... 50050. • Clicking [Cancel] takes you back to the previous page without saving changes. 28 Click [Network] on your network. In this option. 1. Automatic Setup The camera automatically obtains the network settings (subnet mask, default gateway and DNS server address) utilizing a DHCP feature on your router. • [Static] allows the user to use a specific IP...

Network Camera
Page 29
Note The current network settings are saved. • When finished, the following page is displayed. Click [Restart]. • The camera restarts, and the Top page is displayed. Click [Save] when finished. • New settings are shown on the Status page in the...] 29 DHCP Setup Static Setup Operating Instructions • Clicking [Cancel] takes you can search the camera IP address by using the Setup Program (see page 72). 5. Note When you do not know the camera IP address while setting [Automatic Setup] or [DHCP Setup], you back to the previous page without saving changes...
Note The current network settings are saved. • When finished, the following page is displayed. Click [Restart]. • The camera restarts, and the Top page is displayed. Click [Save] when finished. • New settings are shown on the Status page in the...] 29 DHCP Setup Static Setup Operating Instructions • Clicking [Cancel] takes you can search the camera IP address by using the Setup Program (see page 72). 5. Note When you do not know the camera IP address while setting [Automatic Setup] or [DHCP Setup], you back to the previous page without saving changes...

Network Camera
Page 30
... port numbers. Some ISPs do not allow you use the camera on the LAN, set the IP address in the order from 50000 to 50050. Ask your ISP or network administrator specifies the IP address and subnet mask, enter them in the Installation/Troubleshooting). Operating... • • • • IP address • • Subnet Mask (Static Only) • • Host Name • (DHCP Only) • Description Allow Access from changing the network settings, clear the check box. To disable Internet access to the camera, check [Yes]. But "0.0.0.0" and "255.255.255...
... port numbers. Some ISPs do not allow you use the camera on the LAN, set the IP address in the order from 50000 to 50050. Ask your ISP or network administrator specifies the IP address and subnet mask, enter them in the Installation/Troubleshooting). Operating... • • • • IP address • • Subnet Mask (Static Only) • • Host Name • (DHCP Only) • Description Allow Access from changing the network settings, clear the check box. To disable Internet access to the camera, check [Yes]. But "0.0.0.0" and "255.255.255...

Network Camera
Page 31
... their host names on the image quality or how bright the object is not displayed." If you cannot access the camera, see page 19 "The Top page is . 160 x 120 pixels: About 3 KB (24 Kbit) 320 x 240 pixels: About 10 KB (80 Kbit) 640 x 480 pixels: ... such as "192.168.0.253". Operating Instructions Setting Description Default Gateway*1 • (Static/DHCP Only) • If you have the assigned Default Gateway address by your ISP or network administrator, enter them in this data field. But "0.0.0.0" and "255.255.255.255" are not available. Set 4 digits (0-255) and 3 periods such as...
... their host names on the image quality or how bright the object is not displayed." If you cannot access the camera, see page 19 "The Top page is . 160 x 120 pixels: About 3 KB (24 Kbit) 320 x 240 pixels: About 10 KB (80 Kbit) 640 x 480 pixels: ... such as "192.168.0.253". Operating Instructions Setting Description Default Gateway*1 • (Static/DHCP Only) • If you have the assigned Default Gateway address by your ISP or network administrator, enter them in this data field. But "0.0.0.0" and "255.255.255.255" are not available. Set 4 digits (0-255) and 3 periods such as...
Network Camera
Page 33
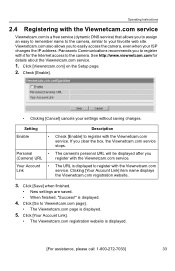
See http://www.viewnetcam.com for the Internet access to the camera. If you to assign an easy to remember name to the camera, similar to register with the Viewnetcam.com service. is displayed. [For assistance, please call: 1-800-272-7033] 33 Click ... [Enable]. • Clicking [Cancel] cancels your ISP changes the IP address. Personal • The camera's personal URL will be displayed after you (Camera) URL register with it for details about the Viewnetcam.com service. 1. Panasonic Communications recommends you to register with the Viewnetcam.com service. Click [Save]...
See http://www.viewnetcam.com for the Internet access to the camera. If you to assign an easy to remember name to the camera, similar to register with the Viewnetcam.com service. is displayed. [For assistance, please call: 1-800-272-7033] 33 Click ... [Enable]. • Clicking [Cancel] cancels your ISP changes the IP address. Personal • The camera's personal URL will be displayed after you (Camera) URL register with it for details about the Viewnetcam.com service. 1. Panasonic Communications recommends you to register with the Viewnetcam.com service. Click [Save]...

Network Camera
Page 36
... (0-255) and 3 periods such as "192.168.0.253". Click [Go to the temperature. Automatic Time • Adjustment • • NTP (Network Time Protocol) server synchronizes the camera's internal clock. Click [Save] when finished. • New settings are not available. The clock will be attached to enable it . Note An "s"...the set time on the Start Day, and move back one hour at the set time on the buffered image. Set the NTP server IP address, set a host name (1-255 characters). Check the box to the transferred images by E-mail or FTP transfer uses only 24 h format. ...
... (0-255) and 3 periods such as "192.168.0.253". Click [Go to the temperature. Automatic Time • Adjustment • • NTP (Network Time Protocol) server synchronizes the camera's internal clock. Click [Save] when finished. • New settings are not available. The clock will be attached to enable it . Note An "s"...the set time on the Start Day, and move back one hour at the set time on the buffered image. Set the NTP server IP address, set a host name (1-255 characters). Check the box to the transferred images by E-mail or FTP transfer uses only 24 h format. ...

Network Camera
Page 49
...Setup page. 2. The camera setting can change the camera number. Set each parameter. • Clicking [Cancel] cancels your settings without saving changes. [For assistance, please call: 1-800-272-7033] 49 Notes • If you click the camera number, the modification ...page is displayed. Select the number, and click [Move]. 3. These configurations are required to view multiple images on the Multi-Camera page. Operating Instructions 2.11 Configuring Multiple Cameras The Multi-Camera Setup page allows you to configure the camera IP addresses and camera...
...Setup page. 2. The camera setting can change the camera number. Set each parameter. • Clicking [Cancel] cancels your settings without saving changes. [For assistance, please call: 1-800-272-7033] 49 Notes • If you click the camera number, the modification ...page is displayed. Select the number, and click [Move]. 3. These configurations are required to view multiple images on the Multi-Camera page. Operating Instructions 2.11 Configuring Multiple Cameras The Multi-Camera Setup page allows you to configure the camera IP addresses and camera...

Network Camera
Page 50
...; New settings are not available. *2 Enter ASCII characters for the camera on the Multi-Camera page. *1 Set 4 digits (0-255) and 3 periods such as "192.168.0.253". Notes • Set the private IP address and port number for the host name (see page 96) or ...1-byte character and 1-7 characters for a 2-byte character). Operating Instructions Setting Display • IP Address*1 or • Host Name*2 Port No. • Camera Name*3 • Description Check the box to enable the camera. Set the port number (1-65535). But [Space and [>] are not available. But "0.0.0.0" and...
...; New settings are not available. *2 Enter ASCII characters for the camera on the Multi-Camera page. *1 Set 4 digits (0-255) and 3 periods such as "192.168.0.253". Notes • Set the private IP address and port number for the host name (see page 96) or ...1-byte character and 1-7 characters for a 2-byte character). Operating Instructions Setting Display • IP Address*1 or • Host Name*2 Port No. • Camera Name*3 • Description Check the box to enable the camera. Set the port number (1-65535). But [Space and [>] are not available. But "0.0.0.0" and...

Network Camera
Page 54
Operating Instructions 7. Select the transfer method, and click [Next>]. • Clicking [
Operating Instructions 7. Select the transfer method, and click [Next>]. • Clicking [
Network Camera
Page 55
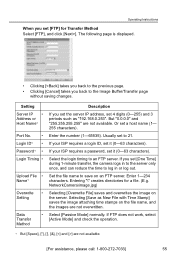
The following page is displayed. • Clicking [] are not available. [For assistance, please call: 1-800-272-7033] 55 Operating Instructions When you set [FTP] for Transfer Method Select [FTP], and click [Next>].
The following page is displayed. • Clicking [] are not available. [For assistance, please call: 1-800-272-7033] 55 Operating Instructions When you set [FTP] for Transfer Method Select [FTP], and click [Next>].
Network Camera
Page 56
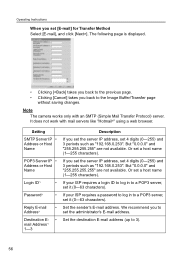
Operating Instructions When you set [E-mail] for Transfer Method Select [E-mail], and click [Next>]. The following page is displayed. • Clicking [
Operating Instructions When you set [E-mail] for Transfer Method Select [E-mail], and click [Next>]. The following page is displayed. • Clicking [

Network Camera
Page 62
Operating Instructions 8. Select the transfer method, and click [Next>]. • Clicking [
Operating Instructions 8. Select the transfer method, and click [Next>]. • Clicking [