Panasonic AKHC931BP - MULTI-FORMAT CAMERA Support and Manuals
Get Help and Manuals for this Panasonic item

View All Support Options Below
Free Panasonic AKHC931BP manuals!
Problems with Panasonic AKHC931BP?
Ask a Question
Free Panasonic AKHC931BP manuals!
Problems with Panasonic AKHC931BP?
Ask a Question
Popular Panasonic AKHC931BP Manual Pages
AKHC931BP User Guide - Page 2
..., any modifications.
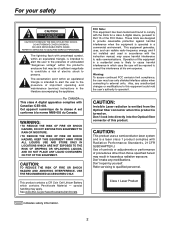
Don't make any unauthorized changes or modifications to comply with Canadian ICES-003. Don't repair by yourself.
The lightning flash with arrowhead symbol, within an equilateral triangle, is a laser class 1 product complies with the instruction manual, may be required to radio communications.
CAUTION:
This product uses a semiconductor laser system and is...
AKHC931BP User Guide - Page 4
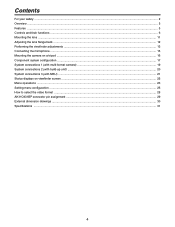
... configuration ...17 System connections 1 (with multi-format camera 19 System connections 2 (with build-up unit) ...20 System connections 3 (with MSU) ...21 Status displays on viewfinder screen ...22 Menu operations ...23 Setting menu configuration ...25 How to select the video format ...28 AK-HC931BP connector pin assignment ...29 External dimension drawings ...30 Specifications ...31
4
AKHC931BP User Guide - Page 5
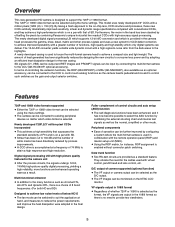
...-chip lens, CCD structure and processes, these new CCDs embody dramatically improved sensitivity, smear and dynamic range specifications compared with conventional CCDs, and they achieve a high performance which only digital systems can be selected using the menu settings.
The camera can be connected to the CCU to control such analog functions as the...
AKHC931BP User Guide - Page 8
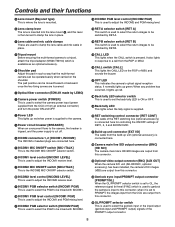
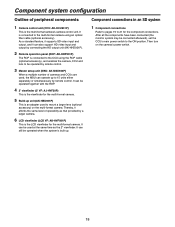
...; Optional video output connector (BNC) [AUX OUT] When the camera D/C unit (AK-HDC931, optional accessory) has been installed, the camera's D/C images (VBS) are output from this connector.
Genlock sync input/PROMPT output connector [PROMPT/GL] When the GL/PROMPT selector switch is set to be operated easily when carried on the ROP or...
AKHC931BP User Guide - Page 9
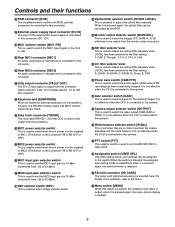
... (CAM, BAR or TEST). It is not effective when the CCU is connected to the camera.
Camera output selector switch [OUTPUT] This is used to adjust the optical filter manually when LOCAL has been selected as the filter setting. when it is pressed again, the menu screen display is cleared.
9 For details on...
AKHC931BP User Guide - Page 10

... It is not effective when the CCU is connected to the camera.
VTR start switch of the lens. When it is set using the monitor output selector switch.
Rear VF connector...button Turning the JOG dial while the menu screen is displayed moves the cursor to the setting items. The menu settings are output from this connector. It performs the same operations as the REC start /RET...
AKHC931BP User Guide - Page 12
...time.
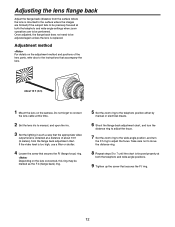
2 Set the lens iris to the instructions that secures the F.f ring.
12 Do not forget to connect
the lens cable at a distance of the lens parts, refer also to manual, and open the iris.
3 Set the lighting... on the camera. About 10 ft (3 m)
1 Mount the lens on the adjustment method and positions of about 10 ft (3 meters) from the surface where the lens is replaced.
Once adjusted...
AKHC931BP User Guide - Page 15
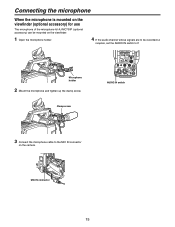
... microphone is mounted on the viewfinder (optional accessory) for use
The microphone of the microphone kit AJ-MC700P (optional accessory) can be recorded so
requires, set the AUDIO IN switch to be mounted on the...
AKHC931BP User Guide - Page 17
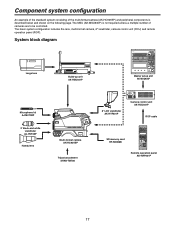
System block diagram
Large lens
Build-up unit AK-HBU931P
Master setup unit AK-MSU930P
Microphone kit AJ-MC700P
2 black-and-white viewfinder AJ-HVF20P
Handy lens
Multi-format camera AK-HC931BP
Tripod attachment SHAN-TM700
8 LCD viewfinder AK-HVF931P
Camera control unit AK-HCU931P
ROP cable
SD memory card RP-SD008B...
AKHC931BP User Guide - Page 18
... a larger lens (optional accessory) on the camera's power switch.
18 As a standard feature, it supports SD video input and output, and it affords the same level of operability as the 2 viewfinder. After all the components have been connected (the monitor system may be connected afterward), set the CCU's main power switch to...
AKHC931BP User Guide - Page 19
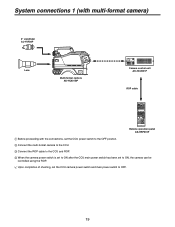
...; Connect the ROP cable to the CCU and ROP.
When the camera power switch is set to ON after the CCU main power switch has been set to ON, the camera can be controlled using the ROP.
Upon completion of shooting, set the CCU camera power switch and main power switch to OFF.
19
AKHC931BP User Guide - Page 21
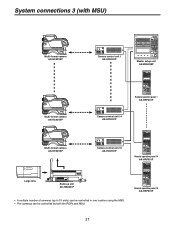
System connections 3 (with MSU)
Multi-format camera AK-HC931BP
Camera control unit 1 AK-HCU931P
Master setup unit AK-MSU930P
Multi-format camera AK-HC931BP
Remote operation panel 1 AK-HRP931P
Camera control unit 14 AK-HCU931P
Multi-format camera AK-HC931BP
Camera control unit 15 AK-HCU931P
Remote operation panel 14 AK-HRP931P
Large lens
Build-up unit AK...
AKHC931BP User Guide - Page 22
... an f-number
voltage output is being used .
�
� � �
�� �
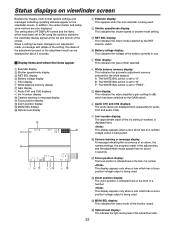
Camera warning or message display: A message indicating the occurrence of an alarm, the camera settings, the progress made , a message with details of the setting, the status of the adjustment process or the adjustment result can be displayed for about...
AKHC931BP User Guide - Page 23
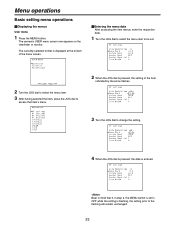
... the item
indicated by the arrow flashes.
3 Turn the JOG dial to the flashing will remain unchanged.
23 The camera's USER menu screen now appears on the viewfinder or monitor. The currently selected format is entered. Menu operations
Basic setting menu operations
Displaying the menus User menu
1 Press the MENU button.
AKHC931BP User Guide - Page 32

...Fax (800) 334-4880 Emergency after hour parts orders (800) 334-4881 TECHNICAL SUPPORT: Emergency 24 Hour Service (800) 222-0741 Panasonic Canada Inc. 5770 Ambler Drive, Mississauga, Ontario L4W 2T3 (905) 624-5010 Panasonic de Mexico S.A.
All rights reserved. de C.V. PANASONIC BROADCAST & TELEVISION SYSTEMS COMPANY UNIT COMPANY OF PANASONIC CORPORATION OF NORTH AMERICA Executive Office: One...
Panasonic AKHC931BP Reviews
We have not received any reviews for Panasonic yet.