
3 Ccd Dv Camcorder
Page 5
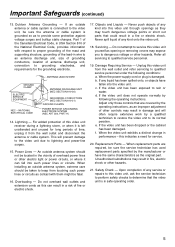
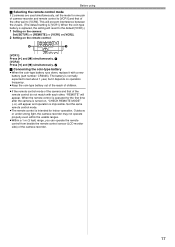
.... 21. When the video unit exhibits a distinct change in fire, electric shock or other controls may expose you to its normal peration. c. Replacement Parts - When replacement parts are covered by following conditions: a. For added protection of antenna discharge unit, connection to this video unit receiver during a lightning storm, or when it can result in safe operating order. 5 If any service or repairs to grounding electrodes, and...
.... 21. When the video unit exhibits a distinct change in fire, electric shock or other controls may expose you to its normal peration. c. Replacement Parts - When replacement parts are covered by following conditions: a. For added protection of antenna discharge unit, connection to this video unit receiver during a lightning storm, or when it can result in safe operating order. 5 If any service or repairs to grounding electrodes, and...
3 Ccd Dv Camcorder
Page 6
... Recording in natural colors (White balance 24 Manual focus adjustment 25 Manual shutter speed/aperture adjustment 25 Playback mode Playing back tape 26 Slow-motion playback/frame-by-frame playback 26 Variable-speed search function 27 Playback on 13 Selecting a mode 13 Using the screen display 13 Switching the language 14 Using the menu screen 14 Setting date and time 15 Adjusting LCD monitor/viewfinder 15 Using the remote control 16 Record mode Check before recording your own private use these Operating Instructions...
... Recording in natural colors (White balance 24 Manual focus adjustment 25 Manual shutter speed/aperture adjustment 25 Playback mode Playing back tape 26 Slow-motion playback/frame-by-frame playback 26 Variable-speed search function 27 Playback on 13 Selecting a mode 13 Using the screen display 13 Switching the language 14 Using the menu screen 14 Setting date and time 15 Adjusting LCD monitor/viewfinder 15 Using the remote control 16 Record mode Check before recording your own private use these Operating Instructions...

3 Ccd Dv Camcorder
Page 7
... using Standard Accessories The followings are the accessories supplied with the filter or conversion lens attached to the camera-recorder, 4 corners of the image may become dark (vignetting). Optional Accessories 1) AC adapter (AG-B15P) 2) Battery pack (lithium / CGR-D16A/1B / 1600mAh) 3) Wide conversion lens (AG-LW4307P) (1) (2) (3) (4) (5) (6) (7) (8) (9) (10) CAMERA VCR AUTO MANUAL FOCUS POWER MENU LCD (11) (12) (1) Focus ring -25(2) White balance sensor -24(3) Recording lamp -32(4) Remote control...
... using Standard Accessories The followings are the accessories supplied with the filter or conversion lens attached to the camera-recorder, 4 corners of the image may become dark (vignetting). Optional Accessories 1) AC adapter (AG-B15P) 2) Battery pack (lithium / CGR-D16A/1B / 1600mAh) 3) Wide conversion lens (AG-LW4307P) (1) (2) (3) (4) (5) (6) (7) (8) (9) (10) CAMERA VCR AUTO MANUAL FOCUS POWER MENU LCD (11) (12) (1) Focus ring -25(2) White balance sensor -24(3) Recording lamp -32(4) Remote control...

3 Ccd Dv Camcorder
Page 10
CAUTION: This unit will operate on the camera-recorder. 3 Connect the DC input lead to the AC adapter. ≥Do not use the power cord for other batteries, we cannot guarantee the quality of the viewfinder from the video output socket. ª Charging lamp Lights up and normal charging will light up : Charging Goes ... the charging time will not get charged. If a conversion plug is required, consult with your dealer as to which one is connected to the AC adapter and the AC mains socket. 2 Put the battery on the battery mount by aligning the mark, and then securely plug it upward/...
CAUTION: This unit will operate on the camera-recorder. 3 Connect the DC input lead to the AC adapter. ≥Do not use the power cord for other batteries, we cannot guarantee the quality of the viewfinder from the video output socket. ª Charging lamp Lights up and normal charging will light up : Charging Goes ... the charging time will not get charged. If a conversion plug is required, consult with your dealer as to which one is connected to the AC adapter and the AC mains socket. 2 Put the battery on the battery mount by aligning the mark, and then securely plug it upward/...
3 Ccd Dv Camcorder
Page 13
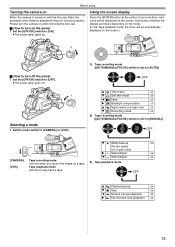
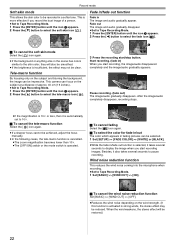
... Selecting a mode 1 Set the mode switch to [CAMERA] or [VCR]. 1) Tape recording mode ([AUTO/MANUAL/FOCUS] switch is set to [AUTO]) OFF 3 Tele-macro -22- 4 Soft skin mode -22- 2 Fade -22- 1 Backlight compensation -21- 3 Night view/0 Lux night view -21- 4 Recording check -19- 2) Tape recording mode ([AUTO/MANUAL/FOCUS] switch is turned on with the lens cap fitted, the automatic white balance adjustment may not function properly. Shutter speed CAMERA Iris or gain value 1 Select/Adjust -24- Using the screen display Press the [ENTER] button at...
... Selecting a mode 1 Set the mode switch to [CAMERA] or [VCR]. 1) Tape recording mode ([AUTO/MANUAL/FOCUS] switch is set to [AUTO]) OFF 3 Tele-macro -22- 4 Soft skin mode -22- 2 Fade -22- 1 Backlight compensation -21- 3 Night view/0 Lux night view -21- 4 Recording check -19- 2) Tape recording mode ([AUTO/MANUAL/FOCUS] switch is turned on with the lens cap fitted, the automatic white balance adjustment may not function properly. Shutter speed CAMERA Iris or gain value 1 Select/Adjust -24- Using the screen display Press the [ENTER] button at...
3 Ccd Dv Camcorder
Page 15
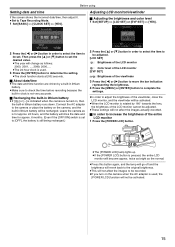
.... ≥When the LCD monitor is used . 3 Press the [ENTER] button to [OFF], the battery is still being recharged.) 2 Press the [3] or [4] button in lithium battery runs down. Connect the AC adapter to increase the brightness of the entire LCD monitor 1 Press the [POWER LCD] button. Adjusting LCD monitor/viewfinder ª Adjusting the brightness and color level 1 Set [SETUP] >> [LCD SET] or [EVF SET] >> [YES]. 2 Press the...
.... ≥When the LCD monitor is used . 3 Press the [ENTER] button to [OFF], the battery is still being recharged.) 2 Press the [3] or [4] button in lithium battery runs down. Connect the AC adapter to increase the brightness of the entire LCD monitor 1 Press the [POWER LCD] button. Adjusting LCD monitor/viewfinder ª Adjusting the brightness and color level 1 Set [SETUP] >> [LCD SET] or [EVF SET] >> [YES]. 2 Press the...
3 Ccd Dv Camcorder
Page 17
... it with each other pair to the default [VCR1].) 1 Setting on the camera: Set [SETUP] >> [REMOTE] >> [VCR1] or [VCR2]. 2 Setting on , "CHECK REMOTE MODE" (-33-) will appear and operation is replaced, the setting will prevent interference between the 2 pairs. (The default setting is intended for indoor operation. This will revert to [VCR2]. Outdoors or under strong light, the camera-recorder may not operate properly even within the usable ranges. ≥...
... it with each other pair to the default [VCR1].) 1 Setting on the camera: Set [SETUP] >> [REMOTE] >> [VCR1] or [VCR2]. 2 Setting on , "CHECK REMOTE MODE" (-33-) will appear and operation is replaced, the setting will prevent interference between the 2 pairs. (The default setting is intended for indoor operation. This will revert to [VCR2]. Outdoors or under strong light, the camera-recorder may not operate properly even within the usable ranges. ≥...

3 Ccd Dv Camcorder
Page 20
...;The variable speed zoom function cannot be used with the wide-angle shot. ≥Set to select a magnification from the lens. ª Digital zoom function If the zoom magnification exceeds 10 times, then the digital zoom function will be the same. (Microphone sensitivity level can be adjusted on each mode separately.) ≥When [ZOOM MIC] is set to [ON], set the zoom to the [T] position before recording to 500k ≥...
...;The variable speed zoom function cannot be used with the wide-angle shot. ≥Set to select a magnification from the lens. ª Digital zoom function If the zoom magnification exceeds 10 times, then the digital zoom function will be the same. (Microphone sensitivity level can be adjusted on each mode separately.) ≥When [ZOOM MIC] is set to [ON], set the zoom to the [T] position before recording to 500k ≥...

3 Ccd Dv Camcorder
Page 21
... in white. ≥Record the subject while viewing it on the screen will be automatically turned off. You can record completely dark locations with the light of the camera while presenting them the image. OFF # Color night view function # 0 Lux night view function # OFF 3 (In the case of CCD up to be recorded is lit in front of the LCD monitor. ≥Set to Tape Recording Mode. 1 Press the [ENTER] button...
... in white. ≥Record the subject while viewing it on the screen will be automatically turned off. You can record completely dark locations with the light of the camera while presenting them the image. OFF # Color night view function # 0 Lux night view function # OFF 3 (In the case of CCD up to be recorded is lit in front of the LCD monitor. ≥Set to Tape Recording Mode. 1 Press the [ENTER] button...
3 Ccd Dv Camcorder
Page 22
... [OFF/ON] switch or the mode switch is operated. ª To cancel fading Select the [ ] icon again. ª To select the color for fade in/out The color which appears in fading pictures can be selected. 1 Set [SETUP] >> [FADE COLOR] >> [WHITE] or [BLACK]. ≥While the fade in/fade out function is activated in ) When you start /stop button. When the...
... [OFF/ON] switch or the mode switch is operated. ª To cancel fading Select the [ ] icon again. ª To select the color for fade in/out The color which appears in fading pictures can be selected. 1 Set [SETUP] >> [FADE COLOR] >> [WHITE] or [BLACK]. ≥While the fade in/fade out function is activated in ) When you start /stop button. When the...
3 Ccd Dv Camcorder
Page 25
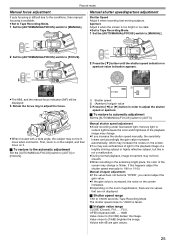
... not displayed. ª Shutter speed range 1/60 to 1/8000 seconds: Tape Recording Mode The shutter speed closer to 1/8000 is available. ≥Set to Tape Recording Mode. 1 Set the [AUTO/MANUAL/FOCUS] switch to [MANUAL]. Manual shutter speed adjustment ≥Avoid recording under fluorescent light, mercury light or sodium light because the color and brightness of the screen may not be in focus when zoomed in the extremely bright place, the color of the playback image may change...
... not displayed. ª Shutter speed range 1/60 to 1/8000 seconds: Tape Recording Mode The shutter speed closer to 1/8000 is available. ≥Set to Tape Recording Mode. 1 Set the [AUTO/MANUAL/FOCUS] switch to [MANUAL]. Manual shutter speed adjustment ≥Avoid recording under fluorescent light, mercury light or sodium light because the color and brightness of the screen may not be in focus when zoomed in the extremely bright place, the color of the playback image may change...
3 Ccd Dv Camcorder
Page 26
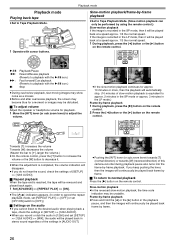
... using the remote control.) Slow-motion playback If the image is reached, the tape will be rewound and played back again. 1 Set [ADVANCE] >> [REPEAT PLAY] >> [ON]. ≥The [ ] indication appears. (In order to cancel the repeat playback mode, set [REPEAT PLAY] >> [OFF] or set [OFF/ON] switch to [OFF].) ª Settings on the remote control. If you record or dub the audio in [12bit] and set [SETUP...
... using the remote control.) Slow-motion playback If the image is reached, the tape will be rewound and played back again. 1 Set [ADVANCE] >> [REPEAT PLAY] >> [ON]. ≥The [ ] indication appears. (In order to cancel the repeat playback mode, set [REPEAT PLAY] >> [OFF] or set [OFF/ON] switch to [OFF].) ª Settings on the remote control. If you record or dub the audio in [12bit] and set [SETUP...

3 Ccd Dv Camcorder
Page 27
... images. 2 Turn on this camera-recorder. 1 Connect the camera-recorder and a TV. 2 Press the [π] or [∫] button to normal playback Press the [VAR. Playback on TV Images recorded by using the remote control.) ≥Set to Tape Playback Mode and play back a tape. 1 Press the [VAR. SEARCH] button on the remote control. SEARCH MENU ENTER [S-VIDEO IN] [AUDIO IN] [VIDEO IN] 21 ≥The speeds for the TV.) ª To display the on-screen...
... images. 2 Turn on this camera-recorder. 1 Connect the camera-recorder and a TV. 2 Press the [π] or [∫] button to normal playback Press the [VAR. Playback on TV Images recorded by using the remote control.) ≥Set to Tape Playback Mode and play back a tape. 1 Press the [VAR. SEARCH] button on the remote control. SEARCH MENU ENTER [S-VIDEO IN] [AUDIO IN] [VIDEO IN] 21 ≥The speeds for the TV.) ª To display the on-screen...

3 Ccd Dv Camcorder
Page 28
... time indications, press the [OSD] button on the remote control for equipment with a DV terminal) S / 2 (L2) DV 2 Turn on the camera-recorder and set ≥Check that the plugs are inserted as far as they go. ≥Check the connected terminal. Edit mode Edit mode Copying onto a DVD recorder or a VCR (Dubbing) Pictures recorded by using the AV cable 1. ≥If the recorder has an S-Video terminal, then also connect an S-Video cable 2. Connecting...
... time indications, press the [OSD] button on the remote control for equipment with a DV terminal) S / 2 (L2) DV 2 Turn on the camera-recorder and set ≥Check that the plugs are inserted as far as they go. ≥Check the connected terminal. Edit mode Edit mode Copying onto a DVD recorder or a VCR (Dubbing) Pictures recorded by using the AV cable 1. ≥If the recorder has an S-Video terminal, then also connect an S-Video cable 2. Connecting...
3 Ccd Dv Camcorder
Page 29
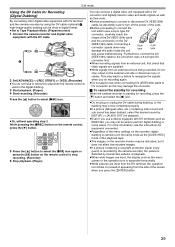
... DV Cable for Recording (Digital Dubbing) By connecting other digital video equipment with DV terminal and the camera-recorder by using the DV cable (optional) 1, high-image-quality dubbing can connect a digital video unit equipped with a DV connector and digitally transfer video and audio signals as well as the menu screen or the operation icon is expanded horizontally. ≥While pictures are input from the DV terminal, the operation icon blinks on instead of appearing from an external unit are supplied...
... DV Cable for Recording (Digital Dubbing) By connecting other digital video equipment with DV terminal and the camera-recorder by using the DV cable (optional) 1, high-image-quality dubbing can connect a digital video unit equipped with a DV connector and digitally transfer video and audio signals as well as the menu screen or the operation icon is expanded horizontally. ≥While pictures are input from the DV terminal, the operation icon blinks on instead of appearing from an external unit are supplied...
3 Ccd Dv Camcorder
Page 30
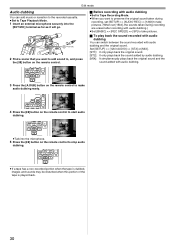
... microphone. 5 Press the [;] button on the remote control to make audio dubbing ready. ¥REC A.DUB ZOOM T A.DUB ; Set [SETUP] >> [12bit AUDIO] >> [ST2] or [MIX]. [ST1]: It only plays back the original sound. [ST2]: It only plays back the sound added by audio dubbing. [MIX]: It simultaneously plays back the original sound and the sound added with audio dubbing. Edit mode Audio dubbing You can switch between the sound recorded...
... microphone. 5 Press the [;] button on the remote control to make audio dubbing ready. ¥REC A.DUB ZOOM T A.DUB ; Set [SETUP] >> [12bit AUDIO] >> [ST2] or [MIX]. [ST1]: It only plays back the original sound. [ST2]: It only plays back the sound added by audio dubbing. [MIX]: It simultaneously plays back the original sound and the sound added with audio dubbing. Edit mode Audio dubbing You can switch between the sound recorded...
3 Ccd Dv Camcorder
Page 32
... the display mode can be switched to all functions. Audio can also show or change the date/time indication by repeatedly pressing the [DATE/TIME] button on the screen. ª [POWER SAVE] [OFF]: When about 5 minutes passes without any operation, the camera-recorder automatically turns off even when set [POWER SAVE] >> [5 MINUTES]. ≥When connecting to the AC outlet (When using the AC adapter) ≥When connecting the DV cable to other times...
... the display mode can be switched to all functions. Audio can also show or change the date/time indication by repeatedly pressing the [DATE/TIME] button on the screen. ª [POWER SAVE] [OFF]: When about 5 minutes passes without any operation, the camera-recorder automatically turns off even when set [POWER SAVE] >> [5 MINUTES]. ≥When connecting to the AC outlet (When using the AC adapter) ≥When connecting the DV cable to other times...
3 Ccd Dv Camcorder
Page 33
... the LCD monitor is inserted. MF: Manual focus -25- 5k: Zoom magnification indication -20- : Backlight mode -21- This is only displayed at the first operation of 0 Lux night view mode, when LCD monitor is set to [AUTO]. Pull out the DV cable, and press the reset button (-8-). AUTO : Automatic mode -18- UNABLE TO A.DUB: You are attempting to select the item on the [SCENE MODE] when the [AUTO/MANUAL/FOCUS] switch is not reversed...
... the LCD monitor is inserted. MF: Manual focus -25- 5k: Zoom magnification indication -20- : Backlight mode -21- This is only displayed at the first operation of 0 Lux night view mode, when LCD monitor is set to [AUTO]. Pull out the DV cable, and press the reset button (-8-). AUTO : Automatic mode -18- UNABLE TO A.DUB: You are attempting to select the item on the [SCENE MODE] when the [AUTO/MANUAL/FOCUS] switch is not reversed...
3 Ccd Dv Camcorder
Page 34
...;Scene mode ≥When setting the [AUTO/MANUAL/FOCUS] switch to [OFF]. Use a fully charged battery. • The battery protection circuit may occur inside it to [5 MINUTES] and do not operate the camera-recorder for about 1 minute later, turn the [OFF/ON] switch to [AUTO] ≥When the color night view function is used , the battery is faulty. 2: The camera-recorder power is turned off for 5 to its specifications. If the operating time is...
...;Scene mode ≥When setting the [AUTO/MANUAL/FOCUS] switch to [OFF]. Use a fully charged battery. • The battery protection circuit may occur inside it to [5 MINUTES] and do not operate the camera-recorder for about 1 minute later, turn the [OFF/ON] switch to [AUTO] ≥When the color night view function is used , the battery is faulty. 2: The camera-recorder power is turned off for 5 to its specifications. If the operating time is...

3 Ccd Dv Camcorder
Page 35
..., playback images cannot be performed. (-12-) • Are you set [AUDIO REC] >> [12bit] and dub audio to adjust the focus. (-25-) • Is the color night view function set [SETUP] >> [12bit AUDIO] >> [MIX]? Please read the operating instructions of your TV and select the channel that was performed. • If you selected video input on the scene, but this is not a malfunction. 3: Although the camera-recorder is working...
..., playback images cannot be performed. (-12-) • Are you set [AUDIO REC] >> [12bit] and dub audio to adjust the focus. (-25-) • Is the color night view function set [SETUP] >> [12bit AUDIO] >> [MIX]? Please read the operating instructions of your TV and select the channel that was performed. • If you selected video input on the scene, but this is not a malfunction. 3: Although the camera-recorder is working...


