User Manual
Page 1
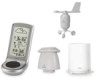
... Advanced Weather Station with Wireless Sensor Set & Mounting Package Model: WMR100N / WMR100NA INTRODUCTION Thank you should know about. PACKAGING CONTENTS BASE STATION 1 x USB cable 1 x 6V adapter 1 x Base Station 4 x AA UM-3 1.5V batteries WIND SENSOR / TEMPERATURE & HUMIDITY SENSOR 1 x Wind Sensor (1 x Wind Vane Above and 1 x Anemometer Below) 1 x Aluminium pole 2 x AA UM-3 1.5V batteries 2 x AAA UM-4 1.5V batteries 1 To purchase additional sensors, please contact your new product. USER MANUAL...
... Advanced Weather Station with Wireless Sensor Set & Mounting Package Model: WMR100N / WMR100NA INTRODUCTION Thank you should know about. PACKAGING CONTENTS BASE STATION 1 x USB cable 1 x 6V adapter 1 x Base Station 4 x AA UM-3 1.5V batteries WIND SENSOR / TEMPERATURE & HUMIDITY SENSOR 1 x Wind Sensor (1 x Wind Vane Above and 1 x Anemometer Below) 1 x Aluminium pole 2 x AA UM-3 1.5V batteries 2 x AAA UM-4 1.5V batteries 1 To purchase additional sensors, please contact your new product. USER MANUAL...
User Manual
Page 2
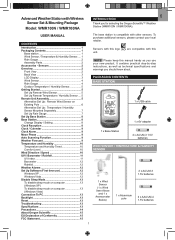
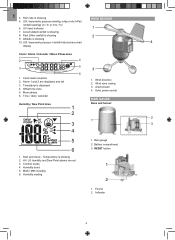
...between the different areas 1 x Versatile Base (Wall or Ground Fixable) 2 ALARM: View and set alarms for barometer, temperature, humidity, rainfall and wind speed 3. SELECT: Switch between the different display modes / settings 4. OVERVIEW FRONT VIEW 1x Vertical 1 x Cone- 1 x Horizontal Attachment Shaped End Attachment Bracket ... left or right to capture outdoor temperature, relative humidity or UV readings in all countries. Optional wireless remote sensors such as those listed below can work with up to 10 sensors at any one time to increase or decrease the values ...
...between the different areas 1 x Versatile Base (Wall or Ground Fixable) 2 ALARM: View and set alarms for barometer, temperature, humidity, rainfall and wind speed 3. SELECT: Switch between the different display modes / settings 4. OVERVIEW FRONT VIEW 1x Vertical 1 x Cone- 1 x Horizontal Attachment Shaped End Attachment Bracket ... left or right to capture outdoor temperature, relative humidity or UV readings in all countries. Optional wireless remote sensors such as those listed below can work with up to 10 sensors at any one time to increase or decrease the values ...
User Manual
Page 3
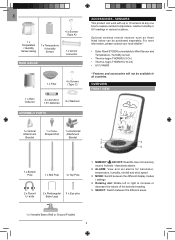
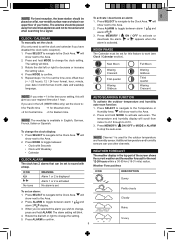
...RESET: Returns unit to default settings 3. controlled clock signal 4. Wind Chill level - temperature is set 7. MAX / MIN temperature 8. Wind speed levels: AVERAGE / MAX / GUST 2. HI gust wind alarm is showing 4. Clock / Alarm / Calendar / Moon Phase Area 6. UV / barometer / rainfall alarm is displayed 7. SEARCH: Searches for sensors or for base station... 8. EU / UK radio signal 7. Temperature trend 2. Heat Index level - Indoor / Outdoor channel temperature and humidity is set 5. WMR100N only - temperature is showing 2....
...RESET: Returns unit to default settings 3. controlled clock signal 4. Wind Chill level - temperature is set 7. MAX / MIN temperature 8. Wind speed levels: AVERAGE / MAX / GUST 2. HI gust wind alarm is showing 4. Clock / Alarm / Calendar / Moon Phase Area 6. UV / barometer / rainfall alarm is displayed 7. SEARCH: Searches for sensors or for base station... 8. EU / UK radio signal 7. Temperature trend 2. Heat Index level - Indoor / Outdoor channel temperature and humidity is set 5. WMR100N only - temperature is showing 2....
User Manual
Page 4
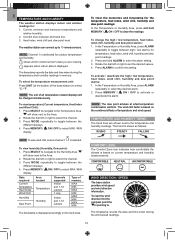
... is showing 2 9. Past 24hrs rainfall is showing 5. Alarm 1 and 2 are set 3. Temperature is showing 8. HI / LO humidity and Dew Point alarms are displayed and set 3. Indicator 4 Clock radio reception 2. Solar power socket RAIN GAUGE Humidity / Dew ... 6 1. Wind direction 2. Accumulated rainfall is showing 2. Timestamp is showing 10. Time / date / calendar 1. Wind vane casing 3. Humidity trend 5. MAX / MIN humidity 6. RESET button 1 2 1. Offset time zone 5. Dew point level - Humidity reading 1. Battery compartment 3. Moon phase 6. ...
... is showing 2 9. Past 24hrs rainfall is showing 5. Alarm 1 and 2 are set 3. Temperature is showing 8. HI / LO humidity and Dew Point alarms are displayed and set 3. Indicator 4 Clock radio reception 2. Solar power socket RAIN GAUGE Humidity / Dew ... 6 1. Wind direction 2. Accumulated rainfall is showing 2. Timestamp is showing 10. Time / date / calendar 1. Wind vane casing 3. Humidity trend 5. MAX / MIN humidity 6. RESET button 1 2 1. Offset time zone 5. Dew point level - Humidity reading 1. Battery compartment 3. Moon phase 6. ...
User Manual
Page 5
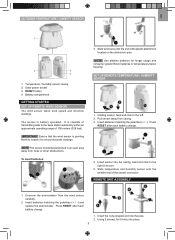
... OUTDOOR TEMPERATURE / HUMIDITY SENSOR 1 3 3. The sensor is capable of 100 meters (328 feet). REMOTE UNIT ASSEMBLY 1. Press RESET after each 1 battery change . 5 NOTE The sensor should be positioned in temperatures below freezing. RESET button 4. Battery compartment GETTING STARTED SET UP REMOTE WIND SENSOR The wind sensor takes wind speed and direction readings. Holding sensor, twist and click to the base station wirelessly within...
... OUTDOOR TEMPERATURE / HUMIDITY SENSOR 1 3 3. The sensor is capable of 100 meters (328 feet). REMOTE UNIT ASSEMBLY 1. Press RESET after each 1 battery change . 5 NOTE The sensor should be positioned in temperatures below freezing. RESET button 4. Battery compartment GETTING STARTED SET UP REMOTE WIND SENSOR The wind sensor takes wind speed and direction readings. Holding sensor, twist and click to the base station wirelessly within...
User Manual
Page 6
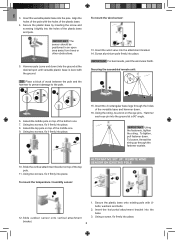
...pole firmly into the base. 3. Securing the assembled remote unit: 15 16 15. To tighten, pull fastener down . 16. Slide outdoor sensor onto vertical attachment bracket. 1. Secure the plastic base by inserting the screw and screwing it firmly into place. 8. Using two screws, fi...wind vane into the ground at the desired spot until versatile plastic base is level with the ground. To mount the temperature / humidity sensor: 12 ALTERNATIVE SET UP: REMOTE WIND SENSOR ON EXISTING POLE 3 1 2 12. Align the holes of the pole with Ubolts, washers and bolts. 2. ...
...pole firmly into the base. 3. Securing the assembled remote unit: 15 16 15. To tighten, pull fastener down . 16. Slide outdoor sensor onto vertical attachment bracket. 1. Secure the plastic base by inserting the screw and screwing it firmly into place. 8. Using two screws, fi...wind vane into the ground at the desired spot until versatile plastic base is level with the ground. To mount the temperature / humidity sensor: 12 ALTERNATIVE SET UP: REMOTE WIND SENSOR ON EXISTING POLE 3 1 2 12. Align the holes of the pole with Ubolts, washers and bolts. 2. ...
User Manual
Page 7
... the polarities (+ / -). ALTERNATIVE SET UP: TEMPERATURE / HUMIDITY SENSOR MOUNTED SEPARATELY 1. If water remains on the cross at the base of the funnel to check the horizontal level. 1 3 2 4 SET UP RAIN GAUGE The rain gauge...time. Slide outdoor sensor onto bracket. Screw firmly into the holes of water on 1-4, the gauge is level. To ensure a level plane: Put a few drops of the sensor...RESET after each battery change. EN 6 146 To set up the Rain Gauge: 5 4. Remove screws and slide the cover off in an open area. Water will pool to the base station. The sensor...
... the polarities (+ / -). ALTERNATIVE SET UP: TEMPERATURE / HUMIDITY SENSOR MOUNTED SEPARATELY 1. If water remains on the cross at the base of the funnel to check the horizontal level. 1 3 2 4 SET UP RAIN GAUGE The rain gauge...time. Slide outdoor sensor onto bracket. Screw firmly into the holes of water on 1-4, the gauge is level. To ensure a level plane: Put a few drops of the sensor...RESET after each battery change. EN 6 146 To set up the Rain Gauge: 5 4. Remove screws and slide the cover off in an open area. Water will pool to the base station. The sensor...

User Manual
Page 8
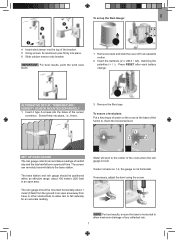
... batteries. Install the base station batteries (4 x UM-3 / AA) matching the polarity + and -. AREA MEANING ICON MEANING Weather Forecast Area Battery in the UV / Rain sensor is low. Receiving signal is strong Time is easily...SET UP BASE STATION NOTE Install batteries in the wind sensor is low. No objects filled with this product for which battery is weak To enable (and force a signal search) / disable the clock radio reception (clock synchronization): 1. Press RESET whenever you use only. WMR100N only - Battery in the remote sensor before the base station...
... batteries. Install the base station batteries (4 x UM-3 / AA) matching the polarity + and -. AREA MEANING ICON MEANING Weather Forecast Area Battery in the UV / Rain sensor is low. Receiving signal is strong Time is easily...SET UP BASE STATION NOTE Install batteries in the wind sensor is low. No objects filled with this product for which battery is weak To enable (and force a signal search) / disable the clock radio reception (clock synchronization): 1. Press RESET whenever you use only. WMR100N only - Battery in the remote sensor before the base station...
User Manual
Page 9
... weather and the weather forecast for the next 12-24 hours within a 30-50 km (19-31 mile) radius. Additional temperature and humidity sensors can be set for Eastern time. Press ALARM to set the clock: (You only need to toggle between alarm 1 and alarm 2 display. 3. CLOCK / CALENDAR To manually set ...show next to change the setting. 5. E N NOTE For best reception, the base station should be placed away from indoor to ch1 through to the Clock Area. will show next to the Clock Area. The setting will give you enter +1 in the time zone setting, this feature to decrease ...
... weather and the weather forecast for the next 12-24 hours within a 30-50 km (19-31 mile) radius. Additional temperature and humidity sensors can be set for Eastern time. Press ALARM to set the clock: (You only need to toggle between alarm 1 and alarm 2 display. 3. CLOCK / CALENDAR To manually set ...show next to change the setting. 5. E N NOTE For best reception, the base station should be placed away from indoor to ch1 through to the Clock Area. will show next to the Clock Area. The setting will give you enter +1 in the time zone setting, this feature to decrease ...
User Manual
Page 10
... indicator and trend line. 3. The weather station can connect up to select MAX / MIN display. appears when indoor data is displayed accordingly in memory. Press MEMORY / ON / OFF to 10 remote sensors. To activate / deactivate the high / low temperature, heat index, wind chill, humidity and... Temperature Heat Index Wind Chill Humidity Dew Point Area located Temperature Humidity Channels supported Indoor and 1-10 outdoor 1 only Indoor and 1-10 outdoor Type of all temperature related displays will form. The timestamp records the date and time when storing the temperature and...
... indicator and trend line. 3. The weather station can connect up to select MAX / MIN display. appears when indoor data is displayed accordingly in memory. Press MEMORY / ON / OFF to 10 remote sensors. To activate / deactivate the high / low temperature, heat index, wind chill, humidity and... Temperature Heat Index Wind Chill Humidity Dew Point Area located Temperature Humidity Channels supported Indoor and 1-10 outdoor 1 only Indoor and 1-10 outdoor Type of all temperature related displays will form. The timestamp records the date and time when storing the temperature and...
User Manual
Page 11
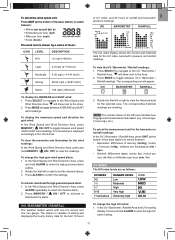
... wind alarm setting. 2. will show next to the Area. 2. To activate / deactivate the high gust wind speed alarm: 1. The corresponding historical readings are as follows: UV INDEX 0-2 3-5 6-7 8-10 11 and above DANGER LEVEL Low Moderate High Very high Extremely high ICON UVI / BAROMETER / RAINFALL The weather station works with one UV sensor and one...
... wind alarm setting. 2. will show next to the Area. 2. To activate / deactivate the high gust wind speed alarm: 1. The corresponding historical readings are as follows: UV INDEX 0-2 3-5 6-7 8-10 11 and above DANGER LEVEL Low Moderate High Very high Extremely high ICON UVI / BAROMETER / RAINFALL The weather station works with one UV sensor and one...
User Manual
Page 12
...installation process. 3. Alarms can read the latest weather data collected from the base station. To set the desired values. 3. Rotate the dial left or right to display the start date is met. The clock line will appear and guide you of certain weather conditions. Setup...setting. 2. Click DISPLAY in Oregon Weather Station dialogue box. Press and hold MODE. Run CD software provided. 2. EN 2. Press ALARM to confirm the settings... ON / OFF to reset the accumulated rainfall to '0' and to set for: • Indoor and outdoor high / low temperatures, dew point and High...
...installation process. 3. Alarms can read the latest weather data collected from the base station. To set the desired values. 3. Rotate the dial left or right to display the start date is met. The clock line will appear and guide you of certain weather conditions. Setup...setting. 2. Click DISPLAY in Oregon Weather Station dialogue box. Press and hold MODE. Run CD software provided. 2. EN 2. Press ALARM to confirm the settings... ON / OFF to reset the accumulated rainfall to '0' and to set for: • Indoor and outdoor high / low temperatures, dew point and High...
User Manual
Page 13
...sensors are within range SPECIFICATIONS BASE STATION Dimensions 143 x 89 x 165 mm (L x W x H) (5.6 x 3.5 x 6.5 inches) Weight 300 g (10.58 oz) without battery INDOOR BAROMETER Barometer unit mb/hPa, inHg and mmHg Measuring range 700 - 1050mb/hPa Accuracy +/- 10 mb/hPa Resolution 1mb (0.0 inHg) Altitude setting Sea level User setting for compensation Weather display Sunny, Partly... the computer. RESET Press RESET to return to 77°F) Memory Current, Min and Max temp. Manually activate radio-controlled clock Temperature is only used for continuous update of window. ...
...sensors are within range SPECIFICATIONS BASE STATION Dimensions 143 x 89 x 165 mm (L x W x H) (5.6 x 3.5 x 6.5 inches) Weight 300 g (10.58 oz) without battery INDOOR BAROMETER Barometer unit mb/hPa, inHg and mmHg Measuring range 700 - 1050mb/hPa Accuracy +/- 10 mb/hPa Resolution 1mb (0.0 inHg) Altitude setting Sea level User setting for compensation Weather display Sunny, Partly... the computer. RESET Press RESET to return to 77°F) Memory Current, Min and Max temp. Manually activate radio-controlled clock Temperature is only used for continuous update of window. ...
User Manual
Page 14
... DD/MM or MM/DD Weekday in 5 (E, G, F, I, S) languages Battery 4 x UM-3 (AA) 1.5V batteries AC adapter 6V REMOTE WIND SENSOR UNIT Dimensions 178 x 76 x 214 mm (L x W x H) (7 x 3 x 8.4 inches) Weight 100 g (3.53 oz) without battery Wind..., hourly and accumulated from last memory reset 2 x UM-3 (AA) 1.5V PRECAUTIONS • Do not subject the unit to excessive force, shock, dust, temperature or humidity. • Do not ...cover the ventilation holes with any items such as newspapers, curtains etc. • Do not immerse the unit in this manual...
... DD/MM or MM/DD Weekday in 5 (E, G, F, I, S) languages Battery 4 x UM-3 (AA) 1.5V batteries AC adapter 6V REMOTE WIND SENSOR UNIT Dimensions 178 x 76 x 214 mm (L x W x H) (7 x 3 x 8.4 inches) Weight 100 g (3.53 oz) without battery Wind..., hourly and accumulated from last memory reset 2 x UM-3 (AA) 1.5V PRECAUTIONS • Do not subject the unit to excessive force, shock, dust, temperature or humidity. • Do not ...cover the ventilation holes with any items such as newspapers, curtains etc. • Do not immerse the unit in this manual...
User Manual
Page 15
... battery compartment before first use. oregonscientific.com/about Oregon Scientific products. FCC STATEMENT This device complies with Part 15 of such waste separately for information. • The contents of this Advanced Weather Station with Wireless Sensor Set & Mounting Package (models: WMR100N / WMR100NA) is no guarantee that to Part 15 of Directive 1999/5/EC. Remove the strip from that interference...
... battery compartment before first use. oregonscientific.com/about Oregon Scientific products. FCC STATEMENT This device complies with Part 15 of such waste separately for information. • The contents of this Advanced Weather Station with Wireless Sensor Set & Mounting Package (models: WMR100N / WMR100NA) is no guarantee that to Part 15 of Directive 1999/5/EC. Remove the strip from that interference...
User Manual 2
Page 1
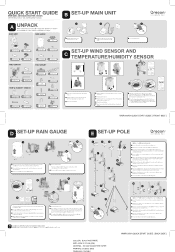
Press the reset button. 9 5 4 7 6 8 While holding the sun shield, turn the sensor counterclockwise Pull down the sensor Slide the battery cover off and insert two AAA batteries matching the polarities (+/-) Press the reset button Insert sensor back into heat shield, turn clockwise to secure 10 10 Locate the battery compartment and open the battery door and install two AA batteries. WMR100NA Base WIND SENSOR TEMP & HUMIDITY SENSOR 1 3 2 Unscrew the anemometer part of the Wind Sensor. Slide the battery cover and insert two AA batteries matching the polarities (+/-).
Press the reset button. 9 5 4 7 6 8 While holding the sun shield, turn the sensor counterclockwise Pull down the sensor Slide the battery cover off and insert two AAA batteries matching the polarities (+/-) Press the reset button Insert sensor back into heat shield, turn clockwise to secure 10 10 Locate the battery compartment and open the battery door and install two AA batteries. WMR100NA Base WIND SENSOR TEMP & HUMIDITY SENSOR 1 3 2 Unscrew the anemometer part of the Wind Sensor. Slide the battery cover and insert two AA batteries matching the polarities (+/-).


