User Manual
Page 1
EN Wireless Rain Gauge with Indoor / Outdoor Thermometer Model: RGR126 User Manual CONTENTS Introduction 2 Product Overview 2 Front View 2 Back View 3 LCD Display 4 Rain Gauge (PCR122 4 Temperature 11 Outdoor 11 Indoor 11 Reset 11 Precautions 11 Technical Specifications 12 Notices 12 Statement of Responsibility 12 About Oregon Scientific 13 FCC Statement 13 Declaration of Conformity 14...
EN Wireless Rain Gauge with Indoor / Outdoor Thermometer Model: RGR126 User Manual CONTENTS Introduction 2 Product Overview 2 Front View 2 Back View 3 LCD Display 4 Rain Gauge (PCR122 4 Temperature 11 Outdoor 11 Indoor 11 Reset 11 Precautions 11 Technical Specifications 12 Notices 12 Statement of Responsibility 12 About Oregon Scientific 13 FCC Statement 13 Declaration of Conformity 14...
User Manual
Page 3
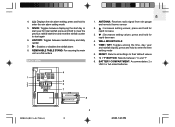
... °F BUTTON: Selects between rainfall history and daily rainfall 7. : Enables or disables the rainfall alarm 8. WALL MOUNT HOLE 5. RESET: Returns all settings to enter the time setting mode 6. HISTORY: Toggles between °C and °F 8. ANTENNA: Receives radio signal...Toggles among the time, day, year and rainfall display; BATTERY COMPARTMENT: Accommodates 2 x UM-3 or AA-sized batteries 4 1 5 2 6 3 7 8 RGR126(R13)-4(final) 3 3 4/6/05, 5:46 PM press and hold for total rainfall; press and hold to start year for rapid increase 3. : Decreases setting ...
... °F BUTTON: Selects between rainfall history and daily rainfall 7. : Enables or disables the rainfall alarm 8. WALL MOUNT HOLE 5. RESET: Returns all settings to enter the time setting mode 6. HISTORY: Toggles between °C and °F 8. ANTENNA: Receives radio signal...Toggles among the time, day, year and rainfall display; BATTERY COMPARTMENT: Accommodates 2 x UM-3 or AA-sized batteries 4 1 5 2 6 3 7 8 RGR126(R13)-4(final) 3 3 4/6/05, 5:46 PM press and hold for total rainfall; press and hold to start year for rapid increase 3. : Decreases setting ...
User Manual
Page 5
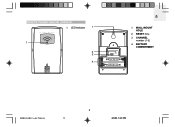
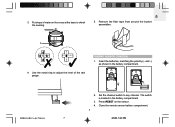
LED Indicator 1 1 2 3 4 1. CHANNEL number (1-3) 4. RESET hole 3. WALL MOUNT HOLE 2. BATTERY COMPARTMENT RGR126(R13)-4(final) 5 5 4/6/05, 5:46 PM EN REMOTE THERMO SENSOR (THN122N) 1.
LED Indicator 1 1 2 3 4 1. CHANNEL number (1-3) 4. RESET hole 3. WALL MOUNT HOLE 2. BATTERY COMPARTMENT RGR126(R13)-4(final) 5 5 4/6/05, 5:46 PM EN REMOTE THERMO SENSOR (THN122N) 1.
User Manual
Page 6
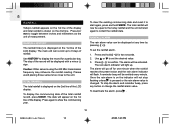
... the rain gauge on the main unit will blink while it is searching for the sensor or rainfall gauge. The reception icon on a level surface. 6 RGR126(R13)-4(final) 6 4/6/05, 5:46 PM Insert the batteries, matching the polarity (+ and -) as shown in the main unit is changed, repeat installation before use. MAIN... It is recommended that you do not obtain a signal from a remote unit please repeat the process above. In the event that you receive a signal. 4. Press RESET, or press and hold SEARCH on the main unit to initiate operation.
... the rain gauge on the main unit will blink while it is searching for the sensor or rainfall gauge. The reception icon on a level surface. 6 RGR126(R13)-4(final) 6 4/6/05, 5:46 PM Insert the batteries, matching the polarity (+ and -) as shown in the main unit is changed, repeat installation before use. MAIN... It is recommended that you do not obtain a signal from a remote unit please repeat the process above. In the event that you receive a signal. 4. Press RESET, or press and hold SEARCH on the main unit to initiate operation.
User Manual
Page 7
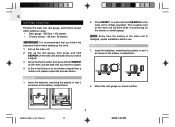
THERMO SENSOR (THN122N) 1. The switch is located in the battery compartment. Close the remote sensor battery compartment. 7 4/6/05, 5:46 PM RGR126(R13)-4(final) 7 2. Remove the fiber tape from around the bucket assemblies. 3 1 3 2 4 4. Press RESET on the cross at the base to any channel. EN 3. Set the channel switch to check the leveling. 5. Put drops of the rain gauge. Insert the batteries, matching the polarity (+ and -) as shown in the battery compartment. 3. Use the metal ring to adjust the level of water on the sensor. 4.
THERMO SENSOR (THN122N) 1. The switch is located in the battery compartment. Close the remote sensor battery compartment. 7 4/6/05, 5:46 PM RGR126(R13)-4(final) 7 2. Remove the fiber tape from around the bucket assemblies. 3 1 3 2 4 4. Press RESET on the cross at the base to any channel. EN 3. Set the channel switch to check the leveling. 5. Put drops of the rain gauge. Insert the batteries, matching the polarity (+ and -) as shown in the battery compartment. 3. Use the metal ring to adjust the level of water on the sensor. 4.
User Manual
Page 10
The date will not stop the alarm and reminder beep, press any time by pressing (( • )). To clear the existing commencing date and reset it to the today rainfall and the unit will be displayed at any button or change the rainfall alarm value. The total rainfall will now ... the 1st line of the display and total rainfall is shown on the 1st line of the LCD display. To deactivate the alarm, press . 10 RGR126(R13)-4(final) 10 4/6/05, 5:46 PM Caution: Other sensors using the 433 MHz transmission frequency may influence the rainfall reading. To set the desired value...
The date will not stop the alarm and reminder beep, press any time by pressing (( • )). To clear the existing commencing date and reset it to the today rainfall and the unit will be displayed at any button or change the rainfall alarm value. The total rainfall will now ... the 1st line of the display and total rainfall is shown on the 1st line of the LCD display. To deactivate the alarm, press . 10 RGR126(R13)-4(final) 10 4/6/05, 5:46 PM Caution: Other sensors using the 433 MHz transmission frequency may influence the rainfall reading. To set the desired value...
User Manual
Page 11
...parts and corrode the electronic circuit. • Do not subject the unit to select between Centigrade and Fahrenheit display units. They may cause unnecessary damage. RGR126(R13)-4(final) 11 11 4/6/05, 5:46 PM Use the °C / °F button to give you years of satisfactory service if you handle it... OUTDOOR The outdoor temperature is displayed on the 4th line of the LCD display. Doing so will return to hold down the button. RESET This button should only be used when the unit is engineered to select between Centigrade and Fahrenheit display units. Do not mix new and...
...parts and corrode the electronic circuit. • Do not subject the unit to select between Centigrade and Fahrenheit display units. They may cause unnecessary damage. RGR126(R13)-4(final) 11 11 4/6/05, 5:46 PM Use the °C / °F button to give you years of satisfactory service if you handle it... OUTDOOR The outdoor temperature is displayed on the 4th line of the LCD display. Doing so will return to hold down the button. RESET This button should only be used when the unit is engineered to select between Centigrade and Fahrenheit display units. Do not mix new and...


