User Guide
Page 1
Read all instructions carefully, and keep for future reference. 53439-01 REV A STEAM-IT™ All Purpose Steam Wand STEAM100 User's Guide Important!
Read all instructions carefully, and keep for future reference. 53439-01 REV A STEAM-IT™ All Purpose Steam Wand STEAM100 User's Guide Important!
User Guide
Page 2
... you have a cleaner, healthier home. Click. ENGLISH Contents Safety 3 Parts 5 Product Components & Accessories 5 Operation 6 Operating Instructions 6 Using the Steam-It 6 Cleaning Surface/Steam Setting Reference 7 Carpet Cleaning 7 For Large Carpeted Areas 7 Stubborn Stains 8 Carpet Pile Rejuvenation 8 Hard Floor Cleaning 8 Attaching an Accessory 8 Maintenance 10 After Each Use 10 Cleaning the Steam Generator 10 Unblocking the Steam Outlet 10 Cleaning the Cloth 10 Troubleshooting 11 Warranty 12 Enjoy Thank You for purchasing an Oreck Steam-It™ All...
... you have a cleaner, healthier home. Click. ENGLISH Contents Safety 3 Parts 5 Product Components & Accessories 5 Operation 6 Operating Instructions 6 Using the Steam-It 6 Cleaning Surface/Steam Setting Reference 7 Carpet Cleaning 7 For Large Carpeted Areas 7 Stubborn Stains 8 Carpet Pile Rejuvenation 8 Hard Floor Cleaning 8 Attaching an Accessory 8 Maintenance 10 After Each Use 10 Cleaning the Steam Generator 10 Unblocking the Steam Outlet 10 Cleaning the Cloth 10 Troubleshooting 11 Warranty 12 Enjoy Thank You for purchasing an Oreck Steam-It™ All...
User Guide
Page 3
... cord. • Do not handle the plug or cleaner with wet hands. • Do not put additives (such as perfume, stain remover or products container alcohol) in the water as directed in this manual. • Do not use with openings blocked. • Do not use without water in place. • Turn off all controls before use . • Always remove the power cord from the socket when...
... cord. • Do not handle the plug or cleaner with wet hands. • Do not put additives (such as perfume, stain remover or products container alcohol) in the water as directed in this manual. • Do not use with openings blocked. • Do not use without water in place. • Turn off all controls before use . • Always remove the power cord from the socket when...
User Guide
Page 4
... steam cleaner at least one hour. Allow the steam cleaner to cool down thoroughly for at electrical systems or wires. • Accessories become hot during operation. • Do not use - SAVE THESE INSTRUCTIONS Household Use Only 4 allow them to cool down before handling. • Do not use the steam cleaner directly overhead. This steam cleaner is suitable for the steam cleaner to heat up during use the steam cleaner to release the steam...
... steam cleaner at least one hour. Allow the steam cleaner to cool down thoroughly for at electrical systems or wires. • Accessories become hot during operation. • Do not use - SAVE THESE INSTRUCTIONS Household Use Only 4 allow them to cool down before handling. • Do not use the steam cleaner directly overhead. This steam cleaner is suitable for the steam cleaner to heat up during use the steam cleaner to release the steam...
User Guide
Page 5
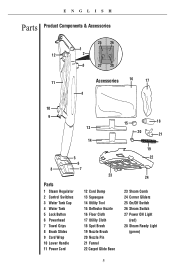
ENGLISH Parts Product Components & Accessories 25 26 1 12 2 3 27 28 11 Accessories 16 17 4 10 9 13 14 5 6 8 7 23 Parts 1 Steam Regulator 2 Control Switches 3 Water Tank Cap 4 Water Tank 5 Lock Button 6 Powerhead 7 Towel Grips 8 Brush Slides 9 Cord Wrap 10 Lower Handle 11 Power Cord 12 Cord Dump 13 Squeegee 14 Utility Tool 15 Deflector Nozzle 16 Floor Cloth 17 Utility Cloth 18 Spot Brush 19 Nozzle Brush 20 Nozzle Pin 21 Funnel 22 Carpet Glide...
ENGLISH Parts Product Components & Accessories 25 26 1 12 2 3 27 28 11 Accessories 16 17 4 10 9 13 14 5 6 8 7 23 Parts 1 Steam Regulator 2 Control Switches 3 Water Tank Cap 4 Water Tank 5 Lock Button 6 Powerhead 7 Towel Grips 8 Brush Slides 9 Cord Wrap 10 Lower Handle 11 Power Cord 12 Cord Dump 13 Squeegee 14 Utility Tool 15 Deflector Nozzle 16 Floor Cloth 17 Utility Cloth 18 Spot Brush 19 Nozzle Brush 20 Nozzle Pin 21 Funnel 22 Carpet Glide...

User Guide
Page 6
... connecting the powerhead or any of the steam cleaner. Turn the steam regulator control to maximum and point the steam nozzle towards a cloth or sink for approximately 10 - 15 seconds, to the "ON" position. After approximately 30 seconds the green "steam ready" light should be illuminated. 4. Using the Steam-It™ NOTE: Carpets should come on the main body of the other cleaning accessories. ENGLISH Operation Operating Instructions...
... connecting the powerhead or any of the steam cleaner. Turn the steam regulator control to maximum and point the steam nozzle towards a cloth or sink for approximately 10 - 15 seconds, to the "ON" position. After approximately 30 seconds the green "steam ready" light should be illuminated. 4. Using the Steam-It™ NOTE: Carpets should come on the main body of the other cleaning accessories. ENGLISH Operation Operating Instructions...
User Guide
Page 7
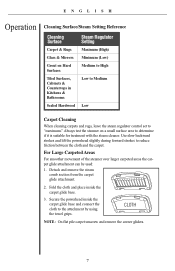
... pile carpet unscrew and remove the corner gliders. 7 Always test the steamer on Hard Surfaces Medium to High Tiled Surfaces, Cabinets & Countertops in Kitchens & Bathrooms Low to Medium Sealed Hardwood Low Carpet Cleaning When cleaning carpets and rugs, leave the steam regulator control set to "maximum." Fold the cloth and place inside the carpet glide base and connect the cloth to the attachment by using...
... pile carpet unscrew and remove the corner gliders. 7 Always test the steamer on Hard Surfaces Medium to High Tiled Surfaces, Cabinets & Countertops in Kitchens & Bathrooms Low to Medium Sealed Hardwood Low Carpet Cleaning When cleaning carpets and rugs, leave the steam regulator control set to "maximum." Fold the cloth and place inside the carpet glide base and connect the cloth to the attachment by using...
User Guide
Page 8
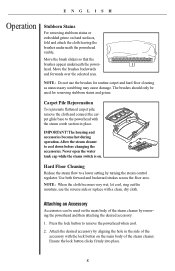
... floor area. Attach the desired accessory by aligning the hole in place. The housing and accessories become hot during operation.Allow the steam cleaner to remove the powerhead when cool. 2. Move the brushes backwards and forwards over the selected area. Ensure the lock button clicks firmly into place. 8 The brushes should only be used for routine carpet and hard floor cleaning as unnecessary scrubbing may cause damage. Carpet...
... floor area. Attach the desired accessory by aligning the hole in place. The housing and accessories become hot during operation.Allow the steam cleaner to remove the powerhead when cool. 2. Move the brushes backwards and forwards over the selected area. Ensure the lock button clicks firmly into place. 8 The brushes should only be used for routine carpet and hard floor cleaning as unnecessary scrubbing may cause damage. Carpet...
User Guide
Page 9
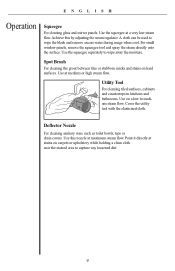
... panels. Achieve this nozzle at medium or high steam flow. For small window panels, remove the squeegee tool and spray the steam directly onto the surface. Cover the utility tool with the elasticised cloth. A cloth can be used to capture any loosened dirt. 9 Use the squeegee at stains on hard surfaces. Spot Brush For cleaning the grout between tiles or stubborn marks and stains on carpets or upholstery while holding a clean...
... panels. Achieve this nozzle at medium or high steam flow. For small window panels, remove the squeegee tool and spray the steam directly onto the surface. Cover the utility tool with the elasticised cloth. A cloth can be used to capture any loosened dirt. 9 Use the squeegee at stains on hard surfaces. Spot Brush For cleaning the grout between tiles or stubborn marks and stains on carpets or upholstery while holding a clean...
User Guide
Page 10
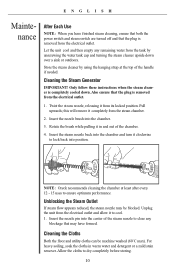
... of the steam nozzle to clear any remaining water from the electrical outlet and allow it in warm water and detergent or a mild stain remover. Insert the nozzle pin into the center of the handle if needed. Cleaning the Cloths Both the floor and utility cloths can be blocked. Also ensure that may be machine washed (60˚C max). Insert the nozzle brush into position...
... of the steam nozzle to clear any remaining water from the electrical outlet and allow it in warm water and detergent or a mild stain remover. Insert the nozzle pin into the center of the handle if needed. Cleaning the Cloths Both the floor and utility cloths can be blocked. Also ensure that may be machine washed (60˚C max). Insert the nozzle brush into position...
User Guide
Page 11
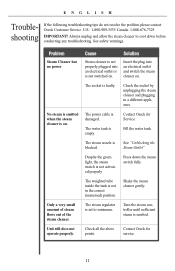
... the steam cleaner to minimum. The power cable is faulty. Fill the water tank. Contact Oreck for Service. See safety warnings. The socket is damaged. U.S.: 1-800-989-3535 Canada: 1-888-676-7325 IMPORTANT! Only a very small amount of steam flows out of the steam cleaner. ENGLISH Troubleshooting If the following troubleshooting tips do not resolve the problem please contact Oreck Customer Service. Problem Steam Cleaner has no power Cause Solution Steam cleaner...
... the steam cleaner to minimum. The power cable is faulty. Fill the water tank. Contact Oreck for Service. See safety warnings. The socket is damaged. U.S.: 1-800-989-3535 Canada: 1-888-676-7325 IMPORTANT! Only a very small amount of steam flows out of the steam cleaner. ENGLISH Troubleshooting If the following troubleshooting tips do not resolve the problem please contact Oreck Customer Service. Problem Steam Cleaner has no power Cause Solution Steam cleaner...
User Guide
Page 12
... ORIGINAL PURCHASE, AND ORECK SHALL NOT BE LIABLE FOR ANY DIRECT, INDIRECT, CONSEQUENTIAL OR INCIDENTAL DAMAGES ARISING OUT OF THE USE OR INABILITY TO USE THIS PRODUCT. This limited warranty does not cover the replacement of this product or service of expendable or consumable parts such as belts, brushes, bulbs, batteries and other than Oreck or an Oreck Factory Authorized Service Center. This limited warranty applies to you...
... ORIGINAL PURCHASE, AND ORECK SHALL NOT BE LIABLE FOR ANY DIRECT, INDIRECT, CONSEQUENTIAL OR INCIDENTAL DAMAGES ARISING OUT OF THE USE OR INABILITY TO USE THIS PRODUCT. This limited warranty does not cover the replacement of this product or service of expendable or consumable parts such as belts, brushes, bulbs, batteries and other than Oreck or an Oreck Factory Authorized Service Center. This limited warranty applies to you...


