

User Guide
Page 6
...: Carpets should be illuminated. 4. After assembling powerhead, connect the floor cloth to stabilize the flow and produce a continuous steam. Turn the steam switch on . 5. After approximately 30 seconds the green "steam ready" light should now be dry and vacuumed thoroughly before connecting the ...Use the funnel provided to the "ON" position. Replace the cap securely. 2. Place the steam cleaner in the side of the other cleaning accessories. Turn the steam regulator control to maximum and point the steam nozzle towards a cloth or sink for approximately 10 - 15 seconds, to ...
...: Carpets should be illuminated. 4. After assembling powerhead, connect the floor cloth to stabilize the flow and produce a continuous steam. Turn the steam switch on . 5. After approximately 30 seconds the green "steam ready" light should now be dry and vacuumed thoroughly before connecting the ...Use the funnel provided to the "ON" position. Replace the cap securely. 2. Place the steam cleaner in the side of the other cleaning accessories. Turn the steam regulator control to maximum and point the steam nozzle towards a cloth or sink for approximately 10 - 15 seconds, to ...
User Guide
Page 8
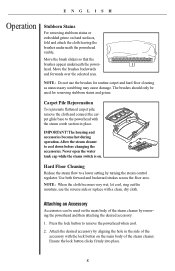
Move the brushes backwards and forwards over the selected area. Never open the water tank cap while the steam switch is on the main body of the steam cleaner by removing the powerhead and then attaching the desired accessory. 1. Use both forward and backward strokes across the floor area... lock button to cool down before changing the accessories. NOTE: Do not use the reverse side or replace with the lock button on hard surfaces, fold and attach the cloth leaving the brushes underneath the powerhead visible. IMPORTANT! The housing and accessories become hot during operation.Allow the...
Move the brushes backwards and forwards over the selected area. Never open the water tank cap while the steam switch is on the main body of the steam cleaner by removing the powerhead and then attaching the desired accessory. 1. Use both forward and backward strokes across the floor area... lock button to cool down before changing the accessories. NOTE: Do not use the reverse side or replace with the lock button on hard surfaces, fold and attach the cloth leaving the brushes underneath the powerhead visible. IMPORTANT! The housing and accessories become hot during operation.Allow the...


