
Manual
Page 1
DLP® Projector User manual
DLP® Projector User manual

Manual
Page 2
......12 Remote control 1...13 Remote control 2...14 Remote control 3...15 Remote control 4...16 SETUP AND INSTALLATION 17 Installing the projector...17 Adjusting the projector image...23 USING THE PROJECTOR 26 Powering on / off the projector 26 Selecting an input source...27 Menu navigation and features 28 OSD Menu tree (SVGA, XGA, and WXGA models...
......12 Remote control 1...13 Remote control 2...14 Remote control 3...15 Remote control 4...16 SETUP AND INSTALLATION 17 Installing the projector...17 Adjusting the projector image...23 USING THE PROJECTOR 26 Powering on / off the projector 26 Selecting an input source...27 Menu navigation and features 28 OSD Menu tree (SVGA, XGA, and WXGA models...

Manual
Page 3
......44 Setup security menu...45 Setup HDMI link settings menu 46 Setup test pattern menu...46 Setup remote settings menu...46 Setup projector ID menu...47 Setup options menu...47 Setup reset menu...48 Info menu...48 MAINTENANCE 49 Replacing the lamp...49 Installing and ...cleaning the dust filter 51 ADDITIONAL INFORMATION 52 Compatible resolutions...52 Image size and projection distance 55 Projector dimensions and ceiling mount installation 57 IR remote control 1 codes...58 IR remote control 2 codes...60 IR remote control 3 codes...62 ...
......44 Setup security menu...45 Setup HDMI link settings menu 46 Setup test pattern menu...46 Setup remote settings menu...46 Setup projector ID menu...47 Setup options menu...47 Setup reset menu...48 Info menu...48 MAINTENANCE 49 Replacing the lamp...49 Installing and ...cleaning the dust filter 51 ADDITIONAL INFORMATION 52 Compatible resolutions...52 Image size and projection distance 55 Projector dimensions and ceiling mount installation 57 IR remote control 1 codes...58 IR remote control 2 codes...60 IR remote control 3 codes...62 ...

Manual
Page 4
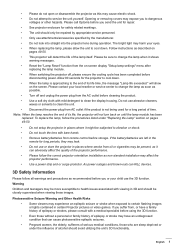
... in a location that restricts air flow. ‡‡ To reduce the risk of fire and/or electric shock, do not expose the projector to the presence of uninsulated "dangerous voltage" within an equilateral triangle is intended to alert the user to rain or moisture. To ensure reliable... ±± In extremely hot, cold or humid environments. (i) Ensure that emits heat. ‡‡ Do not let objects or liquids enter the projector. Important Safety Instruction ‡‡ Do not stare into the direct beam, RG2 IEC 62471-5:2015. ‡‡ Do not block any ventilation openings...
... in a location that restricts air flow. ‡‡ To reduce the risk of fire and/or electric shock, do not expose the projector to the presence of uninsulated "dangerous voltage" within an equilateral triangle is intended to alert the user to rain or moisture. To ensure reliable... ±± In extremely hot, cold or humid environments. (i) Ensure that emits heat. ‡‡ Do not let objects or liquids enter the projector. Important Safety Instruction ‡‡ Do not stare into the direct beam, RG2 IEC 62471-5:2015. ‡‡ Do not block any ventilation openings...
Manual
Page 5
... or removing covers may expose you suffer from AC outlet if the product is approaching to dangerous voltages or other hazards. Please call Optoma before disconnecting power. Allow 90 seconds for a long period of alcohol should avoid utilizing the unit's 3D functionality. will detect the ...the battery/batteries are sleep deprived or under "Replacing the Lamp" section on pages 49-50. ‡‡ Do not setup the projector in certain Projector pictures or video games. As power outages and brown-outs can KILL devices. 3D Safety Information Please follow all warnings and precautions as...
... or removing covers may expose you suffer from AC outlet if the product is approaching to dangerous voltages or other hazards. Please call Optoma before disconnecting power. Allow 90 seconds for a long period of alcohol should avoid utilizing the unit's 3D functionality. will detect the ...the battery/batteries are sleep deprived or under "Replacing the Lamp" section on pages 49-50. ‡‡ Do not setup the projector in certain Projector pictures or video games. As power outages and brown-outs can KILL devices. 3D Safety Information Please follow all warnings and precautions as...

Manual
Page 6
... notice. The manufacturer reserves the right to revise this publication and to make changes from time to time in 3D projection may damage your 3D PROJECTOR near open stairwells, cables, balconies, or other countries throughout the world. ‡‡ If you experience any of the following symptoms, stop viewing the 3D...
... notice. The manufacturer reserves the right to revise this publication and to make changes from time to time in 3D projection may damage your 3D PROJECTOR near open stairwells, cables, balconies, or other countries throughout the world. ‡‡ If you experience any of the following symptoms, stop viewing the 3D...

Manual
Page 7
.... English 7 If this electronic device into an outlet on is encouraged to try to correct the interference by the Federal Communications Commission, to operate this projector. Notice: Canadian users This Class B digital apparatus complies with the limits for help. These limits are designed to maintain compliance with Part 15 of the...
.... English 7 If this electronic device into an outlet on is encouraged to try to correct the interference by the Federal Communications Commission, to operate this projector. Notice: Canadian users This Class B digital apparatus complies with the limits for help. These limits are designed to maintain compliance with Part 15 of the...
Manual
Page 8
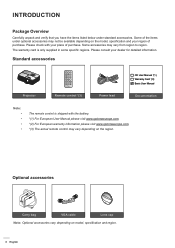
The warranty card is shipped with your place of purchase. Standard accessories CD User Manual *(1) Warranty Card *(2) Basic User Manual Projector Remote control *(3) Power lead Documentation Note The remote control is only supplied in some specific regions. Some accessories may vary depending on the region. Please ...
The warranty card is shipped with your place of purchase. Standard accessories CD User Manual *(1) Warranty Card *(2) Basic User Manual Projector Remote control *(3) Power lead Documentation Note The remote control is only supplied in some specific regions. Some accessories may vary depending on the region. Please ...
Manual
Page 11
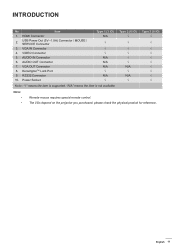
...) √ √ Note: ‡‡ ‡‡ Remote mouse requires special remote control. English 11 VIDEO Connector 5. AUDIO IN Connector 6. The I/Os depend on the projector you purchased, please check the physical product for reference. AUDIO OUT Connector 7. USB Power Out (5V 1.5A) Connector / MOUSE / SERVICE Connector 3. RS232 Connector 10. Power...
...) √ √ Note: ‡‡ ‡‡ Remote mouse requires special remote control. English 11 VIDEO Connector 5. AUDIO IN Connector 6. The I/Os depend on the projector you purchased, please check the physical product for reference. AUDIO OUT Connector 7. USB Power Out (5V 1.5A) Connector / MOUSE / SERVICE Connector 3. RS232 Connector 10. Power...

Manual
Page 17
... please refer to be horizontal and not tilted either forwards/backwards or left/right. SETUP AND INSTALLATION Installing the projector Your projector is placed from the screen the projected image size increases and vertical offset also increases proportionally. Table mount front Ceiling...any orientation other orientation will dictate which installation location you select. For none standard installation advise please contact Optoma. Do not operate the projector in one of four possible positions. Your room layout or personal preference will invalidate the warranty and may...
... please refer to be horizontal and not tilted either forwards/backwards or left/right. SETUP AND INSTALLATION Installing the projector Your projector is placed from the screen the projected image size increases and vertical offset also increases proportionally. Table mount front Ceiling...any orientation other orientation will dictate which installation location you select. For none standard installation advise please contact Optoma. Do not operate the projector in one of four possible positions. Your room layout or personal preference will invalidate the warranty and may...

Manual
Page 18
...176; ‡‡ Allow at least 30 cm clearance around the exhaust vent. When operating the projector in a horizontal position. SETUP AND INSTALLATION Projector installation notice (SVGA_XGA_WXGA) ‡‡ Place the projector in an enclosed space, ensure that the intake vents do not recycle hot air from the exhaust ...vent. The tilt angle of the projector should not exceed 15 degrees, nor should pass a certified thermal evaluation to ensure that the projector does not recycle exhaust air, as this may cause the device to other than the...
...176; ‡‡ Allow at least 30 cm clearance around the exhaust vent. When operating the projector in a horizontal position. SETUP AND INSTALLATION Projector installation notice (SVGA_XGA_WXGA) ‡‡ Place the projector in an enclosed space, ensure that the intake vents do not recycle hot air from the exhaust ...vent. The tilt angle of the projector should not exceed 15 degrees, nor should pass a certified thermal evaluation to ensure that the projector does not recycle exhaust air, as this may cause the device to other than the...
Manual
Page 23
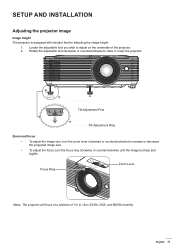
Locate the adjustable foot you wish to raise or lower the projector. Rotate the adjustable foot clockwise or counterclockwise to adjust on the underside of 1m to increase or decrease the projected image size. ‡‡ To ... equipped with elevator feet for adjusting the image height. 1. SETUP AND INSTALLATION Adjusting the projector image Image height The projector is sharp and legible. English 23 Focus Ring Zoom Lever Note: The projector will focus at a distance of the projector. 2. Tilt-Adjustment Feet Tilt-Adjustment Ring Zoom and focus ‡‡ To adjust the...
Locate the adjustable foot you wish to raise or lower the projector. Rotate the adjustable foot clockwise or counterclockwise to adjust on the underside of 1m to increase or decrease the projected image size. ‡‡ To ... equipped with elevator feet for adjusting the image height. 1. SETUP AND INSTALLATION Adjusting the projector image Image height The projector is sharp and legible. English 23 Focus Ring Zoom Lever Note: The projector will focus at a distance of the projector. 2. Tilt-Adjustment Feet Tilt-Adjustment Ring Zoom and focus ‡‡ To adjust the...

Manual
Page 25
... control and the sensor should not be longer than 6 meters from time to time. ‡‡ If the remote control and the projector are within a very short distance, the remote control might become ineffective from the remote control to the screen and reflecting the IR beams ...back to the projector. SETUP AND INSTALLATION Effective range Infra-Red (IR) remote control sensor is close to Inverter-Type fluorescent lamps, it might become ineffective. ‡...
... control and the sensor should not be longer than 6 meters from time to time. ‡‡ If the remote control and the projector are within a very short distance, the remote control might become ineffective from the remote control to the screen and reflecting the IR beams ...back to the projector. SETUP AND INSTALLATION Effective range Infra-Red (IR) remote control sensor is close to Inverter-Type fluorescent lamps, it might become ineffective. ‡...

Manual
Page 26
.... Disconnect the power lead from the electrical outlet and the projector. USING THE PROJECTOR Powering on / off the projector or Powering on the projector keypad or the remote control. 2. Note: It is not recommended that the projector is turned on immediately, right after 15 seconds. Securely connect... the power lead and signal/source cable. A start up screen will shut down. 4. When the projector is turned on the projector keypad or the remote control. 3. If you wish to turn red. 2. When connected, the On/Standby LED will turn on ...
.... Disconnect the power lead from the electrical outlet and the projector. USING THE PROJECTOR Powering on / off the projector or Powering on the projector keypad or the remote control. 2. Note: It is not recommended that the projector is turned on immediately, right after 15 seconds. Securely connect... the power lead and signal/source cable. A start up screen will shut down. 4. When the projector is turned on the projector keypad or the remote control. 3. If you wish to turn red. 2. When connected, the On/Standby LED will turn on ...

Manual
Page 27
or English 27 If multiple sources are connected, push the source button on the screen, such as computer, notebook, video player, etc. The projector will automatically detect the source. USING THE PROJECTOR Selecting an input source Turn on the connected source that you want to display on the projector keypad or the remote control to select the desired input.
or English 27 If multiple sources are connected, push the source button on the screen, such as computer, notebook, video player, etc. The projector will automatically detect the source. USING THE PROJECTOR Selecting an input source Turn on the connected source that you want to display on the projector keypad or the remote control to select the desired input.

Manual
Page 28
... then press or key to select the desired item in the main menu. To open the OSD menu, press on the remote control or the projector keyboard. 2. While making a selection on a particular page, press or key to be adjusted in the sub menu and adjust as described above. ... the screen will return to make image adjustments and change a variety of settings. Adjust the settings by using keys. 4. USING THE PROJECTOR Menu navigation and features The projector has multilingual on-screen display menus that allow you to the main menu. 6. To exit, press the or again. SVGA, XGA,...
... then press or key to select the desired item in the main menu. To open the OSD menu, press on the remote control or the projector keyboard. 2. While making a selection on a particular page, press or key to be adjusted in the sub menu and adjust as described above. ... the screen will return to make image adjustments and change a variety of settings. Adjust the settings by using keys. 4. USING THE PROJECTOR Menu navigation and features The projector has multilingual on-screen display menus that allow you to the main menu. 6. To exit, press the or again. SVGA, XGA,...

Manual
Page 29
... -50~50 1~15 -50~50 -50~50 1~10 Warm Medium Cool R [Default] G B C Y M W -50~50 [Default: 0] -50~50 [Default: 0] -50~50 [Default: 0] English 29 USING THE PROJECTOR OSD Menu tree (SVGA, XGA, and WXGA models) Main Menu Sub Menu Sub Menu 2 Sub Menu 3 Sub Menu 4 Display Mode [Data] Wall Color Display Brightness...
... -50~50 1~15 -50~50 -50~50 1~10 Warm Medium Cool R [Default] G B C Y M W -50~50 [Default: 0] -50~50 [Default: 0] -50~50 [Default: 0] English 29 USING THE PROJECTOR OSD Menu tree (SVGA, XGA, and WXGA models) Main Menu Sub Menu Sub Menu 2 Sub Menu 3 Sub Menu 4 Display Mode [Data] Wall Color Display Brightness...

Manual
Page 30
... signal) [Default: 0] 0~31 (depends on signal) [Default: 0] -5~5 (depends on signal) [Default: 0] -5~5 (depends on signal) [Default: 0] Bright Eco. Position Exit Brightness Mode [Lamp Base - USING THE PROJECTOR Main Menu Sub Menu Sub Menu 2 Sub Menu 3 Sub Menu 4 Color Matching RGB Gain/Bias Reset Exit Red Gain Green Gain Blue Gain Red Bias...
... signal) [Default: 0] 0~31 (depends on signal) [Default: 0] -5~5 (depends on signal) [Default: 0] -5~5 (depends on signal) [Default: 0] Bright Eco. Position Exit Brightness Mode [Lamp Base - USING THE PROJECTOR Main Menu Sub Menu Sub Menu 2 Sub Menu 3 Sub Menu 4 Color Matching RGB Gain/Bias Reset Exit Red Gain Green Gain Blue Gain Red Bias...

Manual
Page 31
USING THE PROJECTOR Main Menu Sub Menu Sub Menu 2 3D Mode Sub Menu 3 3D->2D 3D 3D Format Display 3D sync invert Aspect Ratio Edge Mask Zoom H Image ...
USING THE PROJECTOR Main Menu Sub Menu Sub Menu 2 3D Mode Sub Menu 3 3D->2D 3D 3D Format Display 3D sync invert Aspect Ratio Edge Mask Zoom H Image ...

Manual
Page 32
USING THE PROJECTOR Main Menu Sub Menu Sub Menu 2 Optional Filter Installed Filter Usage Hours Sub Menu 3 Filter Settings Filter Reminder Sub Menu 4 Setup Filter Reset Direct Power ...
USING THE PROJECTOR Main Menu Sub Menu Sub Menu 2 Optional Filter Installed Filter Usage Hours Sub Menu 3 Filter Settings Filter Reminder Sub Menu 4 Setup Filter Reset Direct Power ...


