
Owner Manual
Page 5
Use this adapter if your AC outlet does not match with the plug on the AV receiver/AV amplifier's power cord (adapter varies from country to mount the AC plug: AM loop antenna (TX-SR706 only) * In catalogs and on packaging, the letter at the end of color. Front Left Front Left SP-B ... operations are the same regardless of the product name indicates the color. Supplied Accessories Make sure you have the following accessories: Remote controller & two batteries (AA/R6) Speaker setup microphone Indoor FM antenna (TX-SR706 only) * Power-plug adapter Only supplied in certain countries.
Use this adapter if your AC outlet does not match with the plug on the AV receiver/AV amplifier's power cord (adapter varies from country to mount the AC plug: AM loop antenna (TX-SR706 only) * In catalogs and on packaging, the letter at the end of color. Front Left Front Left SP-B ... operations are the same regardless of the product name indicates the color. Supplied Accessories Make sure you have the following accessories: Remote controller & two batteries (AA/R6) Speaker setup microphone Indoor FM antenna (TX-SR706 only) * Power-plug adapter Only supplied in certain countries.
Owner Manual
Page 6
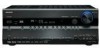
...Accurate 32-bit DSP Processing x 2 Connections • 4 HDMI*4 Inputs and 1 Output (ver. 1.3a) • Onkyo for System Control • 6 Digital Inputs (3 Optical / 3 Coaxial) • 5 S-Video Inputs / 2 Outputs ...8226; Compatible with RI Dock for both digital and analog domains. THX Select2 Plus receivers also feature proprietary THX technologies (e.g., THX Mode) which is a trademark of SIRIUS ...and operation for iPod • Aluminum Front Panel • Preprogrammed V-Compatible Remote with permission. *2. patents and other U.S. THX Select2 Plus requirements define ...
...Accurate 32-bit DSP Processing x 2 Connections • 4 HDMI*4 Inputs and 1 Output (ver. 1.3a) • Onkyo for System Control • 6 Digital Inputs (3 Optical / 3 Coaxial) • 5 S-Video Inputs / 2 Outputs ...8226; Compatible with RI Dock for both digital and analog domains. THX Select2 Plus receivers also feature proprietary THX technologies (e.g., THX Mode) which is a trademark of SIRIUS ...and operation for iPod • Aluminum Front Panel • Preprogrammed V-Compatible Remote with permission. *2. patents and other U.S. THX Select2 Plus requirements define ...
Owner Manual
Page 7
...14 Aiming the Remote Controller 14 Controlling the AV Receiver/AV Amplifier 15 About Home Theater 16 Enjoying Home Theater 16 Connections Connecting the AV Receiver/AV Amplifier 17 Connecting Your Speakers 17 Bi-amping the Front Speakers 19 Connecting Antenna (TX-SR706 only 20 About AV Connections 22 Connecting...or DAT Recorder 36 Connecting a Power Amplifier 37 Connecting a Tuner (TX-SA706 only 37 Connecting an RI Dock 38 Connecting Onkyo V Components 39 Connecting the Power Cord 39 Turning On the AV Receiver/AV Amplifier 40 Turning On and Standby 40 First Time Setup First Time...
...14 Aiming the Remote Controller 14 Controlling the AV Receiver/AV Amplifier 15 About Home Theater 16 Enjoying Home Theater 16 Connections Connecting the AV Receiver/AV Amplifier 17 Connecting Your Speakers 17 Bi-amping the Front Speakers 19 Connecting Antenna (TX-SR706 only 20 About AV Connections 22 Connecting...or DAT Recorder 36 Connecting a Power Amplifier 37 Connecting a Tuner (TX-SA706 only 37 Connecting an RI Dock 38 Connecting Onkyo V Components 39 Connecting the Power Cord 39 Turning On the AV Receiver/AV Amplifier 40 Turning On and Standby 40 First Time Setup First Time...
Owner Manual
Page 9
...you can be displayed as arrow buttons and are used to select and set the AV receiver/AV amplifier to access the onscreen setup menus that appear on the connected TV. C ...and it 's for private listening. F Remote control sensor (14) This sensor receives control signals from the remote controller. G Display See "Display" on page 59. On the TX-SA706, this mode is connected here for ... VOLUME control (54) and indicator This control is used to select radio presets (see page 58) (TX-SR706 only). The volume level can also be used with video games. See "Volume Setup" on . P...
...you can be displayed as arrow buttons and are used to select and set the AV receiver/AV amplifier to access the onscreen setup menus that appear on the connected TV. C ...and it 's for private listening. F Remote control sensor (14) This sensor receives control signals from the remote controller. G Display See "Display" on page 59. On the TX-SA706, this mode is connected here for ... VOLUME control (54) and indicator This control is used to select radio presets (see page 58) (TX-SR706 only). The volume level can also be used with video games. See "Volume Setup" on . P...
Owner Manual
Page 12
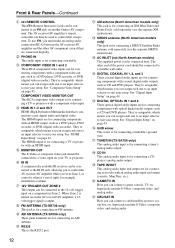
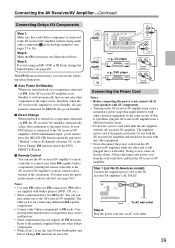
...TX-SR706 only) This jack is for connecting a turntable. N AC INLET (not North American models) The supplied power cord is for connecting a SIRIUS Satellite Radio antenna, sold separately (see the separate SIRIUS instructions). See "Digital Input Setup" on the AV receiver/AV amplifier, a 12volt trigger signal is turned on on page 44. The AV receiver/AV amplifier's remote...assign each one to an input selector to suit your setup. See "Digital Input Setup" on another Onkyo AV component. P DIGITAL OPTICAL IN 1 and 2 These optical digital audio inputs are for connecting components ...
...TX-SR706 only) This jack is for connecting a turntable. N AC INLET (not North American models) The supplied power cord is for connecting a SIRIUS Satellite Radio antenna, sold separately (see the separate SIRIUS instructions). See "Digital Input Setup" on the AV receiver/AV amplifier, a 12volt trigger signal is turned on on page 44. The AV receiver/AV amplifier's remote...assign each one to an input selector to suit your setup. See "Digital Input Setup" on another Onkyo AV component. P DIGITAL OPTICAL IN 1 and 2 These optical digital audio inputs are for connecting components ...
Owner Manual
Page 14
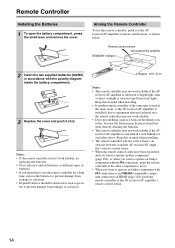
... you want to operate an Onkyo component without V connection, point the remote controller at the other component to use the remote controller for a long time, remove the batteries to operate an Onkyo component with the polarity diagram inside the battery compartment. 3 Replace the cover and push it and the AV receiver/AV ampli- Remote Controller Installing the Batteries...
... you want to operate an Onkyo component without V connection, point the remote controller at the other component to use the remote controller for a long time, remove the batteries to operate an Onkyo component with the polarity diagram inside the battery compartment. 3 Replace the cover and push it and the AV receiver/AV ampli- Remote Controller Installing the Batteries...
Owner Manual
Page 15
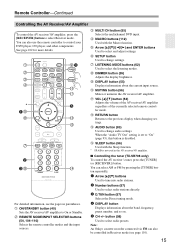
...57) Used to control your DVD player, CD player, and other components. Note: An Onkyo cassette recorder connected via V can also use the remote controller to select radio stations directly. 3 D.TUN button (57) Selects the Direct tuning... mode. 4 DISPLAY button Displays information about the current input source. You can also be controlled in Receiver mode (see the pages in this button is set to "On" (page 93), this AV receiver/AV amplifier. ■ Controlling the tuner (TX-SR706...
...57) Used to control your DVD player, CD player, and other components. Note: An Onkyo cassette recorder connected via V can also use the remote controller to select radio stations directly. 3 D.TUN button (57) Selects the Direct tuning... mode. 4 DISPLAY button Displays information about the current input source. You can also be controlled in Receiver mode (see the pages in this button is set to "On" (page 93), this AV receiver/AV amplifier. ■ Controlling the tuner (TX-SR706...
Owner Manual
Page 38
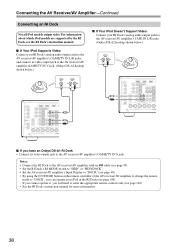
...HDD" or "HDD/DOCK". • Set the AV receiver/AV amplifier's Input Display to "DOCK" (see page 48). • By using the [CUSTOM] button on the remote controller of the AV receiver/AV amplifier to change the remote mode to "DOCK", you have an Onkyo DS-A1 RI Dock • Connect its video output... jack to the AV receiver/AV amplifier GAME/TV IN V jack. (Onkyo DS-A2 hookup shown below.) ■ If ...
...HDD" or "HDD/DOCK". • Set the AV receiver/AV amplifier's Input Display to "DOCK" (see page 48). • By using the [CUSTOM] button on the remote controller of the AV receiver/AV amplifier to change the remote mode to "DOCK", you have an Onkyo DS-A1 RI Dock • Connect its video output... jack to the AV receiver/AV amplifier GAME/TV IN V jack. (Onkyo DS-A2 hookup shown below.) ■ If ...
Owner Manual
Page 39
... than the one to the manuals supplied with your other V-capable Onkyo components, pointing the remote controller at the AV receiver/AV amplifier's remote control sensor instead of your DVD player is connected to the AV receiver/AV amplifier's DVD multichannel input, you start playback on a component connected via V, the AV receiver/AV amplifier automatically selects that component as the input source...
... than the one to the manuals supplied with your other V-capable Onkyo components, pointing the remote controller at the AV receiver/AV amplifier's remote control sensor instead of your DVD player is connected to the AV receiver/AV amplifier's DVD multichannel input, you start playback on a component connected via V, the AV receiver/AV amplifier automatically selects that component as the input source...
Owner Manual
Page 40
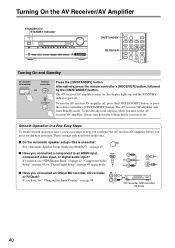
...Setup" on page 49. ■ Have you use it off. If you connected an Onkyo MD recorder, CD recorder, or RI Dock? The AV receiver/AV amplifier comes on the AV receiver/AV amplifier, always turn down the volume before you connected a component to an HDMI input, ...ON/STANDBY] button, or press the remote controller's [ON/STANDBY] button. If you have , see "Changing the Input Display" on page 48. Turning On the AV Receiver/AV Amplifier STANDBY/ON STANDBY indicator ON/STANDBY RECEIVER Turning On and Standby AV receiver/ AV amplifier Remote controller or Press the [ON/STANDBY...
...Setup" on page 49. ■ Have you use it off. If you connected an Onkyo MD recorder, CD recorder, or RI Dock? The AV receiver/AV amplifier comes on the AV receiver/AV amplifier, always turn down the volume before you connected a component to an HDMI input, ...ON/STANDBY] button, or press the remote controller's [ON/STANDBY] button. If you have , see "Changing the Input Display" on page 48. Turning On the AV Receiver/AV Amplifier STANDBY/ON STANDBY indicator ON/STANDBY RECEIVER Turning On and Standby AV receiver/ AV amplifier Remote controller or Press the [ON/STANDBY...

Owner Manual
Page 47
... select: 10kHz: Select if 10 kHz steps are used in your TV. 5 Press the [SETUP] button. Note that when this setting is selected on the AV receiver/AV amplifier by the [SETUP] button. Hardware Setup 1. Hardware Setup", and then press [ENTER]. tons to select "7. If the main menu doesn't appear, make sure the...AM Frequency Step Setup (on some models) For AM tuning to work properly, you must specify the AM frequency step used in your area. 47 Remote Control 2. HDMI 3 Use the Up and Down [R]/[X] but - Tuner", and then press [ENTER]. tons to select "3.
... select: 10kHz: Select if 10 kHz steps are used in your TV. 5 Press the [SETUP] button. Note that when this setting is selected on the AV receiver/AV amplifier by the [SETUP] button. Hardware Setup 1. Hardware Setup", and then press [ENTER]. tons to select "7. If the main menu doesn't appear, make sure the...AM Frequency Step Setup (on some models) For AM tuning to work properly, you must specify the AM frequency step used in your area. 47 Remote Control 2. HDMI 3 Use the Up and Down [R]/[X] but - Tuner", and then press [ENTER]. tons to select "3.
Owner Manual
Page 54
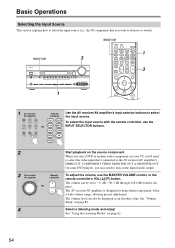
... volume, use the or INPUT SELECTOR buttons. 2 3 AV receiver/ AV amplifier Remote controller or 4 Start playback on the digital audio output. The AV receiver/AV amplifier is designed for home theater enjoyment. The volume level can be displayed as an absolute value. MULTI CH 1 MULTI CH 3 3 1 1 AV receiver/ AV amplifier Remote controller Use the AV receiver/AV amplifier's input selector buttons to or watch...
... volume, use the or INPUT SELECTOR buttons. 2 3 AV receiver/ AV amplifier Remote controller or 4 Start playback on the digital audio output. The AV receiver/AV amplifier is designed for home theater enjoyment. The volume level can be displayed as an absolute value. MULTI CH 1 MULTI CH 3 3 1 1 AV receiver/ AV amplifier Remote controller Use the AV receiver/AV amplifier's input selector buttons to or watch...
Owner Manual
Page 55
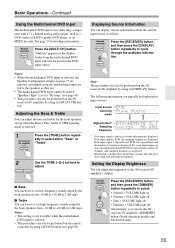
Note: This procedure can adjust the brightness of the AV receiver/AV amplifier's display. Remote controller Press the [RECEIVER] button, and then press the [DIMMER] button repeatedly to select: • Normal + VOLUME light on the display. Audio from ...CH] button. Remote controller Press the [RECEIVER] button, and then press the [DISPLAY] button repeatedly to +10 dB in 2 dB steps. If the input signal is PCM, the sampling frequency is displayed. The following information can use the AV receiver/AV amplifier's [DIMMER] button (North American models and TX-SA706 only). ...
Note: This procedure can adjust the brightness of the AV receiver/AV amplifier's display. Remote controller Press the [RECEIVER] button, and then press the [DIMMER] button repeatedly to select: • Normal + VOLUME light on the display. Audio from ...CH] button. Remote controller Press the [RECEIVER] button, and then press the [DISPLAY] button repeatedly to +10 dB in 2 dB steps. If the input signal is PCM, the sampling frequency is displayed. The following information can use the AV receiver/AV amplifier's [DIMMER] button (North American models and TX-SA706 only). ...
Owner Manual
Page 57
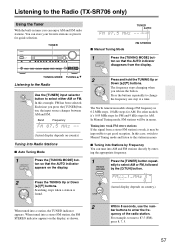
... number buttons to enter the frequency of the radio station. Listening to the Radio (TX-SR706 only) Using the Tuner With the built-in tuner you can tune into AM and FM stations directly by entering the appropriate frequency. 1 Remote controller Press the [TUNER] button repeatedly to select AM or FM, followed by...
... number buttons to enter the frequency of the radio station. Listening to the Radio (TX-SR706 only) Using the Tuner With the built-in tuner you can tune into AM and FM stations directly by entering the appropriate frequency. 1 Remote controller Press the [TUNER] button repeatedly to select AM or FM, followed by...
Owner Manual
Page 58
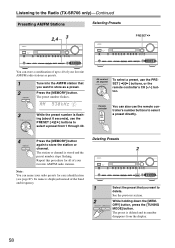
...number stops flashing. AV receiver/ AV amplifier To select a preset, use the remote controller's number buttons to select a preset directly. 4 Press the [MEMORY] button again to store the station or channel. Remote controller You can also use the PRESET [F]/[S] buttons, or the remote controller's CH ... ing (about 8 seconds), use the PRESET [F]/[S] buttons to select a preset from the display. 58 Listening to the Radio (TX-SR706 only)-Continued Presetting AM/FM Stations Selecting Presets 2,4 3 PRESET You can store a combination of up to 40 of your favorite AM/FM...
...number stops flashing. AV receiver/ AV amplifier To select a preset, use the remote controller's number buttons to select a preset directly. 4 Press the [MEMORY] button again to store the station or channel. Remote controller You can also use the PRESET [F]/[S] buttons, or the remote controller's CH ... ing (about 8 seconds), use the PRESET [F]/[S] buttons to select a preset from the display. 58 Listening to the Radio (TX-SR706 only)-Continued Presetting AM/FM Stations Selecting Presets 2,4 3 PRESET You can store a combination of up to 40 of your favorite AM/FM...

Owner Manual
Page 62
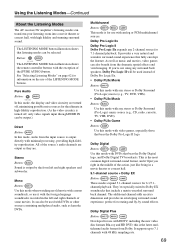
... check the format, see "Displaying Source Information" on the AV receiver/AV amplifier Selecting with the Remote Controller MUSIC MOVIE/TV GAME THX Press the [RECEIVER] button, and then press the LISTENING MODE button repeatedly to the AV receiver/AV amplifier with video games. [THX] button This button selects ... modes you can only select the Pure Audio, Mono, Direct, or Stereo listening mode. Pressing this mode is selected, the AV receiver/AV amplifier's display is turned off and only video signals input through HDMI IN can select depends on the format of headphones is connected...
... check the format, see "Displaying Source Information" on the AV receiver/AV amplifier Selecting with the Remote Controller MUSIC MOVIE/TV GAME THX Press the [RECEIVER] button, and then press the LISTENING MODE button repeatedly to the AV receiver/AV amplifier with video games. [THX] button This button selects ... modes you can only select the Pure Audio, Mono, Direct, or Stereo listening mode. Pressing this mode is selected, the AV receiver/AV amplifier's display is turned off and only video signals input through HDMI IN can select depends on the format of headphones is connected...
Owner Manual
Page 69
Button: The LISTENING MODE button illustration shows the remote controller buttons with 48 kHz sampling rate. 69 Stereo Button: Sound is output by sound effects. Dolby Pro Logic IIx Dolby Pro Logic II Dolby ... channels are . Dolby Digital Button: Use this mode with minimal processing, providing high-fidelity reproduction. Using the Listening Modes-Continued About the Listening Modes The AV receiver/AV amplifier's listening modes can transform your listening room into a movie theater or concert hall, with DVDs or other sources containing multiplexed audio, such as karaoke...
Button: The LISTENING MODE button illustration shows the remote controller buttons with 48 kHz sampling rate. 69 Stereo Button: Sound is output by sound effects. Dolby Pro Logic IIx Dolby Pro Logic II Dolby ... channels are . Dolby Digital Button: Use this mode with minimal processing, providing high-fidelity reproduction. Using the Listening Modes-Continued About the Listening Modes The AV receiver/AV amplifier's listening modes can transform your listening room into a movie theater or concert hall, with DVDs or other sources containing multiplexed audio, such as karaoke...
Owner Manual
Page 72
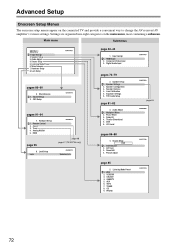
Hardware Setup 8. Volume Setup 2. Remote Control 2. Analog Multich 5. Speaker Configuration 3. Dolby EX 4. LFE Level pages 86-88 4. Name Edit 4. VCR/DVR 3. Audio Adjust 4. Tuner 4. Lock Setup Lock page 98 page 47 (TX-SR706 only) Unlocked page 42-44 1. Component Video Input 3. Equalizer Settings 6. ... most containing a submenu. Settings are organized into eight categories on the connected TV and provide a convenient way to change the AV receiver/AV amplifier's various settings. Speaker Setup 1. THX Audio Setup page 81-82 3. GAME/TV 5. OSD Setup pages 91-94 7. ...
Hardware Setup 8. Volume Setup 2. Remote Control 2. Analog Multich 5. Speaker Configuration 3. Dolby EX 4. LFE Level pages 86-88 4. Name Edit 4. VCR/DVR 3. Audio Adjust 4. Tuner 4. Lock Setup Lock page 98 page 47 (TX-SR706 only) Unlocked page 42-44 1. Component Video Input 3. Equalizer Settings 6. ... most containing a submenu. Settings are organized into eight categories on the connected TV and provide a convenient way to change the AV receiver/AV amplifier's various settings. Speaker Setup 1. THX Audio Setup page 81-82 3. GAME/TV 5. OSD Setup pages 91-94 7. ...
Owner Manual
Page 79
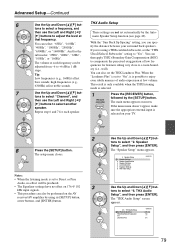
...is selected on your surround back speakers. If the main menu doesn't appear, make sure the appropriate external input is selected. 1 Remote controller Press the [RECEIVER] button, followed by the [SETUP] button. The "Speaker Setup" menu appears. 2. THX Audio Setup", and then press [ENTER.../Select2 Subwoofer" setting to Direct or Pure Audio, no effect will be produced. • The Equalizer settings have no effect on the AV receiver/AV amplifier by the Automatic Speaker Setup function (see page 49). Speaker Distance 4. tons to select a frequency, and then use the Left and...
...is selected on your surround back speakers. If the main menu doesn't appear, make sure the appropriate external input is selected. 1 Remote controller Press the [RECEIVER] button, followed by the [SETUP] button. The "Speaker Setup" menu appears. 2. THX Audio Setup", and then press [ENTER.../Select2 Subwoofer" setting to Direct or Pure Audio, no effect will be produced. • The Equalizer settings have no effect on the AV receiver/AV amplifier by the Automatic Speaker Setup function (see page 49). Speaker Distance 4. tons to select a frequency, and then use the Left and...
Owner Manual
Page 81
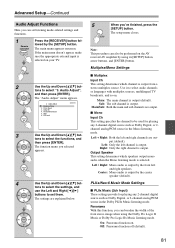
...on your TV. 2 Use the Up and Down [R]/[X] but- Use it to set listening mode-related settings and functions. 1 Remote controller Press the [RECEIVER] button followed by the front left channel is output by using the Dolby Pro Logic II Music or Dolby Pro Logic IIx Music... Input Ch This setting determines which speakers output mono audio when the Mono listening mode is output. Main: The main channel is selected on the AV receiver/AV amplifier by the center speaker (default). The "Audio Adjust" menu appears. 3. Multiplex / Mono 2. Main/Sub: Both the main and sub channels ...
...on your TV. 2 Use the Up and Down [R]/[X] but- Use it to set listening mode-related settings and functions. 1 Remote controller Press the [RECEIVER] button followed by the front left channel is output by using the Dolby Pro Logic II Music or Dolby Pro Logic IIx Music... Input Ch This setting determines which speakers output mono audio when the Mono listening mode is output. Main: The main channel is selected on the AV receiver/AV amplifier by the center speaker (default). The "Audio Adjust" menu appears. 3. Multiplex / Mono 2. Main/Sub: Both the main and sub channels ...


