
Owner Manual
Page 5
...Theater 15 Enjoying Home Theater 15 Connecting the AV receiver 16 Connecting Your Speakers 16 Using Dipole Speakers 16 Bi-amping Front Speakers (TX-SR577 only)....... 19 Connecting Antenna 20 About AV Connections 22 Connecting Audio and Video Signals to the AV receiver 23 Which Connections Should I Use 23 Connecting... an RI Dock 34 Connecting a Dock with the Universal Port connector 34 Connecting Onkyo V Components 35 Connecting the Power Cord 35 Turning On & First Time Setup Turning On the AV receiver 36 Turning On and Standby 36 First Time Setup 37 Audyssey 2EQ™ Room...
...Theater 15 Enjoying Home Theater 15 Connecting the AV receiver 16 Connecting Your Speakers 16 Using Dipole Speakers 16 Bi-amping Front Speakers (TX-SR577 only)....... 19 Connecting Antenna 20 About AV Connections 22 Connecting Audio and Video Signals to the AV receiver 23 Which Connections Should I Use 23 Connecting... an RI Dock 34 Connecting a Dock with the Universal Port connector 34 Connecting Onkyo V Components 35 Connecting the Power Cord 35 Turning On & First Time Setup Turning On the AV receiver 36 Turning On and Standby 36 First Time Setup 37 Audyssey 2EQ™ Room...

Owner Manual
Page 12
...connection (RCA) between the AV receiver and the other component, even if they are connected digitally. There is composite video input and output jack for connecting the video signal, and there are for connecting the audio signal. R PRE OUT: SURR BACK L/R (TX-SR507 only) This analog audio ...antenna. Q ZONE 2 LINE OUT L/R These analog audio outputs can be connected to bi-amp front Speakers. The FRONT HIGH L/R terminal can be used to the line inputs on another V-capable Onkyo component for connecting a recorder with an HDMI input. The HDMI inputs are for connecting ...
...connection (RCA) between the AV receiver and the other component, even if they are connected digitally. There is composite video input and output jack for connecting the video signal, and there are for connecting the audio signal. R PRE OUT: SURR BACK L/R (TX-SR507 only) This analog audio ...antenna. Q ZONE 2 LINE OUT L/R These analog audio outputs can be connected to bi-amp front Speakers. The FRONT HIGH L/R terminal can be used to the line inputs on another V-capable Onkyo component for connecting a recorder with an HDMI input. The HDMI inputs are for connecting ...
Owner Manual
Page 16
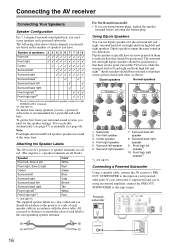
To get the best from your surround-sound system, you need to the amp's input. Attaching the Speaker Labels The AV receiver's positive (+) speaker terminals are all red. (The negative (-) speaker terminals are all black.) Speaker Color Front left, Zone 2 left White Front ... speakers should be positioned so that their arrows point toward each speaker cable in two directions. Subwoofer 2. Center speaker 4. Surround right speaker *1 (TX-SR577) 7 8 7. Surround back left and right*1 dipole speakers should be positioned so that their arrows point toward the TV/screen, while the...
To get the best from your surround-sound system, you need to the amp's input. Attaching the Speaker Labels The AV receiver's positive (+) speaker terminals are all red. (The negative (-) speaker terminals are all black.) Speaker Color Front left, Zone 2 left White Front ... speakers should be positioned so that their arrows point toward each speaker cable in two directions. Subwoofer 2. Center speaker 4. Surround right speaker *1 (TX-SR577) 7 8 7. Surround back left and right*1 dipole speakers should be positioned so that their arrows point toward the TV/screen, while the...

Owner Manual
Page 17
...the power cord from the ends of the connected speakers is 4 ohms or more than one cable to each speaker terminal. Connecting the AV receiver-Continued Speaker Connection Precautions Read the following before making any connections. • Read the instructions supplied with an impedance of between 6 and... at high volume levels for a long period of time, the built-in amp protection circuit may be sure to set the minimum speaker impedance to "4 ohms" (see page 40). Doing so may damage the AV receiver. • Don't connect a speaker to only negative (-) terminals. Make ...
...the power cord from the ends of the connected speakers is 4 ohms or more than one cable to each speaker terminal. Connecting the AV receiver-Continued Speaker Connection Precautions Read the following before making any connections. • Read the instructions supplied with an impedance of between 6 and... at high volume levels for a long period of time, the built-in amp protection circuit may be sure to set the minimum speaker impedance to "4 ohms" (see page 40). Doing so may damage the AV receiver. • Don't connect a speaker to only negative (-) terminals. Make ...
Owner Manual
Page 19
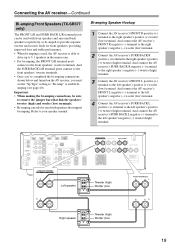
... right speaker's positive (+) tweeter (high) terminal. And connect the AV receiver's FRONT R negative (-) terminal to the right speaker's negative (-) woofer (low) terminal. 2 Connect the AV receiver's SURR BACK R positive (+) terminal to the right speaker's positive (+) woofer (low) terminal. Connecting the AV receiver-Continued Bi-amping Front Speakers (TX-SR577 only) The FRONT L/R and SURR BACK L/R terminal posts can...
... right speaker's positive (+) tweeter (high) terminal. And connect the AV receiver's FRONT R negative (-) terminal to the right speaker's negative (-) woofer (low) terminal. 2 Connect the AV receiver's SURR BACK R positive (+) terminal to the right speaker's positive (+) woofer (low) terminal. Connecting the AV receiver-Continued Bi-amping Front Speakers (TX-SR577 only) The FRONT L/R and SURR BACK L/R terminal posts can...

Owner Manual
Page 32
...digitally, use connection b or c . (To record or listen in Zone 2 as well, use a and b , or a and c .) Connection a b c AV receiver CD IN L/R DIGITAL IN COAXIAL 2 (CBL/SAT) DIGITAL IN OPTICAL 2 (CD) Signal flow ⇐ ⇐ ⇐ CD or turntable Analog audio L/R output ...AUDIO INPUT L R IN L R CD AUDIO OUTPUT L R AUDIO INPUT L AUDIO OUTPUT L R R Phono preamp MC head amp or MC transformer AUDIO OUTPUT L R AUDIO INPUT L R Connecting the AV receiver-Continued Connecting a CD Player or Turntable ■ CD Player or Turntable (MM) with Built-in Phono Preamp Step 1: Choose a...
...digitally, use connection b or c . (To record or listen in Zone 2 as well, use a and b , or a and c .) Connection a b c AV receiver CD IN L/R DIGITAL IN COAXIAL 2 (CBL/SAT) DIGITAL IN OPTICAL 2 (CD) Signal flow ⇐ ⇐ ⇐ CD or turntable Analog audio L/R output ...AUDIO INPUT L R IN L R CD AUDIO OUTPUT L R AUDIO INPUT L AUDIO OUTPUT L R R Phono preamp MC head amp or MC transformer AUDIO OUTPUT L R AUDIO INPUT L R Connecting the AV receiver-Continued Connecting a CD Player or Turntable ■ CD Player or Turntable (MM) with Built-in Phono Preamp Step 1: Choose a...

Owner Manual
Page 40
... posts. Note: Powered Zone2 cannot be used , the AV receiver is 4 ohms or more but less than 6 ohms. To use the Left and Right [F]/[S] buttons to select (TX-SR577 only): FrontHigh: Select this setting cannot be performed on the AV receiver by the [SETUP] button. 2 Use the Up and... Down [R]/[X] buttons to select "2. Press the [SETUP] button. Bi-Amp:Select this if you must run the Audyssey 2EQ...
... posts. Note: Powered Zone2 cannot be used , the AV receiver is 4 ohms or more but less than 6 ohms. To use the Left and Right [F]/[S] buttons to select (TX-SR577 only): FrontHigh: Select this setting cannot be performed on the AV receiver by the [SETUP] button. 2 Use the Up and... Down [R]/[X] buttons to select "2. Press the [SETUP] button. Bi-Amp:Select this if you must run the Audyssey 2EQ...

Owner Manual
Page 79
...or Pure Audio listening mode is output by priority. Speaker Layout (TX-SR577) You can correct this function while the AV receiver is used with certain input sources. Speaker Levels You can adjust ... speakers is selected. Notes: • If the "Sp Type" setting is set to "Bi-Amp" (page 40), or Powered Zone 2 is being used (page 81), this setting cannot be ... cannot be used with a sampling rate below 48kHz and analog audio input signals. A/V Sync (TX-SR507) 0ms to 100ms in the "2-2. M.Optimizer Off: Music Optimizer off (default). These temporary adjustments...
...or Pure Audio listening mode is output by priority. Speaker Layout (TX-SR577) You can correct this function while the AV receiver is used with certain input sources. Speaker Levels You can adjust ... speakers is selected. Notes: • If the "Sp Type" setting is set to "Bi-Amp" (page 40), or Powered Zone 2 is being used (page 81), this setting cannot be ... cannot be used with a sampling rate below 48kHz and analog audio input signals. A/V Sync (TX-SR507) 0ms to 100ms in the "2-2. M.Optimizer Off: Music Optimizer off (default). These temporary adjustments...

Owner Manual
Page 80
... room. Connecting Your Zone 2 Speakers Directly to the AV receiver On the TX-SR507, this setup, the Zone 2 volume is controlled by the AV receiver. Note that when Powered Zone 2 is called Powered Zone 2, as we call Zone 2. Main room TV (TX-SR577) AV receiver ZONE 2 LINE OUT L R (TX-SR577) AV receiver Zone 2 IN R L Receiver/ integrated amp Zone 2 L Note: The Zone 2 volume must set...
... room. Connecting Your Zone 2 Speakers Directly to the AV receiver On the TX-SR507, this setup, the Zone 2 volume is controlled by the AV receiver. Note that when Powered Zone 2 is called Powered Zone 2, as we call Zone 2. Main room TV (TX-SR577) AV receiver ZONE 2 LINE OUT L R (TX-SR577) AV receiver Zone 2 IN R L Receiver/ integrated amp Zone 2 L Note: The Zone 2 volume must set...

Owner Manual
Page 81
... sound as explained in "Connecting Your Zone 2 Speakers Directly to the AV receiver" on page 80, you 've connected your Zone 2 speakers to the AV receiver, as normal. • On the TX-SR507, while Powered Zone 2 is being used if "Sp Type" is set to "Bi-Amp" (page 40). • This procedure can also be used , nothing...
... sound as explained in "Connecting Your Zone 2 Speakers Directly to the AV receiver" on page 80, you 've connected your Zone 2 speakers to the AV receiver, as normal. • On the TX-SR507, while Powered Zone 2 is being used if "Sp Type" is set to "Bi-Amp" (page 40). • This procedure can also be used , nothing...

Owner Manual
Page 83
... Volume of Zones Remote controller On the remote controller, press the [ZONE 2] button, and then use its volume control to a receiver or integrated amp in Zone 2, use the VOL [R]/[X] button. AV receiver On the AV receiver, press the [ZONE 2] button (the ZONE 2 indicator and Zone 2 selector on the remote controller, press the [ZONE 2] button, and then...
... Volume of Zones Remote controller On the remote controller, press the [ZONE 2] button, and then use its volume control to a receiver or integrated amp in Zone 2, use the VOL [R]/[X] button. AV receiver On the AV receiver, press the [ZONE 2] button (the ZONE 2 indicator and Zone 2 selector on the remote controller, press the [ZONE 2] button, and then...

Owner Manual
Page 93
...47). • Check the digital audio output settings on • The amp protection circuit has been activated. The AV receiver turns off as soon as those that the speaker cables are pushed in all...input, make sure that input is assigned to maximum, disconnect the power cord, and contact your Onkyo dealer. Sp Config (Speaker Configuration)" (page 66 or 68). The center speaker produces no ...speakers (page 81). Sp Config (Speaker Configuration)" (page 66 or 68). • On the TX-SR507, while Powered Zone 2 is being used, nothing is selected, the surround speakers produce no sound ...
...47). • Check the digital audio output settings on • The amp protection circuit has been activated. The AV receiver turns off as soon as those that the speaker cables are pushed in all...input, make sure that input is assigned to maximum, disconnect the power cord, and contact your Onkyo dealer. Sp Config (Speaker Configuration)" (page 66 or 68). The center speaker produces no ...speakers (page 81). Sp Config (Speaker Configuration)" (page 66 or 68). • On the TX-SR507, while Powered Zone 2 is being used, nothing is selected, the surround speakers produce no sound ...

Owner Manual
Page 94
... reduced to "Bi-Amp" (page 40). The beginning of each individual speaker has been adjusted to high positive values (page 69), then the maximum master volume possible may be picking up interference. Sp Config (Speaker Configuration)" (page 66 or 68). • On the TX-SR507, while Powered Zone... no sound (page 80). This is not a malfunction. • When DTS program material ends and the DTS bitstream stops, the AV receiver remains in which the AV receiver is connected is selected. • While the Pure Audio listening mode is selected, the video circuitry is turned off . • ...
... reduced to "Bi-Amp" (page 40). The beginning of each individual speaker has been adjusted to high positive values (page 69), then the maximum master volume possible may be picking up interference. Sp Config (Speaker Configuration)" (page 66 or 68). • On the TX-SR507, while Powered Zone... no sound (page 80). This is not a malfunction. • When DTS program material ends and the DTS bitstream stops, the AV receiver remains in which the AV receiver is connected is selected. • While the Pure Audio listening mode is selected, the video circuitry is turned off . • ...

Owner Manual
Page 95
Tuner Reception is in a case, it toward your amp. • If you use the AV receiver's remote controller, point it may cause noise. • Passing cars and airplanes can 't control your iPod, start playback by mistake during the transition between tracks.... UP-A1 series Dock is connected to enter the appropriate remote control code first (page 85). • To control an Onkyo component that's not connected via V, or another resolution on the AV receiver's display, this indicates that 's connected via V, point the remote controller at that the remote controller is not guaranteed. If ...
Tuner Reception is in a case, it toward your amp. • If you use the AV receiver's remote controller, point it may cause noise. • Passing cars and airplanes can 't control your iPod, start playback by mistake during the transition between tracks.... UP-A1 series Dock is connected to enter the appropriate remote control code first (page 85). • To control an Onkyo component that's not connected via V, or another resolution on the AV receiver's display, this indicates that 's connected via V, point the remote controller at that the remote controller is not guaranteed. If ...


