
Owner Manual
Page 1
... sound recordings ....... 9 Tape dubbing 10 Useful recording functions 11 Connecting Onkyo components for future reference. Please read this manual will enable you for purchasing an Onkyo Stereo Cassette Tape Deck. Please retain this manual for z operation 12 Appendix Handling cassette tapes 13 Cassette deck maintenance 14 Specifications 14 Troubleshooting guide 15 En Following the instructions in this manual thoroughly before making connections and plugging in the unit. TA-RW255_En.book Page 1 Tuesday, April 19, 2005 4:36 PM Stereo Cassette Tape Deck TA-RW255 Instruction...
... sound recordings ....... 9 Tape dubbing 10 Useful recording functions 11 Connecting Onkyo components for future reference. Please read this manual will enable you for purchasing an Onkyo Stereo Cassette Tape Deck. Please retain this manual for z operation 12 Appendix Handling cassette tapes 13 Cassette deck maintenance 14 Specifications 14 Troubleshooting guide 15 En Following the instructions in this manual thoroughly before making connections and plugging in the unit. TA-RW255_En.book Page 1 Tuesday, April 19, 2005 4:36 PM Stereo Cassette Tape Deck TA-RW255 Instruction...
Owner Manual
Page 2
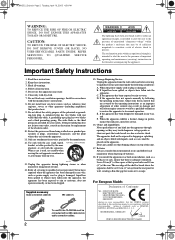
... storms or when unused for replacement of the obsolete outlet. 10. Adjust only those controls that may be of sufficient magnitude to persons. Keep these instructions. 2. Clean only with an z cable and an audio connection cables. 2 15. Only use z, the TA-RW255 must be set 10 cm (4") away from tip-over. Unplug this unit. 17. Supplied accessory Audio connection cable (2) z cable (1) To use attachments/accessories specifi...
... storms or when unused for replacement of the obsolete outlet. 10. Adjust only those controls that may be of sufficient magnitude to persons. Keep these instructions. 2. Clean only with an z cable and an audio connection cables. 2 15. Only use z, the TA-RW255 must be set 10 cm (4") away from tip-over. Unplug this unit. 17. Supplied accessory Audio connection cable (2) z cable (1) To use attachments/accessories specifi...

Owner Manual
Page 3
...with an appropriate fuse. The wire which is coloured brown must be connected to three hours. Check for personal use this Unit with the letter L or coloured red. Setting the [STANDBY/ON] switch to cassette tapes). Never Touch ...rear panels may damage the finish or remove the panel lettering. 4. Make sure that indicated on this unit or its power cord while your Onkyo dealer. 3. If you 've finished using this unit should be replaced, the replacement fuse must be connected to pack it how it off the power. 7. Therefore, this unit, remove cassettes and turn...
...with an appropriate fuse. The wire which is coloured brown must be connected to three hours. Check for personal use this Unit with the letter L or coloured red. Setting the [STANDBY/ON] switch to cassette tapes). Never Touch ...rear panels may damage the finish or remove the panel lettering. 4. Make sure that indicated on this unit or its power cord while your Onkyo dealer. 3. If you 've finished using this unit should be replaced, the replacement fuse must be connected to pack it how it off the power. 7. Therefore, this unit, remove cassettes and turn...
Owner Manual
Page 4
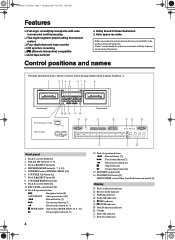
... 1. Deck A r EJECT button [6] 4. COUNTER A/B button [8] 7. COUNTER RESET button [8] 9. REVERSE MODE button [6, 7, 8, 10] 5. Deck B r EJECT button [8] 8. Deck B operation buttons t : Rec/pause button [8] AUTO SPACE : Auto space button [11] d : Rewind button [7] f : Fast forward button [7] a : Reverse play button [6, 9] e DUBB.STOP : Stop button (DUBB.STOP) [6, 9, 10] s : Forward play button [6] 13. STANDBY/ON button [5] MAIN POWER switch (Other than North American model) [5] Display a Deck A direction indicator b Reverse mode indicator c Dubbing indicators d Dolby...
... 1. Deck A r EJECT button [6] 4. COUNTER A/B button [8] 7. COUNTER RESET button [8] 9. REVERSE MODE button [6, 7, 8, 10] 5. Deck B r EJECT button [8] 8. Deck B operation buttons t : Rec/pause button [8] AUTO SPACE : Auto space button [11] d : Rewind button [7] f : Fast forward button [7] a : Reverse play button [6, 9] e DUBB.STOP : Stop button (DUBB.STOP) [6, 9, 10] s : Forward play button [6] 13. STANDBY/ON button [5] MAIN POWER switch (Other than North American model) [5] Display a Deck A direction indicator b Reverse mode indicator c Dubbing indicators d Dolby...
Owner Manual
Page 5
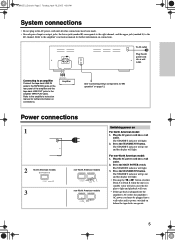
... TAPE REC jacks on For North American model: 1. Plug the AC power cord into a wall outlet. The STANDBY indicator will light. 2. Press the STANDBY/ON button. The STANDBY indicator will go out and the display will light. • Pressing the a or s button of input or output jacks, the lower jack (marked R) corresponds to the right channel, and the upper jack (marked L) to the amplifier's instruction manual for further information on connections. Plug...
... TAPE REC jacks on For North American model: 1. Plug the AC power cord into a wall outlet. The STANDBY indicator will light. 2. Press the STANDBY/ON button. The STANDBY indicator will go out and the display will light. • Pressing the a or s button of input or output jacks, the lower jack (marked R) corresponds to the right channel, and the upper jack (marked L) to the amplifier's instruction manual for further information on connections. Plug...
Owner Manual
Page 6
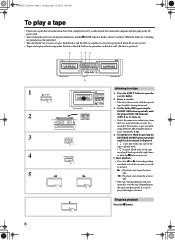
... noise reduction system that all connections have been completed exactly as indicated in the connections diagram and then plug in the AC power cord. • After turning the power on which side of auto-reverse playback; Set the Reverse Mode by pressing the DOLBY NR button repeatedly until the desired mode is displayed. ( v ) one side: Only one side of the tape is pressed. 5. a : Playback starts from...
... noise reduction system that all connections have been completed exactly as indicated in the connections diagram and then plug in the AC power cord. • After turning the power on which side of auto-reverse playback; Set the Reverse Mode by pressing the DOLBY NR button repeatedly until the desired mode is displayed. ( v ) one side: Only one side of the tape is pressed. 5. a : Playback starts from...
Owner Manual
Page 7
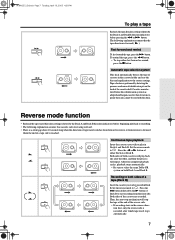
... reverse mode to the correct settings. Both sides of the cassette shell. Both sides of both sides of Deck B to b . Press the t button followed by the s button of a tape (Deck B) Insert the cassette you wish to both cassettes will repeat. Then, the auto-stop mechanism will stop either Deck A or Deck B. TA-RW255_En.book Page 7 Tuesday, April 19, 2005 4:36 PM A A A A To play a tape Recheck the tape direction settings...
... reverse mode to the correct settings. Both sides of the cassette shell. Both sides of both sides of Deck B to b . Press the t button followed by the s button of a tape (Deck B) Insert the cassette you wish to both cassettes will repeat. Then, the auto-stop mechanism will stop either Deck A or Deck B. TA-RW255_En.book Page 7 Tuesday, April 19, 2005 4:36 PM A A A A To play a tape Recheck the tape direction settings...
Owner Manual
Page 8
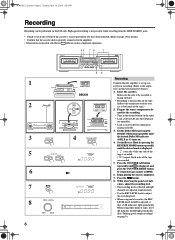
... adjusted simultaneously. • Use the REC LEVEL knob to the amplifier. • Illustrations enclosed in the desired station on the tuner. • Load a CD (or LP) into the CD player (or turntable). • Load a cassette into the tape player (analog or DAT). 3. Make sure the side to be performed on Deck B only. Press the t button. 8. ONKYO 34 7 5 1 89 1 DECK B 2 3 DOLBY NR 4 REVERSE MODE 5 6 COUNTER A/B RESET DECK-B PLAY...
... adjusted simultaneously. • Use the REC LEVEL knob to the amplifier. • Illustrations enclosed in the desired station on the tuner. • Load a CD (or LP) into the CD player (or turntable). • Load a cassette into the tape player (analog or DAT). 3. Make sure the side to be performed on Deck B only. Press the t button. 8. ONKYO 34 7 5 1 89 1 DECK B 2 3 DOLBY NR 4 REVERSE MODE 5 6 COUNTER A/B RESET DECK-B PLAY...
Owner Manual
Page 9
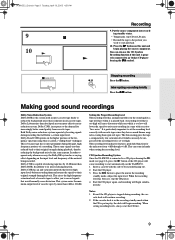
... systems operate by more than Dolby B NR. It is played back. This can also use the CD Synchro Recording function if this unit and begin playing the source component. TA-RW255_En.book Page 9 Tuesday, April 19, 2005 4:36 PM 9 10 e s Recording 9. This is because tape hiss is inherent in the recording standby mode when the CD is set , stop CD (or LP) play , the deck...
... systems operate by more than Dolby B NR. It is played back. This can also use the CD Synchro Recording function if this unit and begin playing the source component. TA-RW255_En.book Page 9 Tuesday, April 19, 2005 4:36 PM 9 10 e s Recording 9. This is because tape hiss is inherent in the recording standby mode when the CD is set , stop CD (or LP) play , the deck...
Owner Manual
Page 10
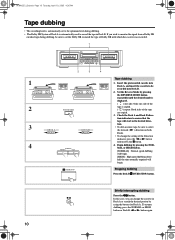
TA-RW255_En.book Page 10 Tuesday, April 19, 2005 4:36 PM Tape dubbing • The recording level is automatically set the Dolby NR to select the forward ( s ) direction on both Decks. • To change the cassette in Deck A or search the desired portion by using the buttons for Deck A. Insert the prerecorded cassette into Deck B. 2. Set the Reverse Mode by the e button. 4. t Briefly interrupting dubbing Press the t button. Check the...
TA-RW255_En.book Page 10 Tuesday, April 19, 2005 4:36 PM Tape dubbing • The recording level is automatically set the Dolby NR to select the forward ( s ) direction on both Decks. • To change the cassette in Deck A or search the desired portion by using the buttons for Deck A. Insert the prerecorded cassette into Deck B. 2. Set the Reverse Mode by the e button. 4. t Briefly interrupting dubbing Press the t button. Check the...

Owner Manual
Page 11
...deck will return to the dubbing pause mode. To continue recording, press the a or s button. • The AUTO SPACE button works in Deck B. Press AUTO SPACE button at any point during dubbing causes Deck A to stop while a blank space is released. AUTO SPACE Pressing the AUTO SPACE button during dubbing Pressing the AUTO SPACE button... PLAY indicator flashes on the tape in both the record and rec/pause modes. Press the t button and the a or s button to begin recording. 2. TA-RW255_En.book Page 11 Tuesday, April 19, 2005 4:36 PM Useful recording functions 21 ONKYO 1 t 2 AUTO ...
...deck will return to the dubbing pause mode. To continue recording, press the a or s button. • The AUTO SPACE button works in Deck B. Press AUTO SPACE button at any point during dubbing causes Deck A to stop while a blank space is released. AUTO SPACE Pressing the AUTO SPACE button during dubbing Pressing the AUTO SPACE button... PLAY indicator flashes on the tape in both the record and rec/pause modes. Press the t button and the a or s button to begin recording. 2. TA-RW255_En.book Page 11 Tuesday, April 19, 2005 4:36 PM Useful recording functions 21 ONKYO 1 t 2 AUTO ...

Owner Manual
Page 12
..., receiver or CD player bearing the z symbol using the remote control cable. It automatically starts recording on the cassette deck when the s button of the master unit. plished using the remote control of the CD player is properly connected to another Onkyo component bearing the z symbol, you must make an analog audio connection between the TA-RW255 and the other component. TA-RW255_En.book Page 12 Tuesday, April 19, 2005 4:36 PM Connecting Onkyo components for z operation If...
..., receiver or CD player bearing the z symbol using the remote control cable. It automatically starts recording on the cassette deck when the s button of the master unit. plished using the remote control of the CD player is properly connected to another Onkyo component bearing the z symbol, you must make an analog audio connection between the TA-RW255 and the other component. TA-RW255_En.book Page 12 Tuesday, April 19, 2005 4:36 PM Connecting Onkyo components for z operation If...

Owner Manual
Page 13
...(s). Endless tapes Do not use the recording button with such a cassette. 2 If at some later date you wish to protect a recording from accidental erasure, break off the tab(s) on the pinch roller or capstan. 2. Tape storage • Do not touch the tape surface. • Do not put tapes near magnetic sources (speakers, amplifiers, TVs, etc.) Your No! light. A •...
...(s). Endless tapes Do not use the recording button with such a cassette. 2 If at some later date you wish to protect a recording from accidental erasure, break off the tab(s) on the pinch roller or capstan. 2. Tape storage • Do not touch the tape surface. • Do not put tapes near magnetic sources (speakers, amplifiers, TVs, etc.) Your No! light. A •...
Owner Manual
Page 14
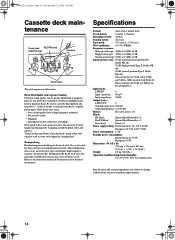
... prevent these problems, clean the heads, pinch rollers and capstans with Dolby C. ble with a cotton swab dipped in the heads after the cassette deck has been used for detailed instructions. Noise reduction of product improvements. 14 This buildup introduces noise and static into tapes and impairs high frequency response. Be sure to clean the head periodically, normally 2 - 3 times a month...
... prevent these problems, clean the heads, pinch rollers and capstans with Dolby C. ble with a cotton swab dipped in the heads after the cassette deck has been used for detailed instructions. Noise reduction of product improvements. 14 This buildup introduces noise and static into tapes and impairs high frequency response. Be sure to clean the head periodically, normally 2 - 3 times a month...

Owner Manual
Page 15
...(s) removed. Remedy: Clean head (see page 14). Remedy: Replace cassette. • Excessive noise and tape hiss. Remedy: Clean (see page 14). Cause: Connecting cables not inserted firmly. Cause: Incorrect equalization. Remedy: Select the appropriate NR mode using this guide, contact an Onkyo authorized service center for assistance. • No power. Cause: Incorrect connection. Remedy: Change switch position. • Tape does not move. Cause: Playback head dirty. Cause...
...(s) removed. Remedy: Clean head (see page 14). Remedy: Replace cassette. • Excessive noise and tape hiss. Remedy: Clean (see page 14). Cause: Connecting cables not inserted firmly. Cause: Incorrect equalization. Remedy: Select the appropriate NR mode using this guide, contact an Onkyo authorized service center for assistance. • No power. Cause: Incorrect connection. Remedy: Change switch position. • Tape does not move. Cause: Playback head dirty. Cause...
Owner Manual
Page 16
... Chung, N.T., HONG KONG Tel: 852-2429-3118 Fax: 852-2428-9039 http://www.ch.onkyo.com/ HOMEPAGE http://www.onkyo.com/ I0504-1 SN 29343966 16 (C) Copyright 2005 ONKYO CORPORATION Japan. TA-RW255_En.book Page 16 Tuesday, April 19, 2005 4:36 PM Sales & Product Planning Div. : 2-1, Nisshin-cho, Neyagawa-shi, OSAKA 572-8540, JAPAN Tel: 072...
... Chung, N.T., HONG KONG Tel: 852-2429-3118 Fax: 852-2428-9039 http://www.ch.onkyo.com/ HOMEPAGE http://www.onkyo.com/ I0504-1 SN 29343966 16 (C) Copyright 2005 ONKYO CORPORATION Japan. TA-RW255_En.book Page 16 Tuesday, April 19, 2005 4:36 PM Sales & Product Planning Div. : 2-1, Nisshin-cho, Neyagawa-shi, OSAKA 572-8540, JAPAN Tel: 072...


