
Owner Manual
Page 1
... the Listening Modes .......... 57 Advanced Operation 67 Troubleshooting 96 En Please read this manual thoroughly before making connections and plugging in this manual for purchasing an Onkyo 7.1ch Home Theater System. 7.1ch Home Theater System HT-S7100 AV Receiver (TX-SR606) Instruction Manual Contents Introduction 2 Connection 14 Turning On & First Time Setup..... 37 Basic Operation Playing...
... the Listening Modes .......... 57 Advanced Operation 67 Troubleshooting 96 En Please read this manual thoroughly before making connections and plugging in this manual for purchasing an Onkyo 7.1ch Home Theater System. 7.1ch Home Theater System HT-S7100 AV Receiver (TX-SR606) Instruction Manual Contents Introduction 2 Connection 14 Turning On & First Time Setup..... 37 Basic Operation Playing...
Owner Manual
Page 4
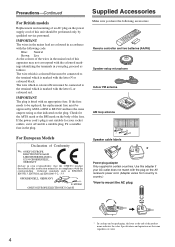
... color. If the power cord's plug is not suitable for the ASTA mark or the BSI mark on the body of Conformity We, ONKYO EUROPE ELECTRONICS GmbH LIEGNITZERSTRASSE 6, 82194 GROEBENZELL, GERMANY declare in own responsibility, that indicated on packaging, the letter at the end of this...black. Use this apparatus may not correspond with the coloured markings identifying the terminals in your plug, proceed as that the ONKYO product described in this instruction manual is marked with an appropriate fuse. Fit a suitable fuse in the mains lead are the same regardless of this adapter ...
... color. If the power cord's plug is not suitable for the ASTA mark or the BSI mark on the body of Conformity We, ONKYO EUROPE ELECTRONICS GmbH LIEGNITZERSTRASSE 6, 82194 GROEBENZELL, GERMANY declare in own responsibility, that indicated on packaging, the letter at the end of this...black. Use this apparatus may not correspond with the coloured markings identifying the terminals in your plug, proceed as that the ONKYO product described in this instruction manual is marked with an appropriate fuse. Fit a suitable fuse in the mains lead are the same regardless of this adapter ...
Owner Manual
Page 9
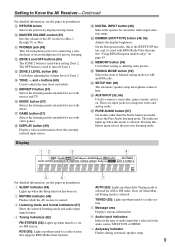
... input source. T DIMMER (RT/PTY/TP) button (48, 56) Adjusts the display brightness. V TUNING MODE button (52) Selects the Auto or Manual tuning mode for composite video and analog audio. There are input jacks for AM and FM radio. The indicator lights up when this button again... off Zone 2. Q GAME button (57) Selects the listening modes intended for private listening. RDS (55): Lights up when tuned to turn off when Manual Tuning mode is for automatic audio input selection setup. On the European modes, this is selected. U MEMORY button (54) Used when storing or deleting radio...
... input source. T DIMMER (RT/PTY/TP) button (48, 56) Adjusts the display brightness. V TUNING MODE button (52) Selects the Auto or Manual tuning mode for composite video and analog audio. There are input jacks for AM and FM radio. The indicator lights up when this button again... off Zone 2. Q GAME button (57) Selects the listening modes intended for private listening. RDS (55): Lights up when tuned to turn off when Manual Tuning mode is for automatic audio input selection setup. On the European modes, this is selected. U MEMORY button (54) Used when storing or deleting radio...

Owner Manual
Page 15
... typically have . Connecting Your Speakers-Continued Speaker Configuration For 7.1-channel surround-sound playback, you need to do this automatically (see page 38) or manually (see page 72). Subwoofer 2. Dipole speakers TV/screen 1 2 3 4 Normal speakers TV/screen 1 2 3 4 Connecting a Powered Subwoofer Using a suitable cable, connect the AV receiver's PRE OUT: SUBWOOFER...
... typically have . Connecting Your Speakers-Continued Speaker Configuration For 7.1-channel surround-sound playback, you need to do this automatically (see page 38) or manually (see page 72). Subwoofer 2. Dipole speakers TV/screen 1 2 3 4 Normal speakers TV/screen 1 2 3 4 Connecting a Powered Subwoofer Using a suitable cable, connect the AV receiver's PRE OUT: SUBWOOFER...

Owner Manual
Page 17
Refer to the left speaker's negative (-) tweeter (high) terminal. 4 Connect the AV receiver's SURR BACK L positive (+) terminal to your speaker manual. And connect the AV receiver's FRONT L negative (-) terminal to the left speaker's positive (+) woofer (low) terminal. Bi-amping Speaker Hookup 1 Connect the AV receiver's FRONT R ...
Refer to the left speaker's negative (-) tweeter (high) terminal. 4 Connect the AV receiver's SURR BACK L positive (+) terminal to your speaker manual. And connect the AV receiver's FRONT L negative (-) terminal to the left speaker's positive (+) woofer (low) terminal. Bi-amping Speaker Hookup 1 Connect the AV receiver's FRONT R ...
Owner Manual
Page 20
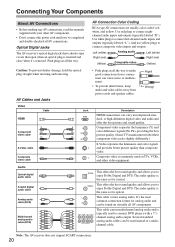
... you to connect left-channel audio inputs and outputs (typically labeled "L"). Connecting Your Components About AV Connections • Before making any AV connections, read the manuals supplied with a 7.1channel analog audio output. Optical Digital Jacks The AV receiver's optical digital jacks have shutter-type covers that open when an optical plug...
... you to connect left-channel audio inputs and outputs (typically labeled "L"). Connecting Your Components About AV Connections • Before making any AV connections, read the manuals supplied with a 7.1channel analog audio output. Optical Digital Jacks The AV receiver's optical digital jacks have shutter-type covers that open when an optical plug...

Owner Manual
Page 27
... via the same type of connection. Likewise, video signals connected to S-Video inputs can only be recorded via the VCR/DVR OUT V jack. See the manuals supplied with your TV or VCR/DVR for Recording Step 1: Video Connection Choose a video connection that matches your source TV or VCR is connected to...
... via the same type of connection. Likewise, video signals connected to S-Video inputs can only be recorded via the VCR/DVR OUT V jack. See the manuals supplied with your TV or VCR/DVR for Recording Step 1: Video Connection Choose a video connection that matches your source TV or VCR is connected to...
Owner Manual
Page 31
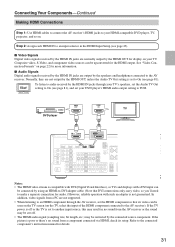
...; The HDMI audio signal (sampling rate, bit length, etc.) may result in the HDMI Input Setup (see page 81). Refer to the connected component's instruction manual for audio.) However, reliable operation with a DVI input can be upconverted for more information. ■ Audio Signals Digital audio signals received by the HDMI IN...
...; The HDMI audio signal (sampling rate, bit length, etc.) may result in the HDMI Input Setup (see page 81). Refer to the connected component's instruction manual for audio.) However, reliable operation with a DVI input can be upconverted for more information. ■ Audio Signals Digital audio signals received by the HDMI IN...

Owner Manual
Page 35
... RI MODE switch to HDD or HDD/DOCK. • Set the AV receiver's Input Display to DOCK (see the RI Dock's instruction manual. ■ If Your iPod Supports Video: Connect your RI Dock's audio output jacks to the AV receiver's GAME/TV IN L/R jacks...IN IN OUT IN OUT IN IN IN OUT L REMOTE CONTROL R CD TAPE GAME/TV CBL/SAT VCR/DV If you have an Onkyo DS-A1 RI Dock, connect its video output jack to the AV receiver's GAME/TV IN V jack. ■ If Your iPod... iPod models are supported by the RI Dock, see page 45). • See the RI Dock's instruction manual for more information. 35
... RI MODE switch to HDD or HDD/DOCK. • Set the AV receiver's Input Display to DOCK (see the RI Dock's instruction manual. ■ If Your iPod Supports Video: Connect your RI Dock's audio output jacks to the AV receiver's GAME/TV IN L/R jacks...IN IN OUT IN OUT IN IN IN OUT L REMOTE CONTROL R CD TAPE GAME/TV CBL/SAT VCR/DV If you have an Onkyo DS-A1 RI Dock, connect its video output jack to the AV receiver's GAME/TV IN V jack. ■ If Your iPod... iPod models are supported by the RI Dock, see page 45). • See the RI Dock's instruction manual for more information. 35
Owner Manual
Page 36
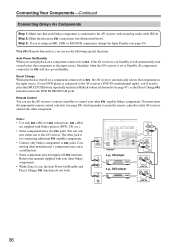
...'s DVD IN (multichannel input), you can use the AV receiver's remote controller to Standby, all functions. Connecting other -capable Onkyo components. And remember to hear all channels (see page 45). cables are supplied with an analog audio cable (RCA). Refer ...DVD e.g., CD player e.g., DVD player R L ANALOG AUDIO OUT R L ANALOG AUDIO OUT 36 Remote Control You can connect either one to the manuals supplied with your other manufacturer's components may cause a malfunction. • Some components may not support all components connected via , the AV receiver ...
...'s DVD IN (multichannel input), you can use the AV receiver's remote controller to Standby, all functions. Connecting other -capable Onkyo components. And remember to hear all channels (see page 45). cables are supplied with an analog audio cable (RCA). Refer ...DVD e.g., CD player e.g., DVD player R L ANALOG AUDIO OUT R L ANALOG AUDIO OUT 36 Remote Control You can connect either one to the manuals supplied with your other manufacturer's components may cause a malfunction. • Some components may not support all components connected via , the AV receiver ...

Owner Manual
Page 41
...properly. Make sure speakers that cannot be emitting sound that if the volume is too high. Writing Error! Changing the Speaker Settings Manually If you 're using a powered subwoofer and it outputs very low-frequency sound at a low volume level, it to the .... FL : Yes SL : --SBL : No C : Yes FR : Yes SR : Yes SBR : Yes SW : --- Retry Cancel This message appears if saving fails. Contact your Onkyo dealer. First Time Setup-Continued Auto Speaker Setup AUDYSSEY - - - - - Speaker Detect Error - - - - - Cancel: Cancel the automatic speaker setup. 41 Auto Speaker Setup AUDYSSEY ...
...properly. Make sure speakers that cannot be emitting sound that if the volume is too high. Writing Error! Changing the Speaker Settings Manually If you 're using a powered subwoofer and it outputs very low-frequency sound at a low volume level, it to the .... FL : Yes SL : --SBL : No C : Yes FR : Yes SR : Yes SBR : Yes SW : --- Retry Cancel This message appears if saving fails. Contact your Onkyo dealer. First Time Setup-Continued Auto Speaker Setup AUDYSSEY - - - - - Speaker Detect Error - - - - - Cancel: Cancel the automatic speaker setup. 41 Auto Speaker Setup AUDYSSEY ...

Owner Manual
Page 50
... no sound. Common Functions-Continued Specifying the Digital Signal Format The following issues when playing PCM or DTS sources, you can specify the signal format manually. • If the beginnings of tracks from a PCM source are cut off, try the PCM setting. • If noise is produced when fast forwarding or...
... no sound. Common Functions-Continued Specifying the Digital Signal Format The following issues when playing PCM or DTS sources, you can specify the signal format manually. • If the beginnings of tracks from a PCM source are cut off, try the PCM setting. • If noise is produced when fast forwarding or...

Owner Manual
Page 52
...With the built-in 0.2MHz steps, 10kHz steps for AM. The North American model changes FM frequency in tuner, you release the button. In Manual Tuning mode, FM stations will be impossible to the station in mono. Searching stops when a station is weak, it 's 0.05MHz steps for ... Listening to the Radio-Continued Listening to change the frequency one step at a time. Band Frequency (Actual display depends on the display. ■ Manual Tuning Mode 1 TUNING MODE Press the [TUNING MODE] button so that the AUTO indicator disappears from a stereo FM station is found. The frequency ...
...With the built-in 0.2MHz steps, 10kHz steps for AM. The North American model changes FM frequency in tuner, you release the button. In Manual Tuning mode, FM stations will be impossible to the station in mono. Searching stops when a station is weak, it 's 0.05MHz steps for ... Listening to the Radio-Continued Listening to change the frequency one step at a time. Band Frequency (Actual display depends on the display. ■ Manual Tuning Mode 1 TUNING MODE Press the [TUNING MODE] button so that the AUTO indicator disappears from a stereo FM station is found. The frequency ...

Owner Manual
Page 68
... angle is 3. This setting works well when the listening position is 40 degrees (default). 68 Wide: Select if the listening angle is considerably off center. Manual: When the source is Dolby EX, you can select any of the listening modes compatible with this setting, you can specify by how much the...
... angle is 3. This setting works well when the listening position is 40 degrees (default). 68 Wide: Select if the listening angle is considerably off center. Manual: When the source is Dolby EX, you can select any of the listening modes compatible with this setting, you can specify by how much the...

Owner Manual
Page 72
...Down [ ]/[ ] buttons to No. Note: • Fixed at Full Band if Subwoofer (step 4) is selected on your speakers' manuals to select "2. Some of the speaker. Sounds below the crossover fre- Speaker Configuration This setting is set automatically by the ...with a good sized woofer. Advanced Setup Speaker Setup 3 This section explains how to check the speaker settings and how to set them manually, which speakers are set automatically by the Automatic Speaker Setup function (see page 38). mine the optimum crossover frequencies. 1 Press the...
...Down [ ]/[ ] buttons to No. Note: • Fixed at Full Band if Subwoofer (step 4) is selected on your speakers' manuals to select "2. Some of the speaker. Sounds below the crossover fre- Speaker Configuration This setting is set automatically by the ...with a good sized woofer. Advanced Setup Speaker Setup 3 This section explains how to check the speaker settings and how to set them manually, which speakers are set automatically by the Automatic Speaker Setup function (see page 38). mine the optimum crossover frequencies. 1 Press the...

Owner Manual
Page 76
...Audyssey, go to step 8. 8 Press the [SETUP] button. The main menu appears onscreen. Equalizer Settings Equalizer Channel 63Hz 250Hz 1000Hz 4000Hz 16000Hz Manual Front 0dB 0dB 0dB 0dB 0dB Use the Up and Down [ ]/[ ] buttons to select "5. Tip: Low frequencies (e.g., 63Hz) affect bass sounds;... If you selected Manual, continue with this setting after having performed the Automatic Speaker Setup. To set the volume of individual speakers. Use the Left and Right [ ]/[ ...
...Audyssey, go to step 8. 8 Press the [SETUP] button. The main menu appears onscreen. Equalizer Settings Equalizer Channel 63Hz 250Hz 1000Hz 4000Hz 16000Hz Manual Front 0dB 0dB 0dB 0dB 0dB Use the Up and Down [ ]/[ ] buttons to select "5. Tip: Low frequencies (e.g., 63Hz) affect bass sounds;... If you selected Manual, continue with this setting after having performed the Automatic Speaker Setup. To set the volume of individual speakers. Use the Left and Right [ ]/[ ...

Owner Manual
Page 82
Lock Setup," and then press [ENTER]. 3 Use the Left and Right [ ]/[ ] buttons to the instruction manuals for your other components. Setup closes. 82 Enable: TV Control enabled. Refer to select: Locked: Setup menus locked. The main menu appears onscreen. If the ...
Lock Setup," and then press [ENTER]. 3 Use the Left and Right [ ]/[ ] buttons to the instruction manuals for your other components. Setup closes. 82 Enable: TV Control enabled. Refer to select: Locked: Setup menus locked. The main menu appears onscreen. If the ...

Owner Manual
Page 94
... does not turn on automatically. (With 3rd generation iPod models, this button, in the RI Dock with the following buttons. Press it will turn the Onkyo DS-A2 or DS-A2X RI Dock on the iPod. H DISPLAY button* Turns on entering a remote control code, see page 45). • See to DOCK.... • Set the RI Dock's RI MODE switch to HDD or HDD/DOCK. • Set the AV receiver's Input Display to the RI Dock's instruction manual for more information. L MENU button* Displays a menu. For details on the backlight for your RI Dock, you can control your iPod is off . • Your...
... does not turn on automatically. (With 3rd generation iPod models, this button, in the RI Dock with the following buttons. Press it will turn the Onkyo DS-A2 or DS-A2X RI Dock on the iPod. H DISPLAY button* Turns on entering a remote control code, see page 45). • See to DOCK.... • Set the RI Dock's RI MODE switch to HDD or HDD/DOCK. • Set the AV receiver's Input Display to the RI Dock's instruction manual for more information. L MENU button* Displays a menu. For details on the backlight for your RI Dock, you can control your iPod is off . • Your...
