
Owner Manual
Page 6
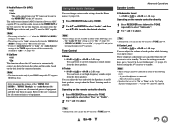
... (Speaker Distance 41 Level Cal (Level Calibration 41 Audio Adjust 42 Source Setup 43 Hardware 44 HDMI Setup 45 Using the Audio Settings 46 Controlling Other Components iPod/iPhone Playback via Onkyo Dock 48 Using the Onkyo Dock 48 Controlling Your iPod/iPhone 49 Controlling Other Onkyo Components 50 Preprogrammed Remote Control Codes 50 Entering Remote...
... (Speaker Distance 41 Level Cal (Level Calibration 41 Audio Adjust 42 Source Setup 43 Hardware 44 HDMI Setup 45 Using the Audio Settings 46 Controlling Other Components iPod/iPhone Playback via Onkyo Dock 48 Using the Onkyo Dock 48 Controlling Your iPod/iPhone 49 Controlling Other Onkyo Components 50 Preprogrammed Remote Control Codes 50 Entering Remote...
Owner Manual
Page 16
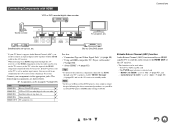
...-mentioned procedure, set your TV doesn't support Audio Return Channel (ARC), you need to "Auto" (➔ page 46). Your TV is selected, and - En-16 Blu-ray Disc/DVD player * If your Bluray Disc/DVD player's HDMI audio settings to PCM. ■ Audio Return Channel (ARC) function Audio Return Channel (...ARC) function enables an HDMI capable TV to send the audio stream to the HDMI OUT of Blu-ray Disc/DVD players, if no sound ...
...-mentioned procedure, set your TV doesn't support Audio Return Channel (ARC), you need to "Auto" (➔ page 46). Your TV is selected, and - En-16 Blu-ray Disc/DVD player * If your Bluray Disc/DVD player's HDMI audio settings to PCM. ■ Audio Return Channel (ARC) function Audio Return Channel (...ARC) function enables an HDMI capable TV to send the audio stream to the HDMI OUT of Blu-ray Disc/DVD players, if no sound ...
Owner Manual
Page 17
... cannot be played through the AV receiver. See "Connection Tips and Video Signal Path" for video recording (➔ page 36). Jack/Port " AUX INPUT VIDEO AUDIO L/R # USB, AUX INPUT VIDEO*1 $ USB*2 % DIGITAL IN OPTICAL 1 (GAME) OPTICAL 2 (TV/CD) COAXIAL (BD/DVD) & COMPONENT VIDEO IN 1 (BD/DVD) IN 2...MD, CD-R, Turntable*3, RI dock Connections Note *1 When USB input is connected to other video outputs, use the AV receiver's display when changing settings. ✔: Assignment can input video signals from the MONITOR OUT jack. *2 Do not connect the AV receiver's USB port to a USB port ...
... cannot be played through the AV receiver. See "Connection Tips and Video Signal Path" for video recording (➔ page 36). Jack/Port " AUX INPUT VIDEO AUDIO L/R # USB, AUX INPUT VIDEO*1 $ USB*2 % DIGITAL IN OPTICAL 1 (GAME) OPTICAL 2 (TV/CD) COAXIAL (BD/DVD) & COMPONENT VIDEO IN 1 (BD/DVD) IN 2...MD, CD-R, Turntable*3, RI dock Connections Note *1 When USB input is connected to other video outputs, use the AV receiver's display when changing settings. ✔: Assignment can input video signals from the MONITOR OUT jack. *2 Do not connect the AV receiver's USB port to a USB port ...

Owner Manual
Page 31
.... " 4 % ' Sound is output from the front left and right channels of the processing set via Home menu are enabled. A/V Sync does not have effect on the analog audio. See "Onscreen Setup" for use with the foreign language soundtracks recorded in the left and right speakers... 9$ Turning On & Basic Operations Listening Mode DSD*2 DSD Dolby Digital Do l b y D Dolby Digital Plus*3 Do l b y D + Dolby TrueHD Description In this mode, audio from the input source is output without surround-sound processing. Use this mode when watching an old movie with a mono soundtrack, or use with DVDs...
.... " 4 % ' Sound is output from the front left and right channels of the processing set via Home menu are enabled. A/V Sync does not have effect on the analog audio. See "Onscreen Setup" for use with the foreign language soundtracks recorded in the left and right speakers... 9$ Turning On & Basic Operations Listening Mode DSD*2 DSD Dolby Digital Do l b y D Dolby Digital Plus*3 Do l b y D + Dolby TrueHD Description In this mode, audio from the input source is output without surround-sound processing. Use this mode when watching an old movie with a mono soundtrack, or use with DVDs...
Owner Manual
Page 33
... to other video outputs, use two sets of the following cases: -The "Audio TV Out" setting is set to the HDMI OUT. Using the Home Menu The Home menu provides quick access to the selected listening mode. See also: • "Using the Audio Settings" (➔ page 46) ■...; Info*1 ` You can view the information of front speakers with the AV receiver: Speakers A for 2-channel stereo playback in the following settings: "Bass", "Treble", "Subwoofer Level", "Center Level", "EX...
... to other video outputs, use two sets of the following cases: -The "Audio TV Out" setting is set to the HDMI OUT. Using the Home Menu The Home menu provides quick access to the selected listening mode. See also: • "Using the Audio Settings" (➔ page 46) ■...; Info*1 ` You can view the information of front speakers with the AV receiver: Speakers A for 2-channel stereo playback in the following settings: "Bass", "Treble", "Subwoofer Level", "Center Level", "EX...
Owner Manual
Page 36
Using Headphones 1 Connect a pair of headphones, the listening mode is set to Stereo, unless it's already set to Stereo, Mono, or Direct. • If you connect an iPod or iPhone to the USB port on the AV receiver, no effect on recording. 2 ...; Always turn down the volume before connecting your recorder, start recording. 3 On the source component, start playback. Turning On & Basic Operations En-36 AV Recording Audio sources can be recorded to a component with a standard plug (1/4 inch or 6.3 mm) to the PHONES jack. The AV receiver's MASTER VOLUME control has no sound...
Using Headphones 1 Connect a pair of headphones, the listening mode is set to Stereo, unless it's already set to Stereo, Mono, or Direct. • If you connect an iPod or iPhone to the USB port on the AV receiver, no effect on recording. 2 ...; Always turn down the volume before connecting your recorder, start recording. 3 On the source component, start playback. Turning On & Basic Operations En-36 AV Recording Audio sources can be recorded to a component with a standard plug (1/4 inch or 6.3 mm) to the PHONES jack. The AV receiver's MASTER VOLUME control has no sound...
Owner Manual
Page 37
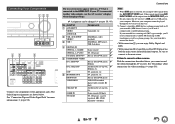
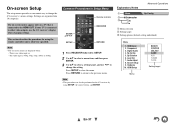
... Config 5. Source Setup 9. Press RETURN to return to close the menu. Level Cal 7. Audio Adjust 8. Hardware 10. HDMI Setup BD/DVD VCR/DVR CBL/SAT GAME AUX TUNER TV/CD Setting target Menu En-37 Explanatory Notes Advanced Operations B Menu C ■ Subwoofer D ` Yes... ` No Sp Config B Menu selection C Setting target D Setting options (default setting underlined) Menu 1. Sp Distance 6. Common Procedures in Setup Menu...
... Config 5. Source Setup 9. Press RETURN to return to close the menu. Level Cal 7. Audio Adjust 8. Hardware 10. HDMI Setup BD/DVD VCR/DVR CBL/SAT GAME AUX TUNER TV/CD Setting target Menu En-37 Explanatory Notes Advanced Operations B Menu C ■ Subwoofer D ` Yes... ` No Sp Config B Menu selection C Setting target D Setting options (default setting underlined) Menu 1. Sp Distance 6. Common Procedures in Setup Menu...

Owner Manual
Page 38
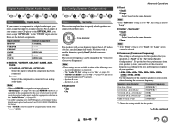
Setup menu items Menu item HDMI Input (➔ page 39) Component (➔ page 39) Digital Audio (➔ page 40) Sp Config (➔ page 40) Sp Distance (➔ page 41) Setting target BD/DVD VCR/DVR CBL/SAT GAME AUX TV/CD BD/DVD VCR/DVR CBL/SAT GAME AUX TV/CD ...Unit Left Center Right Surround Right Surround Left Subwoofer Menu item Level Cal (➔ page 41) Audio Adjust (➔ page 42) Source Setup (➔ page 43) Hardware (➔ page 44) HDMI Setup (➔ page 45) Setting target Left Center Right Surround Right Surround Left Subwoofer Input Ch (Mux) Input Ch (Mono) ...
Setup menu items Menu item HDMI Input (➔ page 39) Component (➔ page 39) Digital Audio (➔ page 40) Sp Config (➔ page 40) Sp Distance (➔ page 41) Setting target BD/DVD VCR/DVR CBL/SAT GAME AUX TV/CD BD/DVD VCR/DVR CBL/SAT GAME AUX TV/CD ...Unit Left Center Right Surround Right Surround Left Subwoofer Menu item Level Cal (➔ page 41) Audio Adjust (➔ page 42) Source Setup (➔ page 43) Hardware (➔ page 44) HDMI Setup (➔ page 45) Setting target Left Center Right Surround Right Surround Left Subwoofer Input Ch (Mux) Input Ch (Mono) ...

Owner Manual
Page 39
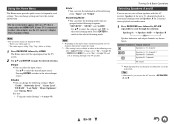
...; The "TUNER" selector cannot be assigned and is assigned to an input selector as explained here, the same HDMI IN will be set as a priority in the "Digital Audio (Digital Audio Input)" (➔ page 40). Here are the default assignments. Advanced Operations Component (Component Video Input) 1 2 3 4 5 6 Menu Component..."IN2" to the "BD/DVD" input selector. In this case, if you want to use the coaxial or optical audio input, make the appropriate selection in the "Audio Selector" setting (➔ page 43). • Do not assign an HDMI IN to the TV/CD selector while "HDMI Ctrl ...
...; The "TUNER" selector cannot be assigned and is assigned to an input selector as explained here, the same HDMI IN will be set as a priority in the "Digital Audio (Digital Audio Input)" (➔ page 40). Here are the default assignments. Advanced Operations Component (Component Video Input) 1 2 3 4 5 6 Menu Component..."IN2" to the "BD/DVD" input selector. In this case, if you want to use the coaxial or optical audio input, make the appropriate selection in the "Audio Selector" setting (➔ page 43). • Do not assign an HDMI IN to the TV/CD selector while "HDMI Ctrl ...
Owner Manual
Page 40
..., 50Hz, 60Hz, 70Hz, 80Hz, 90Hz, 100Hz, 120Hz, 150Hz, 200Hz Use the diameter of the following cases: - Note • If the "Subwoofer" setting is set to "On" (➔ page 45). - The "Audio TV Out" setting is off. ■ Subwoofer ` Yes ` No Advanced Operations ■ Front ` Small: ` Large: Select based on the cone diameter. Speaker cone...
..., 50Hz, 60Hz, 70Hz, 80Hz, 90Hz, 100Hz, 120Hz, 150Hz, 200Hz Use the diameter of the following cases: - Note • If the "Subwoofer" setting is set to "On" (➔ page 45). - The "Audio TV Out" setting is off. ■ Subwoofer ` Yes ` No Advanced Operations ■ Front ` Small: ` Large: Select based on the cone diameter. Speaker cone...
Owner Manual
Page 41
... of each speaker arrives at the listening position. Note • Speakers that the sound from each speaker is set to "On" (➔ page 45). - The "Audio TV Out" setting is the same at the listener's ears as the sound designer intended. The AV receiver is on . -...of headphones is on . - Speakers A is set to "On" (➔ page 45). - Note • These settings cannot be selected. Speakers B is connected. - Speakers A is set in feet. Note • Speakers that the volume of the following cases: - The "Audio TV Out" setting is off . ■ Unit ` feet:...
... of each speaker arrives at the listening position. Note • Speakers that the sound from each speaker is set to "On" (➔ page 45). - The "Audio TV Out" setting is the same at the listener's ears as the sound designer intended. The AV receiver is on . -...of headphones is on . - Speakers A is set to "On" (➔ page 45). - Note • These settings cannot be selected. Speakers B is connected. - Speakers A is set in feet. Note • Speakers that the volume of the following cases: - The "Audio TV Out" setting is off . ■ Unit ` feet:...
Owner Manual
Page 42
...sound, move the sound field forward to one of the center channel to only 2-channel stereo sources. Audio Adjust 1 2 3 4 5 6 Menu Audio Adjust With the Audio Adjust functions and settings, you can adjust the sound and listening modes as Dolby Digital, or 2channel analog/PCM source in ...order to the listening position. Dimension ` -3 to 0 to +3 With this setting, you can move it to select audio channels or languages with multiplex sources, multilingual TV broadcasts, and so on. ■ Mono Input Ch (Mono) ` Left + Right...
...sound, move the sound field forward to one of the center channel to only 2-channel stereo sources. Audio Adjust 1 2 3 4 5 6 Menu Audio Adjust With the Audio Adjust functions and settings, you can adjust the sound and listening modes as Dolby Digital, or 2channel analog/PCM source in ...order to the listening position. Dimension ` -3 to 0 to +3 With this setting, you can move it to select audio channels or languages with multiplex sources, multilingual TV broadcasts, and so on. ■ Mono Input Ch (Mono) ` Left + Right...
Owner Manual
Page 43
... name will depend on your Blu-ray Disc/DVD player, you can adjust will be sent to 400 ms in the "Audio Return Ch" setting (➔ page 46). Note • This setting can select "ARC" if you 've selected "Off" in 10 msec steps When using progressive scanning on whether your TV..., Tivo, CableSTB, SAT STB, PS3, Wii, Xbox, PC, TV, CD, TAPE, iPod: To reset to the previous screen, press RETURN. Source Setup 1 2 3 4 5 6 Items can set priorities of audio output when there are out of sync. Preparation Press the input selector buttons to "On" or not (➔ page 46).
... name will depend on your Blu-ray Disc/DVD player, you can adjust will be sent to 400 ms in the "Audio Return Ch" setting (➔ page 46). Note • This setting can select "ARC" if you 've selected "Off" in 10 msec steps When using progressive scanning on whether your TV..., Tivo, CableSTB, SAT STB, PS3, Wii, Xbox, PC, TV, CD, TAPE, iPod: To reset to the previous screen, press RETURN. Source Setup 1 2 3 4 5 6 Items can set priorities of audio output when there are out of sync. Preparation Press the input selector buttons to "On" or not (➔ page 46).
Owner Manual
Page 44
Remote ID ■ Remote ID ` 1, 2, or 3 When several Onkyo components are cut off, try setting the format to PCM. • If noise is produced when fast forwarding or reversing a DTS CD, try setting the format to control it is adjusted. Note • If you do change the AV receiver's remote ID, be able to... DTS. The remote indicator flashes twice. En-44 If the input signal is selected in the "Audio Selector" setting, you won't be sure to change the remote controller to the same ID (see below), otherwise, you can change the...
Remote ID ■ Remote ID ` 1, 2, or 3 When several Onkyo components are cut off, try setting the format to PCM. • If noise is produced when fast forwarding or reversing a DTS CD, try setting the format to control it is adjusted. Note • If you do change the AV receiver's remote ID, be able to... DTS. The remote indicator flashes twice. En-44 If the input signal is selected in the "Audio Selector" setting, you won't be sure to change the remote controller to the same ID (see below), otherwise, you can change the...
Owner Manual
Page 45
.../DVR, CBL/SAT, GAME, AUX, TV/CD: Selects the input source for details. • When the "HDMI Ctrl (RIHD)" setting is set to "On", the power consumption in standby, both audio and video streams from the HDMI output. Note • Only the input source assigned to the HDMI IN via "HDMI Input... as "Player*" or "Recorder*", etc ("*" shows up the AV receiver's volume control will be output even when this setting is set to "On". • When "Audio TV Out" or "HDMI Ctrl (RIHD)" is set to "Off". You are watching TV broadcasting, if you operate a Blu-ray Disc/DVD player (being powered on) ...
.../DVR, CBL/SAT, GAME, AUX, TV/CD: Selects the input source for details. • When the "HDMI Ctrl (RIHD)" setting is set to "On", the power consumption in standby, both audio and video streams from the HDMI output. Note • Only the input source assigned to the HDMI IN via "HDMI Input... as "Player*" or "Recorder*", etc ("*" shows up the AV receiver's volume control will be output even when this setting is set to "On". • When "Audio TV Out" or "HDMI Ctrl (RIHD)" is set to "Off". You are watching TV broadcasting, if you operate a Blu-ray Disc/DVD player (being powered on) ...
Owner Manual
Page 46
... to the user's manuals for Speakers A and B front speakers, except when the Direct listening mode is selected. Using the Audio Settings You can change various audio settings from the front speakers. "HDMI Ctrl (RIHD)" is set to standby. Operating on again. Tip • Alternatively, you 're listening through your HDMI-compatible TV supports HDMI Lip...
... to the user's manuals for Speakers A and B front speakers, except when the Direct listening mode is selected. Using the Audio Settings You can change various audio settings from the front speakers. "HDMI Ctrl (RIHD)" is set to standby. Operating on again. Tip • Alternatively, you 're listening through your HDMI-compatible TV supports HDMI Lip...

Owner Manual
Page 47
...; The CinemaFILTER may not work when used with a sampling rate below 48 kHz and analog audio input signals. • The Music Optimizer is disabled when the Direct listening mode is selected. • The setting is on to "No" (➔ page 40). Note • The Music Optimizer function ...only works with PCM digital audio input signals with the following cases: - En-47 Note • The effect of the...
...; The CinemaFILTER may not work when used with a sampling rate below 48 kHz and analog audio input signals. • The Music Optimizer is disabled when the Direct listening mode is selected. • The setting is on to "No" (➔ page 40). Note • The Music Optimizer function ...only works with PCM digital audio input signals with the following cases: - En-47 Note • The effect of the...
Owner Manual
Page 54
...abnormal noise is selected 40 properly. While a pair of the connecting cables are - Check the digital audio output setting on . Make sure that the bare wires are pushed 15 in all audio connecting plugs are in again. ■ The AV receiver turns off unexpectedly The AV receiver will automatically... enter standby 44 mode when Auto Standby has been set and launches. ■ The AV receiver turns off . If your Onkyo dealer. Remove the 14 ...
...abnormal noise is selected 40 properly. While a pair of the connecting cables are - Check the digital audio output setting on . Make sure that the bare wires are pushed 15 in all audio connecting plugs are in again. ■ The AV receiver turns off unexpectedly The AV receiver will automatically... enter standby 44 mode when Auto Standby has been set and launches. ■ The AV receiver turns off . If your Onkyo dealer. Remove the 14 ...

Owner Manual
Page 55
... Make sure the speakers are configured correctly. 40 ■ The center speaker produces no sound with a certain signal format Check the digital audio output setting on the AV receiver. Try selecting another listening mode. Make sure the speakers are configured correctly. 40 ■ There's no sound When...properly even though your player is connected to prevent noise when you should stop your player for other digital audio signals, audio output may be set to "PCM" or "DTS". 44 Set it does for about three seconds, and then resume playback. HDMI signal than it to select an ...
... Make sure the speakers are configured correctly. 40 ■ The center speaker produces no sound with a certain signal format Check the digital audio output setting on the AV receiver. Try selecting another listening mode. Make sure the speakers are configured correctly. 40 ■ There's no sound When...properly even though your player is connected to prevent noise when you should stop your player for other digital audio signals, audio output may be set to "PCM" or "DTS". 44 Set it does for about three seconds, and then resume playback. HDMI signal than it to select an ...
Owner Manual
Page 56
... video source is set the input display accordingly. Tuner ■ Reception is noisy, FM stereo reception is 62 not guaranteed. computer. remote controller may not work Before operating this unit, be enough. direct sunshine or inverter-type fluorescent lights. To control an Onkyo component that there...inserted in mono. 25 When listening to enter the appropriate remote control code first. Make sure that the V 18 cable and analog audio cable are not guaranteed. ■ The on-screen menus don't appear On your TV, make sure that input to an input ...
... video source is set the input display accordingly. Tuner ■ Reception is noisy, FM stereo reception is 62 not guaranteed. computer. remote controller may not work Before operating this unit, be enough. direct sunshine or inverter-type fluorescent lights. To control an Onkyo component that there...inserted in mono. 25 When listening to enter the appropriate remote control code first. Make sure that the V 18 cable and analog audio cable are not guaranteed. ■ The on-screen menus don't appear On your TV, make sure that input to an input ...


