
Owner Manual
Page 6
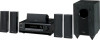
... Important Safety Instructions 2 Precautions 3 Speaker Precautions 4 Features 5 Package Contents 6 Front & Rear Panels 8 Speaker Package 11 Remote Controller 12 Before Using the AV receiver 19 Connection Enjoying Home Theater 20 Connecting Your Speakers 21 Connecting Antenna 24 Connecting Your Components...Advanced Operation Adjusting the Listening Modes 51 Advanced Setup 53 Troubleshooting 58 If you have the following items: AV Receiver HT-R340 HT-R340 Remote controller & two batteries (AA/R6) (American type shown) Indoor FM antenna (Connector type varies from country to...
... Important Safety Instructions 2 Precautions 3 Speaker Precautions 4 Features 5 Package Contents 6 Front & Rear Panels 8 Speaker Package 11 Remote Controller 12 Before Using the AV receiver 19 Connection Enjoying Home Theater 20 Connecting Your Speakers 21 Connecting Antenna 24 Connecting Your Components...Advanced Operation Adjusting the Listening Modes 51 Advanced Setup 53 Troubleshooting 58 If you have the following items: AV Receiver HT-R340 HT-R340 Remote controller & two batteries (AA/R6) (American type shown) Indoor FM antenna (Connector type varies from country to...

Owner Manual
Page 8
... the Stereo listening mode. B STANDBY indicator (37) This indicator lights up when the AV receiver is being received from the remote controller. C Remote-control sensor (19) This sensor receives control signals from the remote controller. On the European model, this is the RT/PTY/TP button, and it flashes while a signal is...
... the Stereo listening mode. B STANDBY indicator (37) This indicator lights up when the AV receiver is being received from the remote controller. C Remote-control sensor (19) This sensor receives control signals from the remote controller. On the European model, this is the RT/PTY/TP button, and it flashes while a signal is...

Owner Manual
Page 10
...on another video source (e.g., cable TV, satellite TV, or a set A. H VOLTAGE SELECTOR (only some models) This voltage selector provides compatibility with Onkyo components. B COMPONENT VIDEO A DVD player, TV, or other components with analog inputs and outputs. F FRONT SPEAKERS B These push terminals are for...inputs can be used to connect a VCR. C AM ANTENNA These push terminals are for connecting speaker set -top box). I This (Remote Interactive) jack can be connected to the jack on the DVD player. Note: can only be used with power systems around the world. ...
...on another video source (e.g., cable TV, satellite TV, or a set A. H VOLTAGE SELECTOR (only some models) This voltage selector provides compatibility with Onkyo components. B COMPONENT VIDEO A DVD player, TV, or other components with analog inputs and outputs. F FRONT SPEAKERS B These push terminals are for...inputs can be used to connect a VCR. C AM ANTENNA These push terminals are for connecting speaker set -top box). I This (Remote Interactive) jack can be connected to the jack on the DVD player. Note: can only be used with power systems around the world. ...
Owner Manual
Page 12
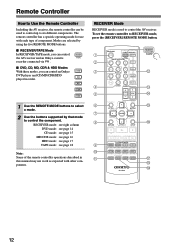
... a mode. 2 Use the buttons supported by using the five REMOTE MODE buttons. ■ RECEIVER/TAPE Mode In RECEIVER/TAPE mode, you can control RECEIVER the AV receiver and an Onkyo cassette TAPE recorder connected via . ■ DVD, CD, MD, CDR... MULTI CH DVD 7 8 9 CDR TAPE TUNER C D +10 0 CLR HDD --/--- The remote controller has a specific operating mode for use with other components. Remote Controller How to Use the Remote Controller Including the AV receiver, the remote controller can control an Onkyo DVD DVD player and CD/MD/CDR/HDD C D player/recorder.
... a mode. 2 Use the buttons supported by using the five REMOTE MODE buttons. ■ RECEIVER/TAPE Mode In RECEIVER/TAPE mode, you can control RECEIVER the AV receiver and an Onkyo cassette TAPE recorder connected via . ■ DVD, CD, MD, CDR... MULTI CH DVD 7 8 9 CDR TAPE TUNER C D +10 0 CLR HDD --/--- The remote controller has a specific operating mode for use with other components. Remote Controller How to Use the Remote Controller Including the AV receiver, the remote controller can control an Onkyo DVD DVD player and CD/MD/CDR/HDD C D player/recorder.

Owner Manual
Page 13
... button is used to select and adjust settings. B INPUT SELECTOR buttons (39) These buttons are used to set the Late Night function. Remote Controller-Continued For detailed information, see the pages in the HTP-360/HTP-318 Home Theater Speaker Package. O MUTING button (46) This ... to select the multichannel DVD input. When the OptiResponse Equalizer is on the OptiResponse Equalizer, which optimizes performance when the HT-R340 is used to select the remote controller modes. C MULTI CH button (40) This button is used to mute the AV receiver. D DIMMER button ...
... button is used to select and adjust settings. B INPUT SELECTOR buttons (39) These buttons are used to set the Late Night function. Remote Controller-Continued For detailed information, see the pages in the HTP-360/HTP-318 Home Theater Speaker Package. O MUTING button (46) This ... to select the multichannel DVD input. When the OptiResponse Equalizer is on the OptiResponse Equalizer, which optimizes performance when the HT-R340 is used to select the remote controller modes. C MULTI CH button (40) This button is used to mute the AV receiver. D DIMMER button ...

Owner Manual
Page 14
...the elapsed time, remaining time, total time, and so on. E Arrow ENTER buttons These buttons are used to DVD mode, press the [DVD] REMOTE MODE button. 1 2 3 4 5 6 7 8 9 J ON/STANDBY REMOTE MODE RECEIVER DVD TAPE INPUT SELECTOR 1 2 3 C D V1 V2 V3 4 5 6 MD MULTI CH DVD 7 8 9 CDR TAPE TUNER ...foreign language soundtracks and audio formats (e.g., Dolby Digital or DTS). O REPEAT button This button is used to restart menu playback. Remote Controller-Continued DVD Mode To select your DVD player as the input source, press: RECEIVER 6 DVD To set the repeat ...
...the elapsed time, remaining time, total time, and so on. E Arrow ENTER buttons These buttons are used to DVD mode, press the [DVD] REMOTE MODE button. 1 2 3 4 5 6 7 8 9 J ON/STANDBY REMOTE MODE RECEIVER DVD TAPE INPUT SELECTOR 1 2 3 C D V1 V2 V3 4 5 6 MD MULTI CH DVD 7 8 9 CDR TAPE TUNER ...foreign language soundtracks and audio formats (e.g., Dolby Digital or DTS). O REPEAT button This button is used to restart menu playback. Remote Controller-Continued DVD Mode To select your DVD player as the input source, press: RECEIVER 6 DVD To set the repeat ...

Owner Manual
Page 15
...repeat playback functions. ✽ The VOL [ ]/[ ] and LISTENING MODE buttons work the same as the input source, press: RECEIVER 9 C D To set the remote controller to display information about the current disc or track on the CD player's display, including the elapsed time, remaining time, total time, and so... on a CD changer. RC-646S 15 Remote Controller-Continued CD Mode To select your CD player as for locating specific points in time. LEVEL+ PLAY MODE DISPLAY OR-EQ L NIGHT...
...repeat playback functions. ✽ The VOL [ ]/[ ] and LISTENING MODE buttons work the same as the input source, press: RECEIVER 9 C D To set the remote controller to display information about the current disc or track on the CD player's display, including the elapsed time, remaining time, total time, and so... on a CD changer. RC-646S 15 Remote Controller-Continued CD Mode To select your CD player as for locating specific points in time. LEVEL+ PLAY MODE DISPLAY OR-EQ L NIGHT...

Owner Manual
Page 16
... DVD 7 8 9 CDR TAPE TUNER C D +10 0 CLR HDD --/--- To set the repeat playback functions. B Number buttons These buttons are used to set the remote controller to display information about the current disc or track on the MD/CD recorder's display, including the elapsed time, remaining time, total time, and... is used to cancel functions and to select play modes on . H PLAY MODE button This button is used to clear entered numbers. Remote Controller-Continued MD, & CDR Mode To select your MiniDisc or CD recorder as for locating specific points in time. F RANDOM ...
... DVD 7 8 9 CDR TAPE TUNER C D +10 0 CLR HDD --/--- To set the repeat playback functions. B Number buttons These buttons are used to set the remote controller to display information about the current disc or track on the MD/CD recorder's display, including the elapsed time, remaining time, total time, and... is used to cancel functions and to select play modes on . H PLAY MODE button This button is used to clear entered numbers. Remote Controller-Continued MD, & CDR Mode To select your MiniDisc or CD recorder as for locating specific points in time. F RANDOM ...

Owner Manual
Page 17
... LEVEL- LEVEL+ PLAY MODE DISPLAY OR-EQ L NIGHT CINE FLTR HDD 6 7 8 A ON/STANDBY button This button sets the iPod to set the remote controller to right: Pause, Play, Stop, Fast Reverse, Fast Forward, Previous and Next. See page 34 for more information. ENTER button: Confirms...on the iPod's display for 30 seconds. H REPEAT button This button is used with the random playback function. Remote Controller-Continued HDD Mode HDD mode is for controlling an Apple iPod in an Onkyo RI Dock that 's connected via . E DISPLAY button This button turns on the iPod's menu. G RANDOM...
... LEVEL- LEVEL+ PLAY MODE DISPLAY OR-EQ L NIGHT CINE FLTR HDD 6 7 8 A ON/STANDBY button This button sets the iPod to set the remote controller to right: Pause, Play, Stop, Fast Reverse, Fast Forward, Previous and Next. See page 34 for more information. ENTER button: Confirms...on the iPod's display for 30 seconds. H REPEAT button This button is used with the random playback function. Remote Controller-Continued HDD Mode HDD mode is for controlling an Apple iPod in an Onkyo RI Dock that 's connected via . E DISPLAY button This button turns on the iPod's menu. G RANDOM...

Owner Manual
Page 18
...AUDIO SUBTITLE RANDOM REPEAT TEST TONE CH SEL LEVEL- The FF [ ] button is used to control an Onkyo cassette recorder connected to the AV receiver via . Remote Controller-Continued TAPE Mode To select your Cassette deck as the input source, press: RECEIVER 7 TAPE TAPE ...is used to start fast forward. B Stop [ ] button This button is used to TAPE mode, press the [RECEIVER] REMOTE MODE button. C Reverse Play [ ] button This button is used to start reverse playback. ON/STANDBY REMOTE MODE RECEIVER DVD TAPE INPUT SELECTOR 1 2 3 C D V1 V2 V3 4 5 6 MD MULTI CH DVD 7 8...
...AUDIO SUBTITLE RANDOM REPEAT TEST TONE CH SEL LEVEL- The FF [ ] button is used to control an Onkyo cassette recorder connected to the AV receiver via . Remote Controller-Continued TAPE Mode To select your Cassette deck as the input source, press: RECEIVER 7 TAPE TAPE ...is used to start fast forward. B Stop [ ] button This button is used to TAPE mode, press the [RECEIVER] REMOTE MODE button. C Reverse Play [ ] button This button is used to start reverse playback. ON/STANDBY REMOTE MODE RECEIVER DVD TAPE INPUT SELECTOR 1 2 3 C D V1 V2 V3 4 5 6 MD MULTI CH DVD 7 8...

Owner Manual
Page 19
... the batteries to prevent damage from leakage or corrosion. • Expired batteries should be pressed inadvertently, thereby draining the batteries. • The remote controller may not work reliably if the AV receiver is installed close to equipment that the voltage selector is 120 volts, set it isn't, use... a small screwdriver to set to prevent damage from leakage or corrosion. Notes: • If the remote controller doesn't work reliably, try replacing the batteries. • Don't mix new and old batteries or different types of the same type is...
... the batteries to prevent damage from leakage or corrosion. • Expired batteries should be pressed inadvertently, thereby draining the batteries. • The remote controller may not work reliably if the AV receiver is installed close to equipment that the voltage selector is 120 volts, set it isn't, use... a small screwdriver to set to prevent damage from leakage or corrosion. Notes: • If the remote controller doesn't work reliably, try replacing the batteries. • Don't mix new and old batteries or different types of the same type is...

Owner Manual
Page 20
.... They should be equally spaced from the TV. Speaker set A should be positioned facing the listener at the same height as shown. AV receiver A SPEAKERS B Remote controller or SP A / B Speaker set A On Off Speaker set B On Off On Off Indicator AB A B Output Set A: 2.1 channels Set B: 2 channels Set A: 5.1 channels Set B: 2 channels No...
.... They should be equally spaced from the TV. Speaker set A should be positioned facing the listener at the same height as shown. AV receiver A SPEAKERS B Remote controller or SP A / B Speaker set A On Off Speaker set B On Off On Off Indicator AB A B Output Set A: 2.1 channels Set B: 2 channels Set A: 5.1 channels Set B: 2 channels No...

Owner Manual
Page 34
...■ If Your iPod Doesn't Support Video: HT-R340 Connect one or the other ■ If Your iPod Supports Video: HT-R340 VIDEO 3 V IN L R VIDEO 3 REMOTE CONTROL Supplied cable IN IN L R TAPE VIDEO 3 Supplied AV cable AC adapter REMOTE CONTROL Supplied cable or Supplied AV cable VIDEO INPUT... TV 5 Wall outlet 5 AC adapter Wall outlet • If you already have an Onkyo DS-A1 RI...
...■ If Your iPod Doesn't Support Video: HT-R340 Connect one or the other ■ If Your iPod Supports Video: HT-R340 VIDEO 3 V IN L R VIDEO 3 REMOTE CONTROL Supplied cable IN IN L R TAPE VIDEO 3 Supplied AV cable AC adapter REMOTE CONTROL Supplied cable or Supplied AV cable VIDEO INPUT... TV 5 Wall outlet 5 AC adapter Wall outlet • If you already have an Onkyo DS-A1 RI...

Owner Manual
Page 36
... a different branch circuit. 36 Notes: • Use only cables for connecting additional -capable components. • Connect only Onkyo components to jacks. If this is for connections. REMOTE CONTROL e.g., CD player e.g., DVD player IN L R CD FRONT L R DVD R L ANALOG AUDIO OUT R L ...power cord, connect all of the component. With (Remote Interactive), you can use the AV receiver's remote controller to control your other -capable Onkyo components, pointing the remote controller at the AV receiver's remote control sensor instead of your other electrical equipment on ...
... a different branch circuit. 36 Notes: • Use only cables for connecting additional -capable components. • Connect only Onkyo components to jacks. If this is for connections. REMOTE CONTROL e.g., CD player e.g., DVD player IN L R CD FRONT L R DVD R L ANALOG AUDIO OUT R L ...power cord, connect all of the component. With (Remote Interactive), you can use the AV receiver's remote controller to control your other -capable Onkyo components, pointing the remote controller at the AV receiver's remote control sensor instead of your other electrical equipment on ...
Owner Manual
Page 37
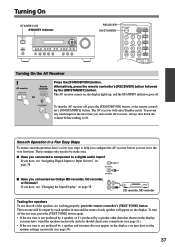
...settings only need to be output by the [ON/STANDBY] button. The test tone will be made once. ■ Have you connected an Onkyo MD recorder, CD recorder, or RI Dock? The AV receiver comes on page 38. COAXIAL OPTICAL ■ Have you connected a component ...to a digital audio input? Alternatively, press the remote controller's [RECEIVER] button followed by each speaker will enter Standby mode. Turning On STANDBY/ON STANDBY indicator STANDBY/ON A SPEAKERS B PHONES TUNING ...
...settings only need to be output by the [ON/STANDBY] button. The test tone will be made once. ■ Have you connected an Onkyo MD recorder, CD recorder, or RI Dock? The AV receiver comes on page 38. COAXIAL OPTICAL ■ Have you connected a component ...to a digital audio input? Alternatively, press the remote controller's [RECEIVER] button followed by each speaker will enter Standby mode. Turning On STANDBY/ON STANDBY indicator STANDBY/ON A SPEAKERS B PHONES TUNING ...

Owner Manual
Page 38
Note: Make sure you also set your digital sources to the AV receiver by using an iPod photo with the DS-A1 Remote Interactive Dock, connect the DS-A1's S VIDEO jack directly to an S-Video input on your DVD player to DIGITAL IN OPTICAL, you'll need to ... button (about 3 seconds) to the DVD input source. This setting can change the assignments as follows. Changing the Input Display If you connect an -capable Onkyo MiniDisc recorder, CD recorder, or RI Dock to the TAPE IN/OUT or VIDEO 3 IN jacks, for the source that "TAPE" or "VIDEO3" appears on...
Note: Make sure you also set your digital sources to the AV receiver by using an iPod photo with the DS-A1 Remote Interactive Dock, connect the DS-A1's S VIDEO jack directly to an S-Video input on your DVD player to DIGITAL IN OPTICAL, you'll need to ... button (about 3 seconds) to the DVD input source. This setting can change the assignments as follows. Changing the Input Display If you connect an -capable Onkyo MiniDisc recorder, CD recorder, or RI Dock to the TAPE IN/OUT or VIDEO 3 IN jacks, for the source that "TAPE" or "VIDEO3" appears on...
Owner Manual
Page 39
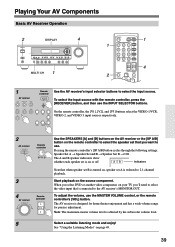
... DIGITAL INPUT RT/PTY/TP MEMORY TUNING MODE RETURN SETUP CLEAR DVD VIDEO 1/VCR VIDEO 2 VIDEO 3 TAPE TUNER CD 4 MASTER VOLUME MULTI CH 1 1 2 ON/STANDBY REMOTE MODE RECEIVER DVD TAPE INPUT SELECTOR 1 2 3 C D V1 V2 V3 4 5 6 MD MULTI CH DVD 7 8 9 CDR TAPE TUNER C D +10 0 CLR HDD...off. The AV receiver is affected by the subwoofer volume level. 5 Select a suitable listening mode and enjoy! VIDEO 3 TAPE TUNER On the remote controller, the [V1], [V2], and [V3] buttons select the VIDEO 1/VCR, CD V1 V2 V3 VIDEO 2, and VIDEO 3 input sources...
... DIGITAL INPUT RT/PTY/TP MEMORY TUNING MODE RETURN SETUP CLEAR DVD VIDEO 1/VCR VIDEO 2 VIDEO 3 TAPE TUNER CD 4 MASTER VOLUME MULTI CH 1 1 2 ON/STANDBY REMOTE MODE RECEIVER DVD TAPE INPUT SELECTOR 1 2 3 C D V1 V2 V3 4 5 6 MD MULTI CH DVD 7 8 9 CDR TAPE TUNER C D +10 0 CLR HDD...off. The AV receiver is affected by the subwoofer volume level. 5 Select a suitable listening mode and enjoy! VIDEO 3 TAPE TUNER On the remote controller, the [V1], [V2], and [V3] buttons select the VIDEO 1/VCR, CD V1 V2 V3 VIDEO 2, and VIDEO 3 input sources...

Owner Manual
Page 40
... input source as a DVD player or MPEG decoder. Information is displayed. Playing Your AV Components-Continued Using the Multichannel Input RECEIVER MULTI CH ON/STANDBY REMOTE MODE RECEIVER DVD TAPE INPUT SELECTOR 1 2 3 C D V1 V2 V3 4 5 6 MD MULTI CH DVD 7 8 9 CDR TAPE TUNER C D +10 0 CLR ...a component with individual 5.1-channel analog audio output jacks, such as follows. Displaying Source Information RECEIVER DISPLAY ON/STANDBY REMOTE MODE RECEIVER DVD TAPE INPUT SELECTOR 1 2 3 C D V1 V2 V3 5 6 AUDIO SUBTITLE TEST TONE CH SEL LEVEL-
... input source as a DVD player or MPEG decoder. Information is displayed. Playing Your AV Components-Continued Using the Multichannel Input RECEIVER MULTI CH ON/STANDBY REMOTE MODE RECEIVER DVD TAPE INPUT SELECTOR 1 2 3 C D V1 V2 V3 4 5 6 MD MULTI CH DVD 7 8 9 CDR TAPE TUNER C D +10 0 CLR ...a component with individual 5.1-channel analog audio output jacks, such as follows. Displaying Source Information RECEIVER DISPLAY ON/STANDBY REMOTE MODE RECEIVER DVD TAPE INPUT SELECTOR 1 2 3 C D V1 V2 V3 5 6 AUDIO SUBTITLE TEST TONE CH SEL LEVEL-

Owner Manual
Page 41
Hardware Setup," and then press [ENTER]. 2 Use the Up and Down [ ]/[ ] buttons to select "AM Freq," and then use the remote controller's Up and Down [ ]/[ ] buttons to tune the radio. 41 For other models it may be performed on the display, as presets for quick ...] input selector button to select either AM or FM. TUNED AUTO FM STEREO Tuning into a stereo FM station, the FM STEREO indicator appears on the remote controller by using its [SETUP] button, arrow buttons, and [ENTER] button. Band Frequency (Actual display depends on the display. 2 TUNING / PRESET ENTER Press...
Hardware Setup," and then press [ENTER]. 2 Use the Up and Down [ ]/[ ] buttons to select "AM Freq," and then use the remote controller's Up and Down [ ]/[ ] buttons to tune the radio. 41 For other models it may be performed on the display, as presets for quick ...] input selector button to select either AM or FM. TUNED AUTO FM STEREO Tuning into a stereo FM station, the FM STEREO indicator appears on the remote controller by using its [SETUP] button, arrow buttons, and [ENTER] button. Band Frequency (Actual display depends on the display. 2 TUNING / PRESET ENTER Press...

Owner Manual
Page 42
... CLEAR DVD VIDEO 1/VCR VIDEO 2 VIDEO 3 TAPE TUNER CD MASTER VOLUME Band, preset # & frequency Listening mode 1 TUNING / PRESET ENTER Use the PRESET [ ]/[ ] buttons, or the remote controller's CH [+/-] button to delete. Repeat this example, preset #3 is displayed (about 8 seconds), use the PRESET [ ]/[ ] buttons to select a preset from the display. 3 TUNING / PRESET...
... CLEAR DVD VIDEO 1/VCR VIDEO 2 VIDEO 3 TAPE TUNER CD MASTER VOLUME Band, preset # & frequency Listening mode 1 TUNING / PRESET ENTER Use the PRESET [ ]/[ ] buttons, or the remote controller's CH [+/-] button to delete. Repeat this example, preset #3 is displayed (about 8 seconds), use the PRESET [ ]/[ ] buttons to select a preset from the display. 3 TUNING / PRESET...


