

Tough 820 iHS Instruction Manual (English)
Page 1
...shots to get accustomed to your new camera, please read these illustrations is provided for purchasing an Olympus digital camera. Keep this manual in a safe place for future reference. ● We recommend...you start to use your camera before taking important photographs. ● In the interest of continually improving products, Olympus reserves the right to enjoy optimum performance and a longer service life. Unless otherwise specified, the explanation...development stages and may differ from the actual product. DIGITAL CAMERA TG-820 TG-620 Instruction Manual ● Thank you for...
...shots to get accustomed to your new camera, please read these illustrations is provided for purchasing an Olympus digital camera. Keep this manual in a safe place for future reference. ● We recommend...you start to use your camera before taking important photographs. ● In the interest of continually improving products, Olympus reserves the right to enjoy optimum performance and a longer service life. Unless otherwise specified, the explanation...development stages and may differ from the actual product. DIGITAL CAMERA TG-820 TG-620 Instruction Manual ● Thank you for...
Tough 820 iHS Instruction Manual (English)
Page 2
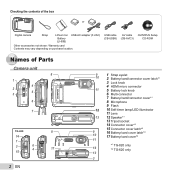
...-USB8) AV cable (CB-AVC3) OLYMPUS Setup CD-ROM Names of the box or Digital camera Strap Lithium Ion USB-AC adapter (F-2AC) Battery (LI-50B) Other accessories not shown: Warranty card Contents may vary depending on purchase location. Checking the contents of Parts Camera unit 8 1 4 2 3 5 6 7 TG-620 8 14 1 3 6 15 4 17 2 EN... 13 12 Speaker*1 13 Tripod socket 14 Connector cover*2 15 Connector cover latch*2 9 10 16 Battery/card cover latch*2 17 Battery/card cover*2 11 16 *1 TG-820 only *2 TG-620 only 13 3
...-USB8) AV cable (CB-AVC3) OLYMPUS Setup CD-ROM Names of the box or Digital camera Strap Lithium Ion USB-AC adapter (F-2AC) Battery (LI-50B) Other accessories not shown: Warranty card Contents may vary depending on purchase location. Checking the contents of Parts Camera unit 8 1 4 2 3 5 6 7 TG-620 8 14 1 3 6 15 4 17 2 EN... 13 12 Speaker*1 13 Tripod socket 14 Connector cover*2 15 Connector cover latch*2 9 10 16 Battery/card cover latch*2 17 Battery/card cover*2 11 16 *1 TG-820 only *2 TG-620 only 13 3

Tough 820 iHS Instruction Manual (English)
Page 3
1 2 3 TG-620 2 1 3 11 4 5 4 5 6 7 8 9 10 6 7 9 10 8 1 Indicator lamp 2 n button 3 Monitor 4 Shutter button 5 Zoom lever 6 Movie record button 7 q button (switching between shooting and playback) 8 Joystick INFO (changing information display) (erase) A button (OK) 9 button 10 E button (camera guide) 11 Speaker* * TG-620 only Attaching the camera strap Pull the strap tight so that it does not come loose. EN 3
1 2 3 TG-620 2 1 3 11 4 5 4 5 6 7 8 9 10 6 7 9 10 8 1 Indicator lamp 2 n button 3 Monitor 4 Shutter button 5 Zoom lever 6 Movie record button 7 q button (switching between shooting and playback) 8 Joystick INFO (changing information display) (erase) A button (OK) 9 button 10 E button (camera guide) 11 Speaker* * TG-620 only Attaching the camera strap Pull the strap tight so that it does not come loose. EN 3

Tough 820 iHS Instruction Manual (English)
Page 4
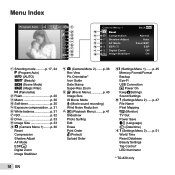
Monitor Shooting mode display 1 P 23 22 21 4 NORM DATE 0.0 WB AUTO ISO AUTO 12M z 00:34 20 19 18 17 16 15 14 13 12 11 1/100 F3.9 26 25 24 1 Shooting mode .......p. 17, 24 2 Flash p. 20 Flash standby/flash charge 2 p. 59 345678 3 4 5 9 10 6 7 Macro/super macro/ S-macro LED mode ....p. 30 Self-timer p. 30 Exposure compensation p. 31 White balance p. 31 ISO p. 32 8 Drive p. 33 9 Image size (still images) p. 33, 67 10 Recording with sound (movies)/wind noise reduction p. 40 11 Image size (movies) p. 40, 68 12 Continuous recording length (movies p. 18 13...
Monitor Shooting mode display 1 P 23 22 21 4 NORM DATE 0.0 WB AUTO ISO AUTO 12M z 00:34 20 19 18 17 16 15 14 13 12 11 1/100 F3.9 26 25 24 1 Shooting mode .......p. 17, 24 2 Flash p. 20 Flash standby/flash charge 2 p. 59 345678 3 4 5 9 10 6 7 Macro/super macro/ S-macro LED mode ....p. 30 Self-timer p. 30 Exposure compensation p. 31 White balance p. 31 ISO p. 32 8 Drive p. 33 9 Image size (still images) p. 33, 67 10 Recording with sound (movies)/wind noise reduction p. 40 11 Image size (movies) p. 40, 68 12 Continuous recording length (movies p. 18 13...

Tough 820 iHS Instruction Manual (English)
Page 5
Playback mode display ● Standard display 12 3456 7 89 1 9 3D 10 4/30 21 '12/02/26 12:30 Still image 23 00:12/00:34 Movie ● Advanced display 1 2 3456 7 89 3D 10 4/30 MAGIC 1/1000 F3.9 2.0 1 ISO WB 100 AUTO 12M NORM 100-0004 '12/02/26 12:30 10 11 12 13 14 MAGIC 15 1/1000 F3.9 2.0 16 1 ISO WB 100 AUTO 17 18 12M NORM 100-0004 19 20 '12/02/26 12:30 21 22 1 Battery check..........p. 13, 60 2 3D image p. 35 3 Eye-Fi transferred.........p. 45 4 Protect p. 44 5 Adding sound p. 42 6 Upload order p. 44 7 Print reservation/number of prints p. 57/p. 56 8 ...
Playback mode display ● Standard display 12 3456 7 89 1 9 3D 10 4/30 21 '12/02/26 12:30 Still image 23 00:12/00:34 Movie ● Advanced display 1 2 3456 7 89 3D 10 4/30 MAGIC 1/1000 F3.9 2.0 1 ISO WB 100 AUTO 12M NORM 100-0004 '12/02/26 12:30 10 11 12 13 14 MAGIC 15 1/1000 F3.9 2.0 16 1 ISO WB 100 AUTO 17 18 12M NORM 100-0004 19 20 '12/02/26 12:30 21 22 1 Battery check..........p. 13, 60 2 3D image p. 35 3 Eye-Fi transferred.........p. 45 4 Protect p. 44 5 Adding sound p. 42 6 Upload order p. 44 7 Print reservation/number of prints p. 57/p. 56 8 ...

Tough 820 iHS Instruction Manual (English)
Page 6
TG-820 TG-820 TG-620 Shutter button (p. 17, 59) Zoom lever (p. 19, 22) TG-620 R button (shooting movies) (p. 18) q button (switching between shooting and playback) (p. 18, 21, 46) button (p. 9) E button (camera guide) (p. 23) 6 EN Camera Settings Using the Buttons Frequently used functions can be accessed using the buttons.
TG-820 TG-820 TG-620 Shutter button (p. 17, 59) Zoom lever (p. 19, 22) TG-620 R button (shooting movies) (p. 18) q button (switching between shooting and playback) (p. 18, 21, 46) button (p. 9) E button (camera guide) (p. 23) 6 EN Camera Settings Using the Buttons Frequently used functions can be accessed using the buttons.
Tough 820 iHS Instruction Manual (English)
Page 7
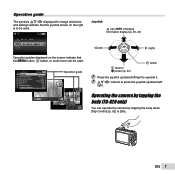
Operating the camera by tapping the body (TG-820 only) You can be used . X Back MENU Y M D Time 2012 . 02 . 26 12 :30 Y/M/D Joystick F (up) /INFO (changing information display) (p. 20, 23) H (left /right to operate ...
Operating the camera by tapping the body (TG-820 only) You can be used . X Back MENU Y M D Time 2012 . 02 . 26 12 :30 Y/M/D Joystick F (up) /INFO (changing information display) (p. 20, 23) H (left /right to operate ...

Tough 820 iHS Instruction Manual (English)
Page 8
Press the A button to display the function menu. Function menu Press H during shooting to set the function menu. 8 EN There may be menus that are unavailable depending on other related settings or the shooting mode (p. 24). The function menu is used shooting settings. To select the function menu Use FG to select a menu and use HI to frequently used to choose the shooting mode and provides access to select a menu option. Selected option Program Auto P Shooting mode 0.0 WB AUTO ISO AUTO 12M MENU Shooting Function menu Setup menu To select the shooting mode Use HI to ...
Press the A button to display the function menu. Function menu Press H during shooting to set the function menu. 8 EN There may be menus that are unavailable depending on other related settings or the shooting mode (p. 24). The function menu is used shooting settings. To select the function menu Use FG to select a menu and use HI to frequently used to choose the shooting mode and provides access to select a menu option. Selected option Program Auto P Shooting mode 0.0 WB AUTO ISO AUTO 12M MENU Shooting Function menu Setup menu To select the shooting mode Use HI to ...
Tough 820 iHS Instruction Manual (English)
Page 9
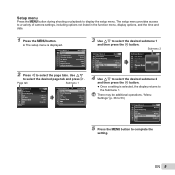
Page tab Submenu 1 Settings Menu 2 File Name Pixel Mapping TV Out Power Save X Back MENU Reset NTSC Off English Settings Menu 2 File Name Pixel Mapping TV Out Power Save X Back MENU Reset NTSC Off English 3 Use FG to select the page tabs. The setup menu provides access to a variety of camera settings, including options not listed in the function menu, display options, and the time and date. 1 Press the button. ● The setup menu is selected, the display returns to the Submenu 1. Submenu 2 Settings Menu 2 File Name Pixel Mapping TV Out Power Save X Back MENU ...
Page tab Submenu 1 Settings Menu 2 File Name Pixel Mapping TV Out Power Save X Back MENU Reset NTSC Off English Settings Menu 2 File Name Pixel Mapping TV Out Power Save X Back MENU Reset NTSC Off English 3 Use FG to select the page tabs. The setup menu provides access to a variety of camera settings, including options not listed in the function menu, display options, and the time and date. 1 Press the button. ● The setup menu is selected, the display returns to the Submenu 1. Submenu 2 Settings Menu 2 File Name Pixel Mapping TV Out Power Save X Back MENU ...
Tough 820 iHS Instruction Manual (English)
Page 10
... File Name Pixel Mapping s (Monitor) TV Out Power Save l (Language) X (Date/time) f d (Settings Menu 3) ...... p. 51 World Time Reset Database Beauty Settings Tap Control* LED Illuminator * TG-820 only p. 45 Memory Format/Format Backup Eye-Fi USB Connection q Power On KeepzSettings Sound Settings e d (Settings Menu 2) ......
... File Name Pixel Mapping s (Monitor) TV Out Power Save l (Language) X (Date/time) f d (Settings Menu 3) ...... p. 51 World Time Reset Database Beauty Settings Tap Control* LED Illuminator * TG-820 only p. 45 Memory Format/Format Backup Eye-Fi USB Connection q Power On KeepzSettings Sound Settings e d (Settings Menu 2) ......
Tough 820 iHS Instruction Manual (English)
Page 11
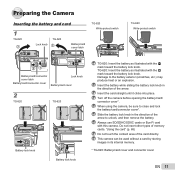
...the battery and card 1 TG-820 3 Lock knob TG-620 3 Battery/card cover latch TG-820 Write-protect switch TG-620 Write-protect switch 2 21 2 1 Battery/card/connector cover latch Battery/card/connector cover Lock knob Battery/card cover 2 TG-820 TG-620 Battery lock knob Battery lock knob TG-820: Insert the battery as ...sure to close and lock the battery/card/connector cover*. Insert the battery while sliding the battery lock knob in its internal memory. * TG-620: Battery/card cover and connector cover EN 11 Damage to unlock, and then remove the battery. When using the camera, be ...
...the battery and card 1 TG-820 3 Lock knob TG-620 3 Battery/card cover latch TG-820 Write-protect switch TG-620 Write-protect switch 2 21 2 1 Battery/card/connector cover latch Battery/card/connector cover Lock knob Battery/card cover 2 TG-820 TG-620 Battery lock knob Battery lock knob TG-820: Insert the battery as ...sure to close and lock the battery/card/connector cover*. Insert the battery while sliding the battery lock knob in its internal memory. * TG-620: Battery/card cover and connector cover EN 11 Damage to unlock, and then remove the battery. When using the camera, be ...
Tough 820 iHS Instruction Manual (English)
Page 12
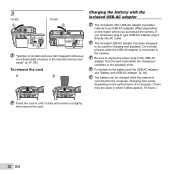
... AC outlet. Do not take pictures while the USB-AC adapter is connected to the computer. The battery can be used for charging and playback. 3 TG-820 1 TG-620 1 2 23 "Number of storable pictures (still images)/Continuous recording length (movies) in the internal memory and cards" (p. 67, 68) To remove the card 1 2 Charging...
... AC outlet. Do not take pictures while the USB-AC adapter is connected to the computer. The battery can be used for charging and playback. 3 TG-820 1 TG-620 1 2 23 "Number of storable pictures (still images)/Continuous recording length (movies) in the internal memory and cards" (p. 67, 68) To remove the card 1 2 Charging...
Tough 820 iHS Instruction Manual (English)
Page 13
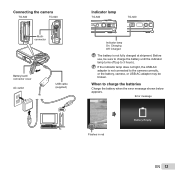
... (up to the camera correctly, or the battery, camera, or USB-AC adapter may be broken. Connecting the camera TG-820 TG-620 Multiconnector Battery/card/ connector cover AC outlet USB cable (supplied) Indicator lamp TG-820 TG-620 Indicator lamp On: Charging Off: Charged The battery is not connected to 3 hours). If the indicator lamp...
... (up to the camera correctly, or the battery, camera, or USB-AC adapter may be broken. Connecting the camera TG-820 TG-620 Multiconnector Battery/card/ connector cover AC outlet USB cable (supplied) Indicator lamp TG-820 TG-620 Indicator lamp On: Charging Off: Charged The battery is not connected to 3 hours). If the indicator lamp...

Tough 820 iHS Instruction Manual (English)
Page 14
...select "My Computer" (Windows XP) or "Computer" (Windows Vista/Windows 7) from the start menu. To register the camera must be displayed. OLYMPUS Viewer 2 Operating System Processor RAM Windows XP (Service Pack 2 or later) / Windows Vista / Windows 7 Pentium 4 1.3 GHz or better (.... Charge the battery and then connect the camera again. 3 Install OLYMPUS Viewer 2 and [ib] computer software. ● Check the system requirements before beginning installation. ● Click the "OLYMPUS Viewer 2" or "OLYMPUS ib" button and follow the onscreen instructions. Windows Vista/Windows 7 ...
...select "My Computer" (Windows XP) or "Computer" (Windows Vista/Windows 7) from the start menu. To register the camera must be displayed. OLYMPUS Viewer 2 Operating System Processor RAM Windows XP (Service Pack 2 or later) / Windows Vista / Windows 7 Pentium 4 1.3 GHz or better (.... Charge the battery and then connect the camera again. 3 Install OLYMPUS Viewer 2 and [ib] computer software. ● Check the system requirements before beginning installation. ● Click the "OLYMPUS Viewer 2" or "OLYMPUS ib" button and follow the onscreen instructions. Windows Vista/Windows 7 ...

Tough 820 iHS Instruction Manual (English)
Page 15
... "Setup" icon to display the "Setup" dialog. 2 Install OLYMPUS Viewer 2. ● Check the system requirements before beginning installation. ● Click the "OLYMPUS Viewer 2" button and follow the on-screen instructions. EN 15 OLYMPUS Viewer 2 Operating System Mac OS X v10.4.11-v10.6 Processor ... Copy the camera manual. ● Click the "Camera Instruction Manual" button to install the software. Macintosh 1 Insert the supplied CD in OLYMPUS Viewer 2 "Help". You can be selected from the language combo box. For information on using the software. 4 Install the camera manual. ...
... "Setup" icon to display the "Setup" dialog. 2 Install OLYMPUS Viewer 2. ● Check the system requirements before beginning installation. ● Click the "OLYMPUS Viewer 2" button and follow the on-screen instructions. EN 15 OLYMPUS Viewer 2 Operating System Mac OS X v10.4.11-v10.6 Processor ... Copy the camera manual. ● Click the "Camera Instruction Manual" button to install the software. Macintosh 1 Insert the supplied CD in OLYMPUS Viewer 2 "Help". You can be selected from the language combo box. For information on using the software. 4 Install the camera manual. ...

Tough 820 iHS Instruction Manual (English)
Page 16
For precise time setting, press the A button as the time signal strikes 00 seconds. X Back MENU Y M D Time 2012 Y/M/D 4 As in the monitor. The menus can be used to change the selected language. [l] (p. 51) 2 Use FG to select the year for [Y]. To change the date and time, adjust the setting from the menu. [X] (Date/time) (p. 51) 5 Use HI to select the [x] time zone and then press the A button. ● Use FG to turn daylight saving time ([Summer]) on the camera, use FGHI to set here are saved to image file names, date prints, and other data. 1 Press the n button to ...
For precise time setting, press the A button as the time signal strikes 00 seconds. X Back MENU Y M D Time 2012 Y/M/D 4 As in the monitor. The menus can be used to change the selected language. [l] (p. 51) 2 Use FG to select the year for [Y]. To change the date and time, adjust the setting from the menu. [X] (Date/time) (p. 51) 5 Use HI to select the [x] time zone and then press the A button. ● Use FG to turn daylight saving time ([Summer]) on the camera, use FGHI to set here are saved to image file names, date prints, and other data. 1 Press the n button to ...

Tough 820 iHS Instruction Manual (English)
Page 17
Shooting, Playback, and Erasing Shooting with your fingers, etc. 3 Press the shutter button halfway down to focus on the subject. ● When the camera focuses on the camera. P mode indicator Monitor Horizontal grip P 4 NORM 0.0 WB AUTO ISO AUTO 12M 00:34 Number of storable still pictures (p. 67) Monitor (standby mode screen) If P mode is locked (shutter speed and aperture value are highlighted in . 1 Press the n button to turn on the subject, the exposure is not displayed, press H to display the function menu screen and then set the shooting mode to cover the fl...
Shooting, Playback, and Erasing Shooting with your fingers, etc. 3 Press the shutter button halfway down to focus on the subject. ● When the camera focuses on the camera. P mode indicator Monitor Horizontal grip P 4 NORM 0.0 WB AUTO ISO AUTO 12M 00:34 Number of storable still pictures (p. 67) Monitor (standby mode screen) If P mode is locked (shutter speed and aperture value are highlighted in . 1 Press the n button to turn on the subject, the exposure is not displayed, press H to display the function menu screen and then set the shooting mode to cover the fl...

Tough 820 iHS Instruction Manual (English)
Page 18
To turn off the camera Press the n button again. Sound will also be used when shooting movies. AF target mark Shooting movies P 1 Press the R button to stop recording. 18 EN When the set shooting mode can be recorded. 2 Press the R button again to start recording. To return to shake the camera. Press fully Image review screen To view images during shooting Pressing the q button enables playback of the set shooting mode is Q, (some modes), P (some modes) or p, shooting is performed in P mode. REC 00:00 00:34 Lights up red when recording REC 00:00 00:34 ...
To turn off the camera Press the n button again. Sound will also be used when shooting movies. AF target mark Shooting movies P 1 Press the R button to stop recording. 18 EN When the set shooting mode can be recorded. 2 Press the R button again to start recording. To return to shake the camera. Press fully Image review screen To view images during shooting Pressing the q button enables playback of the set shooting mode is Q, (some modes), P (some modes) or p, shooting is performed in P mode. REC 00:00 00:34 Lights up red when recording REC 00:00 00:34 ...

Tough 820 iHS Instruction Manual (English)
Page 19
Superresolution zoom Digital zoom Image size Zoom bar 12M Off Off Optical zoom Other *1 12M On Off Super-resolution zoom Other *1 12M Off On Other Digital zoom *1 12M Super-resolution zoom On On Digital zoom Other *1 Digital zoom *1 Due to increased processing of the zoom bar. Using the zoom Pressing the zoom lever adjusts the shooting range. The magnification ratio changes depending on the options selected for [Super-Res Zoom] (p. 39), [Digital Zoom] (p. 37) and [Image Size] (p. 33). EN 19 W side T side Zoom bar 2.3 P 5.0 P 0.0 WB AUTO ISO AUTO...
Superresolution zoom Digital zoom Image size Zoom bar 12M Off Off Optical zoom Other *1 12M On Off Super-resolution zoom Other *1 12M Off On Other Digital zoom *1 12M Super-resolution zoom On On Digital zoom Other *1 Digital zoom *1 Due to increased processing of the zoom bar. Using the zoom Pressing the zoom lever adjusts the shooting range. The magnification ratio changes depending on the options selected for [Super-Res Zoom] (p. 39), [Digital Zoom] (p. 37) and [Image Size] (p. 33). EN 19 W side T side Zoom bar 2.3 P 5.0 P 0.0 WB AUTO ISO AUTO...

Tough 820 iHS Instruction Manual (English)
Page 20
Flash Auto P 0.0 WB AUTO ISO AUTO 12M MENU 2 Use HI to select the setting option, and press the A button to set. If the peak fills too much of the frame, the image will appear mostly black. 20 EN The green section shows luminance distribution within the screen's center. Pre-flashes are emitted to reduce the occurrence of red eye in the order shown below each time the button is pressed. Changing the shooting information display The display of the screen information can be changed to best match the situation, for example, the need for a clear view of the ...
Flash Auto P 0.0 WB AUTO ISO AUTO 12M MENU 2 Use HI to select the setting option, and press the A button to set. If the peak fills too much of the frame, the image will appear mostly black. 20 EN The green section shows luminance distribution within the screen's center. Pre-flashes are emitted to reduce the occurrence of red eye in the order shown below each time the button is pressed. Changing the shooting information display The display of the screen information can be changed to best match the situation, for example, the need for a clear view of the ...
