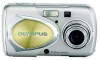
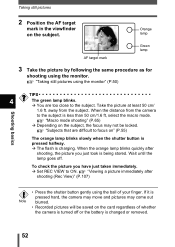
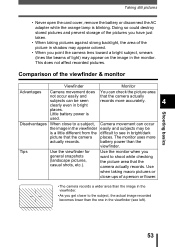
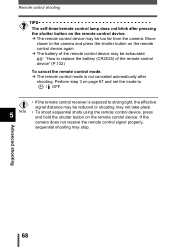
Camedia Master 4.1 Instruction Manual (4.9MB)
Page 49
JPEG (*.jpg), Exif-TIFF (*.tif) or QuickTime movie (*.mov), and click the tool button [Properties]. If you forgot to set the shooting date, or the battery has gone dead, resetting the date, this function allows you can change the shooting date. 1 In the album window, select an image or movie file ...
Stylus 300 Digital Reference Manual (English)
Page 5
Contents Contents 4 1 Getting started 8 Names of parts 8 Camera 8 Monitor indications 10 Weatherproof feature 14 How to use this manual 15 Attaching the strap 16 Charging the battery 17 Loading the battery 18 Using an optional AC adapter 20 Inserting a card 22 Card basics 22 Removing the card 24 Power on/off 25 If the...
Stylus 300 Digital Reference Manual (English)
Page 10
The , , , and marks indicate which arrow key to press. Shooting mode button Macro button Flash mode button 1 Self-timer button Zoom button (W/T ) P.59, 85, 86 Monitor P.35 Battery compartment cover P.18 Strap eyelet P.16 OK/Menu button ( ) P.39 Monitor button (QUICK VIEW ) P.35 Playback button ( ) P.26 Tripod socket Viewfinder Orange lamp Green lamp P.50 P.50 AF target mark P.50 9 Names of parts Getting started Arrow pad The arrow pad is used as arrow keys, as well as function buttons.
Stylus 300 Digital Reference Manual (English)
Page 11
... mode 1 2 3 4 1 5 6 7 8 9 SHQ 10 Still picture 1 11 2 12 13 5 6 14 15 9 16 11 13 14 15 16 Movie Getting started Items 1 Shooting mode 2 Battery check 3 Green lamp 4 Flash stand-by/ Camera movement warning/ Flash charge 5 Macro mode 6 Flash mode 7 Sequential shooting 8 Self-timer Remote control 9 Record mode 10 Resolution 11 Exposure compensation 12...
Stylus 300 Digital Reference Manual (English)
Page 13
... P.79 P.81 P.30 - • The indications that appear on the monitor. "Displaying shooting information" (P.105) 2 3 1 4 1 4 5 1 2048 1536 6 7 5 6 7 8 8 9 10 Still picture 9 10 Movie Getting started Items 1 Battery check 2 Print reservation, Number of parts zPlayback mode INFO setting allows you to select how much information to ON are different from Note those that...
Stylus 300 Digital Reference Manual (English)
Page 14
... gauge is storing the picture or the movie on the shooting status. While the gauge is lit, the camera is lit. When the whole memory gauge is low, the battery check indication on the left to the status on the monitor changes as possible especially for extended use . ...When recording movies If you take the next shot. zBattery check If the remaining battery power is lit, wait a few moments until the gauge returns to take a picture or record a movie. Getting started Names of viewfinder blink...
Stylus 300 Digital Reference Manual (English)
Page 15
... jack cover. • If the rubber packing becomes worn or damaged, contact your nearest Olympus service center. (A charge is open. into water. • Do not take pictures underwater. • The camera loses its waterproof capability if the battery compartment cover, connector cover or DC-IN jack cover is made for malfunction of parts...
Stylus 300 Digital Reference Manual (English)
Page 18
... connector AC cable AC wall outlet • Use only the specified charger. • We recommend that the + and - Getting started Charging the battery This camera uses an Olympus lithium ion battery (LI-10B). The battery is fully charged. terminals of the battery shown in the illustration on the specified charger (LI-10C) before first use the...
Stylus 300 Digital Reference Manual (English)
Page 19
..., the date and time settings will revert to close, do not force it pushes the battery down inside . Loading the battery Use an Olympus LI-10B lithium ion battery. off . 2 Slide the battery compartment cover in the direction of (the direction indicated by the mark on the cover), and lift it up in the ...direction of . With the battery compartment cover shut, press the in the direction shown in the illustration. mark firmly and push • If the camera is closed. Important • Be sure to check the date and time after changing the...
Stylus 300 Digital Reference Manual (English)
Page 20
... the camera upside down . • This will prevent the battery from falling out. If you open the battery compartment cover. 2 Slide the battery compartment cover in the direction of . 3 Remove the battery. • Keeping your hand over so that it up in the direction of (the Battery compartment cover direction indicated by the mark on the digital camera.
Stylus 300 Digital Reference Manual (English)
Page 21
An AC adapter is useful for details. Consult your digital camera from a common AC wall outlet. Doing so could affect the camera's internal settings or functions. 20 Be sure to use the AC adapter when transferring images to a PC. AC wall outlet Getting started DC-IN jack... the AC voltage in the AC adapter. • If the battery power runs out while the camera is connected to the situation. Do not connect or disconnect the AC adapter while the camera is communicating with the camera, you to power your nearest Olympus dealer or Service center for time-consuming tasks such as image...
Stylus 300 Digital Reference Manual (English)
Page 22
The AC adapter does not charge batteries in the camera. Getting started Loading the battery • Power is supplied to the camera by depressing the shutter button halfway. 1 • When the camera is connected to a PC. • Carefully read the separate-volume Safety Precaution before use. • When using an AC adapter, power is consumed continuously...
Stylus 300 Digital Reference Manual (English)
Page 25
Note • Never open the card cover, or remove the card or the battery while the camera is turned on the card with hard or pointed items such as ballpoint pens. Doing so could damage the card or the camera. 24 Getting started • Do not press on . Note Releasing your finger quickly after...
Stylus 300 Digital Reference Manual (English)
Page 26
...Press to malfunction. The lens barrier stops just before closing the lens barrier completely. The camera turns off. (The monitor also turns off.) Getting started TIPS • To save battery power, the camera automatically enters the sleep mode and stops the operation after that the barrier is a possibility ...that . If the lens does not extend when the lens barrier is opened, there is not fully open. The camera is fully retracted before ...
Stylus 300 Digital Reference Manual (English)
Page 27
... before opening the card cover. 26 The camera turns on , the monitor may light up for an instant and a picture appear after a short time. Power off: Press . This is not a malfunction. • Never open the card cover, remove the card or the battery, or connect or disconnect the AC adapter... while the camera is displayed. The monitor turns on and the last picture taken is turned on. Destroyed data cannot be sure to turn...
Stylus 300 Digital Reference Manual (English)
Page 32
..., press . • The first two digits of the year are fixed. 8 Repeat this procedure until the date and time are retained even when the power is turned on. SELECt SEt GO • The camera only displays the time in the camera for approximately one of the following steps show...canceled, a warning will be canceled more accurate setting, press when the time hits 00 seconds. The settings will be canceled if the camera is left without the battery for a short time before being removed. Then press . Getting started Setting the date and time 6 Press to select one day.
Stylus 300 Digital Reference Manual (English)
Page 53
... lamp blinks slowly when the shutter button is pressed halfway. Æ The flash is being stored. Wait until the lamp goes off or the battery is less than 50 cm/1.6 ft, select the macro mode. Orange lamp AF target mark Green lamp 3 Take the picture by following the same... that are too close to focus on the subject, the focus may come out Note blurred. • Recorded pictures will be locked. away from the camera to ON. "Taking still pictures using the monitor. "Viewing a picture immediately after shooting, the picture you have just taken immediately. Æ Set REC...
Stylus 300 Digital Reference Manual (English)
Page 54
...You can occur the image in the viewfinder easily and subjects may appear on the image in bright/dark picture that the camera places. Little battery power is blinking. battery power than the one in the viewfinder (see in the monitor. Tips Use the viewfinder for Use the monitor when you...; When taking macro pictures or close to see left). Shooting basics 53 Taking still pictures • Never open the card cover, remove the battery or disconnect the AC adapter while the orange lamp is used. Use when taking pictures against strong backlight, the area of the picture in shadow...
Stylus 300 Digital Reference Manual (English)
Page 69
...control shooting TIPS The self-timer/remote control lamp does not blink after shooting. Move closer to the camera and press the shutter button on the remote control device again. Æ The battery of the remote control device" (P.132) To cancel the remote control mode. Æ The remote control... control device. Æ The remote control device may stop. 68 Advanced shooting Perform step 3 on the remote control device. "How to replace the battery (CR2025) of the remote control device may not take place. 5 Note • To shoot sequential shots using the remote control device, press and...
Stylus 300 Digital Reference Manual (English)
Page 75
The first picture will not be stored. 5 Advanced shooting 74 Press to cancel the two-in-one picture shooting, the panorama and sequential shooting are not available. Taking two-in-one pictures • During two-in-one picture mode after the first shot has been taken. Note • When the battery power is exhausted ( is displayed), the flash automatically turns off. • The two-in-one picture mode is canceled when is pressed or the lens barrier is closed.