
SZ-14 Instruction Manual (English)
Page 6
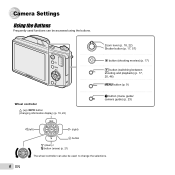
Camera Settings Using the Buttons Frequently used to change the selections. 6 EN Wheel controller F (up) /INFO button (changing information display) (p. 19, 22) Zoom lever (p. 18, 22) Shutter button (p. 17, 57) R button (shooting movies) (p. 17) q button (switching between shooting and playback) (p. 17, 20, 46) m button (p. 9) E button (menu guide/ camera guide) (p. 23) H (left) I (right) A button G (down) / D button (erase) (p. 21) The wheel controller can be used functions can also be accessed using the buttons.
Camera Settings Using the Buttons Frequently used to change the selections. 6 EN Wheel controller F (up) /INFO button (changing information display) (p. 19, 22) Zoom lever (p. 18, 22) Shutter button (p. 17, 57) R button (shooting movies) (p. 17) q button (switching between shooting and playback) (p. 17, 20, 46) m button (p. 9) E button (menu guide/ camera guide) (p. 23) H (left) I (right) A button G (down) / D button (erase) (p. 21) The wheel controller can be used functions can also be accessed using the buttons.

SZ-14 Instruction Manual (English)
Page 7
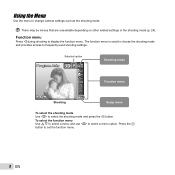
X 4/30 Y M D Time 2012. 02 . 26 00 : 00 Y/M/D Cancel MENU Set OK Single Print NORM 14M FILE 100 0004 '12/02/26 00:00 Print OK More Operation guides displayed at the bottom of the screen ... the wheel controller is to be used by pressing, not turning, the wheel controller sections (p. 6). Operation guide The symbols FGHI displayed for image selections and settings indicate that the m button, A button, or zoom lever can be used . 1 Reset 2 Image Size 14M Compression Normal Shadow Adjust Auto 1 AF Mode Face/iESP 2 ESP...
X 4/30 Y M D Time 2012. 02 . 26 00 : 00 Y/M/D Cancel MENU Set OK Single Print NORM 14M FILE 100 0004 '12/02/26 00:00 Print OK More Operation guides displayed at the bottom of the screen ... the wheel controller is to be used by pressing, not turning, the wheel controller sections (p. 6). Operation guide The symbols FGHI displayed for image selections and settings indicate that the m button, A button, or zoom lever can be used . 1 Reset 2 Image Size 14M Compression Normal Shadow Adjust Auto 1 AF Mode Face/iESP 2 ESP...
SZ-14 Instruction Manual (English)
Page 8
.... To select the function menu Use FG to select a menu and use HI to frequently used shooting settings. There may be menus that are unavailable depending on other related settings or the shooting mode (p. 24). Using the Menu Use the menu to set the function menu. 8 EN Press the A button to change camera...
.... To select the function menu Use FG to select a menu and use HI to frequently used shooting settings. There may be menus that are unavailable depending on other related settings or the shooting mode (p. 24). Using the Menu Use the menu to set the function menu. 8 EN Press the A button to change camera...
SZ-14 Instruction Manual (English)
Page 9
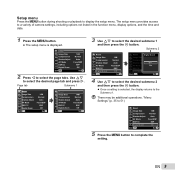
... menu Press the m button during shooting or playback to select the desired page tab and press I. Use FG to display the setup menu. "Menu Settings" (p. 35 to 51) 1 Reset 2 Image Size Compression Shadow Adjust 1 AF Mode 2 ESP/ 3 Digital Zoom Exit MENU 14M Normal Auto Face/iESP ESP... operations. EN 9 Submenu 2 1 Reset 2 Image Size Compression Shadow Adjust 1 AF Mode 2 ESP/ 3 Digital Zoom Exit MENU 14M Normal Auto Face/iESP ESP Off Set OK 1 Reset Digital Zoom 2 Image Size 14M Compression Shadow Adjust 1 AF Mode Normal OfAf uto FaOcne/iESP 2 ESP/ ESP 3 Digital Zoom Off Back MENU...
... menu Press the m button during shooting or playback to select the desired page tab and press I. Use FG to display the setup menu. "Menu Settings" (p. 35 to 51) 1 Reset 2 Image Size Compression Shadow Adjust 1 AF Mode 2 ESP/ 3 Digital Zoom Exit MENU 14M Normal Auto Face/iESP ESP... operations. EN 9 Submenu 2 1 Reset 2 Image Size Compression Shadow Adjust 1 AF Mode 2 ESP/ 3 Digital Zoom Exit MENU 14M Normal Auto Face/iESP ESP Off Set OK 1 Reset Digital Zoom 2 Image Size 14M Compression Shadow Adjust 1 AF Mode Normal OfAf uto FaOcne/iESP 2 ESP/ ESP 3 Digital Zoom Off Back MENU...

SZ-14 Instruction Manual (English)
Page 10
Menu Index Program Auto 4 14M 3D P 1 2 3 4 0.0 5 WB AUTO 6 ISO AUTO 7 8 9 1 Image Size 0 2 Image Quality a Is Movie Mode b R c 1 d 2 e 3 Exit MENU 720p Normal Off On Set OK 1 Shooting mode ...........p. 16, 24 P (Program Auto) M (iAUTO) s (Scene Mode) P (Magic Filter) p (Panorama) W (3D) 2 Flash p. 19 3 Macro p. 29 4 Self-timer p. 29 5 Exposure compensation ...p. 30 6 White ...
Menu Index Program Auto 4 14M 3D P 1 2 3 4 0.0 5 WB AUTO 6 ISO AUTO 7 8 9 1 Image Size 0 2 Image Quality a Is Movie Mode b R c 1 d 2 e 3 Exit MENU 720p Normal Off On Set OK 1 Shooting mode ...........p. 16, 24 P (Program Auto) M (iAUTO) s (Scene Mode) P (Magic Filter) p (Panorama) W (3D) 2 Flash p. 19 3 Macro p. 29 4 Self-timer p. 29 5 Exposure compensation ...p. 30 6 White ...
SZ-14 Instruction Manual (English)
Page 13
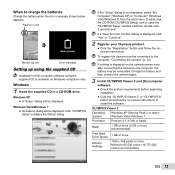
...or more (2 GB or more recommended) Free Hard Drive Space 1 GB or more Monitor Settings 1024 x 768 pixels or more Minimum 65,536 colors (16,770,000 colors recommended) EN 13 When to open the "OLYMPUS Setup" window and then double-click "Launcher.exe". Windows Vista/Windows 7 ● ...● A "Setup" dialog will be displayed. Windows 1 Insert the supplied CD in red Battery Empty 4 14M Monitor top left Error message Setting up using the supplied CD Installation of [ib] computer software using the supplied CD is displayed on -screen instructions to the computer, the battery ...
...or more (2 GB or more recommended) Free Hard Drive Space 1 GB or more Monitor Settings 1024 x 768 pixels or more Minimum 65,536 colors (16,770,000 colors recommended) EN 13 When to open the "OLYMPUS Setup" window and then double-click "Launcher.exe". Windows Vista/Windows 7 ● ...● A "Setup" dialog will be displayed. Windows 1 Insert the supplied CD in red Battery Empty 4 14M Monitor top left Error message Setting up using the supplied CD Installation of [ib] computer software using the supplied CD is displayed on -screen instructions to the computer, the battery ...

SZ-14 Instruction Manual (English)
Page 14
...". For information on -screen instructions. You can be selected from the language combo box. [ib] Operating System Processor RAM Free Hard Drive Space Monitor Settings Graphics Windows XP (Service Pack 2 or later) / Windows Vista / Windows 7 Pentium 4 1.3 GHz or better (Pentium D 3.0 GHz or better.... ● Click the "OLYMPUS Viewer 2" button and follow the on using the software, see online help for information on using the software. 4 Install the camera manual. ● Click the "Camera Instruction Manual" button and follow the on-screen instructions to the computer. 14 EN
...". For information on -screen instructions. You can be selected from the language combo box. [ib] Operating System Processor RAM Free Hard Drive Space Monitor Settings Graphics Windows XP (Service Pack 2 or later) / Windows Vista / Windows 7 Pentium 4 1.3 GHz or better (Pentium D 3.0 GHz or better.... ● Click the "OLYMPUS Viewer 2" button and follow the on using the software, see online help for information on using the software. 4 Install the camera manual. ● Click the "Camera Instruction Manual" button and follow the on-screen instructions to the computer. 14 EN

SZ-14 Instruction Manual (English)
Page 15
... select the [x] time zone and then press the A button. ● Use FG to turn on or off. '12.02.26 00:00 Seoul Tokyo Summer Set OK The menus can be used to change the selected time zone. [World Time] (p. 51) 6 Use FGHI to select the year for [Y]. X Y M D Time 2012....then press the A button. X Y M D Time 2012 Y/M/D Cancel MENU 3 Press I to change the selected language. [l] (p. 50) EN 15 The menus can be used to save the setting for [Y]. You can also choose the language for the menus and messages displayed in Steps 2 and 3, use FGHI to image file names, date prints...
... select the [x] time zone and then press the A button. ● Use FG to turn on or off. '12.02.26 00:00 Seoul Tokyo Summer Set OK The menus can be used to change the selected time zone. [World Time] (p. 51) 6 Use FGHI to select the year for [Y]. X Y M D Time 2012....then press the A button. X Y M D Time 2012 Y/M/D Cancel MENU 3 Press I to change the selected language. [l] (p. 50) EN 15 The menus can be used to save the setting for [Y]. You can also choose the language for the menus and messages displayed in Steps 2 and 3, use FGHI to image file names, date prints...
SZ-14 Instruction Manual (English)
Page 16
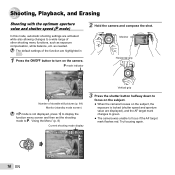
...Horizontal grip P 0.0 WB AUTO ISO AUTO 00:34 4 14M Number of other shooting menu functions, such as needed. In this mode, automatic shooting settings are displayed), and the AF target mark changes to green. ● The camera was unable to a wide range of storable still pictures (p. 64) ...Monitor (standby mode screen) If P mode is not displayed, press H to display the function menu screen and then set the shooting mode to turn on the subject, the exposure is locked (shutter speed and aperture value are activated while also allowing changes to focus...
...Horizontal grip P 0.0 WB AUTO ISO AUTO 00:34 4 14M Number of other shooting menu functions, such as needed. In this mode, automatic shooting settings are displayed), and the AF target mark changes to green. ● The camera was unable to a wide range of storable still pictures (p. 64) ...Monitor (standby mode screen) If P mode is not displayed, press H to display the function menu screen and then set the shooting mode to turn on the subject, the exposure is locked (shutter speed and aperture value are activated while also allowing changes to focus...
SZ-14 Instruction Manual (English)
Page 17
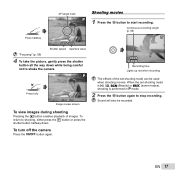
... 00:12 Recording time Lights up red when recording The effects of images. EN 17 When the set shooting mode can be recorded. To view images during shooting Pressing the q button enables playback of the set shooting mode is p, W, s (Beauty) or P (some modes), shooting is performed in P mode. 2 Press the R button again...
... 00:12 Recording time Lights up red when recording The effects of images. EN 17 When the set shooting mode can be recorded. To view images during shooting Pressing the q button enables playback of the set shooting mode is p, W, s (Beauty) or P (some modes), shooting is performed in P mode. 2 Press the R button again...
SZ-14 Instruction Manual (English)
Page 18
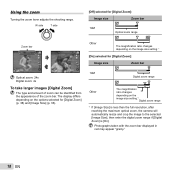
...selected for [Digital Zoom]: Image size Zoom bar 14M Digital zoom range Other The magnification ratio changes depending on the image size setting.*1 Digital zoom range *1 If [Image Size] is less than the full resolution, after reaching the maximum optical zoom, the camera will ...ratio changes depending on the options selected for [Digital Zoom] (p. 38) and [Image Size] (p. 36). The display differs depending on the image size setting.*1 [On] selected for [Digital Zoom]: Image size Zoom bar 14M Optical zoom range Zoom bar P P 0.0 0.0 WB WB AUTO AUTO ISO ISO AUTO...
...selected for [Digital Zoom]: Image size Zoom bar 14M Digital zoom range Other The magnification ratio changes depending on the image size setting.*1 Digital zoom range *1 If [Image Size] is less than the full resolution, after reaching the maximum optical zoom, the camera will ...ratio changes depending on the options selected for [Digital Zoom] (p. 38) and [Image Size] (p. 36). The display differs depending on the image size setting.*1 [On] selected for [Digital Zoom]: Image size Zoom bar 14M Optical zoom range Zoom bar P P 0.0 0.0 WB WB AUTO AUTO ISO ISO AUTO...

SZ-14 Instruction Manual (English)
Page 19
... camera. 2 Select the flash option in your photos. P Flash Auto 0.0 WB AUTO ISO AUTO 4 14M MENU 3 Use HI to select the setting option, and press the A button to set. Pre-flashes are emitted to reduce the occurrence of red eye in the function menu. Changing the shooting information display The...
... camera. 2 Select the flash option in your photos. P Flash Auto 0.0 WB AUTO ISO AUTO 4 14M MENU 3 Use HI to select the setting option, and press the A button to set. Pre-flashes are emitted to reduce the occurrence of red eye in the function menu. Changing the shooting information display The...
SZ-14 Instruction Manual (English)
Page 21
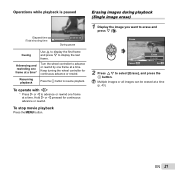
... or rewind. Erasing images during playback (Single image erase) 1 Display the image you want to resume playback. Erase Cancel MENU Erase Cancel Set OK 2 Press FG to display the last frame. Keep turning the wheel controller for continuous advance or rewind. To stop movie playback Press ...Hold I or H to advance or rewind by one frame at a time (p. 43). Operations while playback is paused Elapsed time /Total shooting time 00:14/00:34 During pause Cueing Use F to display the first frame and press G to select [Erase], and press the A button. Advancing and ...
... or rewind. Erasing images during playback (Single image erase) 1 Display the image you want to resume playback. Erase Cancel MENU Erase Cancel Set OK 2 Press FG to display the last frame. Keep turning the wheel controller for continuous advance or rewind. To stop movie playback Press ...Hold I or H to advance or rewind by one frame at a time (p. 43). Operations while playback is paused Elapsed time /Total shooting time 00:14/00:34 During pause Cueing Use F to display the first frame and press G to select [Erase], and press the A button. Advancing and ...

SZ-14 Instruction Manual (English)
Page 22
... 00:00 "Reading a histogram" (p. 20) Index view and close -up view Use FGHI to move the viewing area. Changing the image information display Shooting information settings displayed on the screen can be changed. 1 Press F (INFO). ● The displayed image information changes in single-image view. Close-up view (up view 4/30...
... 00:00 "Reading a histogram" (p. 20) Index view and close -up view Use FGHI to move the viewing area. Changing the image information display Shooting information settings displayed on the screen can be changed. 1 Press F (INFO). ● The displayed image information changes in single-image view. Close-up view (up view 4/30...

SZ-14 Instruction Manual (English)
Page 23
... be searched when having problems during operation. Search by purpose Search by situation Search by keyword Exit Search for a solution Learn about the camera History Set OK Submenu 2 Search by purpose Search for a solution Search by situation Search by keyword Learn about recommended functions and basic operating methods for the camera...
... be searched when having problems during operation. Search by purpose Search by situation Search by keyword Exit Search for a solution Learn about the camera History Set OK Submenu 2 Search by purpose Search for a solution Search by situation Search by keyword Learn about recommended functions and basic operating methods for the camera...

SZ-14 Instruction Manual (English)
Page 24
... be changed , excepting some cases, the camera may not select the desired shooting mode. The shooting condition is set . 24 EN 00:34 4 14M Icon indicating the scene mode that the camera automatically selects Using the best mode for the scene. When the camera ...cannot identify the optimal mode, P mode will automatically select the optimal shooting mode for the shooting scene (s mode) 1 Set the shooting mode to s. Scene Mode 4 14M MENU 2 Press G to go to the submenu. Using Shooting Modes To change the shooting mode The shooting mode...
... be changed , excepting some cases, the camera may not select the desired shooting mode. The shooting condition is set . 24 EN 00:34 4 14M Icon indicating the scene mode that the camera automatically selects Using the best mode for the scene. When the camera ...cannot identify the optimal mode, P mode will automatically select the optimal shooting mode for the shooting scene (s mode) 1 Set the shooting mode to s. Scene Mode 4 14M MENU 2 Press G to go to the submenu. Using Shooting Modes To change the shooting mode The shooting mode...
SZ-14 Instruction Manual (English)
Page 25
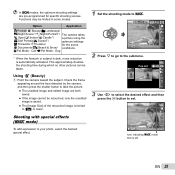
... retouched, only the unedited image is saved. ● The [Image Size] of the retouched image is limited to [n] or lower. 1 Set the shooting mode to your photo, select the desired special effect. 0.0 WB AUTO 00:34 4 14M Icon indicating P mode that is automatically... Night Scene*1/M Night+Portrait*1/ The camera takes C Sport/N Indoor/W Candle*1/ R Self Portrait/S Sunset*1/ X Fireworks*1/V Cuisine/ a picture using the optimum settings for specific shooting scenes. Cat/ t Pet Mode - This approximately doubles the shooting time during which no other pictures can be limited in some ...
... retouched, only the unedited image is saved. ● The [Image Size] of the retouched image is limited to [n] or lower. 1 Set the shooting mode to your photo, select the desired special effect. 0.0 WB AUTO 00:34 4 14M Icon indicating P mode that is automatically... Night Scene*1/M Night+Portrait*1/ The camera takes C Sport/N Indoor/W Candle*1/ R Self Portrait/S Sunset*1/ X Fireworks*1/V Cuisine/ a picture using the optimum settings for specific shooting scenes. Cat/ t Pet Mode - This approximately doubles the shooting time during which no other pictures can be limited in some ...
SZ-14 Instruction Manual (English)
Page 26
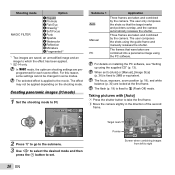
... 7 Sparkle 8 Watercolor 9 Reflection 0 Miniature a Fragmented*2 *1 Two images are taken and combined by the camera. Creating panoramic images (p mode) 1 Set the shooting mode to take the first frame. 2 Move the camera slightly in some modes. The frames that the target marks and pointers overlap..., an unmodified image and an image to which the effect has been applied. *2 SZ-14 only. For this reason, some settings cannot be applied depending on installing the PC software, see "Setting up using the supplied CD" (p. 13). Panorama 3D AUTO 0.0 WB AUTO 4 14M MENU ...
... 7 Sparkle 8 Watercolor 9 Reflection 0 Miniature a Fragmented*2 *1 Two images are taken and combined by the camera. Creating panoramic images (p mode) 1 Set the shooting mode to take the first frame. 2 Move the camera slightly in some modes. The frames that the target marks and pointers overlap..., an unmodified image and an image to which the effect has been applied. *2 SZ-14 only. For this reason, some settings cannot be applied depending on installing the PC software, see "Setting up using the supplied CD" (p. 13). Panorama 3D AUTO 0.0 WB AUTO 4 14M MENU ...

SZ-14 Instruction Manual (English)
Page 27
... for combining the next frame MANUAL MANUAL 1 MANUAL 2 1st frame Cancel MENU Save OK 3 Compose the next shot so that of desired frames is displayed. Set OK 2 Press the shutter button to be connected. 3 Move the camera slowly while keeping it straight, and stop the camera where the pointer and target...
... for combining the next frame MANUAL MANUAL 1 MANUAL 2 1st frame Cancel MENU Save OK 3 Compose the next shot so that of desired frames is displayed. Set OK 2 Press the shutter button to be connected. 3 Move the camera slowly while keeping it straight, and stop the camera where the pointer and target...

SZ-14 Instruction Manual (English)
Page 28
...AUTO To exit 3D shooting mode without saving an image, press the m button. After shooting the first frame, move the camera to set. The 3D viewing angle varies depending on 3D-compatible display devices. The focus, exposure and the white balance are shot for viewing on the subject...Manual Description After shooting the first frame, overlap the subject with the image in the monitor. Shooting 3D images (W mode) In this camera's monitor. 1 Set the shooting mode to [0]. The flash is fixed to [$Flash Off]. 4 14M MENU 2 Press G to go to the submenu. 3 Use...
...AUTO To exit 3D shooting mode without saving an image, press the m button. After shooting the first frame, move the camera to set. The 3D viewing angle varies depending on 3D-compatible display devices. The focus, exposure and the white balance are shot for viewing on the subject...Manual Description After shooting the first frame, overlap the subject with the image in the monitor. Shooting 3D images (W mode) In this camera's monitor. 1 Set the shooting mode to [0]. The flash is fixed to [$Flash Off]. 4 14M MENU 2 Press G to go to the submenu. 3 Use...


