

E-PL1 Manual de Instru败s (Portugu鱩
Page 106
...a FLASH MODE a a PICTURE MODE a a STILL a a K PICTURE MOVIE a a IMAGE ASPECT a a w a a AE BKT a a WB BKT a a FL BKT a a ISO BKT a a MULTIPLE EXPOSURE k k X k k W k k s k k REC VIEW k a c MENU DISPLAY k k FIRMWARE k k AF MODE STILL PICTURE MOVIE a k a a AF AREA a a RESET LENS k k BULB FOCUSING k k FOCUS RING k a MF ASSIST k a P SET HOME k k 11 AEL/AFL AEL/AFL MEMO k k a a ; a a NOISE FILTER a a WB a a ALL > k k COLOR SPACE a a SHADING COMP. a a K SET k a PIXEL COUNT k a QUICK ERASE k a RAW...
...a FLASH MODE a a PICTURE MODE a a STILL a a K PICTURE MOVIE a a IMAGE ASPECT a a w a a AE BKT a a WB BKT a a FL BKT a a ISO BKT a a MULTIPLE EXPOSURE k k X k k W k k s k k REC VIEW k a c MENU DISPLAY k k FIRMWARE k k AF MODE STILL PICTURE MOVIE a k a a AF AREA a a RESET LENS k k BULB FOCUSING k k FOCUS RING k a MF ASSIST k a P SET HOME k k 11 AEL/AFL AEL/AFL MEMO k k a a ; a a NOISE FILTER a a WB a a ALL > k k COLOR SPACE a a SHADING COMP. a a K SET k a PIXEL COUNT k a QUICK ERASE k a RAW...

E-PL1 Instruction Manual (English)
Page 12
... position (press the shutter button halfway). G 250 F5.6 38 Shutter speed Aperture value • Focus will lock, the AF confirmation mark (( or n) will light, and an AF target will be briefly displayed to show the focus position. ( Lenses that supports Hi-Speed Imager AF* n Lenses with an UNLOCK switch can 4 not be used while retracted. Basic guide Taking photographs/shooting movies 1 Frame the shot. • Keep your...
... position (press the shutter button halfway). G 250 F5.6 38 Shutter speed Aperture value • Focus will lock, the AF confirmation mark (( or n) will light, and an AF target will be briefly displayed to show the focus position. ( Lenses that supports Hi-Speed Imager AF* n Lenses with an UNLOCK switch can 4 not be used while retracted. Basic guide Taking photographs/shooting movies 1 Frame the shot. • Keep your...

E-PL1 Instruction Manual (English)
Page 17
... RAW+JPEG photos are taken using FG. 1 PORTRAIT B e i F D ISO C AUTO G LN SELECT SET 250 F5.6 38 • Press i or press the shutter button halfway to display the view through the lens in scene mode 1 Rotate the mode dial to which effects have been applied. • When JPEG is set in [e-PORTRAIT], two images are saved, one from before application of the effect (with set picture quality) and...
... RAW+JPEG photos are taken using FG. 1 PORTRAIT B e i F D ISO C AUTO G LN SELECT SET 250 F5.6 38 • Press i or press the shutter button halfway to display the view through the lens in scene mode 1 Rotate the mode dial to which effects have been applied. • When JPEG is set in [e-PORTRAIT], two images are saved, one from before application of the effect (with set picture quality) and...
E-PL1 Instruction Manual (English)
Page 24
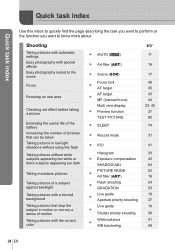
.... Shooting Taking pictures with automatic settings Easy photography with the correct color iAUTO (A) g 11 Art filter (ART) 16 Scene (SCN) Focus lock AF target AF target MF (manual focus) Multi view display Preview function TEST PICTURE SLEEP 17 46 45 45 44 33, 40 37 80 74 Record mode 31 ISO 41 Histogram 33 Exposure compensation 40 SHADOW ADJ 63 PICTURE MODE 52 Art filter (ART) 16 Flash shooting 54...
.... Shooting Taking pictures with automatic settings Easy photography with the correct color iAUTO (A) g 11 Art filter (ART) 16 Scene (SCN) Focus lock AF target AF target MF (manual focus) Multi view display Preview function TEST PICTURE SLEEP 17 46 45 45 44 33, 40 37 80 74 Record mode 31 ISO 41 Histogram 33 Exposure compensation 40 SHADOW ADJ 63 PICTURE MODE 52 Art filter (ART) 16 Flash shooting 54...
E-PL1 Instruction Manual (English)
Page 26
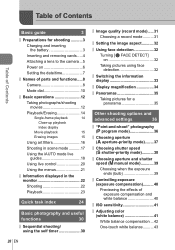
... battery 3 Inserting and removing cards .....4 Attaching a lens to the camera ...5 Power on 6 Setting the date/time 7 Names of parts and functions.....8 Camera 8 Mode dial 10 Basic operations 12 Taking photographs/shooting movies 12 Playback/Erasing 14 Single-frame playback 14 Close-up playback Index display Movie playback 15 Erasing images 15 Using art filters 16 Shooting in scene mode ...........17 Using the iAUTO mode live guides 18 Using live control 20 Using the menus 21 Information displayed in the monitor 22 Shooting 22 Playback 23 Quick...
... battery 3 Inserting and removing cards .....4 Attaching a lens to the camera ...5 Power on 6 Setting the date/time 7 Names of parts and functions.....8 Camera 8 Mode dial 10 Basic operations 12 Taking photographs/shooting movies 12 Playback/Erasing 14 Single-frame playback 14 Close-up playback Index display Movie playback 15 Erasing images 15 Using art filters 16 Shooting in scene mode ...........17 Using the iAUTO mode live guides 18 Using live control 20 Using the menus 21 Information displayed in the monitor 22 Shooting 22 Playback 23 Quick...
E-PL1 Instruction Manual (English)
Page 27
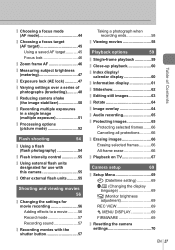
... 50 Recording multiple exposures in a single image (multiple exposure 51 Processing options (picture mode 52 Flash shooting 54 Using a flash (flash photography 54 Flash intensity control 55 Using external flash units designated for use with this camera 55 Other external flash units ..........55 Shooting and viewing movies 56 Changing the settings for movie recording 56 Adding effects to a movie .........56 Record mode 57 Recording sound 57 Recording movies with the shutter button 57 Taking a photograph when recording ends 58 Viewing movies 58 Playback...
... 50 Recording multiple exposures in a single image (multiple exposure 51 Processing options (picture mode 52 Flash shooting 54 Using a flash (flash photography 54 Flash intensity control 55 Using external flash units designated for use with this camera 55 Other external flash units ..........55 Shooting and viewing movies 56 Changing the settings for movie recording 56 Adding effects to a movie .........56 Record mode 57 Recording sound 57 Recording movies with the shutter button 57 Taking a photograph when recording ends 58 Viewing movies 58 Playback...

E-PL1 Instruction Manual (English)
Page 29
... the image processing functions...94 Information 95 Card basics 95 Usable cards 95 Formatting the card 95 Battery and charger 96 Using your charger abroad .......96 Interchangeable lenses 97 M.ZUIKO DIGITAL interchangeable lenses .........97 M.ZUIKO DIGITAL lens specifications 98 Four Thirds Adapter 99 Using electronic view finder (sold separately 100 Program line diagram (P mode 101 Exposure warning display.......101 Flash synchronization and shutter speed 102 Flash modes that can be set by shooting mode...
... the image processing functions...94 Information 95 Card basics 95 Usable cards 95 Formatting the card 95 Battery and charger 96 Using your charger abroad .......96 Interchangeable lenses 97 M.ZUIKO DIGITAL interchangeable lenses .........97 M.ZUIKO DIGITAL lens specifications 98 Four Thirds Adapter 99 Using electronic view finder (sold separately 100 Program line diagram (P mode 101 Exposure warning display.......101 Flash synchronization and shutter speed 102 Flash modes that can be set by shooting mode...

E-PL1 Instruction Manual (English)
Page 51
... images taken with the record mode set the shooting functions, cancel multiple exposure shooting first. P 250 F5.6 38 % Tips • To overlay 3 or more frames: To overlay 3 or more information on the LCD monitor. The camera is turned off/The q button is pressed/The MENU button is pressed/ The shooting mode is set , i is displayed as a RAW file and use [OVERLAY] to a mode other than P, A, S, M/The battery power runs out/The USB cable...
... images taken with the record mode set the shooting functions, cancel multiple exposure shooting first. P 250 F5.6 38 % Tips • To overlay 3 or more frames: To overlay 3 or more information on the LCD monitor. The camera is turned off/The q button is pressed/The MENU button is pressed/ The shooting mode is set , i is displayed as a RAW file and use [OVERLAY] to a mode other than P, A, S, M/The battery power runs out/The USB cable...

E-PL1 Instruction Manual (English)
Page 56
Shooting and viewing movies Changing the settings for exposure compensation and aperture value, and shutter speed. • If [IMAGE STABILIZER] is activated while recording a movie, the recorded image is enlarged slightly. Use HI to the brightness of the subject. g "Using art filters" (P. 16) 56 EN Depiction of art filter mode. Movie can be resumed while the camera displays a message stating that take advantage of either the lens or the camera. • You cannot...
Shooting and viewing movies Changing the settings for exposure compensation and aperture value, and shutter speed. • If [IMAGE STABILIZER] is activated while recording a movie, the recorded image is enlarged slightly. Use HI to the brightness of the subject. g "Using art filters" (P. 16) 56 EN Depiction of art filter mode. Movie can be resumed while the camera displays a message stating that take advantage of either the lens or the camera. • You cannot...

E-PL1 Instruction Manual (English)
Page 57
... select the record mode item using FG. 2 Select a movie record mode using the shutter button. 1 Set the mode dial to reflect the playback time and advances more slowly than usual. Shooting and viewing movies Recording movies with the shutter button If movie recording has not been assigned to the < or R (movie) button, you can reduce these sounds by shooting with [AF MODE] set to [S-AF], or by the lens and camera operating may not correctly display the recording time in a movie, the sound made...
... select the record mode item using FG. 2 Select a movie record mode using the shutter button. 1 Set the mode dial to reflect the playback time and advances more slowly than usual. Shooting and viewing movies Recording movies with the shutter button If movie recording has not been assigned to the < or R (movie) button, you can reduce these sounds by shooting with [AF MODE] set to [S-AF], or by the lens and camera operating may not correctly display the recording time in a movie, the sound made...

E-PL1 Instruction Manual (English)
Page 60
Only items for which [ON] is selected for protection or deletion. U F/G/H/I Position the zoom frame. Select a picture. i Select the highlighted picture for information settings will be displayed (P. 74). Close-up playback Press the U button to display a zoom frame in or out. • Press U and use HI to view other 2x INFO images at the selected zoom ratio. • Press FGHI to scroll to other U areas of...
Only items for which [ON] is selected for protection or deletion. U F/G/H/I Position the zoom frame. Select a picture. i Select the highlighted picture for information settings will be displayed (P. 74). Close-up playback Press the U button to display a zoom frame in or out. • Press U and use HI to view other 2x INFO images at the selected zoom ratio. • Press FGHI to scroll to other U areas of...

E-PL1 Instruction Manual (English)
Page 65
... R START ERASE SET • Images with audio recordings are indicated by a H icon. • To delete a recording, select [ERASE] in Step 2. # Caution • You cannot record sound for protected images. $ Notes • Audio recording can be adjusted in the monitor. 6 Press i. select [YES] and press i. % Tips • To overlay 4 or more frames, save the overlay image as a RAW file and use [IMAGE OVERLAY] repeatedly. # Caution • When the record mode is saved as...
... R START ERASE SET • Images with audio recordings are indicated by a H icon. • To delete a recording, select [ERASE] in Step 2. # Caution • You cannot record sound for protected images. $ Notes • Audio recording can be adjusted in the monitor. 6 Press i. select [YES] and press i. % Tips • To overlay 4 or more frames, save the overlay image as a RAW file and use [IMAGE OVERLAY] repeatedly. # Caution • When the record mode is saved as...

E-PL1 Instruction Manual (English)
Page 69
... set the basic camera functions. 6 Camera setup Setup Menu Use the Setup Menu to set in units of 1 - j±0 k±0 REC VIEW 5SEC c MENU DISPLAY OFF FIRMWARE BACK SET Option Description g X (Date/ Set the camera clock. the display - language) s (Monitor You can change the language used for making a brief check of the picture you are displayed immediately after checking it. Displays the image being recorded to another language. For details on -screen display (Changing and error messages from ENGLISH to the card is useful for erasing a picture after shooting...
... set the basic camera functions. 6 Camera setup Setup Menu Use the Setup Menu to set in units of 1 - j±0 k±0 REC VIEW 5SEC c MENU DISPLAY OFF FIRMWARE BACK SET Option Description g X (Date/ Set the camera clock. the display - language) s (Monitor You can change the language used for making a brief check of the picture you are displayed immediately after checking it. Displays the image being recorded to another language. For details on -screen display (Changing and error messages from ENGLISH to the card is useful for erasing a picture after shooting...
E-PL1 Instruction Manual (English)
Page 82
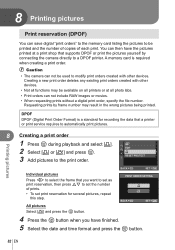
... the pictures printed at a print shop that a printer or print service requires to be used to a DPOF printer. 8 Printing pictures Print reservation (DPOF) You can save digital "print orders" to the memory card listing the pictures to automatically print pictures. 8 Creating a print order 1 Press i during playback and select [ You can not include RAW images or movies. • When requesting prints without a digital print order, specify the file number. A memory card is a standard for recording the data that supports DPOF or print the pictures...
... the pictures printed at a print shop that a printer or print service requires to be used to a DPOF printer. 8 Printing pictures Print reservation (DPOF) You can save digital "print orders" to the memory card listing the pictures to automatically print pictures. 8 Creating a print order 1 Press i during playback and select [ You can not include RAW images or movies. • When requesting prints without a digital print order, specify the file number. A memory card is a standard for recording the data that supports DPOF or print the pictures...

E-PL1 Instruction Manual (English)
Page 84
... a printer Use the provided USB cable to connect the camera to a PictBridge-compatible printer. 1 Turn the printer on and connect the camera's multi-connector to the printer's USB port with a printer using a USB cable. 2 Press I. Multi-connector Smaller terminal USB cable Printing pictures Look for the USB connection is connected to the USB cable. USB • [ONE MOMENT] is displayed. 84 EN • Images recorded in RAW data cannot be printed. • You cannot print movie images. • The camera will not enter sleep mode while it is displayed. 3 Use...
... a printer Use the provided USB cable to connect the camera to a PictBridge-compatible printer. 1 Turn the printer on and connect the camera's multi-connector to the printer's USB port with a printer using a USB cable. 2 Press I. Multi-connector Smaller terminal USB cable Printing pictures Look for the USB connection is connected to the USB cable. USB • [ONE MOMENT] is displayed. 84 EN • Images recorded in RAW data cannot be printed. • You cannot print movie images. • The camera will not enter sleep mode while it is displayed. 3 Use...

E-PL1 Instruction Manual (English)
Page 93
... be held upright for a prolonged period, remove the battery and card. The dust reduction function operates when the camera is turned on the image pickup device and to take a test shot and check that is very dirty, soak the cloth in a cool, dry place that the camera works properly. Cleaning and storing the camera Cleaning the camera Turn off the lens with ultrasonic vibrations. Wipe the...
... be held upright for a prolonged period, remove the battery and card. The dust reduction function operates when the camera is turned on the image pickup device and to take a test shot and check that is very dirty, soak the cloth in a cool, dry place that the camera works properly. Cleaning and storing the camera Cleaning the camera Turn off the lens with ultrasonic vibrations. Wipe the...

E-PL1 Instruction Manual (English)
Page 102
...; Choose the value that most closely matches to the Super FP mode, it detects backlight with longer duration than for normal flash before emitting light. • #AUTO, $ can be set by shooting mode Shooting Mode Super control panel Flash Mode Flash Conditions for Shutter timing firing the flash speed limit P/A # AUTO ! # $ ! k SLOW # SLOW # (red-eye reduction) Slow synchronization (1st curtain) Slow synchronization 1st curtain 2nd...
...; Choose the value that most closely matches to the Super FP mode, it detects backlight with longer duration than for normal flash before emitting light. • #AUTO, $ can be set by shooting mode Shooting Mode Super control panel Flash Mode Flash Conditions for Shutter timing firing the flash speed limit P/A # AUTO ! # $ ! k SLOW # SLOW # (red-eye reduction) Slow synchronization (1st curtain) Slow synchronization 1st curtain 2nd...
E-PL1 Instruction Manual (English)
Page 104
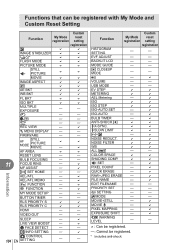
... be registered with My Mode and Custom Reset Setting Custom Function My Mode reset registration setting registration F D D IMAGE STABILIZER D D jY* D D FLASH MODE D D PICTURE MODE D D STILL K PICTURE D D MOVIE D D IMAGE ASPECT D D w D D AE BKT D D WB BKT D D FL BKT D D ISO BKT D D MULTIPLE EXPOSURE k k X k k W k k s k k REC VIEW k D c MENU DISPLAY k k FIRMWARE k k AF MODE STILL PICTURE MOVIE D k D D AF AREA D D RESET LENS k k BULB FOCUSING k k 11 FOCUS RING MF ASSIST k D k D P SET HOME k k AEL/AFL k D AEL...
... be registered with My Mode and Custom Reset Setting Custom Function My Mode reset registration setting registration F D D IMAGE STABILIZER D D jY* D D FLASH MODE D D PICTURE MODE D D STILL K PICTURE D D MOVIE D D IMAGE ASPECT D D w D D AE BKT D D WB BKT D D FL BKT D D ISO BKT D D MULTIPLE EXPOSURE k k X k k W k k s k k REC VIEW k D c MENU DISPLAY k k FIRMWARE k k AF MODE STILL PICTURE MOVIE D k D D AF AREA D D RESET LENS k k BULB FOCUSING k k 11 FOCUS RING MF ASSIST k D k D P SET HOME k k AEL/AFL k D AEL...

E-PL1 Instruction Manual (English)
Page 109
...;lm camera Image pickup device Product type 4/3" Live MOS sensor No. of effective pixels Approx. 12,300,000 pixels Screen size 17.3 mm (H) × 13.0 mm (V) Aspect ratio 1.33 (4:3) Live view Sensor Field of focusing point Exposure control Imager contrast detection system 11 points Auto, Optional Metering system Metered range Shooting modes ISO sensitivity Exposure compensation White balance Product type Mode setting Recording TTL metering system (imager metering) Digital ESP metering...
...;lm camera Image pickup device Product type 4/3" Live MOS sensor No. of effective pixels Approx. 12,300,000 pixels Screen size 17.3 mm (H) × 13.0 mm (V) Aspect ratio 1.33 (4:3) Live view Sensor Field of focusing point Exposure control Imager contrast detection system 11 points Auto, Optional Metering system Metered range Shooting modes ISO sensitivity Exposure compensation White balance Product type Mode setting Recording TTL metering system (imager metering) Digital ESP metering...

E-PL1 Instruction Manual (English)
Page 113
... is operating normally. • Always observe the operating environment restrictions described in the camera's manual. • Do not directly touch or wipe the image pickup device of pictures you throw away dead batteries, be restored after using products with high-precision technology. When using the camera. • Always unload the battery from forming inside the camera. This may cause lens or shutter curtain damage, color failure...
... is operating normally. • Always observe the operating environment restrictions described in the camera's manual. • Do not directly touch or wipe the image pickup device of pictures you throw away dead batteries, be restored after using products with high-precision technology. When using the camera. • Always unload the battery from forming inside the camera. This may cause lens or shutter curtain damage, color failure...


